crwdns2915892:0crwdne2915892:0
This repair guide was authored by the iFixit staff and hasn’t been endorsed by Google. Learn more about our repair guides here.
Use this guide to replace a cracked or broken screen on your Google Pixel 6.
Your new replacement screen will come with the fingerprint reader already attached. If not, you will need to reinstall the original fingerprint reader to your new replacement screen. If you are replacing the fingerprint reader, you will need to recalibrate the reader to maintain its functionality. If you're using an aftermarket screen and fingerprint sensor, you may encounter issues with the fingerprint recalibration tool.
If the frame is deformed, it's important to replace it to make sure the new screen will mount correctly and won’t suffer damage from uneven pressure.
If your battery is swollen, take appropriate precautions. Before disassembling your device, discharge the battery below 25%. This reduces the risk of a dangerous thermal event if the battery is accidentally damaged during the repair.
Caution: The Pixel 6 contains class 1 lasers. Disassembly could result in exposure to invisible infrared laser emissions.
Note: This guide instructs you to replace only the screen, including its safety plastic frame. However, some replacement screens for this phone come without the pre-installed frame (a.k.a. chassis), which requires a different removal procedure. Make sure you have the correct part before starting this guide.
Retaining water resistance after the repair will depend on how well you reapply the adhesive, but your device will lose its IP (Ingress Protection) rating.
Before you begin this procedure, be sure to have a set of replacement adhesives for the screen.
crwdns2942213:0crwdne2942213:0
-
-
Fully power off your phone and unplug any cables.
-
-
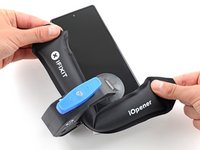
crwdns2935267:0crwdne2935267:0Clampy - Anti-Clamp$24.95
-
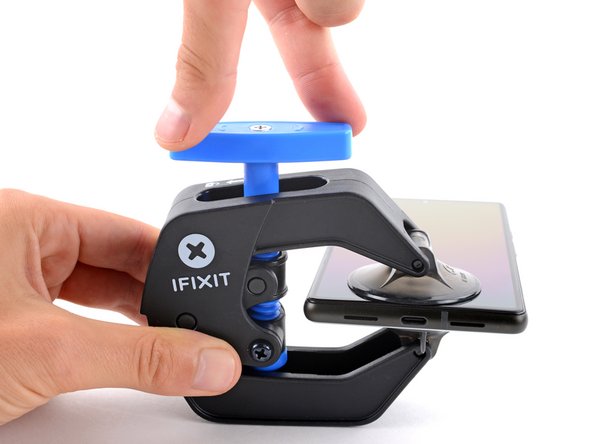
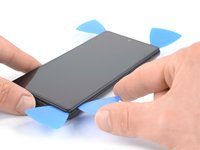
Pull the blue handle backwards to unlock the Anti-Clamp's arms.
-
Slide the arms over either the left or right edge of your phone.
-
Position the suction cups near the bottom edge of the phone—one on the front, and one on the back.
-
Squeeze the cups together to apply suction.
-
-
-
Pull the blue handle forward to lock the arms.
-
Turn the handle clockwise 360 degrees or until the cups start to stretch.
-
Make sure the suction cups remain aligned with each other. If they begin to slip out of alignment, loosen the suction cups slightly and realign the arms.
-
-
-
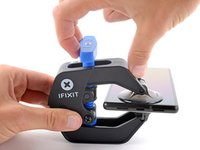
Heat an iOpener and thread it through the arms of the Anti-Clamp.
-
Fold the iOpener so it lays on the bottom edge of the phone.
-
Wait one minute to give the adhesive a chance to release and present an opening gap.
-
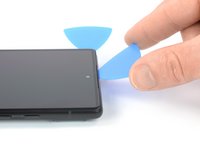
Insert an opening pick under the screen frame when the Anti-Clamp creates a large enough gap.
-
Skip the next two steps.
-
-
-
Apply a heated iOpener to the screen to loosen the adhesive underneath. Apply the iOpener for at least three minutes.
what area of the phone do i apply it to?
middle, edges, diagonal?
Only on the edges.
-
-
-
-
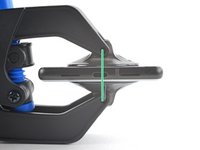
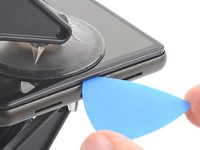
Once the screen is warm to the touch, apply a suction handle to the bottom edge of the screen.
-
Lift the screen, including its safety frame, with the suction handle to create a small gap between the screen and the phone assembly.
-
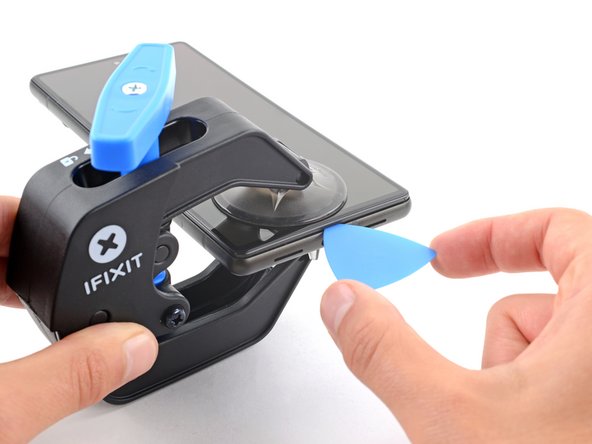
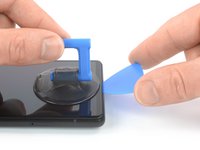
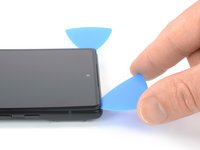
Insert an opening pick into the gap between the screen frame and the phone assembly.
-
Slide the opening pick to the bottom right corner of the screen to slice its adhesive.
-
Leave the opening pick in place to prevent the adhesive from resealing.
-
-
-
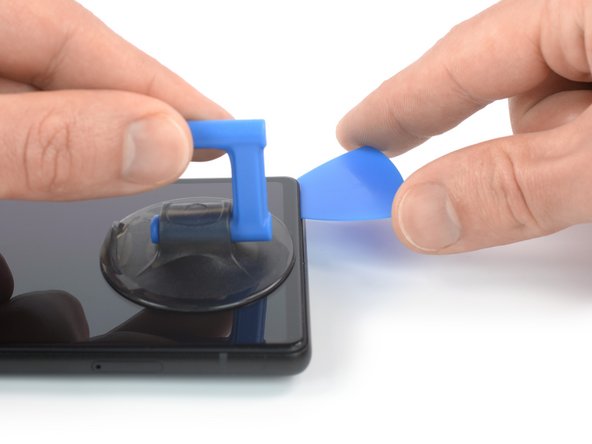
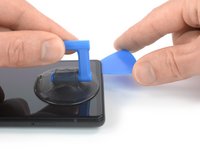
Insert a second opening pick at the bottom edge and slide it to the bottom left corner of the screen to slice the adhesive.
-
Leave the opening pick in place to prevent the adhesive from resealing.
-
-
-
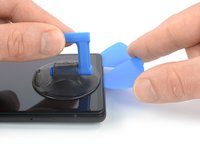
The screen of the Google Pixel 6 is not only held in place by adhesive but also small plastic clips. If your opening pick gets blocked during the screen removal procedure, it means you inserted your pick too deep underneath the screen. Only insert the tip of the opening pick (3-4 mm) when slicing the display adhesive.
-
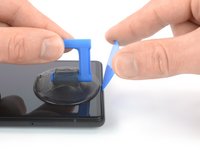
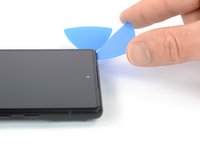
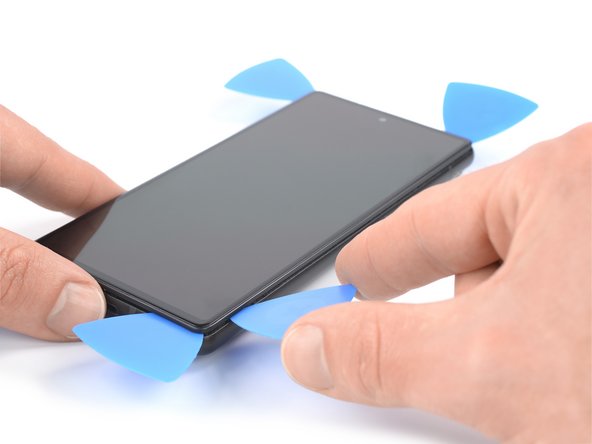
Insert a third opening pick underneath the bottom left corner of the screen.
-
Slide the opening pick along the left edge of the screen to slice the adhesive.
-
Leave the opening pick in the top left corner to prevent the adhesive from resealing.
-
-
-
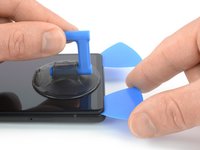
Insert a fourth opening pick at the top left corner of the screen.
-
Slide the opening pick along the top edge of the phone to slice the adhesive.
-
Leave the opening pick in the top right corner to prevent the adhesive from resealing.
-
-
-
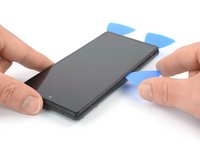
Insert a fifth opening pick and slide it along the right edge of the phone to slice the remaining adhesive.
-
-
-
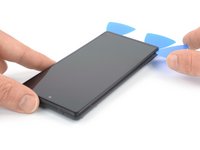
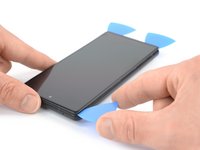
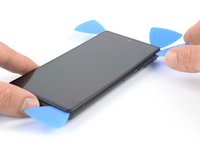
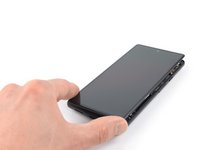
Carefully open the right side of the screen to the left side of the phone assembly like you would open a book.
-
-
crwdns2935267:0crwdne2935267:0Tweezers$4.99
-
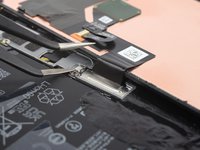
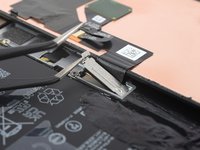
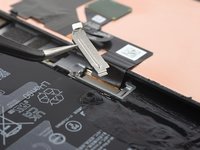
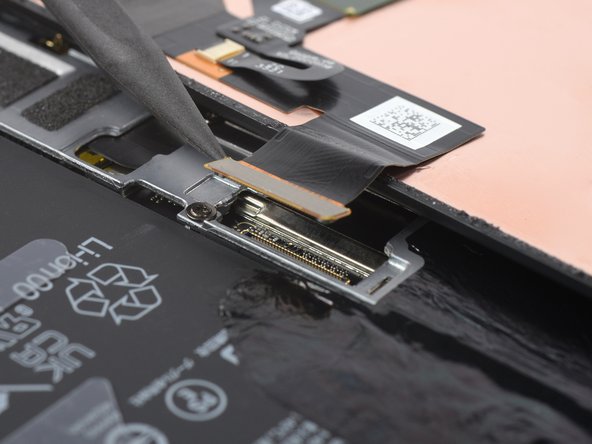
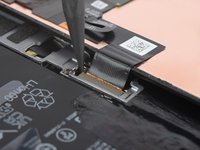
Use a pair of tweezers to carefully unhinge and remove the metal bracket sitting on top of the display cable connector.
Don't be afraid to bend that clip. I had to bend mine to around 90 degrees.
Thank you very much for the information
Don't forget to put the bracket back on during reassembly!
I only realised I had forgotten to reattach it when I was putting the tools away and saw the bracket on the desk... both halves are already glued together so far too late for me. Let's hope it doesn't come loose or I'll be meticulously scraping off all that glue again lol
The absolute same thing happened to me...! I just saw it laying around on the table after cleaning up... Did you experience any issues so far? Not keen on opening it up again eager haha.
Milkiman -
Any chance someone has an update on how bad it is to just go on and use the phone without that bracket?
Leilin -
My bracket was a little bit stuck. I bent the tab on the left side to 90 degrees, as Jack mentioned. Then I folded the bracket with my finger to the right side and then upwards. When reinstalling, you can bend the bent tab back to its original position.
I couldn't get the bracket back installed. Just wouldn't click back in place no matter what I tried. Hopefully screen cable doesn't pop out anytime soon 😂
-
-
-
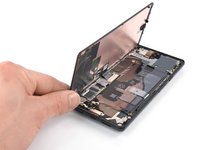
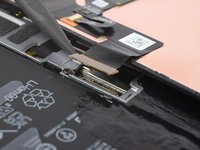
Use a spudger to disconnect the display flex cable by prying the connector straight up from its socket.
-
-
-
When handling your screen, grip it by its edges.
-
When placing the screen on your work area, make sure nothing is touching the bottom of the screen. Consider placing it on a soft, lint-free cloth.
-
-
-
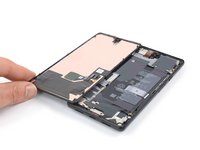
Remove the screen.
-
If you replaced the screen, check the front-facing camera hole on the screen and remove any remaining protective liners in it.
-
This is a good point to test your phone before sealing it up. Temporarily connect your screen, power on your phone, and make sure it works as expected. Before continuing with reassembly, power off your phone and disconnect the screen.
-
Follow this guide if you're using custom-cut adhesives for your device.
-
Follow this guide if you're using a pre-cut adhesive card.
-
If you're installing a new screen, follow this guide to calibrate the fingerprint sensor.
Has the issue with the fingerprint not working after screen replacement been sorted?
I bought the repair kit that included the adhesive & fingerprint module. If that's what you bought as well, you will have to use the google repair tool. https://pixelrepair.withgoogle.com/udfps. I had to manually download the google usb drivers & install them on Windows 11 because the phone wasn't being detected by the pixel repair tool.
Hello, fingerprint does'nt work now.... any tips ? thank !
I had the screen on my 6A replaced at a U-BreakiFix got home fingerprint reader does not work. It says enrollment not complete. Go to your repair facility. I guess they must have some magic that makes it work again due to security issues
Great directions, would be helpful to have a section on Google Pixel 6 Display Adhesive - Genuine
This guide is clear and easy to follow. The other one where you actually replace the screen and put the new adhesive is much less easy to follow, and takes much more time to complete because you have to remove all traces of the old adhesive. I used GooGone and a 2mm flat head screwdriver as a scraping tool and it worked well.
The fingerprint reader was not working after the upgrade, but I got it to work by visiting https://pixelrepair.withgoogle.com/udfps and since I'm using Ubuntu, I had to run those two commands:
sudo usermod -aG plugdev $LOGNAMEsudo apt-get install android-sdk-platform-tools-commonAnd then reboot my computer before my phone could be connected. I rebooted my phone manually after the upgrade and all was working normally. In fact, the new fingerprint sensor works better than the one I got before. The new one is actually usable.
My Pixel 6 is like new! (except perhaps for the water resistance)
Great tips! I wish I had thought of Goo Gone. By far the longest part of the procedure was cleaning out the old adhesive, and using alcohol swabs (including a few spares on hand) was slow and not very effective.
After Chrome on ubuntu was unhappy with recognizing my phone I had to resort to using a Mac, but I would prefer your solution.
Alternate solution, without installing anything:
Determine the USB bus and device ID of your phone.
lsusbAssuming, the bus ID is '004', and the device ID is '001', temporary allow access to this USB device for all users.
chmod 0777 /dev/bus/usb/004/001Thomas -
Easy enough and excellent guide! Thank you!
The guide was very helpful, but could be improved somewhat. I made the mistake of removing the screen without the bracket & didn't realize until I had attached the adhesive & tried to put the new screen on. So I had to remove the adhesive & the bracket before the new screen would fit, since it has it's own bracket. Another tip would be to include the instructions for getting the fingerprint module to work. Including https://pixelrepair.withgoogle.com/udfps & downloading & installing the google usb driver.
I agree that the guide was good. To be more clear, after the screen is completly installed you have go here https://pixelrepair.withgoogle.com/udfps to fix your fingerprint sensor, but my phone was not recognized by the utility when you plug it in Fast Boot Mode. This requires the usb drivers to be installed on the computer. Go here to download the usb https://developer.android.com/studio/run... Once you have the drivers you will have to go to device manager and you will see your Pixel 6 with a exclamation point on it. Right click on the Pixel 6 and select update drivers. Now browse to the folder that you extracted your drivers to that you just downloaded. This will fix the pixel 6 to be recognized by the utility. Now run the utiltity, and just make sure you reboot your phone when the utiltiy is done and it should be fixed.
Just finished a screen replacement on my pixel 6. Everything was pretty straight forward and the instructions and guide was really clear. Scraping all the old tape/glue and making sure I get every last piece out of the phone was the most time consuming part, but totally doable in the end. Using something like goo gone or lighter fluid helps greatly in dissolving the tape residue and the include plastic scraper tool helped scraping every single last piece of goop off the phone.
Had a little scare with the fingerprint scanner not working even after following the guide and calibrating the fingerprint scanner through google's website. I did it on a win11 computer at first, but thought I would use another computer with win10 to see if that made any difference. Fortunately that worked and my phone is back to 100% working again.
Thank you very much, worked as expected! Had also to recalibrate fingerprint censor AND then reboot the phone manually.
For Ubuntu, you have to add some udev rules or use some other trick to make Chrome/Chromium access your USB devices.
Never explains how to snap the bracket of the new phone screen onto the device. Incomplete.
-


If possible, turn on your device and test your repair before installing new adhesive and resealing.
To reassemble your device, follow these instructions in reverse order.
To run a diagnostics test with the built-in Pixel Diagnostic tool, click here.
Take your e-waste to an R2 or e-Stewards certified recycler.
Repair didn’t go as planned? Try some basic troubleshooting, or ask our Answers community for help.
crwdns2935221:0crwdne2935221:0
crwdns2935229:0175crwdne2935229:0

crwdns2947412:078crwdne2947412:0
Ordered the official Google Pixel 6 display part from iFixit and followed this guide, which worked well. However, it's probably worth adding that you may need to manually calibrate the display once it's installed if the phone is throwing up fingerprint reader errors (which is what happened to me). You can do that via this tool from Google: https://pixelrepair.withgoogle.com/udfps
The best advice when performing this procedure is.
The guide worked great, thanks! :D
Warning to others though: Careful what you buy! The genuine display was out of stock so I bought from a different source which didn't come with a fingerprint reader or display adhesive. My fault for not paying attention when buying, but fair warning to everyone else to double check. I hadn't even considered the reader being glued to the screen but not included on replacement parts. The adhesive is an easy purchase, but not sure how hard the fingerprint reader will be. I might be back to unlocking with a pin like some kind of caveman!
Nvm, found the guide for the fingerprint reader replacement. Hopefully I can just move this one over.
I'd second this warning as well - from what I eventually found online, when you try to calibrate the fingerprint reader with an aftermarket screen, you'll get a profile error that doesn't allow you to proceed. This is because the screen profile isn't loaded on Google's Servers, not the fingerprint reader. So essentially if you get an aftermarket screen, Google won't allow you to calibrate the fingerprint reader :(
Bought the screen with repair kit from iFixit. Be aware, the custom cut adhesive guide they recommend for reattaching the screen is WRONG. It says you hold the tabs to align and place the adhesive strip. That's NOT the case with the one included here. The side with the tabs actually has to be pulled off first. Had to order another one from iFixit. Now without my phone a couple days while waiting for the new part to arrive. Now without my phone for a few days waiting for the new adhesive to arrive. Not great.
For those who are not able to get the Pixel 6 detected in the "Fast Boot Mode" on the website https://pixelrepair.withgoogle.com/udfps you need to install the Driver. First and foremost on Device Manager you should see Pixel 6 or other device, and then update driver, install the driver from the downloaded w/ instructions from https://developer.android.com/studio/run.... Update Driver and point the driver to this location where you just downloaded the driver. (unzipped version). Once you are done the device gets recognized immmeidately on the Chrome Repair Website.
And one more important steps, make sure this is in Fast Mode (not safe/recovery/rescue). Second after you see successful installation on Chrome, you need to restart the Pixel 6, the automatic first restart does not work, you need to restart manually. And then go to finger print and setup again. This is very important!!
Thanks, useful info Venu.
Thank you. Your solution worked perfectly. I'm glad I saw it before I started the repair otherwise I would have been stressed out.
Couldn't find the unique calibration software for this deviceCouldn't find the unique calibration software for this device
i get thhis messege
did you know how to fix it ?
I installed the driver using the following method and had success:
1. Download driver from link in Venu's post
2. Unzip download folder
3. Double-click android_winusb.inf inside the folder and install
4. Go to the udfps site and perform update
5. I had to perform two restarts and then my fingerprint sensor started working again!
Austin -
Soooooo good! Got a dude screen on Monday. Thought I screwed up and was sweating. Tested the broken screen and realised it still worked. Support came back to me in 24 hours and put me on the list for the next part available. Got it today (Thursday) and now I have a working phone again. Very easy and fun fix. Used the heat pack and a hairdryer, Take your time opening it and do as best you can on cleaning out the glue on the edge. Also, recommend using some books or other gentle clamps to close after. Finally, like Mark, I needed to use https://pixelrepair.withgoogle.com/udfps and it worked after I restarted manually.
#RightToRepair #FTW so happy. Saved 45% of the cost to repair in a shop and got a little more comfortable with my phone and own skills.
So I have two pixel 6 phones with physical damage to one causing the display to have a "black ink spot" eventually overtake the screen, and the other with water damage that initially seemed inconsequential, but within an hour rendered the screen unusable(due to not being able to see what's displayed. Dropped it in a toilet 😑 fully submerged for all of one second).
Both phones work perfectly well otherwise. Will this replacement work(fix the phone), or is this something one cannot determine with certainty? If not, will it likely do so (or more commonly/most often the case)
Success! I was dubious on the iOpener and after reading the comments, decided to use a heat gun and an instant read thermometer. Slowly got around 150 degrees F and using the suction cup it started opening up. The other tools worked great. I ordered the OEM replacement screen and it included the display adhesive. That wasn't clear to me so I ordered one separately and now I have an extra.
I assumed you would not need to re-calibrate the fingerprint reader since the OEM screen included the reader. But, I did. Note that you don't have to reset the phone to factory settings. Something I read made me think you did. As posted by Venu Reddy above, follow the instructions at https://pixelrepair.withgoogle.com/udfps.
Fantastic guide. Replaced a Pixel 6 screen that was totally smashed from a face-flat fall outside. Seems to have worked like a charm, and has saved a huge amount of money (and e-waste)! I had to recalibrate the fingerprint reader after installing the new screen (via the tool at https://pixelrepair.withgoogle.com/udfps), and after doing that everything is working as expected. Overall, very satisfied. Thanks to Dominik Schnabelrauch and iFixit!
So fo those struggling to get the pixelrepair tool to recognise there phone. on windows 10/11
Step 1. Try connect using instructions here > https://pixelrepair.withgoogle.com/udfps If it works, Yay! if it doesnt proceed to step 2.
Step 2 > Download the Google USB Driver Zip (https://developer.android.com/studio/run... extract the file to a known location
Step 3 > Go into Fastboot mode and connect your phone
Step 4 > Open Control Panel > Device Manager > Other Devices , Locate the device with the error message , Right click and Update that driver
Step 5 > Browse my computer for Drivers
Step 6 > Browse the location you extracted the Google USB Driver to and Next Next Next
Step 7 > Browse to https://pixelrepair.withgoogle.com/udfps and try again
It should work, the issue is Fast boot appears to use a different driver then the primary OS (which makes sense) the only issue is you cant install the driver until you are in fastboot mode and that isn't mentioned anywhere!
Hope this helps someone :-)
Thank you so so much for taking the time to write out the steps! After an hour of frustration, I found your comment and it worked!!! Appreciate it !!!
The hardest part of this repair is getting the old adhesive out of the track along the edge before putting the new one in. I sprayed some WD-40 into a cup and used the tip of the spudger to apply some to loosen it. I don't know if it helped. Wish I had read the previous comment about using a 2mm jeweler's screwdriver (yes, metal!). That and some Goo Gone or WD-40 should work. I couldn't figure out the coffee filter technique. I used about 15 alcohol prep pads (they include one in the kit). I found a fast scrubbing action with my fingernail jamming the alcohol pad into the track to be effective as a final cleaning. Good luck! Overall, this screen replacement isn't that hard.
I purchased this exact screen from iFix-it and the instructions and install were excellent. One major flaw is that fingerprint reader does not even work, almost like it is not even recognized as being present. When the software calls for fingerprint it immediately goes gos to request 4 digit screen lock pin. Very frustrating.
Pretty straightforwad and P6 is way easier to open than my old P3. One thing to note, when lifting the old broken screen, the small rectangular rubber surround thing which borders the light sensor under the camera stuck to the screen. I didn't pay close attention to this until I was about to install the new one and noticed this part should've stayed with the phone / bottom portion. As others said, cleaning the old adhesive was the hardest bit and I second what Kurt said, 2mm screwdriver + lots of isopropyl alcohol. The bottom frame doesn't seem too scratch easily, seems to be made out of plastic instead of aluminium. Finally thanks to Jim for the UDFPS walkthrough, my Win11 failed to recognise the P6 initially until I followed your instructions :)
Not good. No good explanation for the blue screens of plastic and how to reassemble. This is half of a guide.
Why does this "genuine" screen replacement look so thick to me? It looks like an LCD that belongs on a phone made 10 years ago.
Could you share what 10-year-old phone you refer to?
Just finished using this guide alongside the replacement screen and tool kit from iFixit. When I first decided to fix my screen myself, I was worried that I might have struggled along the way, but I can happily say my repair went without issue. Instead of using the included heat pad I used a hair dryer and carefully heated the edges of the phone, I then proceeded to use the suction cup and guitar pick to begin slicing through the adhesive. This part was surprisingly easy and did not take much effort. The hardest part of this repair was adequately cleaning up the old adhesive that comes with the phone, which was more tedious than hard. The new screen fits in perfectly after applying the new adhesive. Just a tip for others looking to take this on, the in-screen fingerprint sensor needs to be calibrated, you can find the tool online by searching for pixel 6 fingerprint calibrator. Overall a very good experience.
I can see my display but the screen is unresponsive to touch
If the screen is unresponsive to touch, then the screen cable is not plugged correctly. I had same problem, removed the screen again, insert the plug correctly and firmly, and it worked.
To prevent snapping the cable, I used adhesive tape on the outside of the screen to act like a hinge, so the screen would not be supportet only by the thin cable. Hope this helps, good luck!
David
David T. -
Hilfe, mein Bildschirm ist nach der Displayinstallation schwar geblieben. Es kommt aber zu einem klacken, wenn ich die Tasten drücke, d.h. das Telefon hat gebootet. Was kann ich tun?
Hallo Stebbke, es könnte sein, dass das Display-Kabel nicht fest sitzt oder der Connector verschmutzt ist. Ich würde dir empfehlen, die empfohlenen Schritte zur Problembehebung durchzugehen.
Just want to give my hats off to the IFIXIT team. My wife dropped her phone the day before her phone case showed up. Since she had a history of not dropping her phones....we didn't purchase the add-on warranty. Welp such is life. The last time I had to replace a screen was my HTC DNA way back in the day, and needless to say I really didn't go in prepared with all the truly necessary tools for the job. So in some way's I still somewhat dreaded replacing the screen from past experience. Thankfully the tool kit was mighty impressive and honest to God worth every extra dollar(unless you already have comparable or better tools), and made the screen removal a total breeze, well other then that pesky adhesive remnants. The how-to tutorial was well written and very helpful. The adhesive template was brilliant and well thought out, and worked perfect. The phone is perfect again. Happy Wife Happy Life. Thank you IFIXIT Team!
I learned some things during the process that I wished I knew before I started
1. There are two metal springy things at the bottom corners. You can seen them in figure 12. If your pick slips too far in they can become damaged and they might catch on a sleeve during the adhesive cleaning.
2. The screen connector is hard to reconnect and clip in place. Took me a good 30 minutes of fiddling, applying a suction cup to the back at the start would have made the screen easier to hold.
3. Fingerprint recalibration requires connection to you computer and if you use windows the driver must be installed before hand. Matt M. had a good explanation on how to install the driver. Fingerprint scanner not working after replacing screen. Pixel 6 Pro
This guide was perfect. Worked as a sharm.
The only note I have is that the guide is not showing you how to reassmble the screen (I see now however, at the bottom of the guide, that one should just follow the guide in reverse order, which makes sense). One thing worth noting though is that there is a "protective" cover over the hole for the front camera, so make sure to remove that before gluing the screen back on the phone (then you wont need to remove the scree a second time and damage the adhesive 😊).
Also, make sure to follow the other posts regarding the fingerprint-reader (install from https://pixelrepair.withgoogle.com/udfps and restart).
Overall, very thorough guide and I couldn't be more pleased with my result.
⭐⭐⭐⭐⭐
I installed my new screen, per the instructions above. When I power the phone on, I have no display. Any help would be appreciated. Did I receive a defective screen or do I have more damage beyond the screen? TIA
Did you find a solution? I'm having the same problem
how did you solved it? we have the same difficulty.
I had same problem, removed the screen again, insert the plug correctly and firmly, and it worked.
To prevent snapping the cable, I used adhesive tape on the outside of the screen to act like a hinge, so the screen would not be supportet only by the thin cable. Hope this helps, good luck!
David
David T. -
Touch is unresponsive after replacement
Good product. Installed and it works fine. BUT, we are missing some crucial steps. Where is the step to reassemble the screen once you have installed the adhesive? Where is the step to show you how to remove all the strips once the screen is connected? Where is the step to show you how to test the screen before removing the strips and clicking in the screen? I searched a long time for these steps and couldnt find them,. so either theyre missing or too hard to find, either way, this is an oversight. I became quite frustrated with it and could have used the help.
Install was great and screen looks the same as new as i expected. I did run into the fingerprint scanner issue and have to reinstall the software as well. Followed instruction from this video https://www.youtube.com/watch?v=qiU6PAnj... and got USB Driver download from this article https://www.thecustomdroid.com/google-an... Hope it helps. Did not need to factory reset the device.
A good guide with a few things left out
The instructions were very clear but it did take at least an hour to remove the adhesive and the guide also doesn't tell you how to put the screen back on but its not too hard to figure out and getting the finger print reader working again was easy after a google. overall the difficulty is moderate but doable and for me a lot cheaper to fix and buy the part from here so I'm pretty happy with the replacement kit
What an easy repair that was! I only needed to heat the phone up a little with a hairdryer to get the screen off using some guitar plectrums. Didn't bother with the gasket but used Zhanlida T-7000 glue to stick the screen back on (the perfect glue for the job as it does not go hard).
Thanks very much guys.
The adhesive comes along with the Display, but better to order extra one at 5 $, as you might damage the first one, as in my case.
The time consuming part - Removing the adhesive, IPA dipped in cotton earbuds helps.
The tricky part- Applying the adhesive properly. Tip- Rest/align the adhesive bottom edge with phone's frame bottom edge and then proceed upwards. It will be perfect.
Fingerprint scanner might not work initially but don't worry, You can fix it via this tool from Google: https://pixelrepair.withgoogle.com/udfps.
After this repair, my front camera does not work anymore. Does anyone know a potential fix?
I had all of the problems above, followed the steps and had minor success. Then my phone simply didn't restart. After trying everything and leaving it for 30 minutes or so, I was able to restart it. So don't worry too much if doesn't restart straight away. Side note, I accidently turned my phone on half way through, but I continued with the procedure and everything was fine.
Après une longue hésitation j'ai décidé de franchir le cap et de changer l'écran moi même.
Dès la reception j'ai été agréablement surpris par la qualité du fix kit. Je le recommande vivement pour faciliter la démarche. Je n'ai pas acheté l'anti clamp. Pas besoin, surtout si l'écran est dejà cassé et qu'on à pas a faire attention à la manipulation liée au démontage.
En suivant le tuto tout s'est déroulé à merveille. Aucun soucis, faire attention aux petites pattes près de chaque angle du téléphone une fois démonté. On les accroche régulièrement pendant le nettoyage.
L'étape la plus délicate à étée de recalibrer l'emprinte. En sois la manip est simple mais sans traduction claire en français j'ai mis du temps à réussir. donc dans l'ordre :
Eteindre le telephone - L'allumer en "fast boot mode" (bouton de démarage + volume bas pendant 3s. Un écran noir avec quelque trucs apparaît) - à ce moment là UNIQUEMENT
- à ce moment là UNIQUEMENT, branchez le telephone et suivez la manipulation indiquée dans le lien entre parhenthèses pour installer le driver (https://developer.android.com/studio/run...).
- une fois le driver installé ouvrez ce lien vers le site google https://pixelrepair.withgoogle.com/udfps
Le téléphone sera reconnu dirrectement. Suivre a démarche qui dure 5 secondes et c'est ok.
Pour moi tout le processus de changement d'écran à été un succès. Je suis ravi de retrouver mon telephone ainsi que tout ce qui s'y trouve.
Hola, cambie la pantalla de mi pixel 6 y segui todos los pasos para la calibracion de huella, aun asi cuando intento agregar mi huella me dice que ha pasado el tiempo para agregar mi huella y no funciona, alguna solucion ?
Ivan Andres Lopez Hernandez - crwdns2934203:0crwdne2934203:0
The fingerprint tool should be mentioned in the guide, not everyone reads the comments. After finishing the screen install the fingerprint sensor didn't work, I didn't look at the comments here for a little while and when I did I used the first comment to fix it. This worked really easy, just make sure to reboot once after the phone boots up: https://pixelrepair.withgoogle.com/udfps
Happy with this purchase. I preordered the Pixel 6 when it was coming out with the phone case and protective screen all from Google... It didn't all come at the same time and my screen cracked at the bottom literally the same day I got it from a <4 inch slip from couch to carpet since when bare it's so... slippery. Google wouldn't do anything for me. Official repair shops are double the price of this, so I finally purchased and it was ridiculously easy. The hardest part was getting the adhesive loose and off. The instructions were good to follow, and I liked the options for the different links depending on things like if you got the pre-cut adhesive or not. The final reassembly I thought was self explanatory reading it but maybe adding in the picture steps of those last steps would benefit others that have commented about it (removing the plastic covers/reattaching). Otherwise, this was really easy. Really happy with it, it's like a brand new phone for me.
okay I completed to installation and I believe I followed all the steps correctly. However, as I pulled off the blue plastic of the custom cut adhesive for my device. I noticed a piece of the blue plastic with a black dot was over the camera lens. I did not read anything in the instruction about this. Now my phone is all back together and my forward lens is clear but my rear lens is cloudy. What did I do wrong? And I can't figure out that finger print calibration, I find my phone listed but it still will not connect.
I need some additional guidance.
After repair by these instructions I have managed to recalibrate fingerpeint sensor and thought that everything is good, until I noticed that the proximity sensor doesn't work anymore. Help me please, I sis everything correctly
Was able to repair perfectly with the ordered screen+tools. Removing the glue was a pain, and with reassembly I would have appreciated a bit more guidance. But nonetheless can recommend 100% - Thanks!
The replacement screen is too thick in comparison to the original. It doesn't fit inside the bevel of the frame. It works but looks terrible. I also had to remove the adhesive and check the connection after it didn't work the first go around. It still would have been sitting up too high in comparison to the original. I could have paid 200 at CPR for them to fix it for me, which is only 50 more than what I paid for a replacement screen that didn't fit. I get the right to repair and I'm all for it, but this did not work out for me at all. I'll be carrying around something that looks put together by a 5 year old for at least a couple years until the phone is paid off.
Has anybody experienced that the screen cracks by itself AFTER replacement same as with lots of the new Pixel 6 phones? Just got mine and am thinking about replacing the screen because it has this self-cracking issue - but only if the replacement doesn't have the same issue a few days later.
Did the following as instructed;
Removal of old screen was a breeze, used a hairdryer to soften the glue. Screen came off with little effort. Remains of the glue was easily removed with some zippo fuel on an eartip.Tested the screen and it was good. Put everything together, left the phone under some weight for half a day to make the glue bind better. Had to calibrate the fingerprint sensor [Google; pixelrepair.withgoogle]. All in all an easy fix for a good price.
Thanks for the manual, tips and have a good day =]
Replacing the screen was very easy, the hardest part was to remove the display cable bracket and remove old adhesive. But IMO guide should have a few more details. For some reason, a tool for the fingerprint scanner recalibration didn't work the first try, so I did it twice. Also worth mentioning, that (in the time of writing this comment) it is not available on Android 14, so I was forced to downgrade to A13 to recalibrate and then update.
Anexo la traduccion ya que considero es de interes:
Sustituir la pantalla fue muy facil, lo mas dificil fue quitar el soporte del cable de la pantalla y quitar el adhesivo viejo. Pero la guía de la OMI debería tener algunos detalles más. Por alguna razón, una herramienta para el escáner de huellas dactilares recalibración no funcionó el primer intento, así que lo hice dos veces. También vale la pena mencionar, que (en el momento de escribir este comentario) no está disponible en Android 14, así que me vi obligado a downgrade a A13 para recalibrar y luego actualizar.
Carlos López (España - Spain) - crwdns2934203:0crwdne2934203:0
As others shared, by following the instructions I did not have much troubles replacing the screen. Two small tips that I learned in the process:
- Removing the old adhesive from the phone was the most timely task. Initially I was making almost no progress and was close to give up leaving it more or less as it was and thus compromising with the quality of the sealing of the new display. Eventually I changed the strategy and was very happy with the results. I made good and relatively fast progress by using very small pieces of cotton, soaked in 95% isopropyl alcohol. Holding the small piece with the tweezers I went over the old adhesive numerous time and it eventually staid on the cotton.
- On a first glance the instructions looked like only giving the disassembly part and I started looking for alternatives until I realized there was also the additional page accessible from Step 14 - on the new adhesive application.
C’est pour la première dans cette plateforme et j’apprécie vraiment ce que vous faites je compte apporter mon soutien en étant dans ce domaine de réparation
Hi Guys.
Is there any manual on how to replace the back glass? And by back glass, I mean the big glass under the camera bar.
I can't seem to find it here nor anywhere else.
Thanks!
Very easy to install! The longest part for me was removing the adhesive. Recalibrated the fingerprint sensor with Google and I'm good to go. I feel like a techie now- gonna advertise my replacement screen services. lol! Thanks guys!
So I finally got the courage to do my first phone screen replacement. I have replaced screens on laptops and TV's but never anything that uses a form of adhesive.
3 parts were frustrating, separating the screen, cleaning the adhesive and the final time I plugged in the connector.
It was my first time separating a screen and it was fiddly.
What I found to be best for removing the adhesive was the closed tip of the fine tweezer and just slowly scraping it away and wiping the big glue boogers onto a tissue. You can run a little ball of adhesive over the other remnant bits of adhesive to pull more off.
Also I had a lot of gunk built up on the inside walls and running the spudger around helped clear that off.
The rest of the process was cruisy and I am currently leaving my phone to get squashed by a big book.
Aussies, 15c stacked or a $1 coin sits at the perfect height.
I feel really proud of myself right now. :)
Please add notes for putting devices back together. I finished doing this guide and putting together to figure out I was supposed to take the blue sticker off the back of the screen.
I did the one on the camera hole.. but missed the big one.. I'm guessing it's blocking the proximity sensor since after putting it all back together, that doesn't work.
This is the second guide I've done recently where I wish more steps were given on the putting back together.
Ordered another display adhesive since I'll need that now.
Great guide to follow would recommend if colder climate maybe heat the ieopener for a 15 seconds longer and the clip is slightly diff on the ipxel 6a but other wise great guide thankyou!
Zum Thema "Pixel Diagnostic Tool": Das Teil läuft laut meinem Pixelchen nur in Amerika! Voll doof ist dieser Tip! 3Thumbsdown !!
Guide doesnt go through how to put the new screen on?
Donde puedo cambiar la pantalla google 6a en miami? vivo en argentina y voy a viajar...cuanto sale? muchas gracias amigos
Thanks, it worked very well.
Maybe add a step 15 and 16 to show that there will be additional effort required after removing the display, before you can add it back in.
I was so happy I got the display removed in like 15 minutes, but then had to spend maybe an hour to properly remove all the remaining glue, before I could actually replace the display.
So, 15 would be steps after removing the display, with reference to the existing guides for removing the glue and or the tools needed.
And 16 could be the summary plus references to existing guides for putting the display back in, including adding new glue.
And 14 would really be just "you did it, the display is properly removed"
I followed the guide and the display is working correctly.
However, re-calibrating the fingerprint sensor is giving the following error message: Your device's current software version:AP1A.240505.004 is newer than this repair tool has.
Did anyone recently do this successfully and remembers which Android build they were using?
Sadly the Google support could not help me with this.
I also got the error massage:
Your device's current software version:AP1A.240505.004 is newer than this repair tool has
At first it didn't work for me but I tried it a few times and somehow the button "install software" at the "pixelrepair.withgoogle.com"appeared. I don't really know, why it suddenly worked.
I think it's crucial to use the "udfps-site": https://pixelrepair.withgoogle.com/udfps
And I think it's crucial to use the "fastboot mode" and not the "rescue mode"
Thanks a lot @benjaminbau6010 !
I don't know if the udfps version of the site not using 'rescue mode' solved the issue, but using your tip the calibration finally worked
and I can happily glue back my screen.
It is only a little disappointing that the Google Pixel Support could not help any better than saying 'please send your device to an authorized repair shop'.
Instructions were very clear! I was also able to calibrate the fingerprint reader in one go using the instruction set.
Thank you for the detailed guide! After breaking my pixel 6 in India, I was so worried that I could not get a repair from the service center! But this helped me repair my screen and use the phone and fingerprint lock again!
Hi, is there a reason the battery isn’t being disconnected in this repair?
If a swollen battery pushed the screen out of the safety frame - is there any harm in removing the screen completely without moving the safety frame? I'm going to have to re-glue the screen back to the frame regardless. It means I won't need the adhesive sticker but the battery decided to do this for me anyway.
Thank you so much for amazing guide. I was able to successfully replace screen for Pixel 6.
The instructions are well written. Only one improvement recommendation would be to have a guide which provides instructions from start all the way to end for clarity of the process. The current one seems like it ends at the removal of broken screen and then have to jump to different pages and come back and then again jump for installation of new screen.
Also, the fingerprint calibration worked perfectly using https://pixelrepair.withgoogle.com/udfps link. As others have mentioned, after the calibration tool is installed, we have to restart manually and sometimes two times and fingerprint sensor error alert notification will go away and you can then enroll your finger again to have it work seamlessly.
Fingerprint and mic stopped working 🙃
I can't power phone off because my display is broken. Can I replace the screen while my phone is still on?
If I cannot use my screen, how do I power it off?
Craig Joseph Van Vliet - crwdns2934203:0crwdne2934203:0
I was thinking the same. Could let the battery run down.
Jack Adrian Zappa - crwdns2934203:0crwdne2934203:0
You can turn the Smartphone off via the boot menue. Push the on/off-button plus the volume up button at the same time. Once the smartphones goes off to restart, hold the volume down button. The smartphone will boot and you can select between recovery mode and other options. You will find the option turn off, which you can select then with the buttons on the side.
Jonas R. - crwdns2934203:0crwdne2934203:0
This is only helpful if you can read your screen. I have a black screen and over 60% battery. It will take days to drain the battery. I need to power it off.
William Maine -