crwdns2915892:0crwdne2915892:0
This repair guide was authored by the iFixit staff and hasn’t been endorsed by Google. Learn more about our repair guides here.
Use this guide to replace a worn-out or dead battery in your Google Pixel 6.
If your battery is swollen, take appropriate precautions.
For your safety, discharge your battery below 25% before disassembling your phone. This reduces the risk of a dangerous thermal event if the battery is accidentally damaged during the repair.
Caution: The Pixel 6 contains class 1 lasers. Disassembly could result in exposure to invisible infrared laser emissions.
Retaining water resistance after the repair will depend on how well you reapply the adhesive, but your device will lose its IP (Ingress Protection) rating.
You’ll need replacement adhesive to reattach components when reassembling the device.
crwdns2942213:0crwdne2942213:0
-
-
Fully power off your phone and unplug any cables.
-
-
crwdns2935267:0crwdne2935267:0Clampy - Anti-Clamp$24.95
-
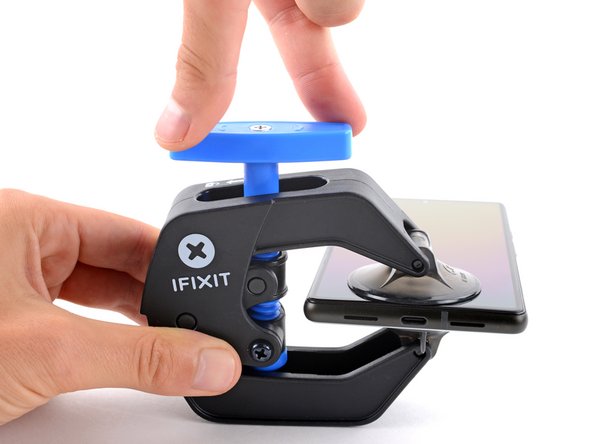
Pull the blue handle backwards to unlock the Anti-Clamp's arms.
-
Slide the arms over either the left or right edge of your phone.
-
Position the suction cups near the bottom edge of the phone—one on the front, and one on the back.
-
Squeeze the cups together to apply suction.
-
-
-
Pull the blue handle forward to lock the arms.
-
Turn the handle clockwise 360 degrees or until the cups start to stretch.
-
Make sure the suction cups remain aligned with each other. If they begin to slip out of alignment, loosen the suction cups slightly and realign the arms.
-
-
-
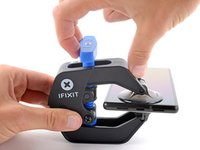
Heat an iOpener and thread it through the arms of the Anti-Clamp.
-
Fold the iOpener so it lays on the bottom edge of the phone.
-
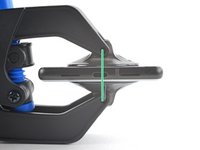
Wait one minute to give the adhesive a chance to release and present an opening gap.
-
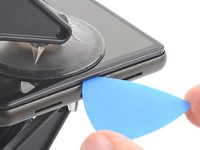
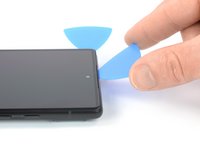
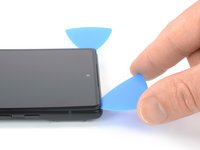
Insert an opening pick under the screen frame when the Anti-Clamp creates a large enough gap.
-
Skip the next two steps.
-
-
-
Apply a heated iOpener to the screen to loosen the adhesive underneath. Apply the iOpener for at least three minutes.
what area of the phone do i apply it to?
middle, edges, diagonal?
Only on the edges.
-
-
-
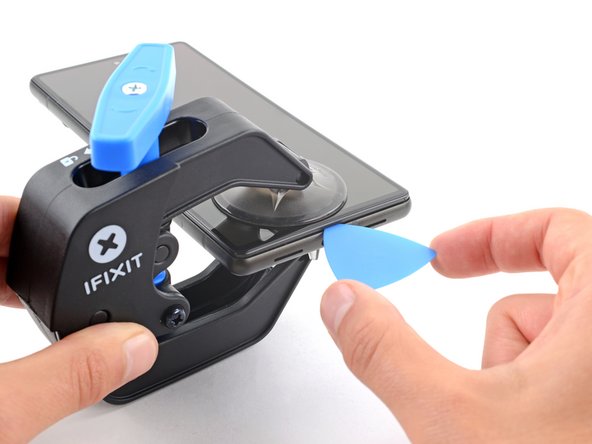
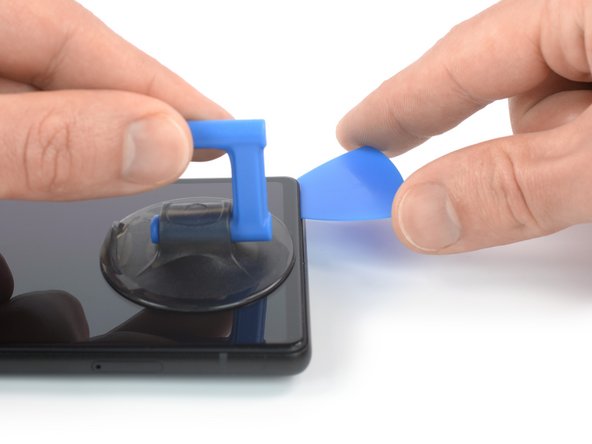
Once the screen is warm to the touch, apply a suction handle to the bottom edge of the screen.
-
Lift the screen, including its safety frame, with the suction handle to create a small gap between the screen and the phone assembly.
-
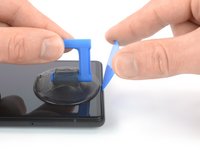
Insert an opening pick into the gap between the screen frame and the phone assembly.
-
Slide the opening pick to the bottom right corner of the screen to slice its adhesive.
-
Leave the opening pick in place to prevent the adhesive from resealing.
-
-
-
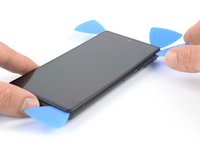
Insert a second opening pick at the bottom edge and slide it to the bottom left corner of the screen to slice the adhesive.
-
Leave the opening pick in place to prevent the adhesive from resealing.
-
-
-
The screen of the Google Pixel 6 is not only held in place by adhesive but also small plastic clips. If your opening pick gets blocked during the screen removal procedure, it means you inserted your pick too deep underneath the screen. Only insert the tip of the opening pick (3-4 mm) when slicing the display adhesive.
-
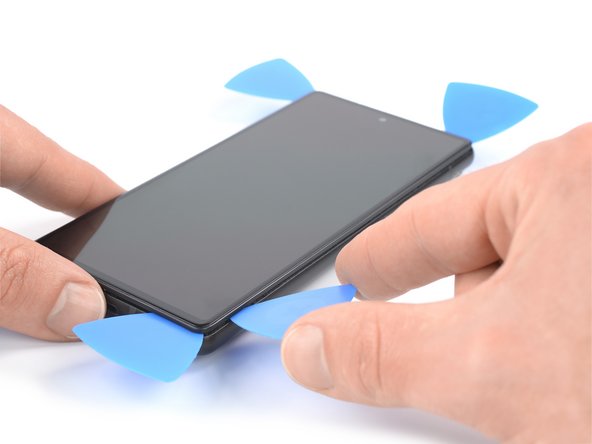
Insert a third opening pick underneath the bottom left corner of the screen.
-
Slide the opening pick along the left edge of the screen to slice the adhesive.
-
Leave the opening pick in the top left corner to prevent the adhesive from resealing.
-
-
-
Insert a fourth opening pick at the top left corner of the screen.
-
Slide the opening pick along the top edge of the phone to slice the adhesive.
-
Leave the opening pick in the top right corner to prevent the adhesive from resealing.
-
-
-
-
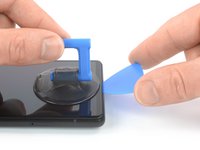
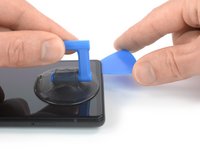
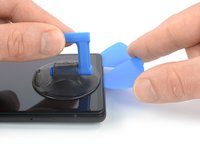
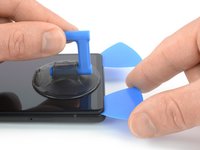
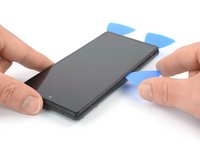
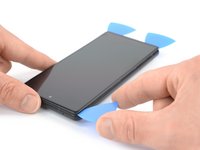
Insert a fifth opening pick and slide it along the right edge of the phone to slice the remaining adhesive.
-
-
-
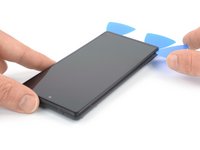
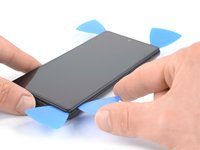
Carefully open the right side of the screen to the left side of the phone assembly like you would open a book.
-
-
crwdns2935267:0crwdne2935267:0Tweezers$4.99
-
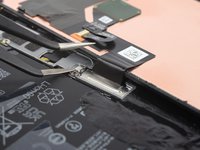
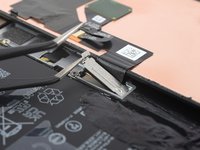
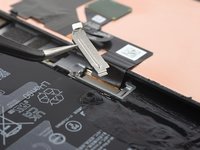
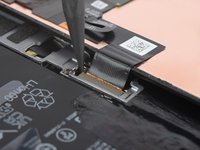
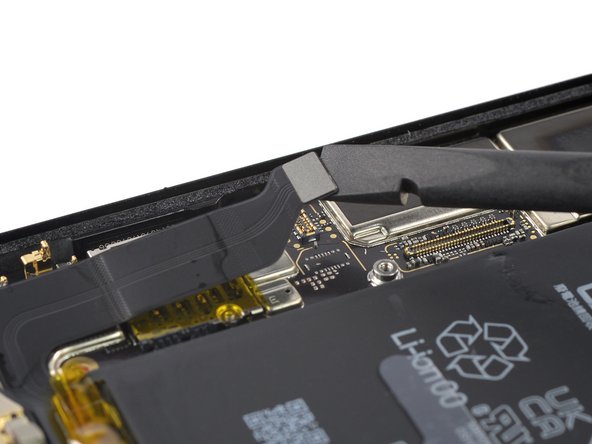
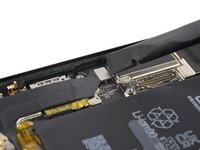
Use a pair of tweezers to carefully unhinge and remove the metal bracket sitting on top of the display cable connector.
Don't be afraid to bend that clip. I had to bend mine to around 90 degrees.
Thank you very much for the information
Don't forget to put the bracket back on during reassembly!
I only realised I had forgotten to reattach it when I was putting the tools away and saw the bracket on the desk... both halves are already glued together so far too late for me. Let's hope it doesn't come loose or I'll be meticulously scraping off all that glue again lol
The absolute same thing happened to me...! I just saw it laying around on the table after cleaning up... Did you experience any issues so far? Not keen on opening it up again eager haha.
Milkiman -
Any chance someone has an update on how bad it is to just go on and use the phone without that bracket?
Leilin -
My bracket was a little bit stuck. I bent the tab on the left side to 90 degrees, as Jack mentioned. Then I folded the bracket with my finger to the right side and then upwards. When reinstalling, you can bend the bent tab back to its original position.
-
-
-
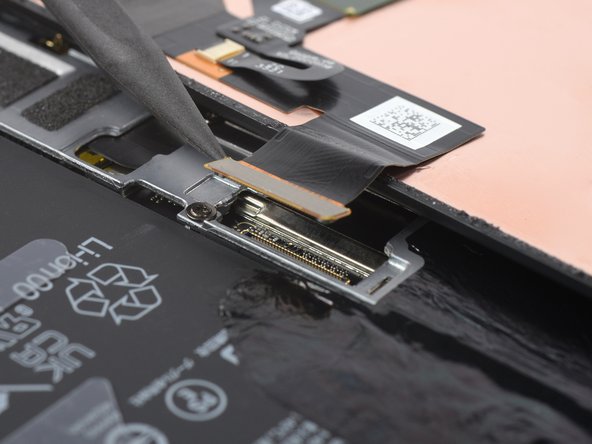
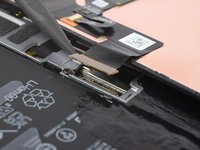
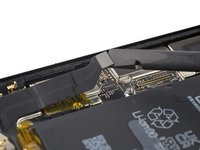
Use a spudger to disconnect the display flex cable by prying the connector straight up from its socket.
-
-
-
When handling your screen, grip it by its edges.
-
When placing the screen on your work area, make sure nothing is touching the bottom of the screen. Consider placing it on a soft, lint-free cloth.
-
-
-
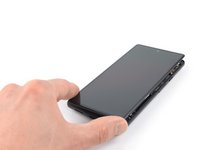
Remove the screen.
-
If you replaced the screen, check the front-facing camera hole on the screen and remove any remaining protective liners in it.
-
This is a good point to test your phone before sealing it up. Temporarily connect your screen, power on your phone, and make sure it works as expected. Before continuing with reassembly, power off your phone and disconnect the screen.
-
Follow this guide if you're using custom-cut adhesives for your device.
-
Follow this guide if you're using a pre-cut adhesive card.
-
If you're installing a new screen, follow this guide to calibrate the fingerprint sensor.
Has the issue with the fingerprint not working after screen replacement been sorted?
I bought the repair kit that included the adhesive & fingerprint module. If that's what you bought as well, you will have to use the google repair tool. https://pixelrepair.withgoogle.com/udfps. I had to manually download the google usb drivers & install them on Windows 11 because the phone wasn't being detected by the pixel repair tool.
Hello, fingerprint does'nt work now.... any tips ? thank !
I had the screen on my 6A replaced at a U-BreakiFix got home fingerprint reader does not work. It says enrollment not complete. Go to your repair facility. I guess they must have some magic that makes it work again due to security issues
Great directions, would be helpful to have a section on Google Pixel 6 Display Adhesive - Genuine
This guide is clear and easy to follow. The other one where you actually replace the screen and put the new adhesive is much less easy to follow, and takes much more time to complete because you have to remove all traces of the old adhesive. I used GooGone and a 2mm flat head screwdriver as a scraping tool and it worked well.
The fingerprint reader was not working after the upgrade, but I got it to work by visiting https://pixelrepair.withgoogle.com/udfps and since I'm using Ubuntu, I had to run those two commands:
sudo usermod -aG plugdev $LOGNAMEsudo apt-get install android-sdk-platform-tools-commonAnd then reboot my computer before my phone could be connected. I rebooted my phone manually after the upgrade and all was working normally. In fact, the new fingerprint sensor works better than the one I got before. The new one is actually usable.
My Pixel 6 is like new! (except perhaps for the water resistance)
Great tips! I wish I had thought of Goo Gone. By far the longest part of the procedure was cleaning out the old adhesive, and using alcohol swabs (including a few spares on hand) was slow and not very effective.
After Chrome on ubuntu was unhappy with recognizing my phone I had to resort to using a Mac, but I would prefer your solution.
Alternate solution, without installing anything:
Determine the USB bus and device ID of your phone.
lsusbAssuming, the bus ID is '004', and the device ID is '001', temporary allow access to this USB device for all users.
chmod 0777 /dev/bus/usb/004/001Thomas -
Easy enough and excellent guide! Thank you!
The guide was very helpful, but could be improved somewhat. I made the mistake of removing the screen without the bracket & didn't realize until I had attached the adhesive & tried to put the new screen on. So I had to remove the adhesive & the bracket before the new screen would fit, since it has it's own bracket. Another tip would be to include the instructions for getting the fingerprint module to work. Including https://pixelrepair.withgoogle.com/udfps & downloading & installing the google usb driver.
I agree that the guide was good. To be more clear, after the screen is completly installed you have go here https://pixelrepair.withgoogle.com/udfps to fix your fingerprint sensor, but my phone was not recognized by the utility when you plug it in Fast Boot Mode. This requires the usb drivers to be installed on the computer. Go here to download the usb https://developer.android.com/studio/run... Once you have the drivers you will have to go to device manager and you will see your Pixel 6 with a exclamation point on it. Right click on the Pixel 6 and select update drivers. Now browse to the folder that you extracted your drivers to that you just downloaded. This will fix the pixel 6 to be recognized by the utility. Now run the utiltity, and just make sure you reboot your phone when the utiltiy is done and it should be fixed.
Just finished a screen replacement on my pixel 6. Everything was pretty straight forward and the instructions and guide was really clear. Scraping all the old tape/glue and making sure I get every last piece out of the phone was the most time consuming part, but totally doable in the end. Using something like goo gone or lighter fluid helps greatly in dissolving the tape residue and the include plastic scraper tool helped scraping every single last piece of goop off the phone.
Had a little scare with the fingerprint scanner not working even after following the guide and calibrating the fingerprint scanner through google's website. I did it on a win11 computer at first, but thought I would use another computer with win10 to see if that made any difference. Fortunately that worked and my phone is back to 100% working again.
Thank you very much, worked as expected! Had also to recalibrate fingerprint censor AND then reboot the phone manually.
For Ubuntu, you have to add some udev rules or use some other trick to make Chrome/Chromium access your USB devices.
Never explains how to snap the bracket of the new phone screen onto the device. Incomplete.
-
-
-
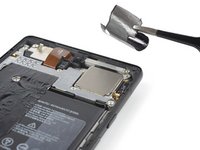
Apply a heated iOpener or a heat gun to the rear glass to loosen the adhesive underneath the graphite films on top of the battery. Apply the iOpener for at least two minutes.
-
-
crwdns2935267:0crwdne2935267:0Tweezers$4.99
-
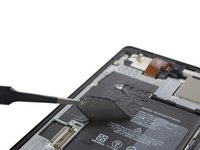
Use a pair of blunt nose tweezers or a clean fingernail to carefully peel the black graphite film off the top edge of the battery and the motherboard shield.
-
Remove the graphite film.
-
-
-
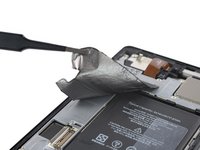
Use a pair of blunt nose tweezers or a clean fingernail to carefully peel the black graphite film off the left edge of the battery and the motherboard shield.
-
-
-
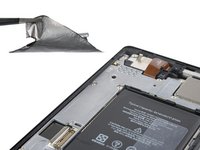
Use a pair of blunt nose tweezers or a clean fingernail to carefully peel the black graphite film off the bottom edge of the battery and the loudspeaker assembly.
-
Remove the graphite film.
There was one tint tiny (1 cm) long graphite(?) piece left over in the battery kit. I didn't see it here in these instructions and I didn't see it on my phone nor did I remove it. Any idea what it's for?
-
-
crwdns2935267:0crwdne2935267:0Magnetic Project Mat$19.95
-
Use a Torx T3 screwdriver to remove the screws securing the motherboard cover:
-
Eight 4.8 mm-long screws
-
One 2.4 mm-long screw
I lost the 2.4 mm-long screw (marked orange)! It seems to be the ground connection from the lower board to the upper board. Will the phone work without this screw?
-
-
-
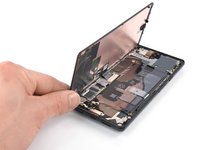
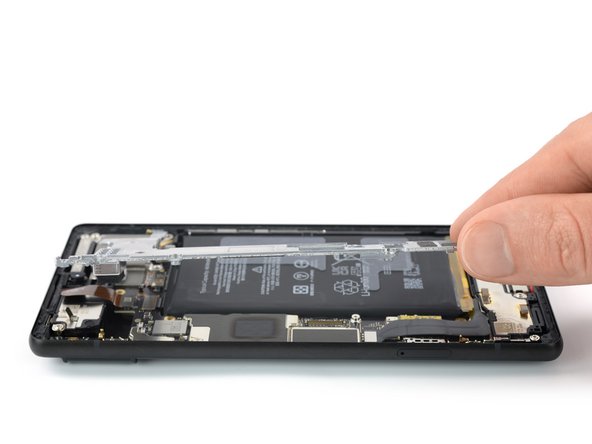
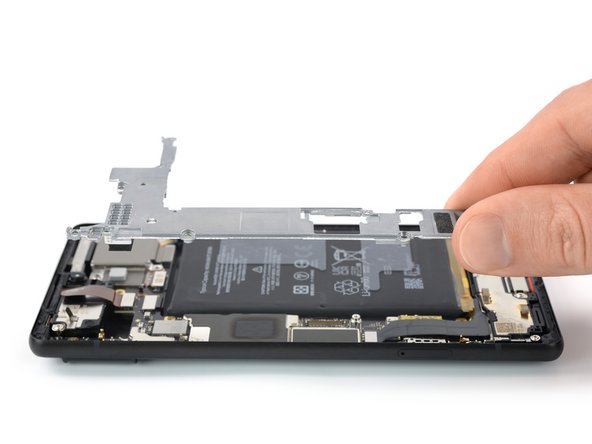
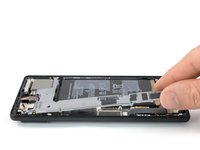
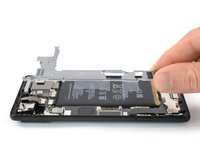
Carefully lift up the motherboard cover and remove it.
-
-
-
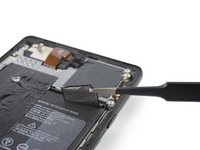
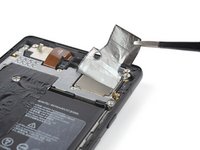
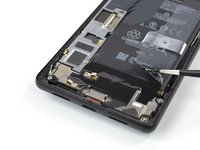
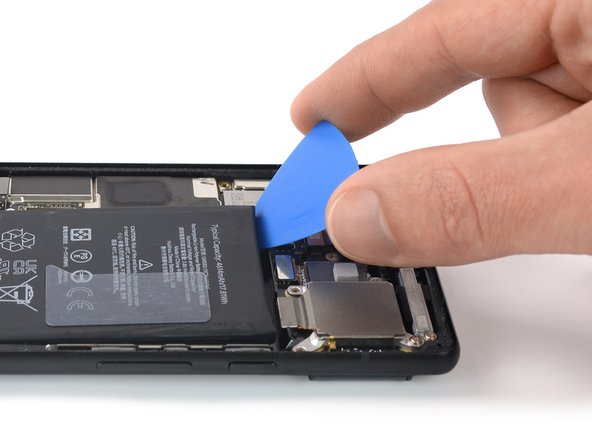
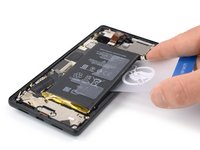
Use a spudger to disconnect the battery cable by prying the connector straight up from its socket.
I have a cable that runs over the battery that is not shown here. How to I move this when changing the battery?
-
-
-
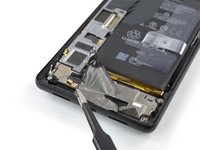
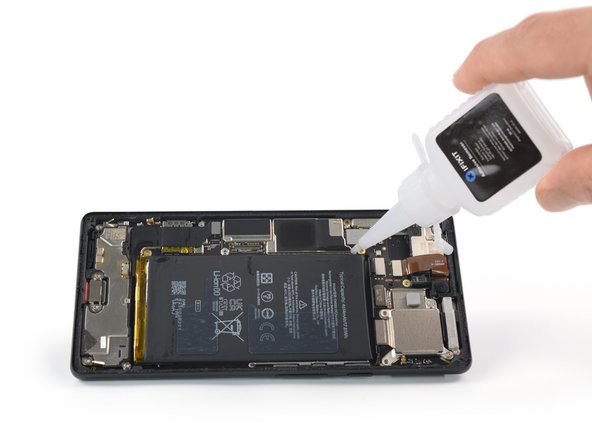
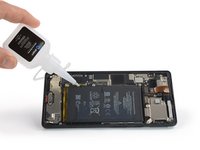
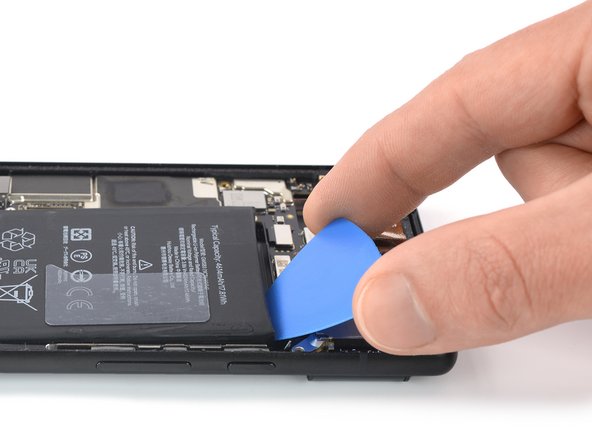
Lift your phone assembly to a ~45° angle.
-
Apply a few drops of high concentration (over 90%) isopropyl alcohol into the gap between the motherboard and the top-left and bottom-left corner of the battery.
-
-
-
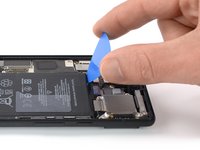
Insert an opening pick into the gap between the top edge of the battery and the motherboard.
-
Use your opening pick to pry up the battery by tilting your pick downwards and widening the gap between the battery and the motherboard to create enough space to insert a plastic card.
-
-
crwdns2935267:0crwdne2935267:0Plastic Cards$2.99
-
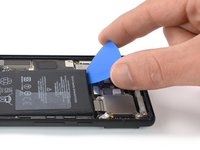
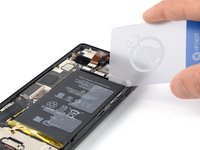
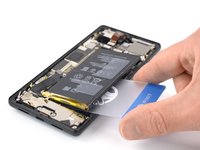
Insert a plastic card underneath the top right corner of the battery.
-
Slide the plastic card underneath the top edge of the battery to slice its adhesive and pry it up.
-
-
-
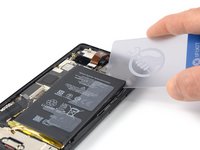
Slide the plastic card along the right edge to the bottom edge of the battery to separate it from the midframe and slice the adhesive.
-
Use your plastic card to pry up the battery.
-
-
-
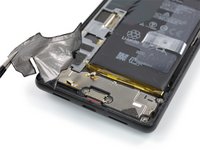
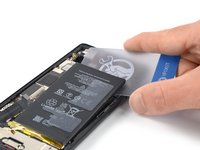
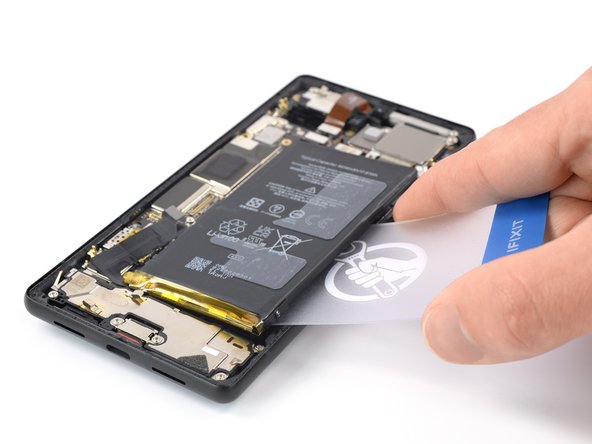
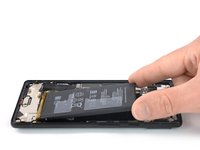
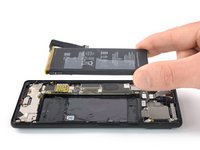
Peel the battery off the remaining adhesive.
-
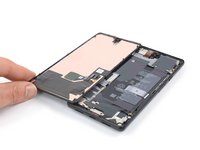
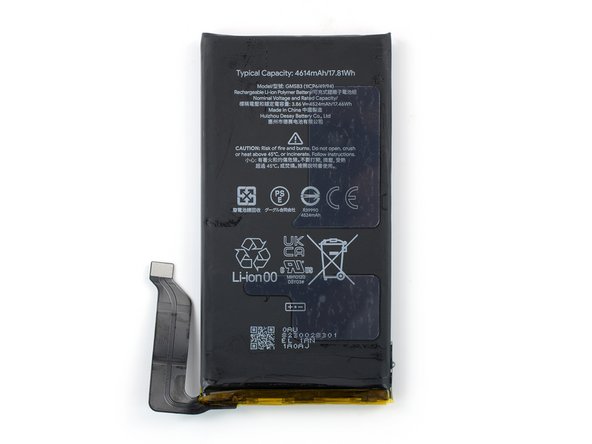
Remove the battery.
Hallo zusammen,
zunächst möchte ich mich für die Anleitung bedanken.
Allerdings habe ich ein paar Kritikpunkte, da die Anleitung meiner Meinung nach zu kurz ist, da ich mir letztendlich ein komplettes Reparaturset für den Batteriewechsel kaufe. Mir fehlen die Montageschritte und weitere Informationen. Es fehlt die Information worauf ich beim Zusammenbau Schritt für Schritt achten muss, ja ein Teil davon ist in dieser Anleitung integriert. Es fehlt aber die Information, wie alte Klebstoffreste am besten entfernt werden. Wie reinige ich die Klebeflächen optimal, um ein gutes Ergebnis zu erzielen. Wie verwende ich die mitgelieferten Schablonen zum Aufkleben der Spacer oder Graphitschichten. Müssen die Oberflächen vor dem Aufkleben der neuen Graphitschichten gereinigt werden? Welche Teile werden mitgeliefert und wofür verwende ich die mitgelieferten Materialien?
Ich finde eure Arbeit super und wichtig, damit jeder sein Handy selbst reparieren kann und Ressourcen geschont werden.
MFG
M.RebelI have followed every step until then, but the guide stops here...
It does not guide how to now mount the new battery.
I am lost with all the stickers...The guide is incomplete and I was left hanging with bunch of stickers and the battery. Why would and how would anyone post a guide for battery replacement with incomplete instructions. I should get a refund for this. Do not recommend buying from this website. Better go to store. Battery replacement there is just 10$ more. Save your time, money and phone.
Ok since it's missing the rest of the steps here is what I did:
- Clean surface of any debris, let the isopropyl dry
- Take the new battery, carefully straighten the cable
- Remove the blue protection to reveal the battery adhesive and place it where the old battery used to be
- Take the first plastic sheet with 2 pieces vaguely rectangular, remove the yellow tape holding the center plastic stripe and then using the stripe and screw holes align the sheet.
- Plug the battery connector carefully, make sure it click in place (step 21)
- Re-install the motherboard guard (step 20-19) be careful of screw size- Plug the screen and test boot, then power off and unplug screen
- See step 14, take the sheet to reinstall graphite film (align with holes)
- Don't forget the small extra pad at the bottom right, near the charging port- Apply adhesive to the contour of the case
- Plug screen, boot to make sure, if ok put the cable bracket back on (step 12 in reverse)- Close the device and apply gentle pressure on the edge
@nyt0x Thank you!!! Doing the electronics' god's work here!! Dear iFixit Team, please add this to the rest of the guide, especially about applying the adhesive to the screen and plugging in the screen again. These are super tedious details that are difficult to do correctly.
-


If possible, turn on your device and test your repair before installing new adhesive and resealing.
Compare your new replacement part to the original part—you may need to transfer remaining components or remove adhesive backings from the new part before installing.
To reassemble your device, follow these instructions in reverse order. During reassembly apply new adhesive where necessary after cleaning the relevant areas with isopropyl alcohol (>90%).
For optimal performance, calibrate your newly installed battery after completing this guide.
To run a diagnostics test with the built-in Pixel Diagnostic tool, click here.
Take your e-waste to an R2 or e-Stewards certified recycler.
Repair didn’t go as planned? Try some basic troubleshooting, or ask our Answers community for help.
crwdns2935221:0crwdne2935221:0
crwdns2935229:079crwdne2935229:0


crwdns2947412:020crwdne2947412:0
Something this guide should add is when using the card to pop the battery adhesive, keep as much to the edge in the middle as you can. The qi charger is covered in that graphite like tape and that is easily damaged. You can see that a little bit in the pictures where it was damaged.
If you have the kit, pay attention to the adhesives. The battery already has adhesive attached, the clear plastic pieces are the battery spacers (look at old battery for positioning), and the graphite tapes match the old. Be careful that the plastics already on the battery (the little tab handle thing), the spacers, and the graphite tape don't overlap.
My original battery started to expand and even lifted up the screen! I had to replace the battery urgently.
I used the genuine Google replacement parts sold through iFixit. Everything worked as expected. I can only recommend using the Pixel Phone Series due to its good repairability and the availability of replacement parts and guides through iFixit. (Availability of Custom ROMs such as GrapheneOS and others is another great bonus :) )
All in all: Magnificent guide for a great device. Thank you guys!
Great guide - than you for your effort Dominik.
My battery had swollen so it was already popping off the screen for me so getting the screen off wasn't so hard :) For me the trickiest bit was getting the battery out - the adhesive was really hard to unstick. Had to do a three or four attempts with the alcohol - take your time and it will come out, don't force it.
Good luck!
My battery had also become swollen and the top right of the screen was lifting. Used the iFixit battery replacement kit and the anti-clamp device opener. For the battery removal, I used the isopropyl alcohol, but I also used the included suction cup as a stand and had the heated iOpener on the back of the phone. I think this helped loosen the battery as well.
This guide and tools made this job really easy and not frustrating at all. Screen was undamaged and worked perfectly after the battery was replaced (I did check it before it was all screwed down/resealed).
Thanks for the great guide and kit!
As many others my battery had started to push up on my screen and swell. I've always been a fan of iFixit, but never been able to afford any of their products, however, the Pixel 6 battery replacement kit is worth the purchase, it came with all the parts and tools needed to replace the battery, I didn't need to use the iOpener as the screen was already apart and IPA helped to remove the battery, I purchased the graphite tape separately as it didnt look like it came with it, but it did, I also didn't need to use the battery spacer, as the battery came with them applied, but I dint know how to use them. great tutorial and easy to follow,
I followed this guide with the kit and for now everything seems to work flawlessly. The only thing I'd suggest is to move the adhesive cleaning rpocess (screen and frame) right after removing the old battery, as you can easily damage the graphite or find out the spudger won't fit in some places. Also in my case the battery pushed the screen out without the safety frame and I had to ask a local repairman for some glue which he did for free (thank you so much!). So if your screen is separated from the safety frame (step 6), you're going to need some adhesive (not superglue though). The battery adhesive wasn't too hard to remove with the iOpener and picks/spudger but I'd recommend you to get some adhesive remover for the frame/screen, as it's a real pain and isopropyl doesn't help too much (I used 96% and it still was a pain). Otherwise it's been delivered to me one day earlier than expected (yay!), and I really appreciate the design/packaging/entire experience. Thank you iFixit and Dominik!
Agreed, I found that the adhesive cleaning on the frame was more difficult once the motherboard shield was back in place, because it would block the (fairly wide) spudger.
I purchased the Google Pixel 6 Battery - Genuine + Fix Kit and completed the repair following this guide. The guide was clear, and well written with great pictures. It took a bit longer than expected, only because it took a while to clean off the adhesive that secures the screen down. The entire repair took me 2 hours, and this was the first phone repair I have completed. The adhesive for the screen was also a little tricky to reapply. I messed up the placement on my first attempt, and some of the adhesive at the top got stuck and curled up on itself. I pushed the adhesive that was stuck back into place with the spudger, and it seems to have worked well. I completed the last few steps of the repair hastily, and forgot to replace the display cable bracket. The phone functions as intended, and if the screen disconnects, I feel confident in my ability to open the phone up again, secure the cable, and replace the bracket if necessary. Thank you for this guide, and for access to the necessary parts.
Great guide, very thorough. No steps were missed during the disassembly. A few recommendations:
1. While you're working on removing adhesive from the phone body, heat up the iOpener and use it to help soften the adhesive on the back of the screen.
2. Use the spudger without any isopropyl or other remover to scrape as much of the adhesive off. It clings to itself and makes little balls. It makes things much cleaner when you do come back through with chemicals
3. Don't apply isopropyl to the center of the battery when removing. I put too much and it seeped down around the inductive charger. The phone battery is adhered at the upper and lower corners to flat plastic and inbetween these two plastics is where the inductive coil sits.
4. When applying the new screen adhesive, once you've placed it on the case, make sure you secure it well. My adhesive pulled off when I removed the blue protective film and I almost had a similar problem to James Miele.
if need it follow the pixel 7 guide: https://www.youtube.com/watch?v=lsz3PD8s...
Batterie seems to be a common problem i had that too. Bought a replacement battrie and repaired it. but then the diplay didnt show any picture. i am sure that the display works because there is litteraly nothing on the screen. and i am pretty sure i didnt damage anythin ist there a solution fr the problem?
Hi, i'm facing the same issue, black screen after replacing the battery. Did you manage to make it work ?
My battery became swollen so I bought the complete repair kit (parts + tools). It was my first time doing this type of fixing.
The tutorial is very clear with good pictures and easy to follow. It would be great if the tutorial also contains instructions to reassemble the device. The tutorial also doesn't mention all parts included on the kit, but, don't worry, you have all necessary stickers for reassembly.
I didn't use isopropyl alcohol, the iOpener and the plastic card are enough to remove the battery. And to glue the battery in its place, the battery comes with stickers already attached on it, so it's easier than the tutorial said.
In fact, the most complicated part is the removal of the old glue. I just scratched it with a repair tool but it's painful and not efficient. If someone has a good trick for that, it could be great.
The guide is incomplete and I was left hanging with bunch of stickers and the battery. Why would and how would anyone post a guide for battery replacement with incomplete instructions. I should get a refund for this. Do not recommend buying from this website. Better go to store. Battery replacement there is just 10$ more. Save your time, money and phone.
It's not hard to figure out where the stickers go, but you are right the instructions seem incomplete.
Nothing I found showed the best way to line up the graphite stickers and at the time the time investment was considerable. If you want a quick solution a local repair location might be best.
Musste dringend mein Akku austauschen, weil er sich schon aufgebläht hatte und mein Display anhob. Nur wollte ich nicht zum Techniker gehen und es für +100 Euro reparieren lassen, sondern dachte mir, dass man es selbst auch günstiger schaffen kann. Daraufhin habe ich dieses Tutorial entdeckt und war ebenfalls erfreut, dass man die benötigten Utensilien direkt bestellen konnte. Gesagt, Getan. Habe fürs aus- und einbauen ca. ne Stunde gebraucht. Alles Top und war überglücklich, dass ich keinen schwerwiegenden Fehler gemacht habe! Konnte ebenfalls vieles technische Wissen mitnehmen und würde jederzeit nochmal von dieser Seite gebrauch machen, wenn etwas nicht stimmt:)
Would have been nice to show us sticker and screen seal replacement/removal - I mean if your gonna put them in the kit why not add a few more tips...
The battery on my Pixel 6 had swollen and was pushing out the screen. I wanted to order just the part but did not see anything saying it included the glue, I ordered the kit since the price difference was the cost of the custom glue kit. I now have 4 iFixit repair tool sets and 2 iOpeners from previous purchases. I did need to use the iOpener to get the glue from the side that had not popped up to release the screen. The hardest part is getting glue to release the battery, even with alcohol. I wish there was another way to pop off the battery without so much worry of not bending it, The next thing that took the longest was cleaning the glue residue around the screen and the case. I found that going slowly around the case with the pointy bit of the spudger worked best, and the board bit of the spudger along the edge of the screen. I usually give myself 2x as long as recommended the complete repair and this time I went over that, but I'm very happy with the result.
It's not hard to figure out where the stickers go, but you are right the instructions seem incomplete.
Nothing I found showed the best way to line up the graphite stickers and at the time the time investment was considerable. If you want a quick solution a local repair location might be best.
Those who say the guide stopped short lol, its easy just work backwards insert the new battery by peeling the stickers off the new battery, I found plugging in the battery first then sticking it down allowed me to get the perfect fit and then just follow the guide in reverse by installing the mainboard cover screwing it back down then install the screen (at this point I would recommend you power on the phone to make sure everything works and power it back down once you confirm this) then reinstall the screen protector bracket. If you have one apply your replacement double sided tape that goes around the edge of the phone and allows your phone to screen to stick back in place if not you can buy screen glue and use that instead (this is what I used) stick the screen back down and you are done (if you used glue allow 8-24 hours for it to fully dry depending on product used). Easy no brain required reassembly.
If I cannot use my screen, how do I power it off?
Craig Joseph Van Vliet - crwdns2934203:0crwdne2934203:0
I was thinking the same. Could let the battery run down.
Jack Adrian Zappa - crwdns2934203:0crwdne2934203:0
You can turn the Smartphone off via the boot menue. Push the on/off-button plus the volume up button at the same time. Once the smartphones goes off to restart, hold the volume down button. The smartphone will boot and you can select between recovery mode and other options. You will find the option turn off, which you can select then with the buttons on the side.
Jonas R. - crwdns2934203:0crwdne2934203:0
This is only helpful if you can read your screen. I have a black screen and over 60% battery. It will take days to drain the battery. I need to power it off.
William Maine -