crwdns2915892:0crwdne2915892:0
iPhone batteries are rated to hold 80% of their capacity for up to 500 charge cycles, which lasts roughly 18-24 months for most users. After that, your iPhone may need to be charged far more frequently, and iOS may warn you that performance is affected (in other words, your phone will run slower). Use this guide to replace your battery and restore your iPhone to like-new performance.
If your battery is swollen, take appropriate precautions.
Note: On iOS 17.6 and earlier, your iPhone may display a warning about the “genuineness” of the battery after the repair, even when using original Apple parts. If your iPhone functions normally, you can safely ignore the warning. On iOS 18 and newer, authenticate your new battery using Apple's Repair Assistant.
For optimal performance, after completing this guide, calibrate your newly installed battery: Charge it to 100% and keep charging it for at least two more hours. Then use your iPhone until it shuts off due to low battery. Finally, charge it uninterrupted to 100%.
crwdns2942213:0crwdne2942213:0
-
-
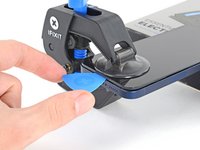
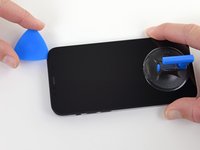
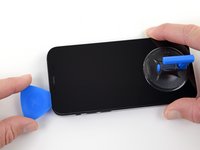
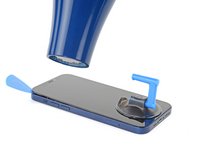
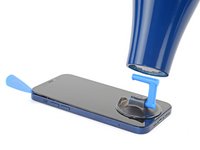
Insert a SIM card eject tool or a paperclip into the small hole in the SIM card tray, located on the volume button edge of the iPhone.
-
Press firmly to eject the tray.
-
-
-
Remove the SIM card tray from the iPhone.
-
-
-
Power off your iPhone before beginning disassembly.
-
Remove the two 6.75 mm long pentalobe P2 screws at the bottom edge of the iPhone.
Please explain how to power off the phone when the broken screen is not responding to touch.
-
-
-
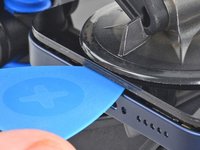
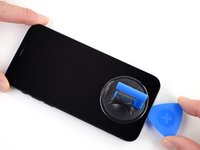
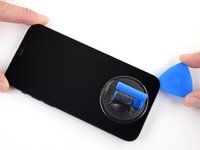
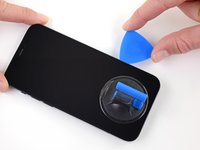
Measure 3 mm from the tip and mark the opening pick with a permanent marker.
Got to step 2 and realized the fix kit doesn't include an opening pick! Looks like a guitar pick, and I have those lying around. Is that expected? Looks like the pick is used in many steps below. There's a little blue crowbar that isn't mentioned in the instructions. Perhaps that replaces the opening pick?
Hi! I can't see which guide you were using when writing this comment. Can you reply here with which guide and fix kit you used?
I see you posted this in Meta. I hope it's resolved soon! In the meantime, a guitar pick may work well enough for your repair.
what fix kit?
My fix kit didn't include an opening pick either
Make sure you check inside the black boxes after emptying them. My pick was stuck inside one of the boxes.
My AliExpress refurbished screen came with a pick that has a coin-like circle that pops out, so no modification was necessary
the picture shows 3 cm but the description says 3 mm's. Which one is it?
That is a misunderstanding. It is a ruler with a scale for cm, it shows 0.3 cm, i.e. 3 mm.
VauWeh -
Oh, come ON!
Big Ed -
It will ALWAYS be millimeters on a phone, but this step is ridiculous, skip it!
@leifdewolf I wouldn't skip it for a first repair.
It's not an Ifixit KIT if it doesn't include everything. You'll need to order the opening pic separately. Or head to Walmart like myself and look for guitar pics. Hopefully, this will work just as well.
No pick in mine as well. It’s really not clear that you have to order this separately when ordering an IPhone SE 202/2022 screen repair kit. Is this the case?
Frustrated, I ordered a compact package where everything was encapsulated. Useless suction tools could not separate the screen. If it is unable to decouple the screen, then why sucking suction tools you have provided.
For my kit the triangle pick was stuck inside the box with the screen not with the other tools maybe it's also there for you
Y’all are getting far, FAR too detailed with some of this stuff…. Measuring and marking the pick that you won’t actually use to open the device?!? lol that’s kinda funny. Just heat it up, grab a spudger, and the back just pops right off! The iFixit tech need to stick to the KISS method more often, you know KEEP IT SIMPLE STUPID!!! Like l, for reals, I’ve been doing this stuff for YEARS and using iFixit guides regularly and this is just ridiculous at this point!
Will the phone still work if the sensor assembly on the back of the screen is damaged?
I don't have a pick, but how much better are these picks than an old credit card for opening an iPhone 13 mini?
The pick in my iFixIt kit was packed with the battery, not with the rest of the toolkit.
-
-
-
Lay overlapping strips of clear packing tape over the iPhone's screen until the whole face is covered.
-
If you can't get the suction cup to stick in the next few steps, fold a strong piece of tape (such as duct tape) into a handle and lift the screen with that instead.
-
-
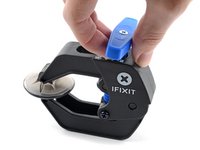
crwdns2935267:0crwdne2935267:0Clampy - Anti-Clamp$24.95
-
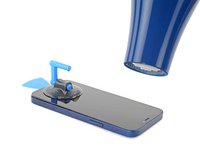
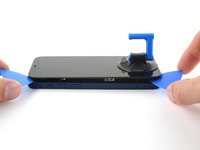
Pull the blue handle backwards to unlock the Anti-Clamp's arms.
-
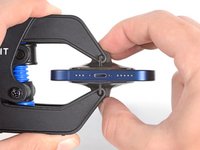
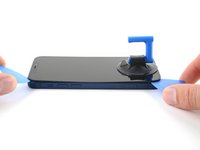
Slide the arms over either the left or right edge of your iPhone.
-
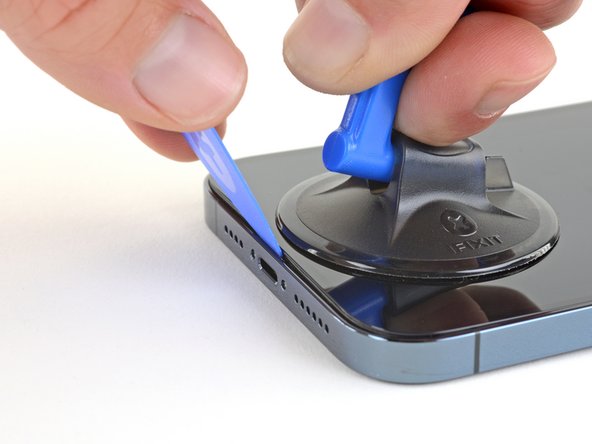
Position the suction cups near the bottom edge of the iPhone—one on the front, and one on the back.
-
Squeeze the cups together to apply suction to the desired area.
-
-
-
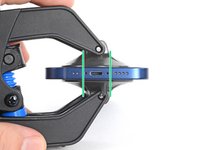
Pull the blue handle forwards to lock the arms.
-
Turn the handle clockwise 360 degrees or until the cups start to stretch.
-
Make sure the suction cups remain aligned with each other. If they begin to slip out of alignment, loosen the suction cups slightly and realign the arms.
-
-
-
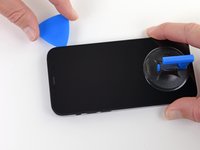
Support your iPhone on something sturdy such as a hardcover book so it rests hands-free and parallel to the ground; this makes it easier to work with in the following steps.
-
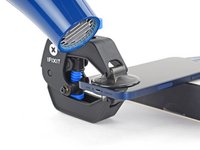
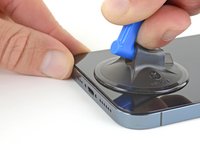
Use a hair dryer to heat along the bottom edge of the iPhone. The screen should feel slightly too hot to touch.
-
Wait one minute to give the adhesive a chance to release and present an opening gap.
-
Insert an opening pick under the plastic screen bezel when the Anti-Clamp creates a large enough gap.
-
Skip the next three steps.
-
-
-
Use a hair dryer or a heat gun to heat the bottom edge of the iPhone for 90 seconds or until the screen is slightly too hot to touch.
-
-
-
If you're using a single suction handle, apply it to the bottom edge of the phone, while avoiding the very edge of the glass.
-
-
-
Pull up on the suction cup with firm, constant pressure to create a slight gap between the screen and the frame.
-
Insert an opening pick at a steep angle into the gap.
If you have the small single suction cup. You have to get glass up enough to get under glass and touch sensor. I inserted pick too soon and separated glass from screen. $200 mistake. ;) Worth buying suction vise tool to get screen high enough. I would try it again after this mistake. with that vise tool.
I made the same mistake. I inserted pick too soon. The glass was detached from the frame and the display died. I should have read this before I worked on it.
-
-
-
Use a hair dryer to heat the right edge of the iPhone (the edge with the power button) for 90 seconds or until the screen is slightly too hot to touch.
-
-
-
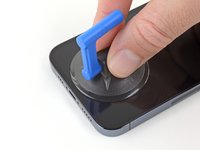
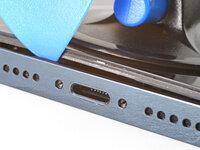
Slide the opening pick around the bottom right corner of the iPhone to separate its adhesive.
-
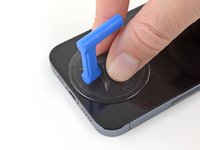
Continue sliding up the right edge of the iPhone until you reach the top right corner.
-
Leave the pick in the top right corner before continuing.
-
-
-
Use a hair dryer to heat the top edge of the iPhone for 90 seconds or until the screen is slightly too hot to touch.
-
-
-
Slide the opening pick around the top right corner of the iPhone to separate the top adhesive.
-
Leave the pick in the top left corner before continuing.
-
-
-
Use a hair dryer to heat the left edge of the iPhone for 90 seconds or until the screen is slightly too hot to touch.
-
-
On the iPhone 12 Pro max the ear and proximity sensor cable on the top is the one to avoid cutting. The display cables are set further in than 3mm so don't worry about the sides too much. It's the ear piece part for the face ID that is most at risk. Yes I damaged it and new part now doesn't allow face I'd to work.
-
-
-
Insert a second opening pick in the bottom left corner of the iPhone.
-
Twist both picks simultaneously until the left edge clips release.
-
-
-
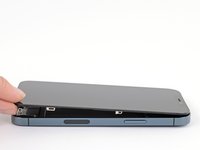
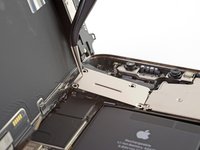
Rotate your iPhone so the right edge faces you.
-
Open the iPhone by swinging the display up from the right side, like the front cover of a book.
-
Lean the display against something to keep it propped up while you're working on the phone.
-
-
crwdns2935267:0crwdne2935267:0Magnetic Project Mat$19.95
-
Remove two 1.1 mm long Y000 screws securing the battery and display connector cover.
-
-
-
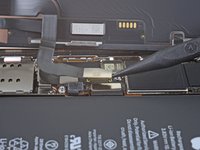
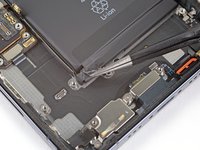
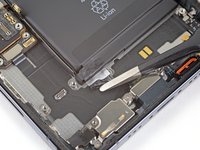
Use a spudger or a clean fingernail to pry the battery connector up from its socket on the logic board.
-
Bend the connector slightly away from the logic board to prevent it from accidentally making contact with the socket and providing power to the phone during your repair.
-
-
-
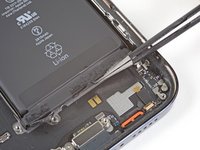
Use a spudger or a fingernail to disconnect the display cable connector.
-
-
-
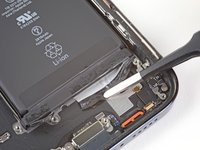
Use a spudger or a fingernail to disconnect the digitizer cable connector.
-
-
-
Use a Y000 driver to remove four screws securing the front sensor connector cover.
-
Three 1.1 mm-long screws
-
One 1.4 mm-long screw
-
-
-
Swing the cover up from the left until the small clip on the right unhooks.
-
Remove the cover.
-
-
-
Use a spudger or a fingernail to disconnect the front sensor assembly cable connector.
-
-
-
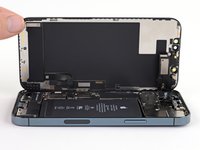
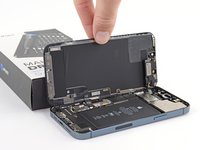
Remove the display assembly.
-
-
-
Use a Phillips driver to remove the four 1.6 mm screws securing the loudspeaker.
-
-
-
Remove the loudspeaker.
-
-
-
Use a Y000 driver to remove the two 1.4 mm long screws securing the SIM card reader connector cover.
removing the loudspeaker gives you room to pull the sticky tape but i've found steps 31-40 unncessary as they are on the side away from the battery. i would skip to step 40.
-
-
-
Remove the SIM card reader cable connector cover.
-
-
-
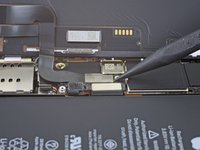
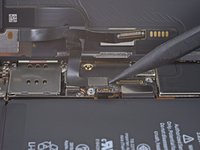
Use the point of a spudger to pry the SIM card reader cable connector straight up and out of its socket on the logic board.
-
-
-
Use a Y000 driver to remove the three screws securing the SIM card reader.
-
Two 1.4 mm screws
-
One 1.1 mm screw
-
-
-
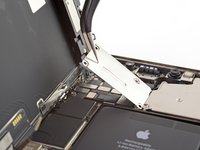
Remove the Taptic Engine cable connector bracket.
-
-
crwdns2935267:0crwdne2935267:0Standoff Screwdriver for iPhones$5.49
-
Use a standoff or a small flathead driver to remove the 2.82 mm long standoff screw securing the SIM card reader.
-
-
-
Remove the SIM card reader.
-
-
-
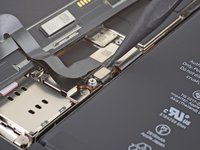
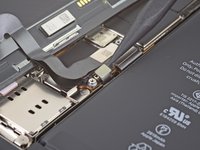
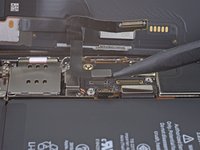
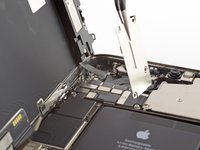
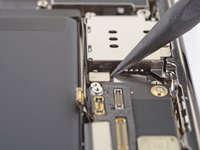
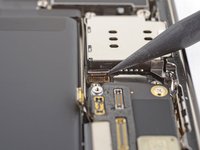
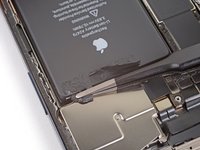
Use the point of a spudger to pry the Taptic Engine cable connector straight up and out of its socket on the logic board.
-
-
-
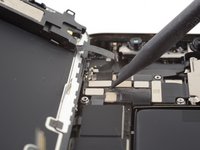
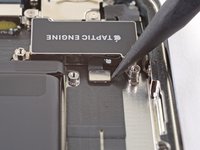
Remove the three screws securing the Taptic Engine.
-
Two 2.8 mm long standoff screws
-
One 1.8 mm Phillips screw
-
-
-
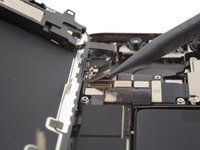
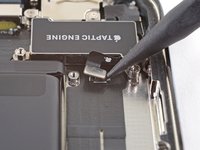
Remove the Taptic Engine.
-
-
-
Each piece of adhesive has a black pull-tab at the end, which is lightly adhered to the edge of the battery.
-
-
-
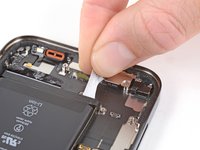
Peel down the first battery adhesive pull-tab to un-stick it from the bottom edge of the battery.
-
-
-
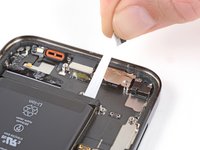
Peel down the second battery adhesive pull-tab to un-stick it from the bottom edge of the battery.
-
-
crwdns2935267:0crwdne2935267:0Tweezers$4.99
-
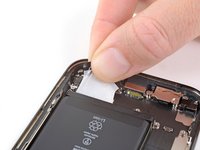
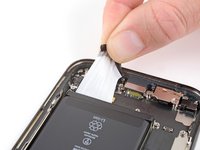
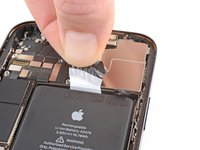
Grab the first pull-tab with your fingers and slowly pull it away from the battery, toward the bottom of the iPhone.
-
Pull hard enough to maintain tension on the strip, but don't force it. Give it plenty of time to stretch and un-stick from under the battery.
-
Don't press down on the battery. Hold the iPhone firmly by its sides.
-
Keep the strip flat and unwrinkled. Try to pull evenly on the whole strip, rather than pulling mainly in the middle or on one side.
-
Pull at a low angle so the strip doesn't snag on the edge of the battery.
-
If the adhesive strip breaks off, try to retrieve it using your fingers or blunt tweezers, and continue pulling—but do not pry under the battery.
-
-
-
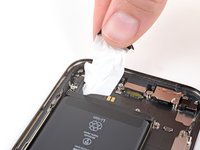
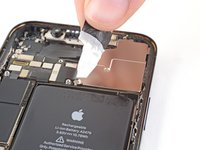
Grab the second pull-tab with your fingers and pull it away from the battery, toward the bottom of the iPhone.
-
Follow the same procedure as with the previous strip: don't press down on the battery, keep the strip flat and unwrinkled, and pull at a low angle.
-
If the adhesive strip breaks off, try to retrieve it using your fingers or blunt tweezers, and continue pulling—but do not pry under the battery.
-
-
-
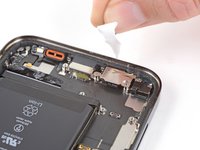
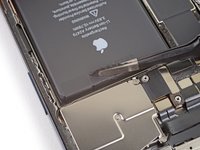
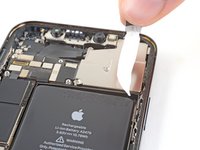
Peel up the two remaining battery adhesive pull-tabs to un-stick them from the top edge of the battery.
-
-
-
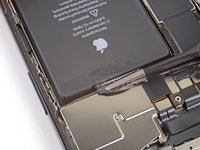
Using the same procedure as before, pull the remaining two tabs, one at a time, to stretch and remove the remaining adhesive strip holding the battery in place. Try not to snag the adhesive on anything.
-
If you removed all the adhesive strips successfully, skip the next step.
-
Otherwise, continue with the next step below.
-
-
-
If you're still having trouble removing the battery, apply a few drops of high concentration (over 90%) isopropyl alcohol under the edge of the battery in the area of the broken adhesive strip(s).
-
Wait about one minute for the alcohol solution to weaken the adhesive.
-
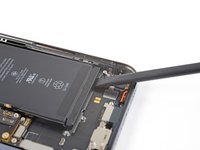
Use an opening pick or the flat end of a spudger to gently lift the battery.
-
-
-
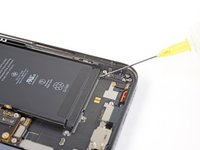
Remove the battery.
-
If there's any alcohol solution remaining in the phone, carefully wipe it off or allow it to air dry before installing your new battery.
-


Compare your new replacement part to the original part—you may need to transfer remaining components or remove adhesive backings from the new part before installing.
To reassemble your device, follow the above steps in reverse order.
After your repair, depending on the replacement part, you may be able to calibrate it using Apple's Repair Assistant, available as of iOS 18. Update your device, navigate to Settings → General →About → Parts & Service History, tap Restart & Finish Repair, and follow the onscreen prompts.
Take your e-waste to an R2 or e-Stewards certified recycler.
Repair didn’t go as planned? Try some basic troubleshooting, or ask our iPhone 12 Pro Answers community for help.
crwdns2935221:0crwdne2935221:0
crwdns2935229:048crwdne2935229:0

crwdns2947412:020crwdne2947412:0
Thanks this is incredibly detailed.
Hello! Do you really need to take away the Taptic Engine and so many parts just to replace the battery?
nope, steps 31-40 are not necessary
AEV -
Everything went fine with the iFixit battery but now I have to deal with an "Important Battery Message" which I can't delete, and the badge number over the settings icon.
That is why we need to force apple to remove serial pairing
Apple has a diagnostic mode that allows for a proper reconfiguration.
DIAGNOSTIC MODE
Turn off phone
Hold both volume buttons while plugging the phone into power.
Release buttons when you see apple logo.
Follow on-screen instructions.
Is this still an issue? Is it likely that my iPhone 12 Pro will display that message if I change the battery or has there been a software update to resolves this issue?
Fred -
That is why we need to force apple to remove serial pairing to logic board
Step 3 references "waterproof seals" around the display which need to be replaced. But there is no description of this procedure, or depiction of what the seals look like. Nor are there any "waterproof seals" available for purchase.
The battery replacement kit includes an adhesive ring for the screen--is this the same thing? Even so there is no procedure shown for how to replace it. I imagine this requires very careful alignment so it would be helpful to have some guidance to make sure it is done correctly.
Please update the instructions to include how to replace the waterproof seals, to make it clear that it is, or is not, the same thing as the screen adhesive, and how to install the adhesive.
Good morning, yesterday i replaced my battery with this instruction. It was late and I reinstalled the screen without ne Sealing.
Yes the black adhesive Ring is the sealing for the phone.
My Question to the people who does often this replacement: Is it nessesary to replace the sealing? - Or will the old sealing also be clueing all together again?
What long-term experience do you have?
Having completed the repair, everything seems to work great other than my phone's battery is constantly showing 1% as the battery level. Has anyone else had this problem?
Removing the loudspeaker gives you room to pull the adhesive but steps 31-40 are unnecessary as they are on the side away from the battery.
Caution regarding the waterproof seals, as they could potentially harm the plastic inserts surrounding the display, leaving the screen vulnerable without its protective plastic casing. To mitigate this risk, it's advisable to apply heat to the left portion of the iPhone where the flex cables are located to soften the seals.
Pretty major omission that there is a foil layer and a thin plastic layer between the screen and the electronics. Phone ruined.
Don't use these instructions! Just send it in
What am I supposed to do in this situation?
I had an iPhone 12 Pro to repair (battery change), when I heated up the phone & used a suction cup to get the screen off, the screen separated from the frame (breaking the screen) & the frame was stuck in the phone (like the frame can be if you forget to remove the penta-screws in the beginning, but I had removed those).
It seams like the adhesive between the frame & phone was stronger than the adhesive between the frame and screen, or it was lodged somehow, so the "weakest link" broke.
Is there a way to prevent this?
Or stop it from becoming a severe problem if detected in time?
Thanks!
These instructions are substantially incorrect or incomplete. Apple offers official instructions which importantly include complete instructions for reassembly and resealing the display. I suggest using the Apple instructions on their site.
These ifixit instructions improperly have you remove more than is needed, and offers no advice for resealing.
ALSO: for the comments on the “battery warning” Apple has a diagnostic mode that allows for a proper reconfiguration.
DIAGNOSTIC MODE
Turn off phone
Hold both volume buttons while plugging the phone into power.
Release buttons when you see apple logo.
Follow on-screen instructions.
Please, you can write the link?
I can find this, but don't the official instructions for reassemble and resealing the display.
https://support.apple.com/en-us/101944
Thank You
Be warned. I replaced the battery in my Iphone 12 Pro following this guide and now Face ID no longer works. I must have damaged a cable around the top cameras whilst operating the repair. Now can no longer use Face ID. Battery tabs also broke instantly when I tried to remove so make sure you have Isopropanol Alcohol as a backup method.
Based on my hands-on experience, the steps of removing Tapic Engine, speakers, etc. can be skipped by dripping a few drops of surgical spirit into the adhesive battery tape to dissolve the tape for a less troublesome removal of the battery.
A) It does seem that some of the piece removals to the left of the battery are not necessary based on Apple's own guide but it's not a major issue but B) no matter what I've tried, the battery (and screen) I installed on my GF's iPhone 12 Pro are being recognized by the phone. There's no option to "restart and repair" in the Settings app, and even throwing the phone into Diagnostic Mode doesn't help. Both are recognized as not working 'correctly' but the repair process does nothing to help. I know this is an Apple issue more than iFixit, but it's still annoying that it seems like the phone will never accurately report on battery info (and the screen might be hamstrung too). Anyway, seems like iFixit should provide a little more detail on this as being a potential issue because at the moment, it looks like something you just have to live with on the newer phones. Doesn't make me feel good about doing my 14 Pro at some point in the future.
What is below the Taptic Engine with the two prongs?
Kgraves - crwdns2934203:0crwdne2934203:0