
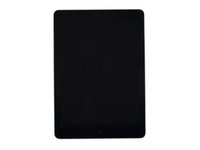
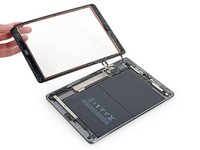
iPad Air Wi-Fi Front Panel Assembly Replacement

crwdns2944107:0crwdnd2944107:0Sam Goldheartcrwdnd2944107:0crwdnd2944107:0crwdnd2944107:012crwdnd2944107:0crwdne2944107:0
crwdns2944111:0Nhl 25, 2025crwdne2944111:0
crwdns2915892:0crwdne2915892:0
crwdns2942287:0crwdne2942287:0Use this guide to replace the front glass and digitizer assembly on an iPad Air.
Be very careful when you isolate the battery using a battery blocker. The battery contacts are easily damaged, resulting in irreversible damage. If you choose to complete the guide without isolating the battery, avoid using metal tools except when completely necessary (like when removing screws) to prevent shorting the battery and damaging sensitive circuit components.
crwdns2942213:0crwdne2942213:0
crwdns2942269:0crwdne2942269:0
crwdns2942337:0crwdne2942337:0

crwdns2943213:0crwdne2943213:0


crwdns2943215:0crwdne2943215:0


crwdns2944105:0crwdne2944105:0

-
-
Place the iOpener in the center of the microwave.
-
-
-
Heat the iOpener for thirty seconds.
-
Throughout the repair procedure, as the iOpener cools, reheat it in the microwave for an additional thirty seconds at a time.
-
-
-
Remove the iOpener from the microwave, holding it by one of the two flat ends to avoid the hot center.
-
-
-
Fill a pot or pan with enough water to fully submerge an iOpener.
-
Heat the water to a boil. Turn off the heat.
-
Place an iOpener into the hot water for 2-3 minutes. Make sure the iOpener is fully submerged in the water.
-
Use tongs to extract the heated iOpener from the hot water.
-
Thoroughly dry the iOpener with a towel.
-
Your iOpener is ready for use! If you need to reheat the iOpener, heat the water to a boil, turn off the heat, and place the iOpener in the water for 2-3 minutes.
-
-
-
If your display glass is cracked, keep further breakage contained and prevent bodily harm during your repair by taping the glass.
-
Lay overlapping strips of clear packing tape over the iPad's display until the whole face is covered.
-
Do your best to follow the rest of the guide as described. However, once the glass is broken, it will likely continue to crack as you work, and you may need to use a metal prying tool to scoop the glass out.
-
-
-
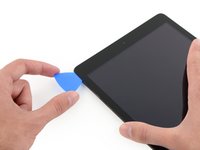
Handling it by the tag, place the heated iOpener on the side of the iPad to the left of the home button assembly.
-
Let the iOpener sit for at least a minute to soften the adhesive beneath the glass.
-
-
-
As you follow the directions, take special care to avoid prying in the following areas:
-
Front-facing camera
-
Antennas
-
Display cables
-
-
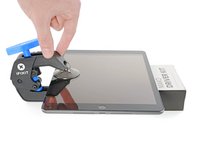
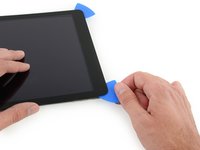
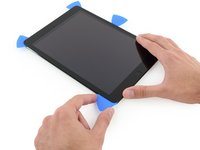
crwdns2935267:0crwdne2935267:0Clampy - Anti-Clamp$24.95
-
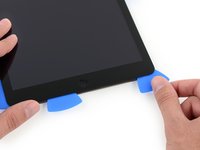
Pull the blue handle backwards to unlock the Anti-Clamp's arms.
-
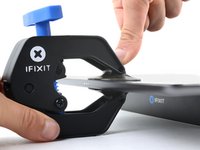
Place an object under your iPad so it rests level between the suction cups.
-
Position the suction cups near the middle of the left edge—one on the top, and one on the bottom.
-
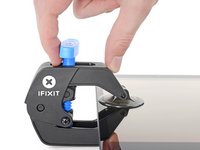
Hold the bottom of the Anti-Clamp steady and firmly press down on the top cup to apply suction.
-
-
-
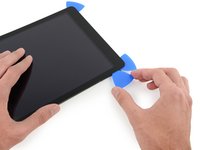
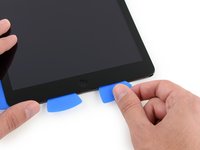
Pull the blue handle forward to lock the arms.
-
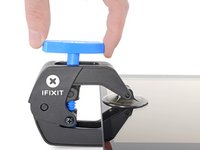
Turn the handle clockwise 360 degrees or until the cups start to stretch.
-
Make sure the suction cups remain aligned with each other. If they begin to slip out of alignment, loosen the suction cups slightly and realign the arms.
-
-
-
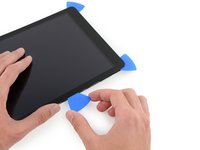
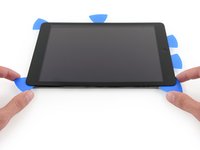
Wait one minute to give the adhesive a chance to release and present an opening gap.
-
If your screen isn't getting hot enough, you can use a hair dryer to heat along the left edge of the iPad.
-
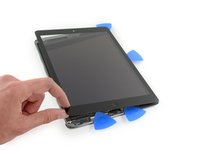
Insert an opening pick under the screen when the Anti-Clamp creates a large enough gap.
-
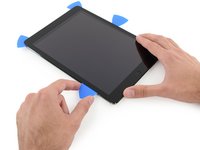
Skip the next two steps.
-
-
-
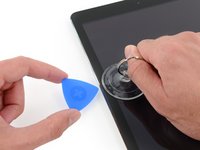
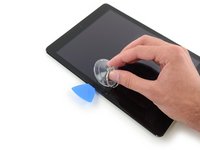
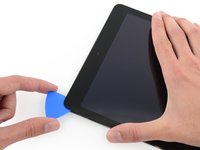
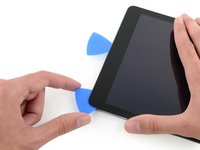
Carefully place a suction cup halfway up the heated side.
-
Be sure the cup is completely flat on the screen to get a tight seal.
-
While holding the iPad down with one hand, pull up on the suction cup to slightly separate the front panel glass from from the rear case.
-
-
-
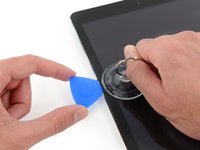
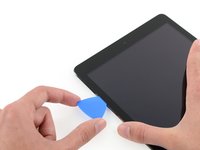
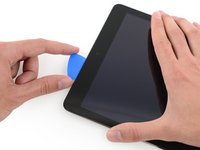
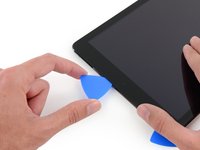
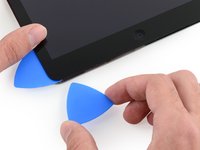
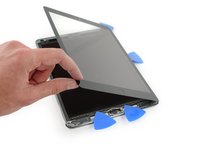
Place an opening pick in the gap opened by the suction cup.
-
Pull the suction cup's plastic nub to release the vacuum seal and remove the suction cup from the display assembly.
-
-
-
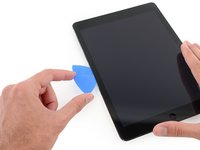
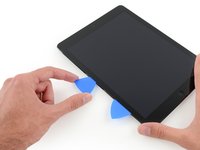
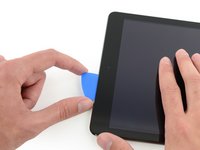
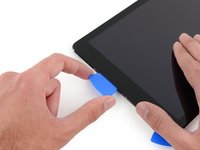
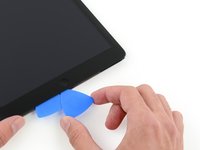
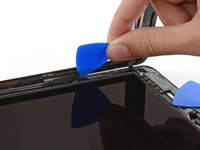
Place a second opening pick alongside the first and slide the pick down along the edge of the iPad, releasing the adhesive as you go.
-
-
-
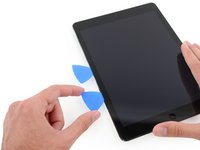
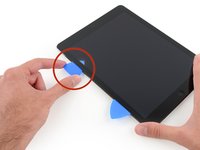
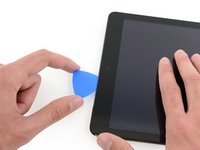
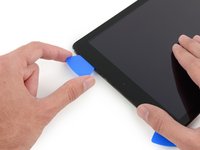
Continue moving the opening pick down the side of the display to release the adhesive.
-
If the opening pick gets stuck in the adhesive, "roll" the pick along the side of the iPad, continuing to release the adhesive.
-
-
-
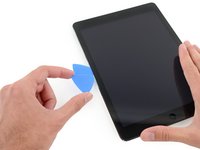
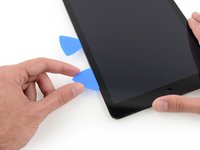
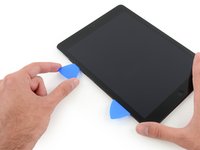
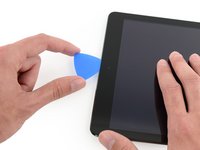
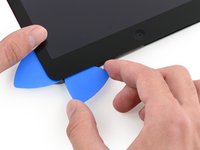
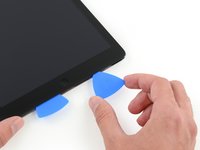
Take the first pick you inserted and slide it up toward the top corner of the iPad.
-
If you can see the tip of the opening pick through the front glass, don't panic—just pull the pick out just a little bit. Most likely, everything will be fine, but try to avoid this as it may deposit adhesive on the front of the LCD that is difficult to clean off.
-
-
-
Reheat the iOpener and place it on the top edge of the iPad, over the front-facing camera.
-
-
-
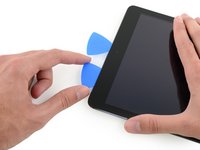
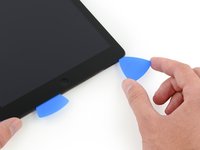
Slide the opening pick around the top left corner of the iPad to separate the adhesive.
-
-
-
Slide the opening pick along the top edge of the iPad, stopping just before you reach the camera.
-
-
-
Pull the pick out slightly, and slide the very tip gently along the top of the front-facing camera section of the top edge.
-
-
-
Leave the opening pick in the iPad slightly past the front-facing camera.
-
Take a second pick and insert it to the left of the camera, and then slide it to the corner of the iPad to finish cutting the adhesive on that edge.
-
-
-
Insert the previous pick deeper into the iPad and slide it away from the camera toward the corner.
-
-
-
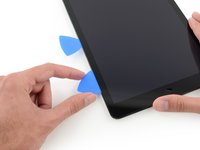
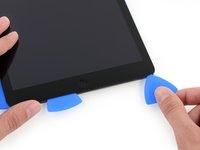
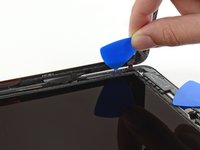
Leave the three picks in the corners of the iPad to prevent re-adhering of the front panel adhesive.
-
Reheat the iOpener and place it on the remaining side of the iPad—along the volume and lock buttons.
-
-
-
Slide the opening pick around the top right corner of the iPad, releasing the adhesive there.
-
-
-
Insert a new opening pick and slide it to the middle of the right edge of the iPad, releasing the adhesive as you go.
-
-
-
Leave the opening picks in place, and set the reheated iOpener on the home button end of the iPad.
-
-
-
Slide the lower left pick to the lower left corner to cut the adhesive on that corner.
-
Leave the pick at the corner. Do not pry any farther, and do not remove the pick from the iPad.
-
The following steps will direct you where to pry to avoid damage to these components. Only apply heat and pry where directed.
-
-
-
With a new pick, slice gently over the left-hand antenna, stopping before the home button.
-
Leave the pick in place before moving on.
-
-
-
Take a new pick and slip it in to the right of the previous pick.
-
Slide across the home button and right-hand antenna using only the very tip to remove the adhesive.
-
-
-
With the adhesive loosened, you can now insert the pick near the right-hand corner. Slide the pick to the left, and stop just short of the Home button.
-
-
-
Reheat and reapply the iOpener to the volume control side of the iPad.
-
-
-
On the side of the iPad opposite the volume controls, you should have a pick lodged into each corner. Twist the picks to lift the glass slightly, separating the last of the adhesive along the display cable edge.
-
-
-
Lift slowly and gently to further detach the adhesive along the display cable edge.
-
-
-
While supporting the front panel glass, use an opening pick to cut the last of the adhesive.
-
-
-
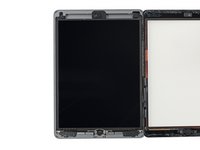
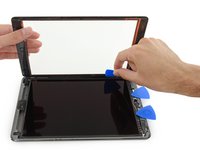
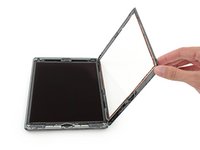
Once all of the adhesive has been separated, open the glass panel like a page in a book and rest it on your workspace.
-
-
-
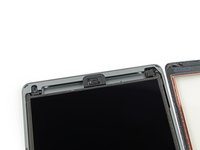
Remove any tape obscuring the LCD screws.
-
-
-
Remove the following Phillips screws securing the LCD.
-
Three 4.0 mm screws
-
One 4.8 mm screw
-
-
-
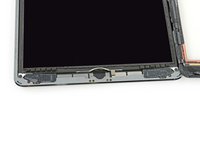
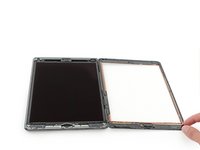
Use the flat end of a spudger to pry the LCD out of its recess just enough to grab it with your fingers.
-
Flip the iPad LCD like a page in a book, lifting near the camera and turning it over the home button end of the rear case.
-
Lay the LCD on its face to allow access to the display cables.
-
-
crwdns2935267:0crwdne2935267:0Battery Blocker$3.99
-
Remove the single 2.3 mm Phillips screw securing the battery connector to the logic board.
-
Slide the battery blocker underneath the battery connector area of the logic board, and leave it in place while you work.
-
-
-
Remove the three 1.4 mm Phillips screws from the display cable bracket.
-
-
-
Use the flat end of a spudger to gently pry the display cable bracket straight up from the logic board.
-
-
-
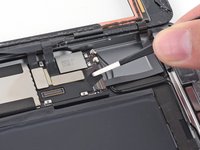
Remove any tape covering the home button ribbon cable connector.
-
-
-
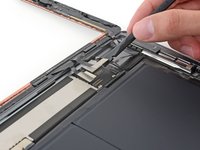
Use the flat end of a spudger to flip the tab on the home button ribbon cable ZIF connector upward.
-
Carefully pull the home button ribbon cable horizontally out of the ZIF connector.
-
-
-
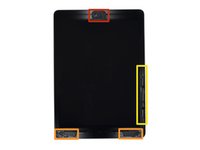
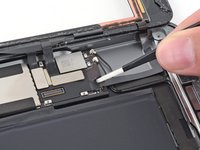
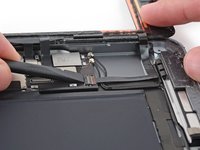
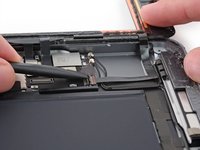
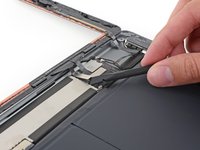
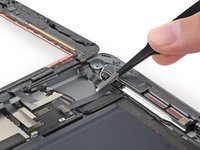
Use a the flat end of a spudger or a fingernail to carefully pop the two digitizer cable connectors straight up from their sockets.
-
-
-
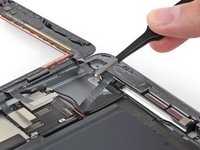
Carefully peel the home button ribbon cable up off of the adhesive holding it to the rear case.
-
-
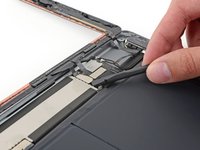
crwdns2935267:0crwdne2935267:0Polyimide Tape$9.99
-
Remove the front panel assembly.
-
If you experience "ghost" or "phantom" touch input issues with your new display, this can be resolved by adding a layer of very thin insulating tape, such as Kapton (polyimide) tape, to the highlighted areas on the back of the panel. iFixit panels come with the proper insulation, and should not require the addition of any tape.
-


To reassemble your device, follow these instructions in reverse order.
crwdns2935221:0crwdne2935221:0
crwdns2935229:0633crwdne2935229:0
crwdns2947821:0crwdne2947821:0
crwdns2947823:0crwdne2947823:0


crwdns2947412:089crwdne2947412:0
Actually, I didnt remove the crashed front panel(the old one) as this guide. The edge of front panel didnt stick so much with the cover case, so I use force to tear off the crumbled edge. Be prepared for the "dust of glass", it will really hurt your body, if you plan to do as my way.
Additionally, there is another difficulty part of me. When I stick the new panel on. There is always some small dust between the screen and the front panel.
Great guide, a lot harder with a cracked screen due to no flat surfaces for suction cup but eventually got it off, thanks
How to put it back? LCD + digitizer do not want to "cooperate" in ribbons area
Use the spudger to gently push or pull them into the slot. That's what I did. It's charging now so I don't know if it works yet or not
Assembled back with a new digitizer. Powered on.
1. Screen keeps to be black, no image. Put on a charger, iPad makes "boing" sound very quite every 10 seconds or so. Plugged it into a Macbook Air, iPad show up in iTunes and iFoto, all data can be accessed.
2. Suddenly, after few minutes connected to the Macbook Air, iPad boot screen appears on iPad and device boots-up.
3. Now, input is very sporadic and unreliable. Device keeps selecting items on its own and starting apps on its own, doesn't react reliably to user input. Seems as if the digitizer or its connection is damaged. Hard to tell, everything went ok, only problem was the removal of the old adhesive to have a plain surface for the new one.
As is, this is a failure, device does not work as expected. Data is safe though.
Seems to be the same problem talked about here at step 39 (don't know why under 39 this is why I didn't see it in the first place.
The guide does tell you to put a narrow piece of tape at the bottom left and right from the home button. I will try this now and hope it helps. I guess it is this problem since the digitizer works perfectly once detached from the screen. A picture of this would be very helpful since it is not clear, how far this tape should go. I will try a complete cover of this area but the downside is, that there will be some space that may hinder the adhesive. I'll see.
I covered the whole bottom copper with tape, digitizer still glues on the frame and... everything is shiny and works as expected. Hence don't forget this tape. Glad I reopened the device, first I was reluctant and wanted to call it a failure, now I have a working iPad again.
Marc -
Now I did some 6h of testing, digitizer works good, only thing that happens now is that the magnetic cover does wake up the iPad when opened and let it sleep when closed, so that is ok but now it also sleeps the device if you open the cover (device wake up) and wrap it 180 degrees around the iPad (as is one of the resting positions). Guess I did something wrong in the inside.
Tremendous guide!
I'm studying the instructions, getting ready to fix my iPad. My questions is, what type of tape do I use to tape the copper/silver on the digitizer? Will normal scotch tape work as I have around the house, or do I need a specialized type of tape?
You need to ether use kapton tape mate or electrical works good to
Dillon -
I had some trouble with the touch ribbon cable, when i close the iPad touch go crazy.
Great video and great picture quality as is the text to go with it i had followed every single step, as i have patience of a saint, only my problem is before i fully stick it down i have tested it by switching it on and nothing, put the charger through and left for 5 minutes as battery was 30% anyway, so probably drained over the last few days while i was away from the office to await a new part to arrive. Is there something i am doing wrong or not. thankyou for your patience and answering this question hopefully.
I have a problem after the replacement, after a month or so, the screen or display start shacking when I press the touchscreen, somebody told me it was the censors, anyone can help me?
I had an issue with replacing the digitizer after replacing the battery on the A1474. The digitizer cracked during removal while doing the battery replacement. All went well with the battery replacement, although this is quite a difficult repair to do. When I installed the digitizer after the new replacement arrived from Amazon, I tested it before sealing everything together. All tests passed, no problems. When I got the unit repealed (everything working), I noticed a tiny spec of lint or something on the interior of the glass between the LCD and the digitizer. I had to take the unit apart again to clean the spec off, and when I re-assembled, the digitizer doesn't work now. I have never had this happen before despite doing a lot of screen replacements. I see from others posts, that Kapton tape is required to be placed at the bottom of the digitizer to avoid 'digitizers gone wild' like I am experiencing. Ordering Kapton tape today. Wondering if anyone is experiencing this with the iFixit Digitizers.
Screen removal: Be sure to heat the adhesive to at least 135f
I wear latex gloves when dealing with the screen and LCD. Upon disassembly, the parts go on a clean sheet of printer paper, then covered with more paper. Then, before assembling i use one of those compressed air keyboard spray cans to remove dust.
This is great for the hi rez pics but anyone planning on doing this should seriously watch one of the numerous videos on youtube
replaced LCD on iPad air that I bought from iFixit. Instructions were good, but the digitizer removal didnt work ask expected. Suction cup and iOpener would not work. I had to use a hair dryer and a razor blade to start. Made a couple very minor nicks in the metal edge, but I use an Otterbox case so you'll never see them anyway. So far, everything is still working. I thought there would be some kind of digitizer calibration, but everything fits so tight I guess it's not needed.
The guide only states heating the iOpener in 30 second intervals with a minimum of 2 minutes in between heating sessions. I found this to be in adequate. I heated the iOpener for 40 seconds and it, indeed, came out of the microwave a lot hotter! I placed it on the left side of the iPad, from top to bottom, for about 15 seconds then placed the suction cup in-front of the iOpener on the left side middle edge of the screen and scooted the iOpener back and pushing down on the suction cup. The extra temp of the iOpener is transferred through the glass really quick. I pulled up and the adhesive became very malleable. Maybe try some extra heating of the iOpener next time to use it properly. I have used the hair dryer method in the past and the iOpener is by far the easiest and cleanest method I that tried.
If you screen is very cracked you might want to consider going for the complete screen assembly. When I got mine apart the clip the holds the button to the screen was too damaged to use. Strangely the clip isn't listed as a part of the iPad Air 1st get if you navigate through the iFixit website looking for iPad Air 1st gen parts but it's for sale here iPad Air Home Button Bracket weird.
I just accomplished this guide yesterday with an iFixit repair kit (digitizer and tools).
My question is, if we covered the metal part by the home button with tape and our digitizer is still freaking out. Do, or can, we send it back to iFixit as a warranty problem?
I completed this repair successfully with no major issues, and it works well enough that I am writing this from the said iPad, but the touchscreen does not work well or at all near bottom corner to the left of the home button (although as far as I have used it it has not "gone wild" yet). Does anybody else have this problem or have an idea on how to solve it?
How do you remove the home button bracket and home button?
I need to transfer my home button to the new piece of glass but there's no instruction as to how to remove the button from the old glass. I assume it's adhesive because I don't see any screws, but I also don't want to bend or damage the bracket.
Correct, it's very strong adhesive. You'll need a lot of heat, patience, and a very thin pry tool or blade to separate it. Wear gloves and eye protection as it's easy to break the glass in the process. The iPad 4 procedure is similar enough that you can use it as a rough guide (although the Air is more difficult IMO). If you're doing more than one, skip the hassle and pick up a replacement panel with the home button preinstalled.
Thank you Jeff for the reply. I just wish this guide included step-by-step instructions how to do this. How exactly do I get the home button assembly back on the new screen? What type of adhesive do I use? How do I apply the new bezel adhesive?
So many questions, I wish I bought the panel with home button pre-installed, but it's too late now.
No worries, it's still a perfectly do-able repair! Here's a video of the process for reference. For re-adhering the button, a bit of Loctite super glue should do the trick. Good luck!
Sent my iPad in for a repair for a replacement screen, and the company have replied
Your device has suffered damage to the top right section of the front
screen. Directly underneath this impact area sits the power/volume flex.
This component connects the power button and volume buttons to the main
board. Based on previous repairs, we have found that if this component is
not repaired then it may cause issues in the future; potentially resulting
in the part either developing a fault or failing completely. This would
result in not being able to turn the device on and off using the power
button and/or be able to control the silent/mute switch and volume buttons.
I have replied saying just to repair the screen they have come back with this
I
Due to the damage we cannot guarantee how long the component will work
for. From past experience we have found if not replaced it can cause
reliability issues in the future. The technician has therefore recommended
this is replaced. The added problem is that to repair this component at a
later date involves having to break the screen to gain access to the
component, which would then incur further costs.
We would be happy to offer the repair at a discounted price of £29.99 on
this occasion as a good will gesture as some of the work would have already
been carried out. This will of course include a 12 month warranty on the
repair for your peace of mind.
Please Note; If a recommendation is declined and this part later fails, this
will not be covered under warranty and may incur further charges.
Please advise how you would like to proceed.
I feel that they just want more money from me. Your views would be appreciated
Kind regards
Please help me proplem touch screen after chang digitizer
Great guide!
I did run into two issues after following it though:
1) After I start up the ipad and the get the Apple logo the screen goes black, but if I hold down the power button I get the power off screen and I can click cancel to get me to the lock screen that asks me to press the home button to open, but this leads me to the next issue
2) when click the home button, nothing happens. I've taken the screen off for the second time and made sure the cable and latch are connected securely, and still nothing.
Any thoughts?
Thanks in advance.
After having replaced a couple of iPhone screens, this was a real breeze having had the prior experience. Thanks again. BTW, I used a blow dryer in conjunction with the iOpener to remove old screen.
A proud dad: My wonderful seven year-old performed all of the steps after the (admitedly tricky) removal of the digitizer, this with a little supervision but she was following the instructions herself. She has much more delicate control than me for these tiny components :-). Thank you for this fabulous guide. Agreed with other readers that two unphotographed steps of the reassembly are stress inducing and hazardous: The pads either side of the home button, and tucking in the cables.
GREAT!
I wrote a flowing commentary on my success using these instructions...wouldn't post.
SO I'll just say, take your time, have a clean work area and use magnifyer glasses!
Thanks again!
Great guide that proved successful for me as well! Only improvement to the guide I would suggest is around the heating pad and time of application. The first 30 second zap does not get it as hot as waiting 10 minutes and zapping again in the microwave. From there on in 10 minute increments it is at a good temperature. Applying for 3 to 5 minutes at a time seemed necessary but perhaps it the glue on the older iPads is even more stubborn. Spudger made for a good clean out tool for the glue, tape, and glass bits. Total time for me was 4 hours but the glass was really broken and lots of working around that.
I followed the instructions to the letter. However, the instructions leave out what to do about the Home button. I used the Digitizer assembly intact and put everything back together and the Home button did not operate though it was in as assembled. It would be nice if the Repair Guides had a little troubleshooting help. I have followed several dozen of iFixit Repair Guides in the past from B&W G3 days through all the iPhones and this is the one thing wanting in the guides.
Hi David—If your home button isn't responding, I'd probably start by re-seating the ribbon cable connector and inspecting the ribbon cable for damage. I happen to agree with you about adding a post-repair troubleshooting/FAQ section to the guides. I think that's a great idea. For now, try posting your question in our Answers forum—there are lots of helpful folks in there who can offer troubleshooting suggestions.
Everything went fine.
I do notice now however that when I open the magnetic cover and place it against the back of the iPad, it goes to sleep.
Im not sure if this procedure affects the magnets.
The only way to stop this is to turn off the auto on/off when you close the cover.
Has anyone else had this problem?
Thanks
I only have to replace the glass, so I'm making sure I don't have to replace the digitizer to, am I correct in this? Any advise will be greatly appreciated. Thank you, Susan Canavas
The glass and digitizer come as a single component—there's no practical way to replace one without the other. That said, the glass/digitizer assembly is very inexpensive.
I did it! But had to use a heat gun because the shards were too small to be removed. It took more than 3 hours, but when I got the old glass panel out, it was a very smooth job.
As others have pointed out: With a completely shattered glass, especially on the left side, the first steps of this guide are only vaguely useful. Be creative! A trick I discovered is that there is a hollow area beneath the glass and above the lcd. The glass was broken completely there, and I was able to crack the glass along the entire left edge from there, slowly but surely, using the edge of the pick as a saw. Finally I could get beneath the edge and follow the guide on the bottom and top, and then again use the sawing technique on the right side. In the end I could lift off the (rest of) the digitizer, and finally scrape the remaining glass and adhesive off the aluminium bezel. It was not a very clean operation, but it worked.
I really have to ask:
What ever happened to Gorilla Glass?
Obviously the glass on iPad Air can simply shatter just playing RealRacing3
being throttle is right at edge of hole of home button,
and if heavy duty case has slightly off center access hole
to home button, this is in fact how mine shattered,
Cruising Le'mans circuit 243 mph requires full throttle,
seriously...
I was hoping there was internal messaging option here, so Ill just
ask if you have time to do a screen
repair., all prepaid door to door.
I just moved or Id attempt mission
myself, and at the moment, have a stack of repair tools sitting in the cart here, to attack it with.
I still use the iPad some, but its so glitchy with phantom actions, and 2 days ago, my 09'MacBook Pro just died, so I'm down to my V20 just purchased 2 months ago.
If not able, we'll gladly use a reference.
Thanks
Phil, Mpls Mn.
Worked smooth for me. Pain in the behind getting the screen off. With patience it came off in about 90 minutes and then it was smooth sailing.
Great!
First time I did something like this. Now that I have the experience, it will only take me 15 minutes next time! Broke the cracked screen when trying to pry it out. Wow! That screen bursts into a fine cloud of dust. Make sure you wear eye protection. Unless you know what you are doing, you will probably break the screen while trying to remove it. Even if it does, just keep going, it won't effect the outcome, it just gets a little messy.
iPad works like new! Few tricky moments, but once you figure it out, you will appreciate the way iPads have been designed. minimal fuss and as easy to put together as a Lego kit!
Cracked screen replacement went well. Had to use a hair dryer instead of the iOpener. Has any experienced this issue after reassembly…. Randomly the screen seems to go into sleep mode. Sometimes it doesn’t do it, sometimes it happens after a few minutes. The screen will go black and have to be unlocked again… Any advice would be helpful, I don’t believe any of the cables were pinched or messed up during assembly.
Started with a badly cracked screen so removal in the suggested manner didn’t work. In the end it took several hours to slowly work the shattered screen off using Spudger and razor knife (be slow and methodical if you go this route as a slip it drop can damage the LCD. Once the old one was removed the rest was easy. Not sure if I could have removed the old one in a single piece even if it wasn’t already shattered
final warning on the heat pad. Accidentally hit 3 minutes on the microwave rather than 30 seconds. Now that was a mess!!!
I fixed my wife’s co-worker Ipad air Wi-Fi tonight. this guide was very helpful. I had to replace the front panel. only thing I think this guide is missing is a how replace the home button and ribbon. other then that. Thanks for the great guide.
Fantastic guide! Easy to follow, in my case I had splintered glass which made the removal of the digitiser harder to get off but once that was done the rest of the process went smooth even the use of the polyimde tape. Put it all back together and everything works perfectly with no glitches.
Thank you so much for putting together this guide.
cheers Owen
Gerade Fertig geworden! Perfekte Anleitung! Wichtig ist das gute abkleben des Glases wenn es euch gesprungen ist, außerdem behutsam mit dem LCD Panel umgehen und vor Staub schützen während dem “lagern” ;-) … Klasse! Vielen Dank
This was my first Ipad Air WiFi replacement. It went off without a hitch. A couple observations or comments.
#1- Check if everything else is working before you begin, i.e. The headphone jack, Front and Rear Cameras, WiFi and Bluetooth, Home Button, Volume buttons, Speaker, EVERYTHING.
#2 - You don’t have to mess with the battery if the battery is drained.
#3 - BUY THE TAPE THAT GOES BETWEEN THE LCD AND DIGITIZER BEFORE YOU BEGIN !!!
#4 - Once you have folded the digitizer to the side, study the digitizer with the new one and visualize how and where the ribbons go. THEN CUT THE RIBBON FROM THE BROKEN DIGITIZER. There is no need to be fumbing with a broken digitizer all over the place.
#5- PRACTICE WITH THE CUT-OFF RIBBONS. When you get to the part of removing conections…Connect them again…Get a feel of how to make these connections if it’s your first time. It will reduce the percentage of you bending the connections of the new digitizer AND you won’t have a feeling of, “how the heck does this connect”.
#6 Finally DENTS, DENTS, DENTS…If the ipad has dents anywhere ESPECIALLY on the corners, the new digitizer WILL NOT go in and be flush with a dented Ipad frame. You have to buy the tool to fix dented corners or learn how to fix and straighten dents somehow.
just finished this repair after a cracked screen. The lcd looked basically ok.
iPad looks like this now:
https://www.dropbox.com/s/a09mkbnpgj8di0...
any idea what’s the problem?
The iOpener heating thing was not effective...a heat gun worked much better. The guitar picks to open the ipad were a joke, that glue is so strong it needs a metal spatula style tool to really get in there (other companies have this). A suction cup to open the glass, which was badly cracked, also didn't work at all, giving more reason for needing a metal spatula. No mention was made in the guide that you'd need new adhesive to use the old home button, which would have been helpful, now I have a sunken in home button. The end of the guide mentions a certain tape you need to isolate the screen electrically, but doesn't say that that tape is included with the new glass purchased from ifixit, which is clearly misleading so that you will think you need to buy the tape (which you don't actually need). On top of all this, I can see lines in the new glass, which is clearly not as high end as the OEM glass. The guide and tools suggested were just not good enough for this very difficult repair.
It is a difficult repair—sorry you had a bad time. The Kapton tape instruction was clearly written to cover all the bases, not to gouge customers—people buy cheap, poorly insulated panels from all over the place, but still use iFixit guides to install them and then they complain here when the repair fails. We update the guides to try and help everyone succeed, even if they don’t buy their parts here. Also, having done this repair a few times, I disagree about using a metal tool—if you need that much force, you haven’t gotten the panel hot enough. Your home button adhesive comment is fair—we wrote this guide for the “full assembly” panel that comes with a new home button preinstalled, which is why there are no instructions for transferring the home button, but it would be nice if we had a longer version for folks who need it. As far as lines in the glass, if you are unhappy with the quality of the part I’d recommend you contact the customer service team directly and they will probably send you a replacement.
thanks for your help my ipad is now fixed for less than $20. mine was really badly smashed up got glass shards everywhere but after carefull cleaning complete success like brand new. thanks
The only advise I would add is to check that your LCD is not damaged before sticking new digitizer to aluminum body. Mine looked to be in good shape but luckily I checked it first before re-assembling digitizer and it had been damaged. My other advise is if your Digitizer is shattered bad like mine was you will need to use an Exacto knife to work the broken adhered edges off aluminum frame after softening adhesive and be prepared to spend a lot more time removing glass and small debris from inside Ipad body.
you do not need the tape that goes between the display and the digitizer if you bought the screen digitizer from ifixit !!!!
you should add the home button replacement in this guide, but it is great!
This guide was perfect and included all the correct parts, process to remove or unclip connections etc. I am very impressed with this guide. Having repaired over 25 of these IPADS using the IFIXIT guides, anyone can do this. All you need is a clean quiet work area. The trick to not getting any dust or prints on the inside of the screen is to NOT PLAY WITH IT AND LOOK AT IT until you are about to put it on. I drain my mini compressor, run it for 5 minutes then leave it open overnight to ensure there is no water in it. Then connect the water oil remover filter onto the compressor, run it for 30 seconds on a piece of toilet paper to ensure to water. Now I have the screen ready to go on, taped up already with the kapton Tape, lightly spray off everything with the air (you could use duster) then the trick is give everything 20 seconds to settle. With blue harbor freight work gloves and painters mask on I connect the screw, grab the air and give a quick blast, peel the plastic and flip it! Never had dus t or prints
Wondering if anyone else had trouble getting the glass to sit flat against the frame. The ribbon cables that connect the front glass to the connectors behind the screen are pretty heavy duty and they press up on the screen, preventing it from sitting into the frame without having to put pressure on it. I heated it with a hair dryer and pressed it under books for a few days but the glass popped up on that edge after a few minutes. I went with iFixIt b/c I’ve done about a dozen screens and figured the parts were pretty reliable, but I’ve never done an Air1 before. So I don’t know if this is an issue with the Air or the part. Anyone else come up with a fix? TIA.
Thanks for this tutorial! It took me a few hours to remove the screen because it was badly cracked. Cups don’t work if the screen is to damaged. I used a hairdryer to heat the adhesive and peeled of the screen working my way around with the pickers. Getting the screen off is the hardest part. Reassembly was easy and the iPad looks like brand new!
Good guide, expensive replacement parts.
First time around, completed assembly only to notice that a small piece of blue film which had covered a bit of adhesive tape for the home button, had been left behind and was clinging to the inside of the glass near the bottom. Tried to quickly pry up the corner before adhesive had fully set, and wound up cracking the new screen. Went looking for a cheaper second replacement and found one for less than half the price (iFixit shipping was 12 bucks vs. 5 for the other guy).
Second screen got here through the polar vortex of late Jan 2019 with no delay. (Way to go USPS!) Second time around went much quicker, though I broke loose one of the 3 lugs for a screw holding down the LCD screen connector (step 36). All good and works perfectly. Thanks, iFixit!
I did this fix. Instructions are good. All seems good…..however only issue I have is when I play any kind of video (ie: netflix, plex, youtube). The video immediately stops on its own. I press play and it just automatically stops. Was wondering if it was a phantom or ghosting issue……however I am not having any issues with the ipad in general. Just when I play videos…..it’s weird. Any help is greatly appreciated!
I damaged the LCD screen cable while repairing my iPad. I don’t know if I didn’t get the ZIF cable plugged in properly or if I damaged the cable during the process. Now only about 80% of the LCD screen works properly. The top is blank with some digital distortion and there is a line of digital artifacts down the right side.
Worked like a charm - same problems with cracked screen, and removing the old glue even with isopropyl is well nigh impossible, but the manual is great!!
Thank you so much for the guide,my ipad is good as new.I didn’t have a heat gun or an iopener so I ended using my hair straightner (It did the job but I wouldn’t recommend anyone to use it lol) I am definitely going to invest on a heat gun.
This guide is brilliant, so happy to have device back up and running :D BUT!!!!
Please please could it be updated to show the correct way/order to remove all the stikys on your new screen and the correct way to stick down the digitizer and home ‘cables’ (the black bits)?
The quality of your parts and tools is excellent !
I do have a problem with your instructions, however. Especially the reassembly. “To reassemble your device, follow these instructions in reverse order.”
That really is a cop out and not very helpful at all. I am retired tech with over 37 years in repair, and that was no use at all. It’s very important in reassembling the tablet, to know the order of removing the internal plastic protective cover sheet, adhering the home button ribbon cable, removing the adhesive covers, and dressing and adhering the front panel assembly ribbon cables and pivot point assembly. I respect fixit as a company and will use it again, but there needs to be more care in drafting the instructions for this repair.
Regards
I agree it would have been helpful if you got the digitizer from Ifixit that has the adhesive already on it. Also should we heat the adhesive again to set it or is just pressing the digitizer in place enough?
iFixitのお陰で、妻のiPadAir(初代)のタッチパネルの2回目の交換が無事終わりました。
私自身は、LC575に始まり現在iMac (Retina 4K, 21.5-inch, 2019)を使っています。2007年のiMacの内臓DVDが動作しなくなり、
それをHDDに積み替えたり、2015年のFujionDriveのiMacが起動できなくなり、分解して調べたところHDDの寿命が尽きていて、HDDを積み替えて再度FujionDriveに戻したり、40歳で始めたMacLifeも30年を越して楽しんでいます。
iFixitのようにMacの治療、完治させる技術を教えてくれる「 iFixit 」達に感謝します!!
OZZY様
iPad Air修理の成功のお話をシェア頂き、ありがとうございました!一つのデバイスを長く丁寧に使い、自分で適宜交換作業を行われることはまさに”所有”されていることに尽きます。私たち皆が見習っていかなければなりません。ありがとうございました。そして今回いただいたコメントの返信の件では、大変失礼いたしました。今後とも、どうぞよろしくお願いします。
I had to crush the screen all the way around with a tiny screw driver to get the digitizer removed. It took me 1 ½ hours to complete and a half hour to remove the crushed pieces from the sides.
This how-to video was great and easy to follow. Very detailed. Was able to replace my cracked iPad Air screen in under an hour.
Your kit brings everything you need to change the touch screen, it was very simpler than I thought. Yes, it is laborious, especially if the touch screen is broken, but it only takes decision and patience.
Only one tip, of which I do not know its importance, but that I have made.
When preparing the new touch screen, before mounting it, I have transferred two pieces that were in the old button and not in the new one.
The pad on the right of the button, I suppose it is so that the button is well supported and the glass does not sink. And a contact tape located to the left of the button, joining two golden contacts, one that is in the button's cable and another that is in the frame of the button itself. I think it is a ground wire.
Thanks for your guide and all the contributions.
I just finished the installation using the item #128018-2. Everything went just as expected. Easy enough, Thanks, ifixit is awesome. I definitely recommend using their tools and products for best results. I say that because the ipad I repaired was previously worked on by someone else. It initially had a cracked screen. When I got it, the home button had recessed into the unit and was unusable. After looking at it I could tell the person did not use or did not understand the ifixit procedures.
GREAT GUIDE!! I followed every step of this to a T and didn’t have any hiccups replacing my iPad screen! THANK YOU IFIXIT! You guys are lifesavers!
Good guide except wish that it included the home button bracket removal instructions for people that wanted to transfer the old one. : /
Heat gun, use a heat gun. I struggle to believe folx have a fine time with the iOpener.
Damaged and then snapped the home button ribbon cable upon reassembly.
What do I need to do to prevent that happening again?
A friend cracked his iPad screen, and asked for help. The iOpener didn't soften the adhesive at all. Therefore I used my hair dryer and two iSclacks. to detach , but when working along the cracked upper left corner, the screen turned into spider web pattern. Very carefully I removed the old screen and followed this easy step by step guide to replace it. Youtube offers a whole lot of videos on how to clean lcd screens. The iPad is now fitted with a new digitiser, and I’m glad all works perfectly well. Thanks for this great guide!
Welche Konsequenz ist aus dem Hinweis zu ziehen, dass die Akkumethode veraltet sei? Wie gehe ich also stattdessen vor?
Über einen Hinweis würde ich mich sehr freuen.
I probably chose the wrong language, so second try:
In the Guide there is written that the method of handling the battery is outdated. Which consequences do follow, how should I handle the battery instead? Just “ignoring” it?
Thanks again!
Hello, after repairing with the kit homebotton is not working? Any idea? Thank you.
Bravo pour votre travail et merci pour votre aide
J’ai fait l’erreur pour les deux vis du connecteur Lightning mais c’était bien expliqué.
Une petite photo du résultat attendu après pliage des nappes avant le collage de l’écran éviterait des grosses sueurs, ainsi que le détail du collage du nouvel écran.
Enfin, j’ai commander les adhésifs alors qu’ils étaient dans le pack mais c’est pas grave….
J’ai donc retrouvé mon vieux iPad Air impeccable après changement d’écran et de batterie.
Super
This guide is good but it should cover also the assemblying of the new digitizer. Distributors may sell digitizers with the ribbons not sticked to it and if the operator doesn't know they must be sticked, he will have problems during the assemblying.
Secondly, it should better cover the removal of the glass when it is cracked because the steps about the suction cup are quite ineffective. Please, cover the missing parts.
Good guide
The pulling off the display film and how to position the display when sticking it on the iPad Air, you could still include in the guide
I didn't find this to be as hard as I had built it up in my mind to be; HOWEVER, saying that I need to say years ago I was the local Nokia service center in my town. But many years ago right after they got rid of analog times. Yeah. A classic installer/repairer mistake when starting something they haven't fixed or installed before is picking up the instructions, flipping through them; maybe even reading a section that is new-then tossing the instructions over the shoulder. "I got this." This usually comes right before something major gets broke. And I can tell you when you try to do it yourself and then mess it up horribly then take it to the repair shop. Well we called that "I can do it myself" syndrome and charged extra to put back together what they brought in in the box. Now knowing all this - I can't stress this enough because I am stupid, stupid, stupid. COVER YOUR SCREEN IN CLEAR BOXING TAPE AND READ ALL THE INSTRUCTION BELOW THROUGH TO THE END BEFORE EVEN ATTEMPTING THIS FIX. Take my advise.
windizy - crwdns2934203:0crwdne2934203:0
I didn't have an iOpener, so I used a wheat type heat bag. If you do this though, make sure you put a layer of plastic between your Mac and the bag, or you'll get condensation in places you don't want it.
Martin Gray - crwdns2934203:0crwdne2934203:0
I started out using the iOpener but switched to my wife's hairdryer. A heat gun or hair dryer proved to be much more convenient and is a time saviour. You can heat more and the glue becomes more fluid make the next steps with the opening picks much easier
Jan Van Puymbroeck - crwdns2934203:0crwdne2934203:0
I know this is obvious, but backup your iPad with iTunes before you start. I'd also turn off your passcode if you have one.
Laurie Higgins - crwdns2934203:0crwdne2934203:0
Ther first time you heat up the iOpener for this repair when its room temperature I had to heat it up for more than 30 seconds. I remember I had to heat it up for around 45 seconds. However, after that when you need to reheat it again during the repair 30 seconds will be enough.
Yousef Ghalib - crwdns2934203:0crwdne2934203:0
I used the wheat bag in a sensor microwave heating up to 65-70 deg C (155 def F).
ian cheong - crwdns2934203:0crwdne2934203:0
Get yourself a cherry pit bean bag the size of your iPad. Heat it, put the iPad on it for 3 to 5 minutes or so, reheat the cherry pit bean bag, again put your iPad on it. Then heat the iOpener and start working. The cherry pit bean bag will have to be reheated several times, but it will soften the adhesive so you have less problems with the iOpener
Tim Feyaerts - crwdns2934203:0crwdne2934203:0
The heating can be done very effectively (and quickly) with 3d printer heated bed. Make sure the bed is clean. Set the temperature to 60c, (130f ) and put the ipad face down for +/- 10 minutes. Repeat as needed throughout the “gentle prying” stages.
polleyphony - crwdns2934203:0crwdne2934203:0
The iOpener did not work at all for me.
I had to use a heat gun and bring the edges of the case up to ~200 degrees (used an infrared thermometer to measure) before the glue would weaken. This obviously superheated the metal frame, so I also had to wear gloves to handle the phone while prying the back off with the included picks.
Mike Jeanette - crwdns2934203:0crwdne2934203:0
Repair instructions worked like a charm. Had to be patient with the iOpener and getting the screen off. I tried repeatedly without success until shifting the suction cup a bit to the left side where perhaps the glue had loosened up a bit more.
Kyle - crwdns2934203:0crwdne2934203:0
The iOpener, in my opinion, is of no help. Many warnings to say “don’t warm it too much”, but the glue doesn’t melt if not warm enough. As a result, a complete waste of time and energy. In addition, too much liquid in it, so it doesn’t lay on the device on a sufficient surface. I took a hairdryer and it worked much much better.
laurentvidu - crwdns2934203:0crwdne2934203:0
I used an immersion bath to heat this to 180F and applied it to the device until the outside temperature of the opener read 150F with an IR thermometer. Removing the screen took very little force with this method.
breadandbits - crwdns2934203:0crwdne2934203:0
My experience. I was replacing the screen which had been cracked and a little shattered in some places. The iopener is pretty much useless, so was the suction cup. The suction cup would probably be more useful if I was doing something besides the screen. Also you probably want the clean the screen before using it so it can get good suction. I used a hair dryer on high for a couple of minutes at a time (someone on this tread suggested that). I used my exacto knife and a razor blade to get into the adhesive. First the exacto to get the initial cut, then the razor blade to go a little deeper. Could have probably just used the razor blade, but the exacto has a little more finesse. I got the razor blade in and a little under the glass then I used the picks to wedge in. I didn’t want to risk anything using the razor blade too much. Used tape to keep the shattered glass together.
trebor65 - crwdns2934203:0crwdne2934203:0
My experience pt2
Fortunately the shattering was mostly on the edges and most of it had adhesive on the back so it stuck together. Just take your time and work your way around following the guide to get the screen off. Have some goof off or goo be gone to clean the frame when putting the new glass on or putting the existing one back. (someone suggested that also, very good idea). Be careful of the LCD (you should know that). The cable on my LCD was pretty tight, so I propped it up while taking the cable cover off and when I put it back on I did the same thing. I just put a bottle on the battery and leaned the back of the LCD on that while attaching the cables and putting the screws back on the cover. Also be careful with the home button and the bracket on the back of it. I had enough old adhesive on left on the bracket that it stuck back to the new glass fine. So far only 12 hours in, so we will see how that holds up when the kids get at it.
trebor65 - crwdns2934203:0crwdne2934203:0
Another alternative if you do not have the iopener is to use a bed time hotwater bottle. Do not over fill it though. Just put enough hot water in to support the phone while you work around the adhesive.
I use both the hot water bottle and iopener together on Samsung's. It makes life easier
gazza667 - crwdns2934203:0crwdne2934203:0
I followed the directions and heated my iOpener for 30 seconds in a 1000 watt microwave, and it came out at 160 degrees F, as verified by a infrared thermometer. This allowed me to separate the last bit of the back of my Samsung S8, which was already coming off due to a swollen battery (hence the reason for the repair).
Dennis - crwdns2934203:0crwdne2934203:0
Hallo,habe den Akku erfolgreich getauscht.Doch seitdem gibt es bei Telefonaten eine Rückkopplung für den anrufenden.Bei mir ist alles normal.Woran liegt das?Mfg
Manu R - crwdns2934203:0crwdne2934203:0
If you follow these instructions, you will crack your screen like I did. Heating the iOpener for 30 seconds, using it to melt glue, then waiting 10 minutes to reheat is useless. The iOpener can be used to maybe warm the glue on whatever side you aren’t working on. You need a hairdryer and/or a heat gun to melt the glue and separate the glass from the iPad.
Anyone want to buy an old iPad with broken glass and a dead battery?
mpulliam - crwdns2934203:0crwdne2934203:0
Not everybody has a microwave. You should provide a target temperature for the iOpener and instructions for a conventional oven, or pot of warm water, or whatever. Although I will probably use a heat gun …
Esmond Pitt - crwdns2934203:0crwdne2934203:0
Three times heating opener and no luck. Tried pressing down gently on opener with a towel, and the opener broke. Wondering if I now replace table mats, fancy table cloth, etc. or will this stuff wash out.
Not impressed so far. Maybe the hair dryer next.
doug - crwdns2934203:0crwdne2934203:0
I support the comments about the iOpener. Everyone has a hair drier, FHS, so get a cheap IR thermometer (£18) and blow heat until the area is 60+ deg C. Still takes w while, and getting the screen off is v scary, but just add more heat if you feel resistance.
The rest of the kit is good, esp the magnetic screwdrivers.
Richard O'Brien - crwdns2934203:0crwdne2934203:0
No, everyone does not have a hairdryer. Some of us don’t even have hair. Thank goodness I already had an IR thermometer, though.
nin10doh -
#### WARNUNG WENN MINIMALSTER SPRUNG IM DISPLAY IST FUNKTIONERT DAS NICHT!!! ######
Hatte einen winzigen, minimalen Sprung im Display. Ich dachte es könnte gehen, weil der Sprung “abgeschlossen” war. Er hat in einer Ecke ein winzige Glasteil rausgeschnitten. NEIN! Geht nicht. Habe alles mit viel Geduld dem iOpener und einem Föhn erhitzt. Es ist trotzdem sofort über das komplette Display zersprungen…
T z - crwdns2934203:0crwdne2934203:0
I’ve started with iOpener but changed very quickly to a heatgun. That was more efficient.
Mizzoo, s.r.o. - crwdns2934203:0crwdne2934203:0
I could not get the iOpener hot enough to melt the glue on my ipad 6. I heated for 45 seconds once and it was boiling and it still never worked. Thank goodness contributors mentioned using a hair dryer. Using an 1700w hair dryer on high did the trick to get the screen off. Still took some time and the case got pretty hot but be patient. It took twice as long and a lot more patience to get the battery out.
Randal Haufler - crwdns2934203:0crwdne2934203:0
I have an Ipad with touch screen issue, if i replace this part it should be Ok?
janderson martin - crwdns2934203:0crwdne2934203:0
WARNING - DO NOT MICROWAVE ON A METAL MICROWAVE RACK
The metal microwave rack can heat up and melt through the iOpener cover letting the contents leak out.
Not a big issue for me as I have a heat gun and used that instead.
Run Up A Tree - crwdns2934203:0crwdne2934203:0
I opened my iPad with the iOpener. Be patient! It may take quite a bit longer to it the iOpener in the microwave than it says in the guide. My microwave can only do 800W and I had to put the iOpener in several times (maybe a total of 90-120 seconds). I recommend that you have the transparent side up an watch the bag carefully. As long a the bag doesn't bloat up and the liquid doesn't start bubbling you should be fine. But I recommend to take the iO out from time to time to check it. (More comments in Step 6.)
marcelflueeler - crwdns2934203:0crwdne2934203:0
I gave upon the I opener and used a hairdryer. (Fixed an iPad 6)
Tom Weber - crwdns2934203:0crwdne2934203:0
iPad mini gen5. I used the iOpener. My microwave is 1200w with carousel. 30 sec got the iOpener to 155ºF. For the 2nd heating, after 10 minutes sitting, the temp was still around 125º so I only cooked it for 15 sec. Not enough increase so +5 sec more which me to 165-170ºF. This should be considered ballpark info because who knows the real output of the various microwaves and the quality of the IR tool used to determine temp.
To successfully open my iPad mini I applied the iOpener twice to the left edge and twice to bottom. & once to R edge. Using the suction cup was difficult for me (I'm in my 70's so my hands don't work too well anymore). I had trouble holding the guitar pick and slipping them in (at an downward angle). In the end, sliding my thumbnail along the edge opened it very slightly and allowed the pick to get into the gap. I marked the ends of all my picks with a sharpie pen for the recommended 2mm insertion to avoid going in too deep. To get the screen open it took me approx 1 hour.
jharrison - crwdns2934203:0crwdne2934203:0
Can’t you just use a hair curler instead?
Aspect22 - crwdns2934203:0crwdne2934203:0
A hairdryer or heat gun works, if heating is kept around 100 deg C (212 deg F - boiling point of water). But… heating this way is cumbersome. Using a hotplate, set to 100 deg C, measured carefully with a fairly inexpensive IR gun, is simpler and easier, if you can afford the hotplate (I used an old pancake griddle with a thermostat knob). It works great for phones, setting them face down for 2 minutes, then picking them up with insulated gloves - cheap, wool gloves work fine. This may require repeated reheating to continue the display removal, but its much simpler.
Because its almost impossible to repeatedly lay an iPad/tablet on the hot plate, I propose an alternative.
Initially lay the larger iPad/tablet, face down, for 2 min, to heat all of the adhesive surrounding the display. Lift and begin the picking process describe in your removal steps. Then lay an iOpener on the hotplate for 2 min (already set to the exact, desired temp) to bring it to working temp for the remaining operations.
Dan Smith - crwdns2934203:0crwdne2934203:0
For iPads in particular, it makes sense to construct a simple, aluminum window frame, laid on a hotplate (see my comment above) that only touches the edges of the display, heating only the adhesive underneath. This prevents general heating of the entire device. Four strips of aluminum, placed together as a frame, would be the simplest and allow variations for all devices - envision it as a pinwheel of strips, radiating outward. Use it for any size device.
Dan Smith - crwdns2934203:0crwdne2934203:0
BTW, always read all comments at each step. New, and possibly useful, suggestions appear on occasion that can be crucial.
Dan Smith - crwdns2934203:0crwdne2934203:0
My iOpener got damaged at the first heating (30 s @ 800 W). The bag got a little melted hole where the liquid came out and a little melted area. I used a combination oven (normal heat and microwave) in microwave only mode. It has a metal grill where the iOpener was placed on. I suppose the metal grill concentrates the microwaves at some points and there the bag melted?
K. Fe - crwdns2934203:0crwdne2934203:0