crwdns2915892:0crwdne2915892:0
Follow this guide to remove or replace the Screen on your iPad Air 4.
If your battery is swollen, take appropriate precautions.
crwdns2942213:0crwdne2942213:0
-
-
Unplug any cables and fully shut down your iPad.
-
-
-
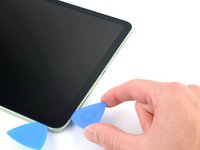
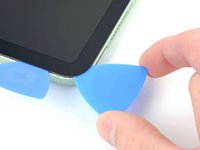
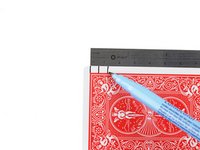
Apply a heated iOpener to the left edge of the screen for two minutes.
The iopener didn't work for me at all. I tried many times, and the screen wouldn't budge at all.
-
-
-
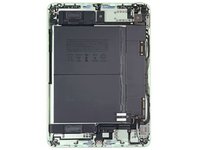
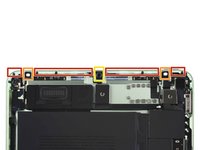
Camera module and ambient light sensors
-
Display cables
-
Screen magnets
-
Display edges
-
-
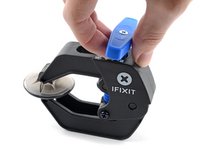
crwdns2935267:0crwdne2935267:0Clampy - Anti-Clamp$24.95
-
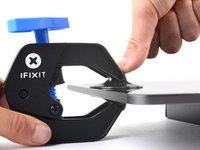
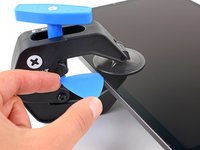
Pull the blue handle backwards to unlock the Anti-Clamp's arms.
-
Place an object under your iPad so it rests level between the suction cups.
-
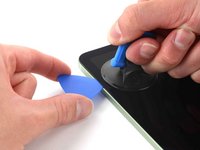
Position the suction cups near the middle of the left edge—one on the top, and one on the bottom.
-
Hold the bottom of the Anti-Clamp steady and firmly press down on the top cup to apply suction.
-
-
-
Pull the blue handle forward to lock the arms.
-
Turn the handle clockwise 360 degrees or until the cups start to stretch.
-
Make sure the suction cups remain aligned with each other. If they begin to slip out of alignment, loosen the suction cups slightly and realign the arms.
-
-
-
Wait one minute to give the adhesive a chance to release and present an opening gap.
-
If your screen isn't getting hot enough, you can use a hair dryer to heat along the left edge of the iPad.
-
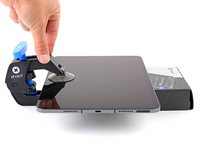
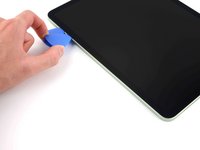
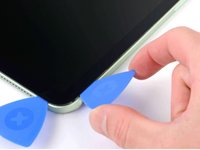
Insert an opening pick under the screen when the Anti-Clamp creates a large enough gap.
-
Skip the next step.
-
-
-
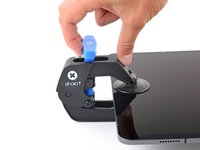
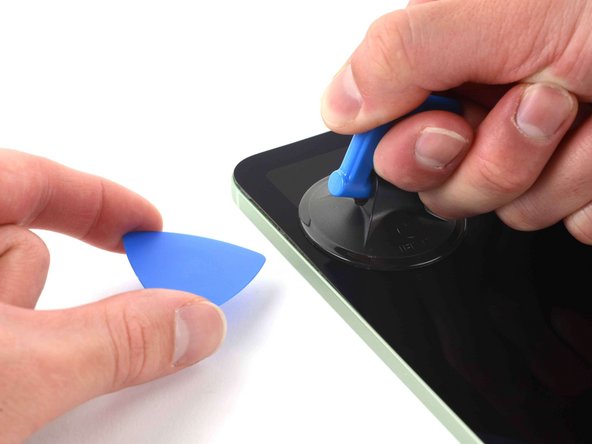
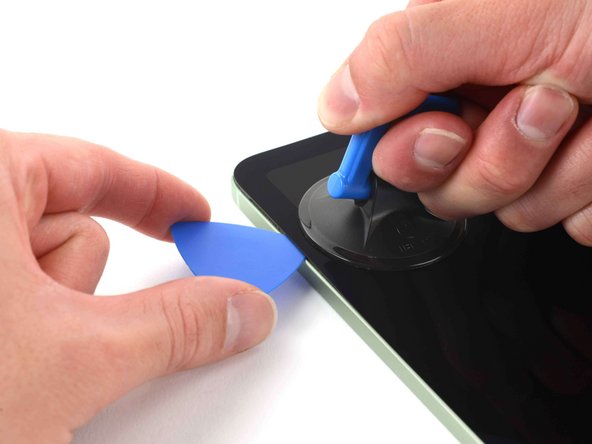
Apply a suction handle to the top left edge of the screen.
-
Pull up on the suction handle with firm, constant pressure to create a gap just small enough to insert an opening pick.
-
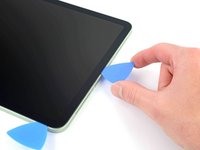
Insert the tip of an opening pick into the gap.
-
Leave the pick in to prevent the adhesive from re-sealing.
-
-
-
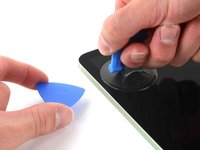
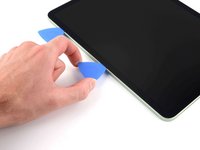
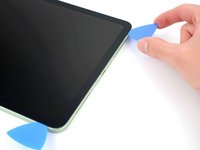
Insert a new opening pick in the gap you just created.
-
Slide the opening pick along the left edge to separate the adhesive.
-
Leave the pick in the bottom left corner to prevent the adhesive from re-sealing.
-
-
-
Apply a heated iOpener to the bottom edge of the screen for two minutes.
-
-
-
-
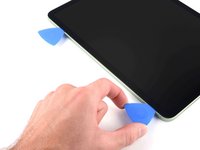
Insert a new opening pick in the bottom left corner.
-
Slide the opening pick along the bottom edge to separate the adhesive.
-
Leave the pick in the bottom right corner to prevent the adhesive from re-sealing.
-
-
-
Apply a heated iOpener to the right edge of the screen for two minutes.
-
-
-
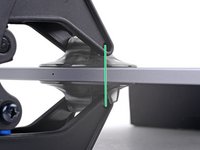
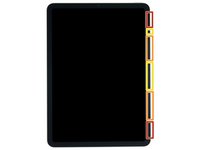
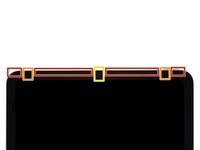
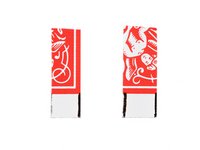
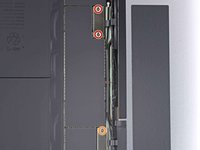
Insert a new opening pick in the bottom right corner and slide along the right edge to separate the adhesive. Make sure to note the following marked areas:
-
Don't insert an opening pick more than 2 mm or you'll damage the screen magnets.
-
Don't insert an opening pick more than 3 mm or you'll damage the display and digitizer cables.
-
Don't insert an opening pick more than 5 mm or you'll damage the display edges.
-
Leave the pick in the top right corner to prevent the adhesive from re-sealing.
-
-
-
Apply a heated iOpener to the top edge of the screen for two minutes.
-
-
-
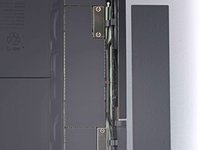
Insert a new opening pick in the top right corner and slide along the top edge to separate the adhesive. Make sure to note the following:
-
Don't insert an opening pick more than 5 mm or you'll damage the display edges.
-
Don't insert an opening pick more than 3 mm or you'll damage the ambient light sensors.
-
Don't insert an opening pick more than 2 mm or you'll damage the front camera module.
-
Leave the pick in the top left corner to prevent the adhesive from re-sealing.
-
-
-
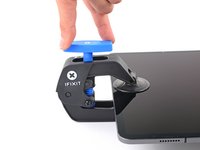
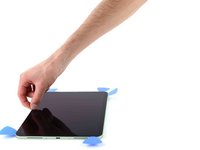
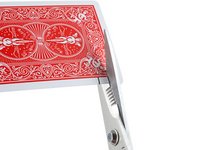
Grip the left edge of the screen and fold it open like a book.
-
-
crwdns2935267:0crwdne2935267:0FixMat$36.95
-
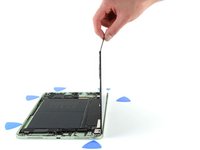
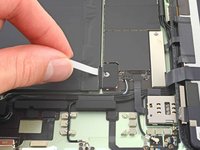
Use a Phillips screwdriver to remove the 1.8 mm screw securing the battery connector to the logic board.
der schritt ist nicht ganz aussage kräftig wie er gemacht werden soll
-
-
Achtung! Die kleinen Kontakte sind sehr empfindlich und brechen leicht, wenn sie seitlich gebogen werden.
Beachte das unbedingt bei Schritt 18! -
-
Cut two 6 mm wide strips from a playing card or cardstock to use as a battery blocker.
-
-
-
Insert the card strips on each side of the battery connector until they stop.
ACHTUNG: Bewege die Streifen niemals seitwärts! Die kleineren Kontakt können dabei leicht abbrechen und dann hast Du ein größeres Problem.
Der Teil ist besonders tricky - mit der Spielkarte habe ich es nicht geschafft, sondern mit dem Teil einer Plastikabdeckung, das ich (etwas schmaler als 6mm geschnitten) per Pinzette eingeschoben habe.
This one was tricky indeed. I could manage it with playing card strips but it wasn't easy. If you do use strips of card or plastic, one tip is cutting them a lot shorter once they are in, to prevent accidentally bumping into the ends later and moving them around, potentially breaking the contacts. Then when you need to get them out, just grab the short ends with the tweezers. Or, get the ifixit Battery Blocker tool, which can't slide around once it's in.
-
-
-
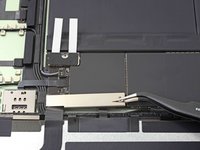
Use a Phillips screwdriver to remove the three screws securing the display and digitizer cable brackets to the logic board:
-
Two 1.1 mm screws
-
One 1.5 mm screw
-
-
crwdns2935267:0crwdne2935267:0Tweezers$4.99
-
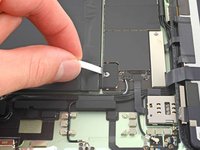
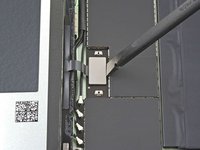
Use tweezers or your fingers to pivot the latch out from the top and remove the bracket.
It wasn't initially clear to me how it was "held in place" and how to pivot it out. The bracket has a hook on the far end (the end opposite the one with the hole) that hooks into the tiny silver-colored part you can see in the third picture (between the four cables and the diagonal part of the flex cable). To remove, just lift up the bracket on the right as shown in the picture, then slide to the left to unhook it from that thing.
-
-
-
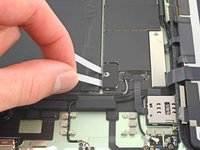
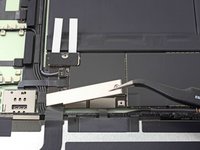
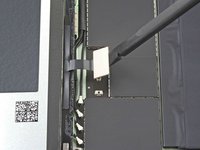
Use tweezers or your fingers to remove the digitizer cable bracket.
-
-
-
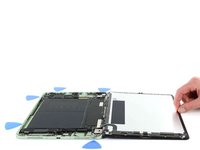
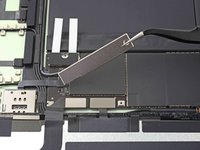
Use the flat end of a spudger to disconnect the two display cables by lifting straight up on the press connectors.
-
-
-
Repeat the previous step for the digitizer cable.
-
-
-
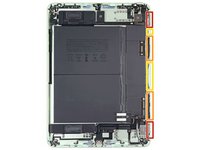
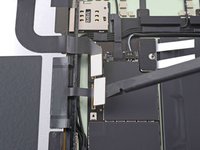
Grip the left edge of the screen and lift it away.
-


Compare your new replacement part to the original part—you may need to transfer remaining components or remove adhesive backings from the new part before installing.
To reassemble your device, follow these instructions in reverse order.
Take your e-waste to an R2 or e-Stewards certified recycler.
Repair didn’t go as planned? Try some basic troubleshooting, or ask our iPad Air 4 answers community for help.
crwdns2935221:0crwdne2935221:0
crwdns2935229:025crwdne2935229:0

crwdns2915084:0crwdne2915084:0

Guide Team crwdns2935289:0Guide Teamcrwdne2935289:0
Staff
crwdns2931471:09crwdne2931471:0
crwdns2935297:012,670crwdne2935297:0
crwdns2947412:015crwdne2947412:0
Does anyone know if the screen is paired to the device? As in if I replace the screen will I still have true tone?
With transfering the assembly, called "Induction", which is placing on the top of the display, from your used iPad, Face ID and True Tone will work properly WITHOUT reprogramming them, that's because True Tone of the iPad isn't paired to them, not as iPhone's.
Thank you for your answer. So basically I don't need to transfer any parts from the old screen to the new screen in order to keep the full features.
Yes but I heard that in recent update that kind of error happened, so you should ensure about it
iPad Air 4 won't charge after screen replacement (screen from iFixit).⏎
No message, no indication on why it doesn't.
Screen and touch work fine.⏎
Any ideas?
Siri said the battery is "at 100%", but the on screen indicator shows empty and the device powers down almost immediately.
No charge indication on screen...
One more thought: I had the battery blocker inserted for 4 days waiting for the adhesive tape to arrive.
After opening it agein I found that one of the smaller battery contacts was broken, probably happened when inserting the battery blocker strips.
So be adviced:
****** ***NEVER move the battery blocker sideways, not even a bit!!!****** It will easily break your battery contacs!!! *********
same problem here, did you fix it?
This was a difficult repair with a severely cracked screen, but after a ton of patience and time picking away and the cracked bits, I was able to remove the old screen and replace with the new. I wasn’t able to disconnect the battery as suggested, but I was careful in how I handled the open iPad Air. Having the right tools for the job was a big help too. I purchased the iOpener and Anti-Clamp after failed attempts with a heating bag (one filled with beans) and a hair dryer. I had other suction devices which helped too, but was limited by the cracker screen, even after covering it in tape. Thanks for the detailed walk through!
iPad Air 4 won't charge after screen replacement (screen from iFixit).
No message, no indication on why it doesn't.
Screen and touch work fine.
Any ideas?
I opened the iPad again and found that one of the smaller battery contacts broke, probably when inserting the battery blocker strips.
Let's see if I can solder on something to replace it - everything is VERY small in there. I just hope that I won't need a replacement device now...
So be adviced:
****** NEVER move the battery blocker sideways, not even a bit!!!*** It will easily break your battery contacs!!! *********
Workaround: Charge the iPad via Magic Keyboard für iPad 11" (USB-C Charging Pass-Through feature)
Pixel -
Successful repair! The worst part was getting a severely cracked screen off. The anti-clamp didn't help a bit due to the severe cracking, but a hair dryer, suction cup, and a lot of patience did it in the end. (Start with largest piece of intact glass on the left and then work your way around to the right side; the instructions seem to be written as if you want to save the screen.) The next worst part was the battery blocker (takes a lot of force to separate the battery contact, even after removing the screw). Having the iOpener tool kit made things a lot easier. About a four hour repair from opening the kit to cleaning up afterwards, and having pre-discharged the battery before starting the repair.
After attached the cables, my (ipad air 4 gen A2316) screen only light up 4 corners but screen is not light up. What happens? Thanks
If I replace the LCD panel of my iPad Air4 with a fake one, will the Apple Pencil become unusable? If you know of any good ways to do this, please let me know.