crwdns2915892:0crwdne2915892:0
Learn how to replace your iPhone 7 Plus screen. This part comes with the front assembly, earpiece speaker, and EMI shield already installed, making for an easier repair.
All you need to do is remove the old screen and transfer the home button to the new screen, in order for it to function.
crwdns2942213:0crwdne2942213:0
crwdns2936621:0crwdne2936621:0
-
-
Power off your iPhone before beginning disassembly.
-
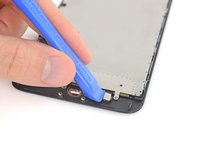
Remove the two 3.4 mm pentalobe screws at the bottom edge of the iPhone.
-
-
-
Measure 3 mm from the tip and mark the opening pick with a permanent marker.
-
-
crwdns2935267:0crwdne2935267:0Clampy - Anti-Clamp$24.95
-
Pull the blue handle backwards to unlock the Anti-Clamp's arms.
-
Slide the arms over either the left or right edge of your iPhone.
-
Position the suction cups near the bottom edge of the iPhone just above the home button—one on the front, and one on the back.
-
Squeeze the cups together to apply suction to the desired area.
Too bad that the instructions use equipment that are not sold with the repair kit that was supposed to be sufficient.
-
-
-
Pull the blue handle forwards to lock the arms.
-
Turn the handle clockwise 360 degrees or until the cups start to stretch.
-
Make sure the suction cups remain aligned with each other. If they begin to slip out of alignment, loosen the suction cups slightly and realign the arms.
-
-
-
Heat an iOpener and thread it through the arms of the Anti-Clamp.
-
Fold the iOpener so it lays on the bottom edge of the iPhone.
-
Wait one minute to give the adhesive a chance to release and present an opening gap.
-
Insert an opening pick into the gap.
-
Skip the next three steps.
-
-
-
Heating the lower edge of the iPhone will help soften the adhesive securing the display, making it easier to open.
-
Use a hairdryer or prepare an iOpener and apply it to the lower edge of the phone for about 90 seconds in order to soften up the adhesive underneath.
-
-
-
Apply a suction cup to the lower half of the front panel, just above the home button.
-
-
-
Pull up on the suction cup with firm, constant pressure to create a slight gap between the screen and the frame.
-
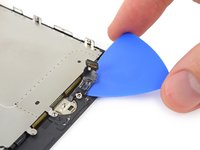
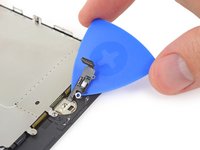
Insert an opening pick into the gap.
I bought a special tool from JerryRigEverything that is a thin, flat metal "knife." It easily made the first cut below the home button and then I used the blue plastic triangles with the 3mm marks to score around the rest of the edges. Careful, slow and patient wins the day here. Careful at the top. Don't just pull up on the screen, definitely push the screen down toward home button as there are a couple of "hooks" holding the screen to the body at the top of phone.
I used an electrician's heat gun for 90 seconds. Worked well. You don't have to pull up on the suction cup very much AT ALL. I bought a special tool from JerryRigEverything that is a thin, flat metal "knife." It easily made the first cut and then I used the blue plastic triangles with the 3mm marks to score around the rest of the edges. I did this in the exact order of the instructions and it worked well. Careful, slow and patient wins the day here. Careful at the top. Don't just lift up on the screen, definitely push the screen down toward home button as there are a couple of clips holding the screen to the body at the top of phone.
-
-
-
Slide the opening pick up the left edge of the phone starting at the lower edge and moving towards the volume control buttons and silent switch, breaking up the adhesive holding the display in place.
-
Stop near the top left corner of the display.
-
-
-
-
Re-insert your tool at the lower right corner of the iPhone, and slide it around the corner and up the right side of the phone to separate the adhesive.
-
-
-
Gently pull up on the suction cup to lift up the bottom edge of the display.
-
Pull on the small nub on the suction cup to remove it from the front panel.
-
-
-
Slide an opening pick underneath the display around the top left corner and along the top edge of the phone to loosen the last of the adhesive.
-
-
-
Slide the display assembly slightly down (away from the top edge of the phone) to disengage the clips holding it to the rear case.
-
-
-
Open the iPhone by swinging the display up from the left side, like the back cover of a book.
-
Lean the display against something to keep it propped up while you're working on the phone.
-
-
-
Remove the following four tri-point Y000 screws securing the lower display cable bracket to the logic board:
-
Three 1.2 mm screws
-
One 2.6 mm screw
-
-
-
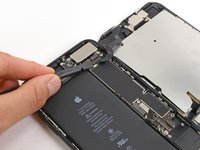
Remove the lower display cable bracket.
after I replaced my battery and tried to turn on my phone it would just stay on the apple logo and nothing would happen. I know I did everything right but… help
-
-
-
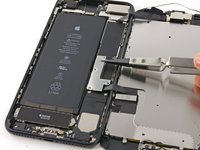
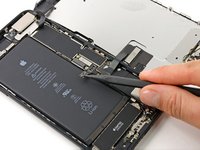
Use the point of a spudger to lift the battery connector out of its socket on the logic board.
-
-
-
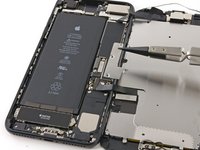
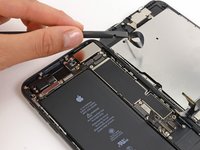
Use the flat end of a spudger or a fingernail to disconnect the two lower display connectors by prying them straight up from their sockets on the logic board.
-
-
-
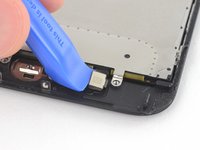
Remove the three tri-point Y000 screws securing the bracket over the front panel sensor assembly connector:
-
One 1.3 mm screw
-
Two 1.0 mm screws
-
Remove the bracket.
The bracket on my iPhone 7 has two screws PH000 instead of Y000. The bracket is glued to front panel sensor assembly connector
-
-
-
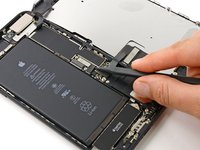
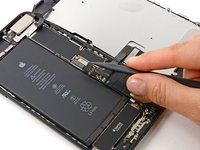
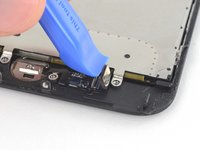
Disconnect the front panel sensor assembly connector from its socket on the logic board.
-
-
-
Remove the four Y000 screws securing the bracket over the home/Touch ID sensor:
-
One 1.1 mm screw
-
Three 1.3 mm screws
-
-
-
Remove the bracket that secures the home/Touch ID sensor.
-
-
-
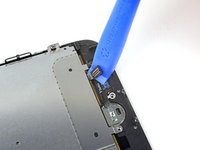
Pry under the left edge of the home button cable connector to disconnect it from its socket.
-
-
-
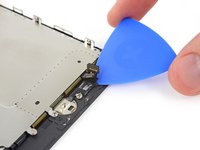
Carefully pry up the underlying connector and move it out of the way of the home/Touch ID cable.
-
If the connector doesn't pry up easily, use a hair dryer or iOpener to heat and soften the adhesive securing the connector, and then try again.
@Ben Just one tiny drop of isopropyl alcohol or it will reach the lcd screen.
-
-
-
Flip the display assembly over. Use a hairdryer or prepare an iOpener and apply it to the lower edge of the display for about 90 seconds in order to soften up the adhesive underneath.
-
-
-
Use an opening pick to gently separate the adhesive holding the home/Touch ID sensor cable to the back side of the display panel.
It cannot be stressed enough that this is the one part of this repair that you can’t screw up. Anything else you’ll deal with during this repair can be easily replaced (The screen, and the sensor/microphone/camera assembly). Tearing this cable means an expensive trip to the apple store. or a very unhappy customer if you’re doing this for someone. Heat is your friend. I don’t even use a spudger or a guitar pick for this one, I use a new playing card to pull this up. If the adhesive isn’t soft enough for the card to get it up, apply more heat. Again, you can’t screw this step up. It’s all or nothing.
A mio avviso questa operazione e’ follia
il chip del tasto home e’ delicatissimo se compromesso, il tasto home non funzionera’ piu’, la riparazione in apple o laboratorio microsaldature e’ altissima.
non conviene cambiare display su 7 e 8.
buona fortuna!!!
Would isopropyl alcohol help here?
-
-
-
Remove the home/Touch ID sensor assembly by lifting it through the front side of the display.
The real pain is in aligning the home button to insert it into the new display. The backside of the LCD leaves little/no room for maneuver because the angle is so tight. Curious about any recommendations to "pop" it back in. It looks like gently sitting it back into place is out of the question, which makes me a little queasy.
After reinstalling the original home button on the new screen, there is no response from the button. I tried putting the button back on the original screen and it works. The home button is not working with the new screen.
-


Compare your new replacement part to the original part—you may need to transfer remaining components or remove adhesive backings from the new part before installing.
To reassemble your device, follow the above steps in reverse order.
Take your e-waste to an R2 or e-Stewards certified recycler.
Repair didn’t go as planned? Try some basic troubleshooting, or search our Answers forum for help.
crwdns2935221:0crwdne2935221:0
crwdns2935229:0626crwdne2935229:0

crwdns2947412:021crwdne2947412:0
Is there any possibility to be sure the device is watertight after replacing the display assembly?
As far as I can tell there is no possible way to get it to the factory seal at this current time. Now that don't mean later on they make an adhesive we can put on the lips of the frame to make a seal like from factory.
What happened to the FaceTime camera, phone mic, ambient light sensor, and other things found in the top of previous phones
there still there at the top of the device. Once you take the plate off the back of the screen they basically fall off the screen.
This guide is not to the IFIXIT standard, the speaker/ambient light sensor assembly etc. cable is sensitive to damage and needs to be heated prior to removal, this is setting people up for failure.
Removing those components isn't part of this guide.
Can someone clarify what this is about? I will be replacing my screen once the components arrive and would like some clarification. Stevep526 believes that there will be damage caused to the speaker/ambient light sensor assy by following the procedure, and a few other comments are saying they are having this same issue.
@jacobcecilflip People are confused because they're trying to use this guide for more than it was intended. If you read the introduction, you'll note that this guide assumes you're installing a "complete" a.k.a. "full assembly" replacement display with a new front-facing camera assembly, speaker, and LCD shield plate already installed. If you buy a bare-bones display instead, you're going to have to remove those components from your old display and transfer them to your new display before installing it, and we don't have instructions for that quite yet. (But we will, eventually.)
I would not recommend purchasing this screen WHATSOEVER. I replaced my screen today, replacing everything correctly, the phone turned on, no issues. However, the screen is of terrible quality. There is screen lag, a grey cast (not because of loose cables or bad connections, it’s just the screen!) with awful coloring, terrible front camera, and it is much dimmer than the original screen. I would go to Ebay and buy a genuine apple screen if I were to do it all over again, and I would suggest you do that as well!
Stevep526: Thanks for the heads up on the cable. You saved my bacon! I was just about to pull the cable up when I read your comment (and this isn’t exactly a great guide) :)
My iPhone 7 Plus was replaced due to a cracked screen. I took it to the mall to get it repaired and not long after they fixed it my phone has been going in and out of a black screen. Would you know what it is? I’d like to try and fix it myself.
Is there anyway to repair an iPhone 7 Plus Screen and keep it waterproof?
Hm this is good
mobile soluation world italy - crwdns2934203:0crwdne2934203:0
Is the replacement screen the same for 7 plus and 7S plus?
Is the replacement screen the same for iPhone 7 plus and 7S plus?
Same issue as Pat. Took my time, was extremely meticulous and yet when I powered it on, the screen was completely washed out and when you adjust the brightness, the screen would pulse and jump at every touch. Pretty disappointed. Spent the extra money for iFixit parts and could’ve gotten the same quality for a third of the price on Amazon.
My phone was dropped and the screen went all black and I can still feel the vibration when I connect it to charge and when I hold to power button, would replacing the screen fix that?
Here is a general guide for applying adhesives. Hope it helps!
Hello! Thank you for you tutorial. I am interested in everything related to the world of mobile phone repairs. Also I would like to share my knowledge and learn more.
This is my website: lcd buy back
Have a good day
Bonsoir, Après changement de l'écran sur iPhone 7plus,au redémarrage l'écran affiché l'iPhone est désactivé se connecter à iTunes, pourquoi et que faire, merci pour la réponse
Ciao a tutti
Dopo aver cambiato schermo il telefono funziona tutto ma quando lo uso per 5 minuti si spegne e si riavvia.
Sapete dirmi il motivo?
The iOpener is JUNK. It SUCKS. Everyone who was suckered into buying this piece of crap has been RIPPED OFF.
Val - crwdns2934203:0crwdne2934203:0
lol there’s lots and lots of junk, just like many useless apple accessoires, but if they make one happy, then they should buy it
ibisiki -