crwdns2915892:0crwdne2915892:0
Use this guide to replace the Lightning connector assembly in your iPhone 7 Plus, which can resolve many charging and connectivity issues that cleaning cannot always fix.
crwdns2942213:0crwdne2942213:0
-
-
Power off your iPhone before beginning disassembly.
-
Remove the two 3.4 mm pentalobe screws at the bottom edge of the iPhone.
-
-
-
Measure 3 mm from the tip and mark the opening pick with a permanent marker.
How to break your phone more like i probably just buy another one its not worth the hassle geometry dash 2.2
Person who doesn’t know how to read a ruler.
-
-
crwdns2935267:0crwdne2935267:0Clampy - Anti-Clamp$24.95
-
Pull the blue handle backwards to unlock the Anti-Clamp's arms.
-
Slide the arms over either the left or right edge of your iPhone.
-
Position the suction cups near the bottom edge of the iPhone just above the home button—one on the front, and one on the back.
-
Squeeze the cups together to apply suction to the desired area.
Too bad that the instructions use equipment that are not sold with the repair kit that was supposed to be sufficient.
-
-
-
Pull the blue handle forwards to lock the arms.
-
Turn the handle clockwise 360 degrees or until the cups start to stretch.
-
Make sure the suction cups remain aligned with each other. If they begin to slip out of alignment, loosen the suction cups slightly and realign the arms.
-
-
-
Heat an iOpener and thread it through the arms of the Anti-Clamp.
-
Fold the iOpener so it lays on the bottom edge of the iPhone.
-
Wait one minute to give the adhesive a chance to release and present an opening gap.
-
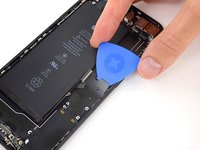
Insert an opening pick into the gap.
-
Skip the next three steps.
-
-
-
Heating the lower edge of the iPhone will help soften the adhesive securing the display, making it easier to open.
-
Use a hairdryer or prepare an iOpener and apply it to the lower edge of the phone for about 90 seconds in order to soften up the adhesive underneath.
-
-
-
Apply a suction cup to the lower half of the front panel, just above the home button.
-
-
-
Pull up on the suction cup with firm, constant pressure to create a slight gap between the screen and the frame.
-
Insert an opening pick into the gap.
I bought a special tool from JerryRigEverything that is a thin, flat metal "knife." It easily made the first cut below the home button and then I used the blue plastic triangles with the 3mm marks to score around the rest of the edges. Careful, slow and patient wins the day here. Careful at the top. Don't just pull up on the screen, definitely push the screen down toward home button as there are a couple of "hooks" holding the screen to the body at the top of phone.
I used an electrician's heat gun for 90 seconds. Worked well. You don't have to pull up on the suction cup very much AT ALL. I bought a special tool from JerryRigEverything that is a thin, flat metal "knife." It easily made the first cut and then I used the blue plastic triangles with the 3mm marks to score around the rest of the edges. I did this in the exact order of the instructions and it worked well. Careful, slow and patient wins the day here. Careful at the top. Don't just lift up on the screen, definitely push the screen down toward home button as there are a couple of clips holding the screen to the body at the top of phone.
-
-
-
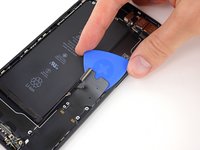
Slide the opening pick up the left edge of the phone starting at the lower edge and moving towards the volume control buttons and silent switch, breaking up the adhesive holding the display in place.
-
Stop near the top left corner of the display.
-
-
-
Re-insert your tool at the lower right corner of the iPhone, and slide it around the corner and up the right side of the phone to separate the adhesive.
-
-
-
Gently pull up on the suction cup to lift up the bottom edge of the display.
-
Pull on the small nub on the suction cup to remove it from the front panel.
-
-
-
Slide an opening pick underneath the display around the top left corner and along the top edge of the phone to loosen the last of the adhesive.
-
-
-
Slide the display assembly slightly down (away from the top edge of the phone) to disengage the clips holding it to the rear case.
-
-
-
Open the iPhone by swinging the display up from the left side, like the back cover of a book.
-
Lean the display against something to keep it propped up while you're working on the phone.
-
-
-
Remove the following four tri-point Y000 screws securing the lower display cable bracket to the logic board:
-
Three 1.2 mm screws
-
One 2.6 mm screw
-
-
-
Remove the lower display cable bracket.
after I replaced my battery and tried to turn on my phone it would just stay on the apple logo and nothing would happen. I know I did everything right but… help
-
-
-
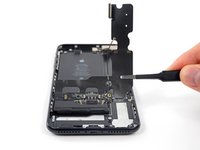
Use the point of a spudger to lift the battery connector out of its socket on the logic board.
-
-
-
Use the flat end of a spudger or a fingernail to disconnect the two lower display connectors by prying them straight up from their sockets on the logic board.
-
-
-
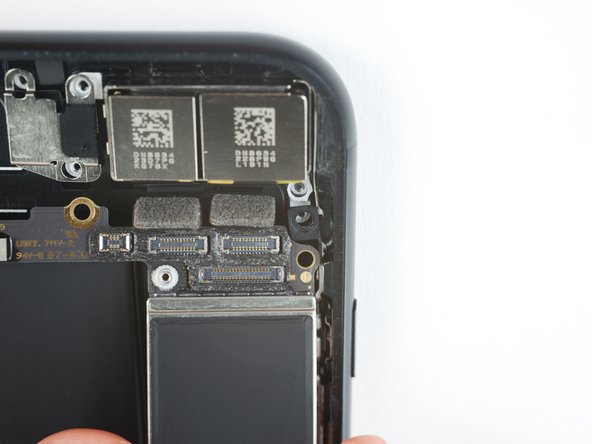
Remove the three tri-point Y000 screws securing the bracket over the front panel sensor assembly connector:
-
One 1.3 mm screw
-
Two 1.0 mm screws
-
Remove the bracket.
The bracket on my iPhone 7 has two screws PH000 instead of Y000. The bracket is glued to front panel sensor assembly connector
-
-
-
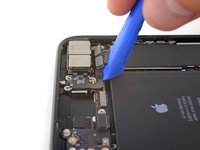
Disconnect the front panel sensor assembly connector from its socket on the logic board.
-
-
-
-
Remove three Phillips screws securing the antenna component:
-
Two 1.3 mm screws
-
One 1.2 mm screw
-
-
-
Remove the 1.3 mm Phillips screw securing the antenna component to the top edge of the rear case.
-
-
-
Tilt the antenna component up towards the top of the phone.
-
Slide the screw boss down and out of its recess.
-
-
-
Remove the top left antenna component.
-
-
-
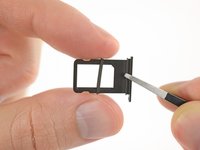
Insert a SIM card eject tool or a paperclip into the small hole in the SIM card tray.
-
Press firmly to eject the tray.
-
-
-
Remove the SIM card tray from the iPhone.
-
-
-
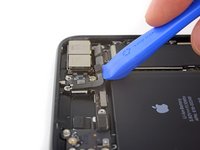
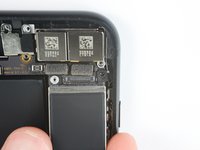
Use an iFixit opening tool or a fingernail to disconnect the dual camera cable connectors by prying them straight up from their sockets.
-
-
crwdns2935267:0crwdne2935267:0Standoff Screwdriver for iPhones$5.49
-
Remove the two screws securing the rear-facing camera bracket:
-
One 1.6 mm Phillips screw
-
One 2.2 mm standoff screw
-
-
-
Remove the bracket covering the rear-facing camera.
-
-
-
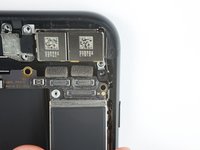
Remove the two 1.3 mm Phillips screws securing the upper cable bracket.
-
-
-
Remove the two 1.3 mm Phillips screws securing the grounding clip at the top left edge of the logic board.
-
-
-
Remove the 1.3 mm Phillips screw securing the antenna flex cable to the top edge of the iPhone's rear case.
-
Remove the remaining Phillips screw from the antenna flex cable.
-
-
-
Use a fingernail or the sharp end of an iFixit opening tool to pry up and disconnect the antenna flex cable connector from the logic board.
-
-
-
Slide the flat edge of a spudger underneath the antenna flex cable to separate the adhesive holding it in place.
The step showing that that screw is removed is missing.
-
-
-
Tilt the antenna flex cable up toward the top of the iPhone.
-
Slide the screw boss down and out of its recess.
-
Remove the antenna flex cable.
-
-
crwdns2935267:0crwdne2935267:0Tweezers$4.99
-
Use a thin pry tool or tweezers to carefully pry up and disconnect the two coaxial cable connectors from the logic board.
-
-
-
Disconnect the two remaining ribbon cables from the logic board:
-
Disconnect the upper cable connector by prying from the top
-
Disconnect the Lightning port connector by prying along the outer edge
-
-
crwdns2935267:0crwdne2935267:0iFixit Precision 4 mm Screwdriver Bit$2.99
-
Remove the seven screws securing the logic board:
-
One 1.3 mm Phillips screw
-
Two 2.1 mm standoff screws
-
One 2.0 mm standoff screw with a large head
-
One 2.0 mm standoff screw with a small head
-
Two 2.2 mm standoff screws
It looks like the iPhone Standoff Screwdriver Bit isn’t actually available on the link in this guide.
Why is that?
Are there actually standoff screw bits for the iFixit kits?
This is a bit irritating that I have ~90 iFixit bits but not one for standoff’s.
-
-
-
Use the point of a spudger to push the SIM card eject plunger out of the logic board's way.
-
-
-
Use the point of a spudger to carefully de-route the two coaxial cables from the small metal clip holding them to the logic board.
The cables need to be popped out of the clip by moving them to the left, towards the battery.
-
-
-
Lift the logic board from the bottom edges and slide it toward the bottom of the iPhone to remove it.
-
-
-
Remove the following two Phillips screws securing the barometric vent to the rear case:
-
One 2.9 mm screw
-
One 2.1 mm screw
“Remove the following Phillips screws” BUT DON’T TELL ME WHAT SIZE SCREWDRIVER TO USE…
It’s in the tools list at the top of the guide.
-
-
-
Gently push the barometric vent in the direction of the Taptic Engine to separate the adhesive securing it to the bottom edge of the iPhone.
-
-
-
Pry up the Taptic Engine's ribbon cable connector to disconnect it.
-
-
-
Remove the three 1.5 mm Phillips screws securing the Taptic Engine to the rear case.
-
-
-
Carefully de-route the two coaxial cables from the metal bracket holding them to the side of the speaker.
-
-
-
Remove the five Phillips screws securing the speaker:
-
Three 1.3 mm screws
-
One 2.3 mm screw
-
One 3.3 mm screw
-
-
-
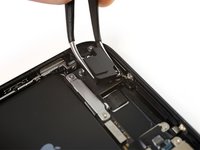
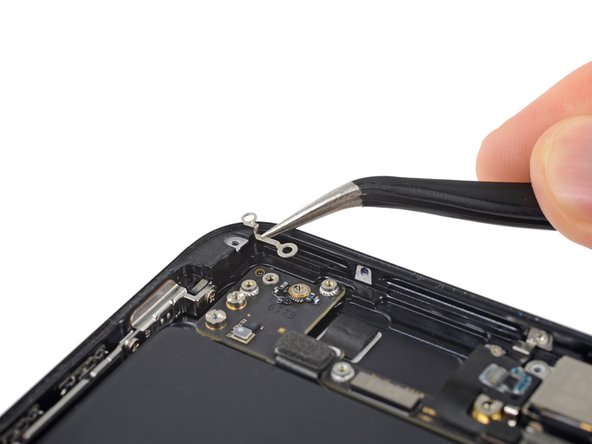
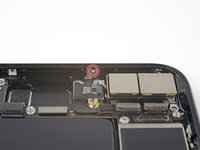
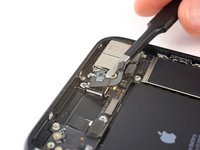
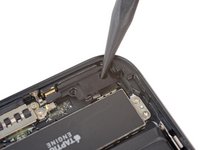
Remove the 2.9 mm Phillips screw at the top left of the Lightning port.
-
-
-
Remove the spring contact underneath the screw you just removed.
-
-
-
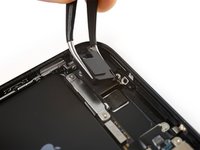
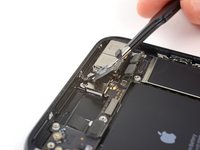
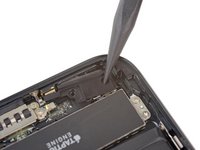
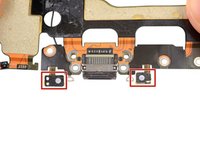
Remove the following three Phillips screws securing the Lightning connector:
-
Two 1.7 mm screws
-
One 2.8 mm screw
-
-
-
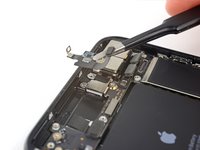
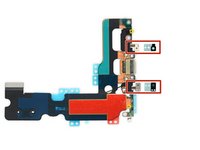
Remove the two 1.2 mm Phillips screws securing the Lightning port to the bottom edge of the iPhone.
-
-
-
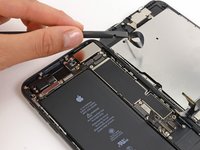
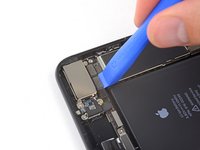
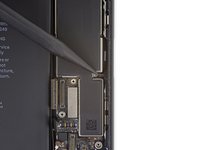
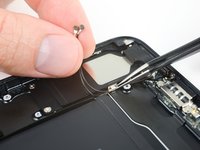
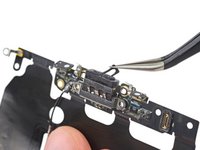
Use the sharp edge of an iFixit Opening Tool to pry the two microphones free from the adhesive securing them in place.
-
-
-
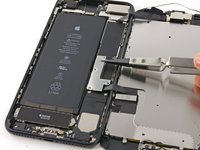
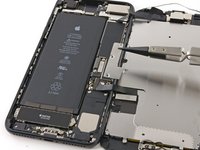
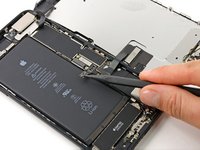
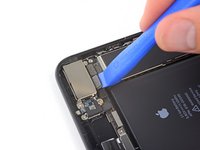
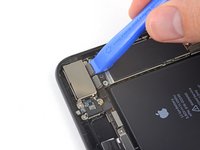
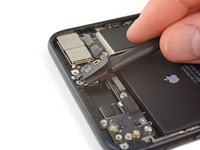
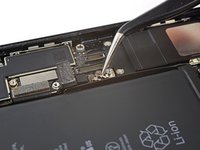
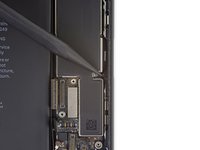
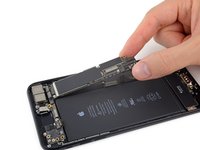
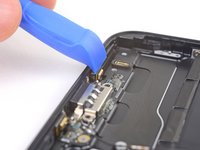
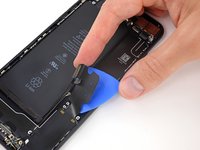
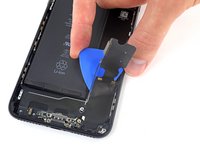
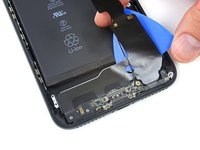
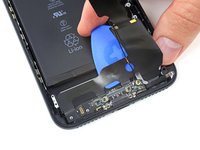
Slide an opening pick or thin pry tool underneath the top portion of the Lightning connector assembly flex cable, and begin separating it from the rear case.
-
-
-
Continue separating the upper portion of the flex cable, being careful not to damage any other components along the way.
-
-
-
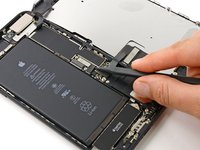
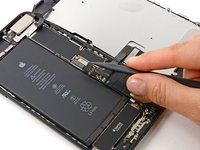
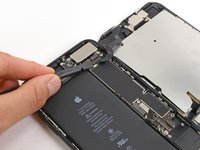
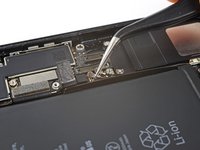
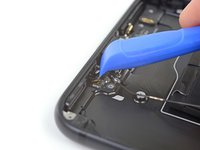
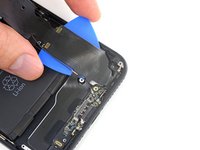
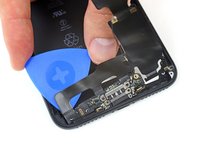
Carefully slide your pick from the corner of the battery to the corner of the iPhone to separate the portion of the flex cable adhered to the outer frame.
-
-
-
Slide your pick across the width of the iPhone to separate all the remaining strands of the flex cable from the rear case.
-
-
-
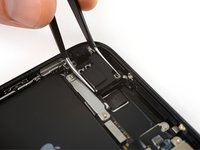
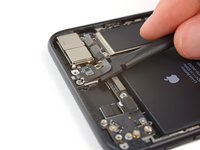
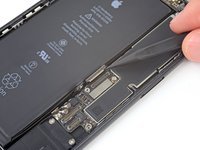
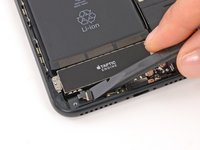
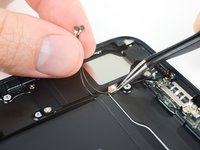
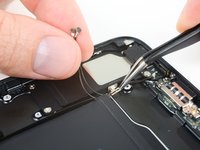
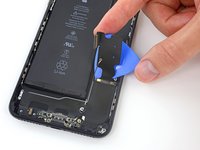
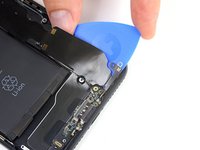
Remove the Lightning connector assembly.
-
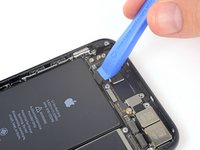
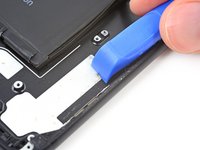
Use a plastic tool to scour any bits of adhesive residue from the rear case.
-
You can clean any remaining residue from the surface with isopropyl alcohol (90% concentration or greater) and a lint-free cloth. Wipe in one direction only, not back and forth.
-
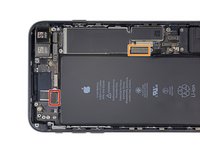
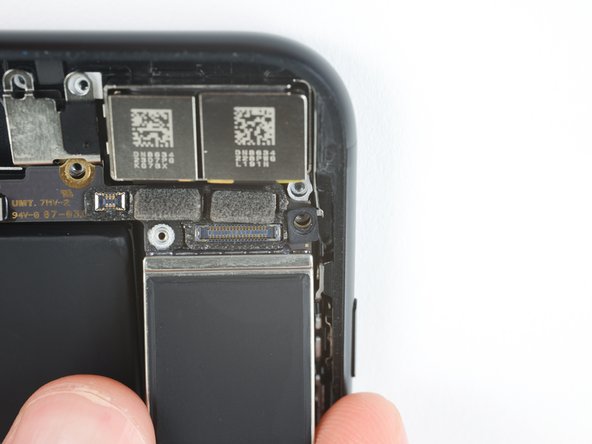
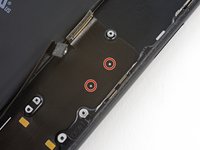
Make sure the Lightning connector assembly is correctly positioned so that the two white dots on the iPhone's rear case show through the two circular cutouts in the Lightning flex cable. If they don't, the flex cable will remain misaligned and you won't be able to reconnect it to its socket on the logic board.
Extremely upsetting that there is not more emphasis put on this step. This may be a failed project now.
I will have to go back 44 steps to realign the lightning connector which is like the other comment said off by less than a millimeter (almost imperceptible. Then I will have to put it back together again 59 more steps. So literally will have to do over 100 more steps because of the lack of clarity here.
-
-
I've replaced it and assembled it back, but it still isn't charging and seems dead, anyone experienced the same/knows why? There shouldn't be any other issues as it was working two days before the charging port died.


Compare your new replacement part to the original part—you may need to transfer remaining components or remove adhesive backings from the new part before installing.
To reassemble your device, follow the above steps in reverse order.
Take your e-waste to an R2 or e-Stewards certified recycler.
Repair didn’t go as planned? Try some basic troubleshooting, or search our Answers forum for help.
crwdns2935221:0crwdne2935221:0
crwdns2935229:0198crwdne2935229:0


crwdns2947412:07crwdne2947412:0
THIS TOOK 8 HOURS BECAUSE I DID NOT HAVE THE STANDOFF SCREW TOOL…..STRIPPED THREADS IN ALUMINUM BODY FRAME.
I strongly urge Ifixit to change this comment “In a pinch, a flathead screwdriver will do the job” - maybe ok for REMOVAL ONLY, but for REASSEMBLY - it is very dangerous - i used a flathead while fixing my daughters phone and they kept going crooked/would not thread in - easily causing me 1-2 hours of frustration and STRIPPING THE THREADS IN THE ALUMINUM BACK FRAME BODY !!!!
I had to hot glue a couple spots and skip several screws on reassembly to do the jankiest, most embarrasing repair job - BUY THE RIGHT SPECIAL TOOL FOR THE STANDOFF SCREWS OR YOU’LL REGRET IT!!!
Did the repair step by step. reversed and put all back together. The phone works i all functions but, when making a call, the receiver of the call hears crackling and con only hear my voice if I talk close to the mic and loud/ continuously. I can hear them perfectly. I believe all is back together because all is working 95% just need microphone to work better? BTW I purchased part on Ebay but they stated it is a Iphone OEM replacement part. Any ideas would be appreciated, thx
Hello, i just changed the lightning connector on my Iphone, everything works great! except!!!! no once can hear me. Any suggestions on where I need to go and check? Thanks.
I followed the instructions to the letter, was very very very careful with handling the ribbon cables and keeping the screws labelled in separate pots so they went back in exactly the right places, changed the charging port and installed a brand new ifixit battery for good measure. Put it all back together and…nothing. Battery won’t charge, neither will the old one. Powers on with the old battery but thats it. Have checked all my work several times, re-attached the ribbon cables and still nothing. I now have to take it to one of those untrustworthy mobile phone repair shops you find all over the UK that I have been trying so hard to avoid. A massive waste of time and money.
Make sure all cables you removed went back on all the way & without any dust or debris. Hope you get it figured out
Carter -
Do screw to screw holes matter, I can't remember which length goes where... Everything is in place and my phone still wont' charge, it was working 2 days ago before my charging port decided it didn't want to work.
I've done all the steps and replaced my charging port. However the phone still doesn't start up, it was ok about a day
The iOpener is JUNK. It SUCKS. Everyone who was suckered into buying this piece of crap has been RIPPED OFF.
Val - crwdns2934203:0crwdne2934203:0
lol there’s lots and lots of junk, just like many useless apple accessoires, but if they make one happy, then they should buy it
ibisiki -