
iPhone 7 Plus Home/Touch ID Sensor Replacement

crwdns2944107:0crwdnd2944107:0Paige Reismancrwdnd2944107:0crwdnd2944107:0crwdnd2944107:011crwdnd2944107:0crwdne2944107:0
crwdns2944111:0Maw 10, 2024crwdne2944111:0
crwdns2915892:0crwdne2915892:0
crwdns2942287:0crwdne2942287:0The iPhone 7 Plus home “button” is actually a solid-state sensor, which also includes Touch ID (fingerprint recognition) capability.
Most replacement home buttons won’t work, so check carefully before starting your repair. Your iPhone’s original home button is uniquely paired to the logic board at the factory—and without Apple’s proprietary calibration process, even a genuine replacement home button from another iPhone won’t work. To fix a broken home button, you should install a specially-made, universal-style home button. Note that these replacements only work as a button; Touch ID will not function.
If you are only replacing a broken screen, you can use this guide to carefully remove and transfer your working original home button to a new screen, preserving all functions, including Touch ID.
During this procedure, to avoid accidentally straining or tearing the display cables, it's best to completely detach the display assembly before beginning repairs on the home/Touch ID sensor. But if you are comfortable doing so, you may skip the display assembly section of this guide and go straight to the home/Touch ID sensor section.
crwdns2942213:0crwdne2942213:0
crwdns2943213:0crwdne2943213:0


crwdns2943215:0crwdne2943215:0


crwdns2944105:0crwdne2944105:0

-
-
Power off your iPhone before beginning disassembly.
-
Remove the two 3.4 mm pentalobe screws at the bottom edge of the iPhone (using a P2 screw bit, if you have a set of bits).
-
-
-
Measure 3 mm from the tip and mark the opening pick with a permanent marker.
-
-
crwdns2935267:0crwdne2935267:0Clampy - Anti-Clamp$24.95
-
Pull the blue handle backwards to unlock the Anti-Clamp's arms.
-
Slide the arms over either the left or right edge of your iPhone.
-
Position the suction cups near the bottom edge of the iPhone just above the home button—one on the front, and one on the back.
-
Squeeze the cups together to apply suction to the desired area.
-
-
-
Pull the blue handle forwards to lock the arms.
-
Turn the handle clockwise 360 degrees or until the cups start to stretch.
-
Make sure the suction cups remain aligned with each other. If they begin to slip out of alignment, loosen the suction cups slightly and realign the arms.
-
-
-
Heat an iOpener and thread it through the arms of the Anti-Clamp.
-
Fold the iOpener so it lays on the bottom edge of the iPhone.
-
Wait one minute to give the adhesive a chance to release and present an opening gap.
-
Insert an opening pick into the gap.
-
Skip the next three steps.
-
-
-
Heating the lower edge of the iPhone will help soften the adhesive securing the display, making it easier to open.
-
Use a hairdryer or prepare an iOpener and apply it to the lower edge of the phone for about 90 seconds in order to soften up the adhesive underneath.
-
-
-
Apply a suction cup to the lower half of the front panel, just above the home button.
-
-
-
Pull up on the suction cup with firm, constant pressure to create a slight gap between the screen and the frame.
-
Insert an opening pick into the gap.
-
-
-
Slide the opening pick up the left edge of the phone starting at the lower edge and moving towards the volume control buttons and silent switch, breaking up the adhesive holding the display in place.
-
Stop near the top left corner of the display.
-
-
-
Re-insert your tool at the lower right corner of the iPhone, and slide it around the corner and up the right side of the phone to separate the adhesive.
-
-
-
Gently pull up on the suction cup to lift up the bottom edge of the display.
-
Pull on the small nub on the suction cup to remove it from the front panel.
-
-
-
Slide an opening pick underneath the display around the top left corner and along the top edge of the phone to loosen the last of the adhesive.
-
-
-
Slide the display assembly slightly down (away from the top edge of the phone) to disengage the clips holding it to the rear case.
-
-
-
Open the iPhone by swinging the display up from the left side, like the back cover of a book.
-
Lean the display against something to keep it propped up while you're working on the phone.
-
-
-
Remove the following four tri-point Y000 screws securing the lower display cable bracket to the logic board:
-
Three 1.2 mm screws
-
One 2.6 mm screw
-
-
-
Remove the lower display cable bracket.
-
-
-
Use the point of a spudger to lift the battery connector out of its socket on the logic board.
-
-
-
Use the flat end of a spudger or a fingernail to disconnect the two lower display connectors by prying them straight up from their sockets on the logic board.
-
-
-
Remove the three tri-point Y000 screws securing the bracket over the front panel sensor assembly connector:
-
One 1.3 mm screw
-
Two 1.0 mm screws
-
Remove the bracket.
-
-
-
Disconnect the front panel sensor assembly connector from its socket on the logic board.
-
-
-
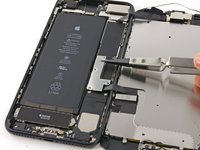
Remove the four Y000 screws securing the bracket over the home/Touch ID sensor:
-
One 1.1 mm screw
-
Three 1.3 mm screws
-
-
-
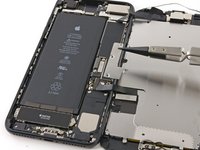
Remove the bracket that secures the home/Touch ID sensor.
-
-
-
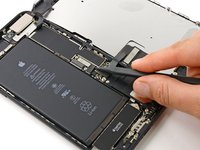
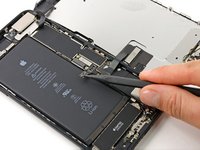
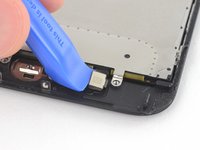
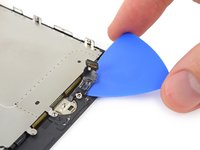
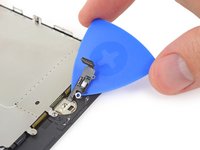
Pry under the left edge of the home button cable connector to disconnect it from its socket.
-
-
-
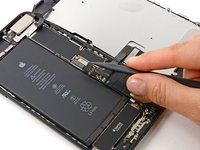
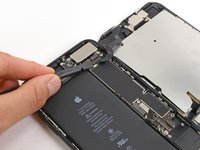
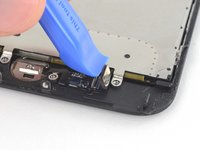
Carefully pry up the underlying connector and move it out of the way of the home/Touch ID cable.
-
If the connector doesn't pry up easily, use a hair dryer or iOpener to heat and soften the adhesive securing the connector, and then try again.
-
-
-
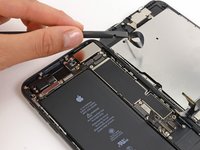
Flip the display assembly over. Use a hairdryer or prepare an iOpener and apply it to the lower edge of the display for about 90 seconds in order to soften up the adhesive underneath.
-
-
-
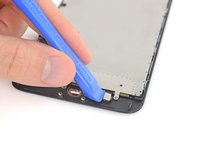
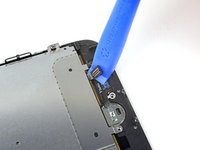
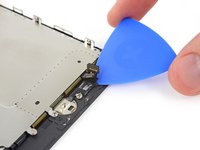
Use an opening pick to gently separate the adhesive holding the home/Touch ID sensor cable to the back side of the display panel.
It cannot be stressed enough that this is the one part of this repair that you can’t screw up. Anything else you’ll deal with during this repair can be easily replaced (The screen, and the sensor/microphone/camera assembly). Tearing this cable means an expensive trip to the apple store. or a very unhappy customer if you’re doing this for someone. Heat is your friend. I don’t even use a spudger or a guitar pick for this one, I use a new playing card to pull this up. Even with the card, you have to be careful. The edge of the playing card can nick the cable if you’re not careful to get it under the ribbon cable. If the adhesive isn’t soft enough for the card to get it up, apply more heat. Again, you can’t screw this step up. It’s all or nothing.
Thanks for the tip! worked great!
Do you know what I need to do if I damage the cable?
Yes playing card is what I used too, worked very well. Just heat it up(I used a 3D printer bed for 30 seconds at 80°). Just go slow from right to left.
Well, no visible damage but the home button won’t work. I contacted a local Apple Authorized Service Center to check options. Since I had personally replaced the screen assembly, they wouldn’t even look at it per Apple policy. They said they would jeopardize their Apple Authorization if they even looked at it. Seems like more of the “Right to Repair” problem to me. Frustrated, but at least I have the accesibility home button working.
Make sure the home button screws aren’t overtightened; that often causes issues. If there’s any damage to the button cable, a repair shop with a skilled microsolderer can patch a new cable on and restore functionality. iPhone 7 home button not working after screen replacement? Worst case scenario, you can also buy a screen repair from Apple, and they’ll include a new home button. I am not a lawyer, but the response you’re describing from the AASP sounds way out of bounds. Good luck!
I don’t know why this step does not include a major warning about it being by far the most challanging step. I started before reading the comments and most likely screwed my home button with it,
I don’t know if it is a broken cable or if it was too much heat later…but I scratched the cable on the first try with the plectrum. It took lots of heat to soften the adhesive and then it worked WAY better for me to start removing the connector from the near side of the home button. And not, as shown, on the far side.
Wish I had known that before - the homebutton ist not working anymore now (and it’s not the screws).
Robert -
Just keep in mind that this is a very delicate step that requires a lot of patience. the part is attached to the body of the phone so firmly and there is no gap to put the opening pick under. So the way I did it was applying a good amount of heat onto the part and not from behind. I did it constantly for 5 minutes, a few minutes at a time, then I pulled the connected up slightly (a little too much pressure on the pull and you will break the wire). Pull it constantly and If the heat has been enough to melt the adhesive, it should come off easily and slowly.
Hi, a little thing to help : i heatened up and then insert a cutter blade to start. Work better
Okay the home button is connected, as touch id works, but I can’t get any motion out of it. I backed off the screws, but that didn’t help. What else can I try?
The home button on an iPhone 7 Plus doesn’t move at all. Anything you feel during normal operation is a small vibration from the Taptic Engine that tricks your brain into thinking the button is moving.
Salve, vorrei un vostro aiuto, ho un problema con il tasto home (il tasto è originale preso dal vecchio display rotto) una volta sostituito il Touch ID funziona perfettamente (l’iPhone si sblocca e legge l’impronta digitale) il tasto invece no (il click per intenderci) cosa può essere? Grazie!
I had to use the iOpener tool twice before the adhesive was soft enough to remove the cable with the pick.
How do I get the home button out? I got the ribbon up.. just not sure how the button comes out
Hi, i replaced the screen and home button, the home button was a bit difficult. When i turn on the Phone, touch id works fine but not home button function. Any idea ?
More precisely, i was wondering if the home button could not work while touch idea does…
Jim -
Wow…I did a lot of praying during this step.
This was a very difficult step… I found using heat wasn't removing the adhesive for my home button. Found a video online that recommended using a playing card and a tiny bit of rubbing alcohol on the corner and slowly sliding it under. I was able to finally remove my home button using this tip.
Heat via hairdryer applied for a solid 3 minutes worked for me.
Thank the stars that I looked at these comments. I managed to do this and transferred the home button successfully. The pick is not good enough to do this job. The suggestion to use a new playing card helped. I also found that if you use a single edged razor to ply apart the bezel from the screen then when you apply heat with the heat gun the bezel will melt and bend a bit out of shape allowing you to use the playing card to lift the home button strip away from the bezel. The adhesive on the old home button strip was enough to stick it to the new screen bezel without having to buy new adhesive.
Thanks for the tip on the new playing card and rubbing some isopropyl alcohol on the corner of the card! I also peeled back the metal plate on the broken screen to get that bracket out of the way for better access to the cable. After applying heat and slowly and steadily working up the cable with the card, the home button popped out in proper working order.
Given that the old screen was already broken. I cut away the part of the screen where the button is, this gave easy access to the side of the ribbon cable which made it simple to gently pry it up and separate it from the plastic case.
After successful screen replacement, returning to give my thanks here. Excellent tips from you all - if you’re using force, you’re doing it wrong. All tips about direct heat, new playing card, bending back the metal bracket on the broken screen, screen protector to hold the replaced home button in place … perfect. Slow and patient, heat and almost no pressurel! Thank you all!
I wish I have read the comments first. Was not patient enough and despite applying heat for several minutes I used force with the thin pick and "successfully" cut away the connector 😔 Can't stress enough I should have been patient and do slowly... even without reading the good advice above!
-
-
-
Remove the home/Touch ID sensor assembly by lifting it through the front side of the display.
-


Compare your new replacement part to the original part—you may need to transfer remaining components or remove adhesive backings from the new part before installing.
To reassemble your device, follow the above steps in reverse order.
Take your e-waste to an R2 or e-Stewards certified recycler.
Repair didn’t go as planned? Try some basic troubleshooting, or search our Answers forum for help.
crwdns2935221:0crwdne2935221:0
crwdns2935229:0101crwdne2935229:0
crwdns2947821:0crwdne2947821:0
crwdns2947823:0crwdne2947823:0


crwdns2947412:017crwdne2947412:0
Correct, and that is also stated in the introduction. This guide is primarily for folks who need to transfer the home button onto a new/replacement display. So Jeff if I'm transferring button to a new display will I retain Touch ID functionality? Or would it be lost? My screen is cracked and I want to replace it. Thanks.
Yes, if you carefully move your original home button to your new display, it should be good as new, Touch ID and all.
Can the home button not be removed through the back? Does it only come through the front?
You can replace the home button but your touch ID wont work anymore. Apple has it coded with your logic board. once you remove it yes, the home button will work well but you can't use the touch ID.
Hello,
The home button was cracked with keys in my pocket when it cracked the home button is started to heat when screen is turned off , when i use with display turned on the home button we not heat, Am wondering what could be wrong,
Any suggestion is appreciated
Does home button will work? after replacing with after-market home button, i just want know any one tried it?
i know touch id will not work.
Recently i have replaced the home button with after market, the phone will not boot up, just flashing with apple logo.
after replacing original it worked for me.
home screen by itself the estimate is $ 169 but “other” damage is estimated at $ 349 (US dollars)
@jeffsu , replacing a button outside Apple will allow me to use the iphone with the assist or not at all?
You can always use Assistive Touch (virtual/on-screen home button). Outside of Apple, replacing the physical sensor/button will restore your button “click” function, but not Touch ID.
hey when i try to replace my home button it dosen’t click or work at all when i try to use it any suggestions?
I bought Home button for iPhone 7 Plus but not working
help my, what I do?
I’m wondering how this button actually works with regard to responsiveness. I just replaced my 7+ screen with an Ifixit screen but I have used a cheap $10 Amazon home button as I messed up in the screen replacement process!
It seems that the cheaper home buttons work but they are sometimes unresponsive and indeed the button that I have now seems to work OK , obviously no touch ID, but it appears not to work at all on occasion and at other times seems to have a delay associated with it. So my question is is this the case with the $25.03 / 3x times the price I fix it button? I’d probably be willing to spring for the price the home button if I knew it worked exactly the same as the Apple one says touch ID.
I just changed the home button of my iPhone 7 Plus and it still doesn’t work. Any ideas what else could be the problem?
Sadly I bought my iPhone with the broken home button and after reset I can’t start it because i’m stuck at the welcome screen “press home button to open” so I can’t activate assistive touch because i’m stuck before I can start the setup. any workaround for this?
Can a home button be bought from apple with the touch ID if so where? Can the after market home button be programed?
i need to replace the o-ring/seal for the iphone 7 home button. can you tell me how to properly seat/install the seal on the button before inserting it back into the screen assembly?
Thanks
زر لا يعمل ولاكن بصمه تشتغل
홈버튼 구입하지 마세요
작동불 거짓말입니다
Depois que troquei a tela e coloquei o botão home ele só funciona a digital , a função home não está funcionando mais , será que danifique ou apertei demais e causa isso ?