
iPhone 6 Rear Case Replacement

crwdns2944107:0crwdnd2944107:0Sam Goldheartcrwdnd2944107:0crwdnd2944107:0crwdnd2944107:010crwdnd2944107:0crwdne2944107:0
crwdns2944111:0Sun 26, 2023crwdne2944111:0
crwdns2915892:0crwdne2915892:0
crwdns2942287:0crwdne2942287:0Use this guide to strip and replace the rear case of your iPhone 6.
crwdns2942213:0crwdne2942213:0
crwdns2943213:0crwdne2943213:0


crwdns2943215:0crwdne2943215:0


crwdns2944105:0crwdne2944105:0

-
-
Power off your iPhone before beginning disassembly.
-
Remove the two 3.6 mm-long P2 Pentalobe screws next to the Lightning connector.
-
-
crwdns2935267:0crwdne2935267:0Clampy - Anti-Clamp$24.95
-
Pull the blue handle backwards to unlock the Anti-Clamp's arms.
-
Slide the arms over either the left or right edge of your iPhone.
-
Position the suction cups near the bottom edge of the iPhone just above the home button—one on the front, and one on the back.
-
Squeeze the cups together to apply suction to the desired area.
-
-
-
Pull the blue handle forwards to lock the arms.
-
Turn the handle clockwise 360 degrees or until the cups start to stretch.
-
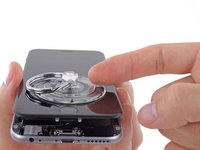
Insert an opening pick under the screen when the Anti-Clamp creates a large enough gap.
-
Skip the next three steps.
-
-
crwdns2935267:0crwdne2935267:0Clampy - Anti-Clamp$24.95
-
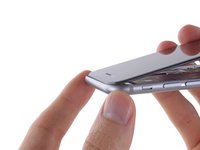
If you don't have an Anti-Clamp, use a single suction cup to lift the front panel:
-
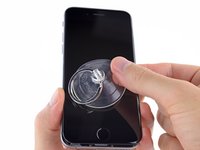
Press a suction cup onto the screen, just above the home button.
-
-
-
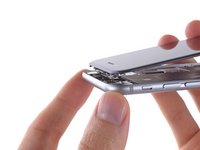
While holding the iPhone down with one hand, pull up on the suction cup to slightly separate the front panel assembly from the rear case.
-
Using a plastic opening tool, begin to gently pry the rear case down, away from the display assembly, while continuing to pull up with the suction cup.
-
-
-
Pull the plastic nub to release the vacuum seal on the suction cup.
-
Remove the suction cup from the display assembly.
-
-
-
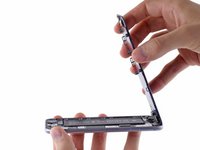
Open the iPhone by swinging the home button end of the front panel assembly away from the rear case, using the top of the phone as a hinge.
-
-
-
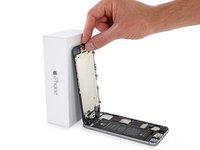
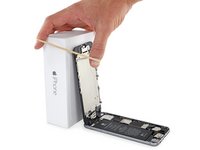
Open the display to about a 90º angle, and lean it against something to keep it propped up while you're working on the phone.
-
Add a rubber band to keep the display securely in place while you work. This prevents undue strain on the display cables.
-
-
crwdns2935267:0crwdne2935267:0Magnetic Project Mat$19.95
-
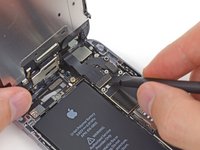
Remove the following Phillips screws from the battery connector bracket:
-
One 2.2 mm screw
-
One 3.2 mm screw
-
-
-
Remove the metal battery connector bracket from the iPhone.
-
-
-
Use a plastic opening tool to gently pry the battery connector up from its socket on the logic board.
-
-
-
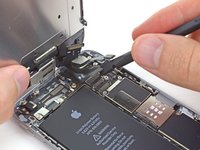
Remove the following five Phillips screws securing the front panel assembly cable bracket:
-
Three 1.2 mm screws
-
One 1.7 mm screw
-
One 3.1 mm screw
-
-
-
Remove the front panel assembly cable bracket from the logic board.
-
-
-
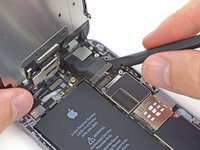
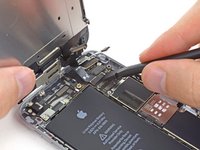
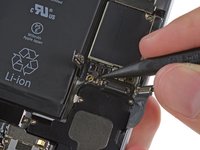
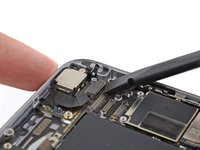
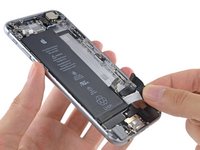
Use a spudger or a fingernail to disconnect the front-facing camera and sensor cable connector.
-
-
-
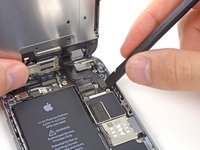
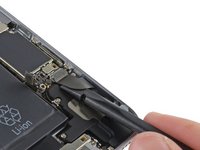
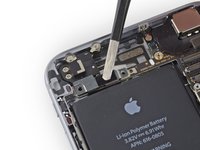
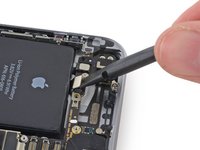
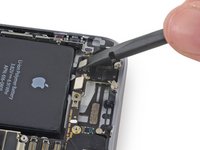
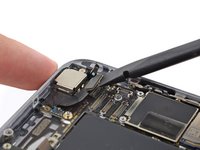
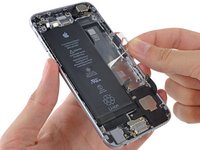
Use a spudger or a fingernail to disconnect the home button cable connector.
Muy buenas....una pregunta tecnica...si el botón falla o no está bien conectado...al conectar este conector ¿ se apagaría el teléfono?. Repare mi iphone y al conectarlo se me apaga el movil, sin embargo si no lo enchufo el movil enciende perfectamente.
Gracias.
I have the same problem. The phone turns on when I disconnect the home button cable, but turns off some seconds after I reconnect it. Does anybody have a solution?
If you look in the prior steps , it clearly says to disconnect the battery when disassembling and reassembling.
-
-
-
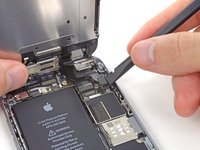
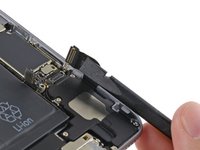
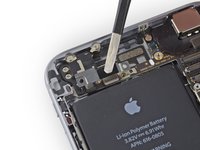
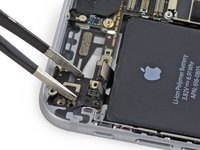
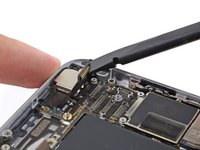
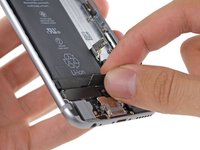
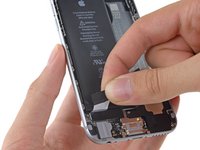
Use a spudger or a fingernail to disconnect the display data cable connector.
-
-
-
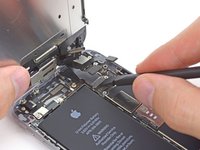
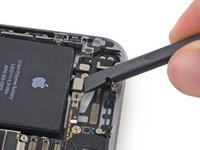
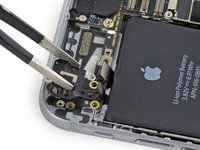
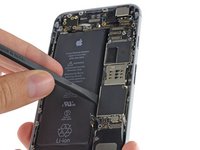
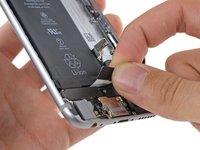
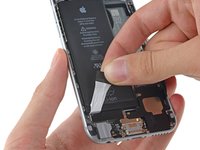
Use the flat end of a spudger to disconnect the digitizer cable connector.
-
-
-
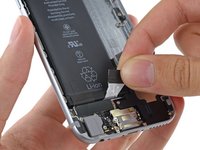
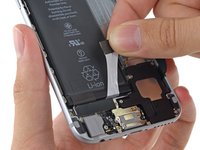
Remove the front panel assembly from the rear case.
-
-
-
Insert a SIM card eject tool or a paperclip into the small hole in the SIM card tray.
-
Press to eject the tray.
-
-
-
Remove the SIM card tray assembly from the iPhone.
-
-
-
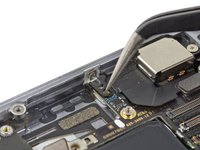
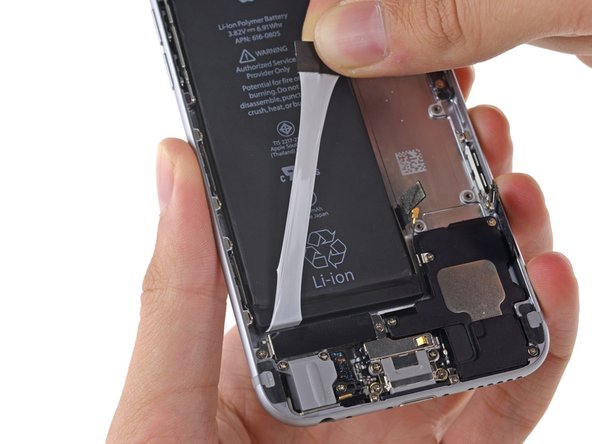
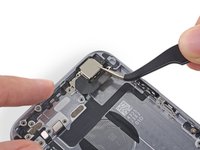
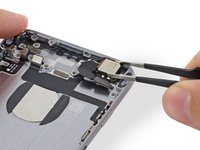
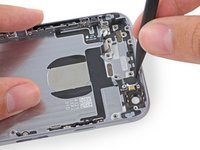
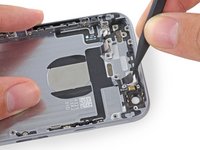
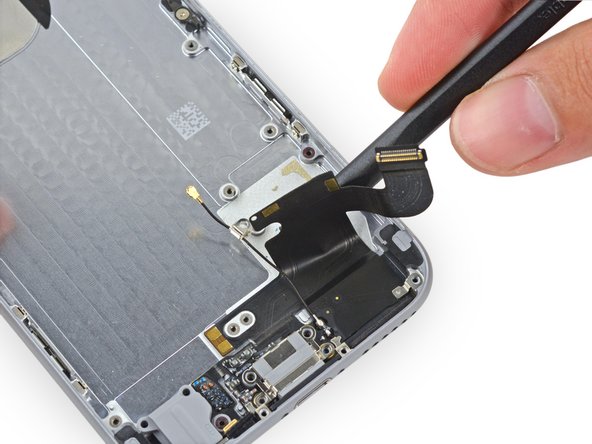
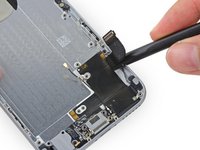
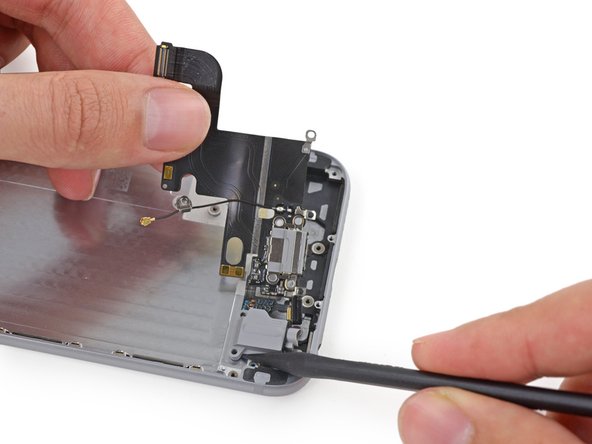
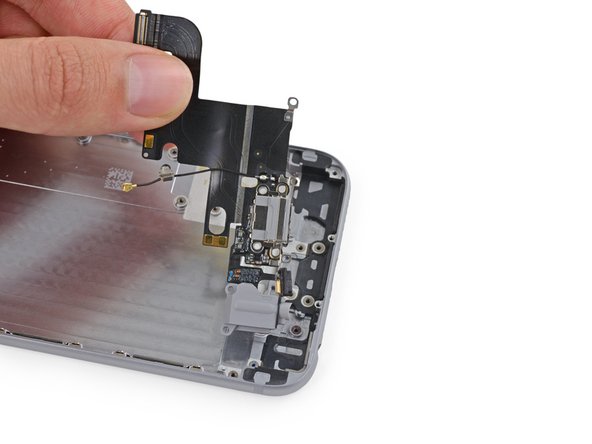
Use the flat end of a spudger to disconnect the Lightning connector assembly cable and fold it out of the way of the speaker.
-
-
-
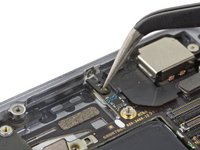
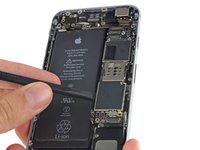
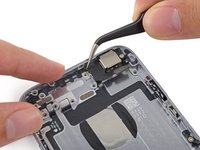
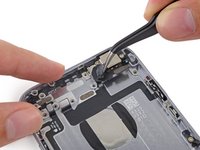
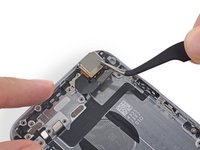
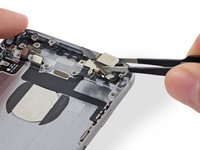
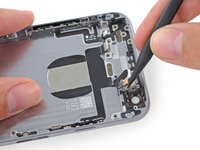
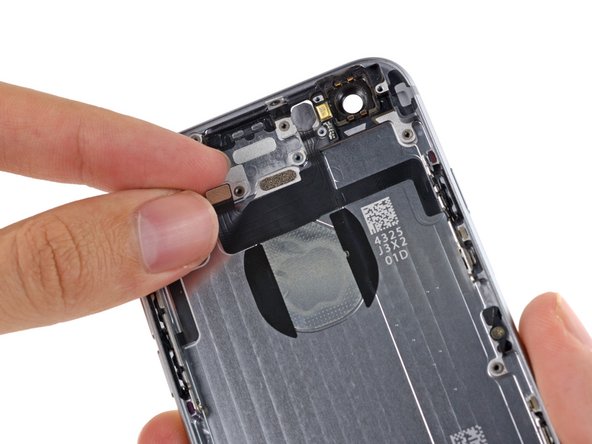
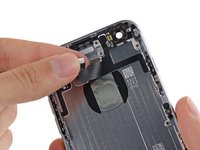
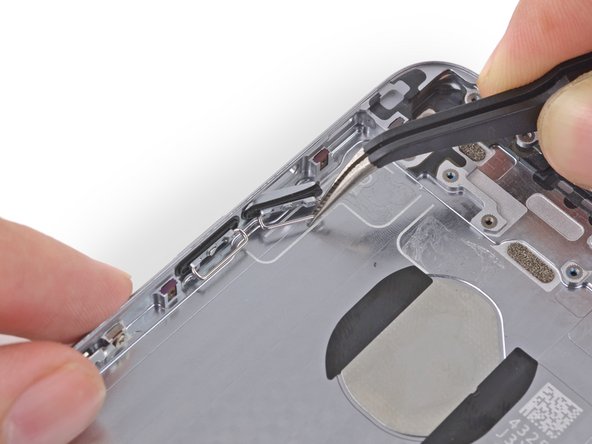
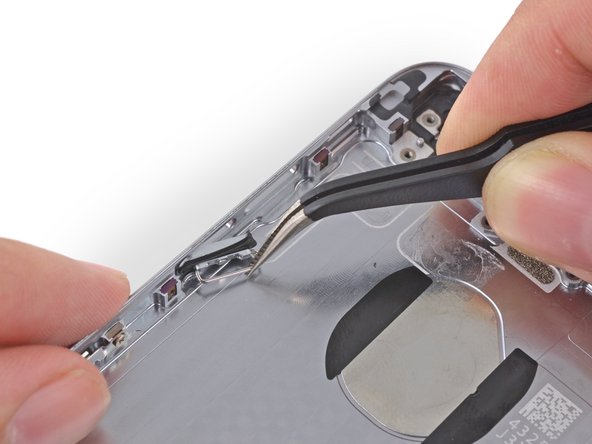
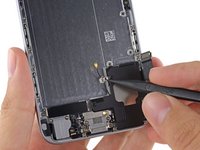
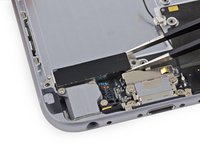
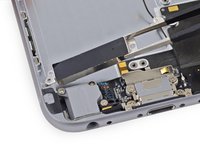
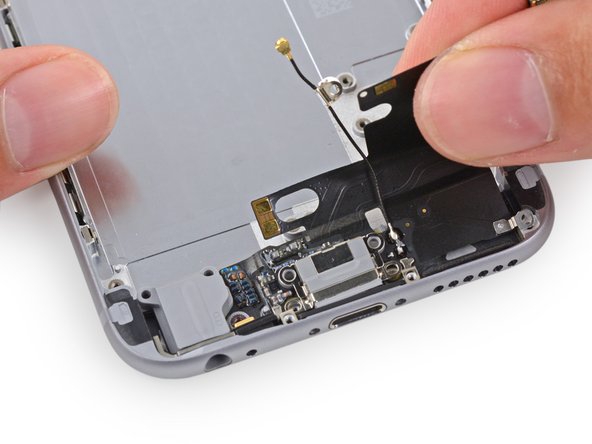
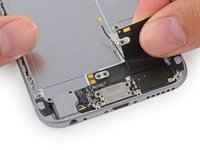
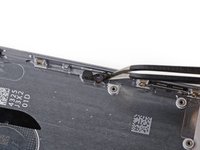
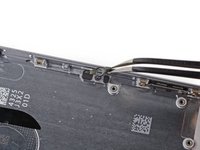
Use the point of a spudger to lift the antenna cable connector up off of its socket on the logic board.
-
-
-
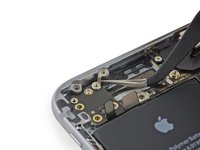
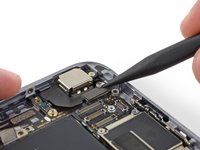
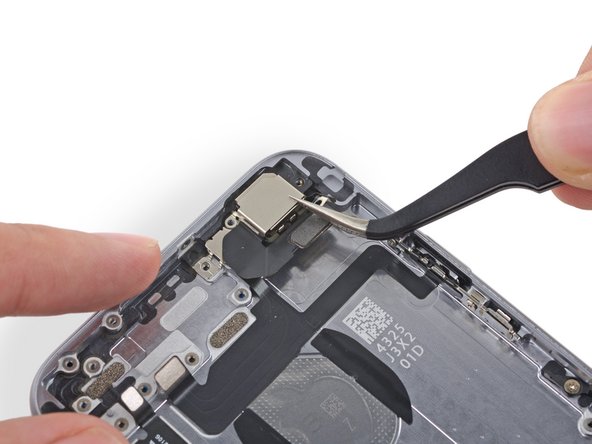
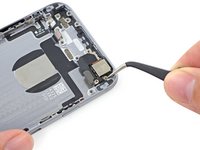
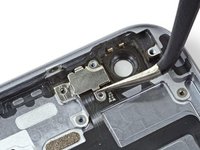
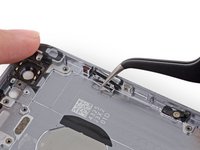
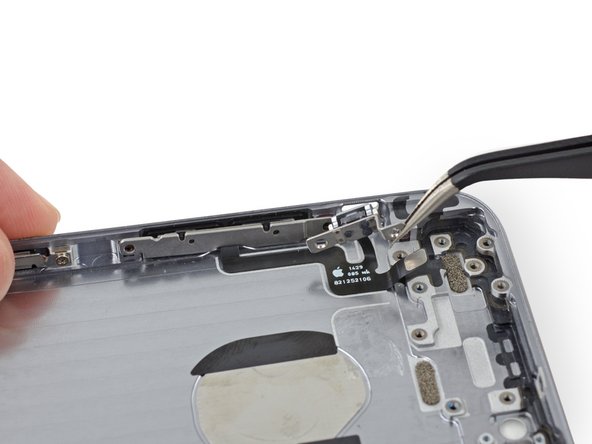
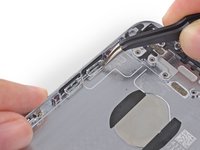
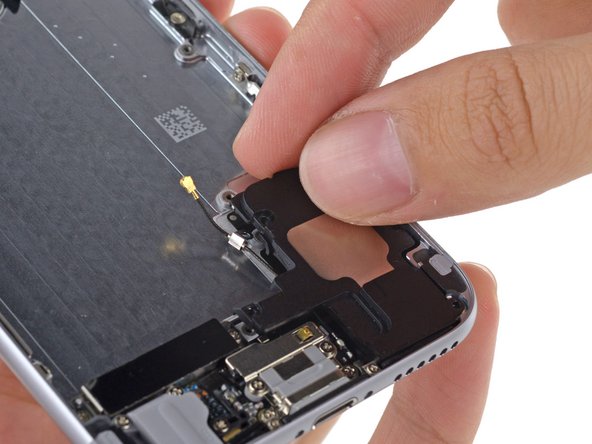
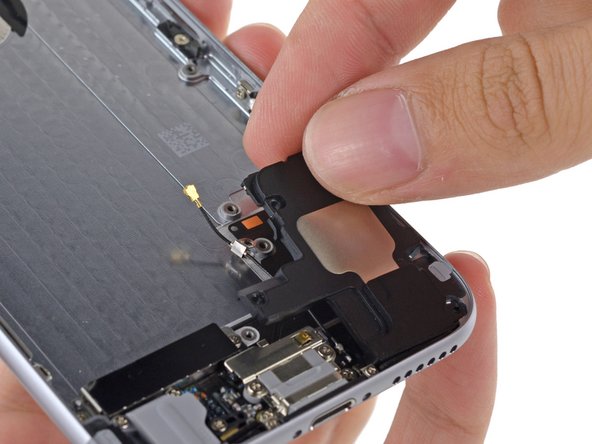
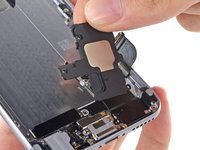
Remove the following Phillips screws from the upper cable bracket:
-
One 2.9 mm screw
-
One 2.2 mm screw
-
-
-
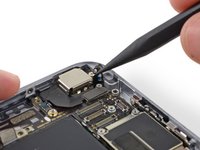
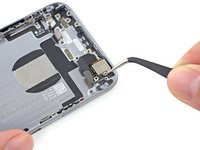
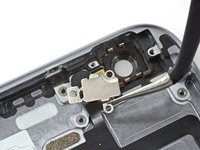
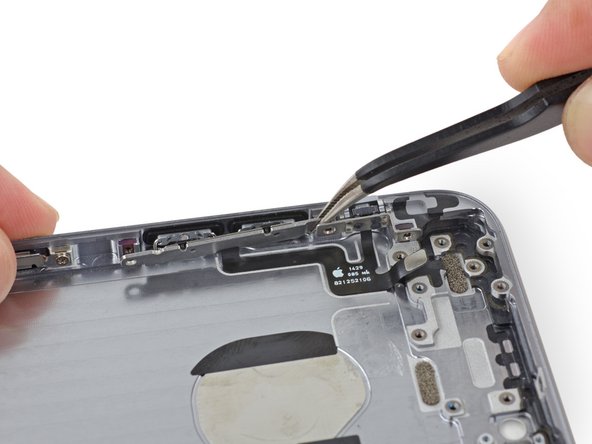
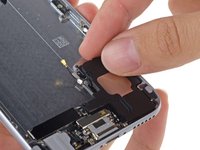
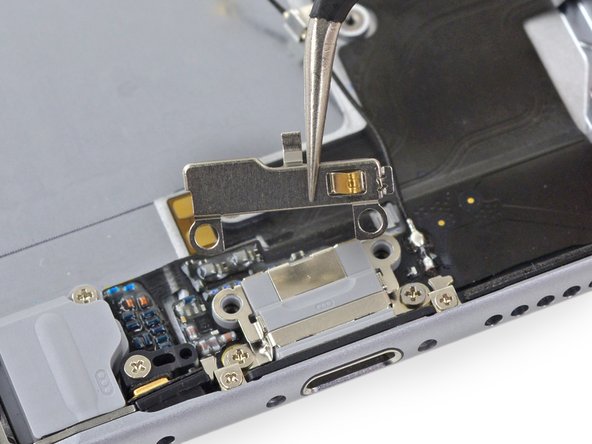
Remove the upper cable bracket from the iPhone.
-
-
-
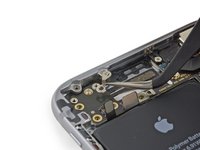
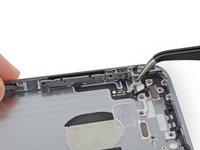
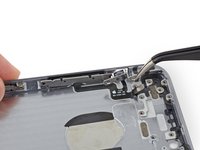
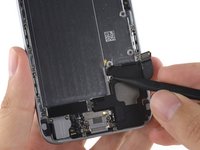
Use the flat end of a spudger to lift the power button and flash assembly cable connector up off of its socket.
-
Lift the volume control cable connector up out of its socket on the logic board.
-
-
-
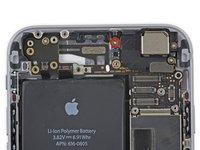
Remove the following four Phillips screws from the Wi-Fi antenna:
-
One 1.5 mm screw
-
One 1.4 mm screw
-
Two 2.1 mm screws
-
-
crwdns2935267:0crwdne2935267:0Tweezers$4.99
-
Remove the Wi-Fi antenna from the iPhone.
-
-
-
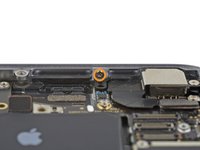
Remove the two 1.6 mm Phillips screws from the grounding bracket.
-
-
-
Remove the grounding bracket from the iPhone.
-
-
-
Remove the following Phillips screws securing the angled logic board bracket.
-
One 2.6 mm screw
-
One 1.3 mm screw, located horizontally in the upper sidewall of the iPhone.
-
-
-
Remove the angled logic board bracket.
-
-
-
Remove the single 1.2 mm Phillips screw securing the antenna interconnect cable to the logic board.
-
-
-
Use the point of a spudger to fold the antenna interconnect cable up out of the way of the logic board.
-
-
-
Use the flat end of a spudger to lift the camera cable connector straight up out of its socket on the logic board.
-
Fold the camera cable up out of the way of the logic board.
-
-
crwdns2935267:0crwdne2935267:0Standoff Screwdriver for iPhones$5.49
-
Remove the following screws securing the logic board to the rear case:
-
Two 1.9 mm Phillips screws
-
One 2.3 mm standoff screw
-
-
-
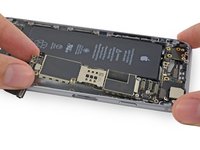
Use the flat end of a spudger to lift the battery connector end of the logic board up slightly, just enough to grab with your fingers.
-
-
-
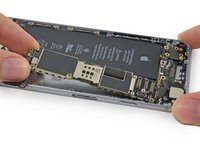
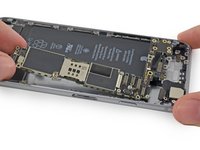
Lift the battery connector end of the logic board and pull it up and out of the rear case.
-
-
crwdns2935267:0crwdne2935267:0Tweezers$4.99
-
Peel back the first battery adhesive tab from the bottom right edge of the battery.
-
-
-
Gently pull the battery adhesive tab away from the battery, toward the bottom of the iPhone.
-
Try not to pull against the battery or the lower components, or you may rip the adhesive strip.
-
Continue pulling, allowing the strip to slowly slip out from between the battery and the rear case. When you feel increased resistance from the strip, stop pulling and continue with the next step.
-
-
-
When you feel increased resistance from the adhesive strip, pull it gently around the lower right corner of the battery.
-
Continue pulling the adhesive tab upward and away from the right edge of the battery, allowing it to slowly slide out from between the battery and the rear case, until the strip comes free from the iPhone.
-
-
-
Peel back the second battery adhesive tab from the bottom left edge of the battery.
-
Again, gently pull the battery adhesive tab upward and away from the battery, allowing the adhesive strip to slowly slide out from between the battery and the rear case.
-
Continue pulling the adhesive tab until you feel increased resistance, and then stop.
-
-
-
When you feel increased resistance from the adhesive strip, pull it gently around the lower left corner of the battery.
-
Continue pulling the adhesive tab upward and away from the left edge of the battery, allowing it to slowly slide out from between the battery and the rear case, until the strip comes free from the iPhone.
-
If you removed both adhesive strips successfully, skip the next two steps and continue on Step 46.
-
If either of the adhesive strips broke off underneath the battery and could not be retrieved, continue with the next step below.
-
-
-
If any of the adhesive strips broke off and the battery remains stuck to the rear case, prepare an iOpener or use a hair dryer to heat the rear case directly behind the battery.
-
-
crwdns2935267:0crwdne2935267:0Plastic Cards$2.99
-
Insert a plastic card under the logic board edge of the battery.
-
Press the card in at several points if necessary to break up the adhesive behind the battery.
-
-
-
After peeling or prying out all adhesive, remove the battery from the iPhone.
-
-
-
Remove any tape covering the upper left rear-facing camera screw.
-
-
-
Remove the following Phillips #00 screws from the rear-facing camera bracket:
-
One 1.5 mm screw
-
One 2.1 mm screw
-
-
-
Remove the rear-facing camera bracket.
-
-
-
Carefully remove the antenna interconnect cable from the rear case.
-
-
-
Remove the rear-facing camera from the iPhone.
-
-
-
Remove the single 1.2 mm Phillips #00 screw securing the flash bracket.
-
-
-
Remove the flash bracket from the rear case.
-
-
-
Remove the two 2.2 mm Phillips #00 screws from the power button bracket.
-
-
-
Use the point of a spudger to gently push the flash and microphone modules up out of their respective holes in the rear case.
-
-
-
Begin to peel the flash/microphone/power button assembly cable up from the rear case starting from the connector end.
-
Continue to peel the cable up, being particularly careful of the narrow component ends of the cable.
-
Remove the flash/microphone/power button assembly cable from the phone.
-
-
-
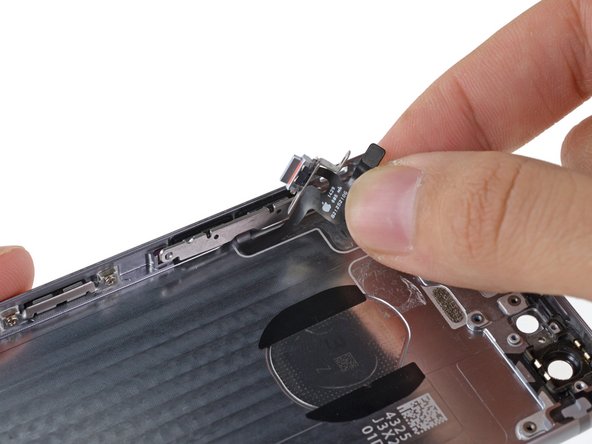
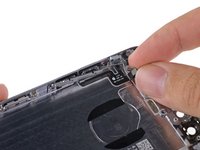
Grip the power button by the metal bar to pull it free from the rear case.
-
The power button is held to the case with an adhesive gasket, pull carefully to prevent ripping the membrane.
-
-
-
Remove the following Phillips #00 screws from the volume control cable brackets:
-
Two 2.3 mm screws
-
One 1.8 mm screw
-
-
-
Pull the hold switch and volume control button brackets away from the rear case to allow access to the button covers.
-
-
-
Begin to peel the volume control button cable up from the rear case starting from the connector end.
-
Be gentle when peeling the thin portions of the cable up from the case.
-
Remove the volume control button cable from the rear case.
-
-
-
Pull the volume control buttons by the metal bar to remove them from the rear case.
-
The buttons are held to the case with an adhesive gasket, pull carefully to prevent ripping the membrane.
-
-
-
Remove the following four Phillips #00 screws securing the speaker:
-
Two 2.9 mm screws
-
Two 2.3 mm screws
-
-
-
Use the point of a spudger to push the antenna interconnect cable clip off of the speaker housing.
-
-
-
Pull the speaker up and out of the rear case.
-
-
-
Remove the two 1.6 mm Phillips #00 screws securing the vibrator to the rear case.
-
-
-
Remove the vibrator from the iPhone.
-
-
-
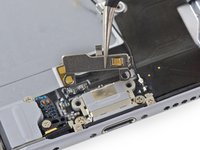
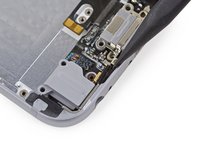
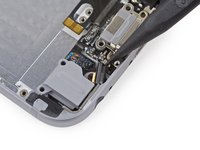
Remove the two 3.1 mm Phillips #00 screws securing the Lightning port retaining bracket.
-
-
-
Remove the Lightning port retaining bracket.
-
-
-
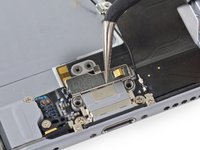
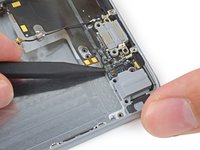
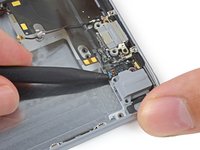
Remove the single 3.6 mm Phillips #00 shoulder screw from the microphone brace.
-
-
-
Remove the microphone brace from the iPhone.
-
-
-
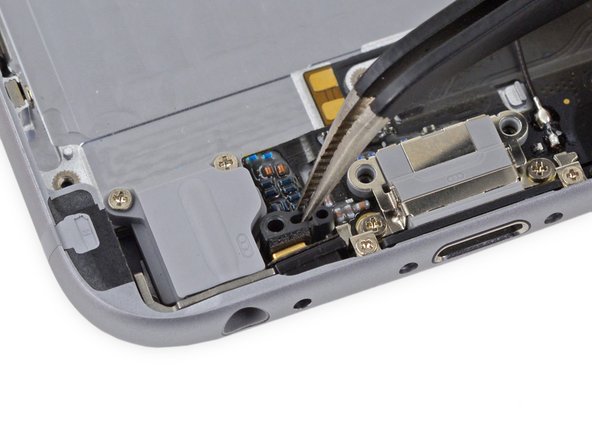
Remove the six remaining Phillips #00 screws from the Lightning connector cable assembly:
-
Two 3.1 mm shoulder screws
-
Two 1.7 mm screws
-
Two 1.5 mm screws
-
-
-
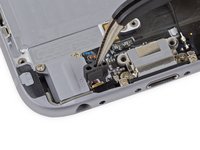
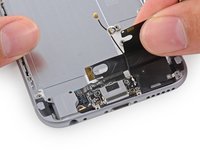
Use the flat end of a spudger to begin peeling the Lightning connector cable assembly up from the rear case.
-
-
-
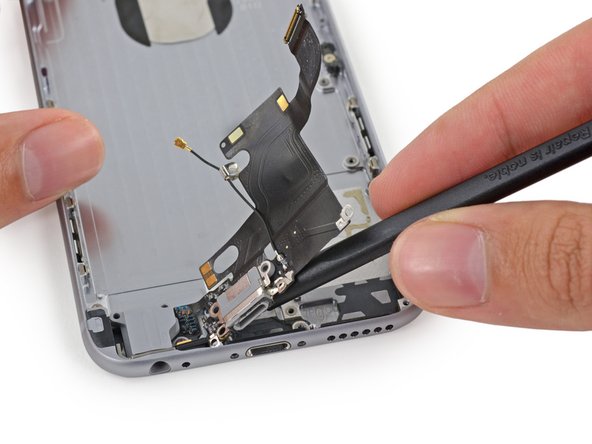
Carefully pull the Lightning connector cable assembly up slightly to free the it from the vibrator and speaker screw posts.
-
-
-
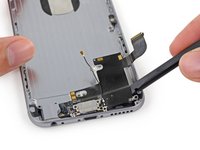
Use the flat end of a spudger to lift under the Lightning connector portion of the cable assembly to free more adhesive.
-
-
-
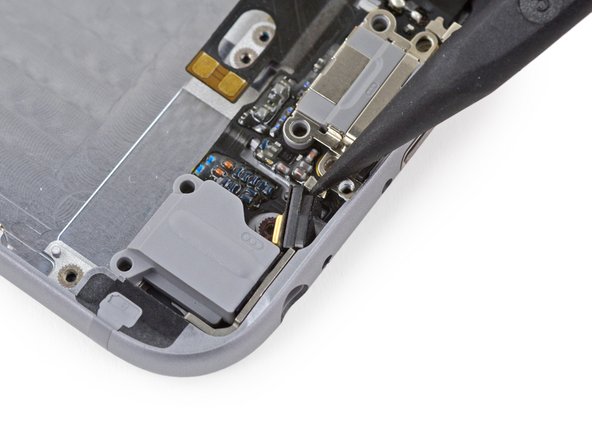
Use the point of a spudger to push the microphone portion of the Lightning cable assembly out of its recess in the rear case.
-
-
-
Gently run the point of a spudger under the cable assembly between the Lightning connector and the headphone jack to free it from the last of the adhesive.
-
-
-
Use the tip of a spudger to help guide the headphone jack out of its recess in the rear case.
-
Remove the Lightning connector cable assembly from the iPhone.
-
-
-
Remove the single 1.7 mm Phillips #00 screw securing the SIM eject lever.
-
-
-
Remove the SIM eject lever from the rear case.
-


To reassemble your device, follow these instructions in reverse order.
crwdns2935221:0crwdne2935221:0
crwdns2935229:0251crwdne2935229:0
crwdns2947821:0crwdne2947821:0
crwdns2947823:0crwdne2947823:0


crwdns2947412:038crwdne2947412:0
My first time inside an iPhone. I slipped on some icy steps and bent my phone. Luckily it bent on the battery side and still worked except for the 'down' volume button. That wouldn't move because the housing was so deformed. Took my time and followed the guide carefully, it was absolutely fine. Took an hour and three quarters.
My issue is the glue on the battery! i destroyed my first battery saying to remove has anyone got any advice on this? thanks
I failed with both battery pull tabs, but I successfully used a microwaveable wheat bag in place of the iOpener, then carefully slid a store loyalty card under the battery. It took a bit of doing but I just took my time. The back of the battery was a bit bubbled but it still works fine.
nbuchan -
I successfully replaced my rear case but upon completion I've noticed my power and volume buttons are no longer clicky in fact they've lost all springiness. I feel like they are constantly touching the button contacts and have yet to turn the phone back on anyone have any ideas as to how to fix this?
In the middle of the volume buttons itself, on the inside is a round plate glued, you have to replace this on the new volume buttons
clbr -
Yeah the buttons themselves have a tiny piece of circular metal that meets a tiny piece of black (carbon?) on the flex button. They are TINY but if there is no black speck OR if the speck is off-center, then you won't have any successful clicking. When it works, it works. There's not mistaking. it's a very simple but tiny mechanical issue with buttons. But it's what makes them so nice.
Check if the circular metal piece on the button is in place. Check if the circular black rubber is in place on the flex cable. Also check if you put the rubber gasket around the button back.
i successfully replaced my case but after i finished my speaker doesnt work anymore, does anyone know how to fix this? the earpiece speaker works but the bottom one beside the charger doesnt
I was having th same issue. I took my phone apart and I pressed down harder on the connector at steps 22. This fixed my problem.
On the bottom of your speaker you have gold contacts. See if they are in place and that they touch the gold on the lightning flex cable.
Awesome guide! Now if you're doing what I'm doing which was a full blown part drop into a fresh frame - you still need to get the bottom grills, headphone plastic, speaker dampers and all that fun stuff with tweezers. Also to note, if you got a fresh stock frame, you'll also need to transfer the side-frame LCD stabilizers. 6 screws and 3 pieces but you still need to consider if your frame has everything in them before you start dropping the charge flex back in. Otherwise this is a complete teardown!
To harp on stock frames - they're great but I had to file my sim slot in order for my sim tray to fit. Also the buttons that come with stock frames do NOT have the extra padding to connect with the actual button on the flex. So unless you have the original button, you'll need to make sure your buttons have a solid click. If they don't, they're missing the tiny mid-connector.
Yep, correct. Tweezers and an utility knife / cutter are your best friend here.
Simply amazing! Used this guide to replace the wifi antenna and flex cover and after about an hour voila', it works! As others may have found, I believe the real problem is the small piece of insulation on the wifi antenna itself. Mine was stuck to the upper glass side of the case whereas the new one had it affixed to the antenna itself. Take your time and label each size screw as you go along and you'll do fine (I simply labeled a piece of scotch tape and placed the screw on it).
Okay tiny problem, I put it back together and didn't notice any problems at first. But when I made a call the other person could hear me, but I couldn't hear anything. Apon further inspection I noticed neither camera is functioning, the battery won't charge more than 15%, and no sound will play from my phone. Does anyone have any advice for fixing this?
Check the header plugs are in correctly. Some are harder to locate in than others.....
Malc -
Thanks so much for putting this up and making it available. A bit fiddly, even for an ex cell transmitter repairer, but got there. Found it good to have a sheet of paper at each important step, draw a sketch of item and lay screws in position they need to be when reassembling.
Terrific.
After finishing everything, whenever I want to plug in my phone it says that the cable is not safe and won't charge. What should I do?
Does the new housing fit in a case just as well as the original housing? I replaced an iPhone 5 housing once and it didn't fit in the case; it was too tall. I didn't want to replace my iPhone 6 housing unless I know that it will fit in my case the same.
Great guide. I completed it, seemingly without a hitch. but now the phone won't power up. Either that or the display isn't working now. I checked the battery cable and display cable and they're plugged into their sockets correctly. Curious what else I should check.
I did accidentally re-connect the battery to the logic board at one point before completing the assembly. I quickly disconnected it after realizing I had a few more steps before I was supposed to plug it in, but I wonder if I could have fried the logic board by jumping the gun.
Not sure if you resolved your issue yet but try turning the phone on and looking closely at the screen with a light shining on it. Often times connecting/disconnecting the screen cables with the battery still plugged in can blow something on the backlight line (normally just a filter). If that's the case you should still be able to see things on the screen if you have the proper lighting.
This guide works great. However, be very careful when removing the lighting cable/audio jack housing. The wiring coming off of it (the flat black piece running to the right of the case) is heavily glued. I went too fast, and ended up damaging it by pulling on it too hard. It might be a good idea to warm up the back panel to loosen the adhesive prior to removing this part.
Hi! Question...
To get to the Lightning port, I have to remove almost Everything, right?
As always, Great guides!!! Much love from Chile :)
Check out the Lightning Connector Replacement guide, you only need to open the phone and then remove the speaker and Taptic engine. Best of luck!
Despues de cambiar la placa de carga lightening, el celular funciona pero al realizar llamadas la señal de la voz disminuye, pero al grabar audio con whats app funciona corrrectamente, no creo que sea el microfono pero que puede ser?
It would be useful if in teardown / repair guides like this you could indicate parts which can be transplanted straight into a new shell - for example the logic board obviously can’t come out of the old shell into a new one, but things like the power button/flash/microphone assembly can.
do you need to apply fresh adhesive when putting the flex cables back into place or are they in themselves adhesive?
YEEHAWW!!! Complete! Take your time. And pay close attention to any step that has many comments. Only issue I had was the standoff screw and its piggyback screw. Don’t mix up the 1.7 mm piggyback screw with the other 1.7 mm screws. They just wont thread in very well. :)
-Mike C.
I did everything as showed on the guide but the screen won’t light up now.
What might be some of problems. Also, pretty stupid from me, but didn’t back this up….how do I come about it now?
Same with me, did you managed to fix it?
My son smashed his screen and then because the phone lost its rigidity it bent in his pocket. I bought a broken phone with a good screen and case and swapped the innards (I left the buttons and cables as I assumed they’d be alright in the broken phone). And it worked! One good phone for a lot lot cheaper than any alternative. Brilliant guide. Thanks!
Just completed replacing the back housing and i was really surprised about how easy it was, so long as you follow these steps and you lay all the parts out on a piece of paper so you don’t muddle them up. If you do this you will be fine.
I don’t know if the battery is punctured or not , but the battery seems to have bent a bit when I was trying to get it out how will I determine if the battery has punctured but the phone still works fine tho
@bashman2020 Don’t re-use any battery that you’ve removed in this way, even if you think it’s only slightly bent. It’s not worth the risk, especially with new batteries being as cheap as they are. Just replace the battery and recycle the old one.
The antennas, are they connected to the body? Their placement seems to be on the right side of the case ?!
I use ifixit guides a lot. They are very helpful for keeping screws organized because you know which screws are the same length. I went through this repair but I noticed that the guide left out transfer of the clips that hold in the screen. Not sure if this is something useful but I didn’t realize I left them in the other housing until I had already screwed the logic board in. Otherwise everything was straight forward and I was able to rebuild my phone from only have a working logic board.
I want to thank you so much for this manual, i didnt tought there would be any free manual around here, but here i am, it worked perfectly for me. I was able to place the parts and screws in their respective place. Thank you once again.
@sam I noticed that you forgot one step, the display retainer brackets on the case. If people don’t transfer this over, the display won’t stay in!
I was able to go through the whole repair while replacing the back case of my iPhone 6…but when I got to the last step of replacing the screen, for some reason the screen wasn’t snapping onto the case. I discovered that the old case has these three little “brackets” on the case of the phone which serve as soft locking mechanisms for the screen (two on the left side and one on the right). The replacement back case I bought didn’t come with these brackets! I’m pretty frustrated now because I need to disassemble almost everything in order to mount them, including the battery, which means my battery adhesive will need to come out!
Remember these brackets if you’re doing this repair. Verify if they are already on the case or if you need to use the old brackets (if they aren’t damaged).