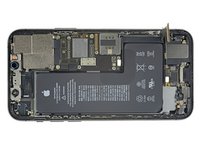
crwdns2915892:0crwdne2915892:0
iPhone batteries are rated to hold 80% of their capacity for up to 500 charge cycles, which lasts roughly 18-24 months for most users. After that, your iPhone may need to be charged far more frequently, and iOS may warn you that performance is affected (in other words, your phone will run slower). Use this guide to replace your battery and restore your iPhone to like-new performance.
If your battery is swollen, take appropriate precautions.
Note: After the repair, your iPhone may display a warning about the “genuineness” of the battery, even when using original Apple parts. If your iPhone functions normally, you can safely ignore the warning.
For optimal performance, after completing this guide, calibrate your newly installed battery: Charge it to 100% and keep charging it for at least two more hours. Then use your iPhone until it shuts off due to low battery. Finally, charge it uninterrupted to 100%.
crwdns2942213:0crwdne2942213:0
-
-
Power off your iPhone before beginning disassembly.
-
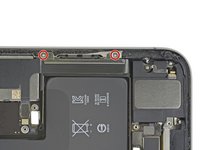
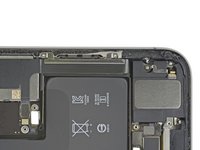
Remove the two 6.7 mm-long pentalobe screws at the bottom edge of the iPhone.
-
-
-
Measure 3 mm from the tip and mark the opening pick with a permanent marker.
Got to step 2 and realized the fix kit doesn't include an opening pick! Looks like a guitar pick, and I have those lying around. Is that expected? Looks like the pick is used in many steps below. There's a little blue crowbar that isn't mentioned in the instructions. Perhaps that replaces the opening pick?
Hi! I can't see which guide you were using when writing this comment. Can you reply here with which guide and fix kit you used?
I see you posted this in Meta. I hope it's resolved soon! In the meantime, a guitar pick may work well enough for your repair.
what fix kit?
My fix kit didn't include an opening pick either
Make sure you check inside the black boxes after emptying them. My pick was stuck inside one of the boxes.
My AliExpress refurbished screen came with a pick that has a coin-like circle that pops out, so no modification was necessary
the picture shows 3 cm but the description says 3 mm's. Which one is it?
That is a misunderstanding. It is a ruler with a scale for cm, it shows 0.3 cm, i.e. 3 mm.
VauWeh -
Oh, come ON!
Big Ed -
It will ALWAYS be millimeters on a phone, but this step is ridiculous, skip it!
@leifdewolf I wouldn't skip it for a first repair.
It's not an Ifixit KIT if it doesn't include everything. You'll need to order the opening pic separately. Or head to Walmart like myself and look for guitar pics. Hopefully, this will work just as well.
No pick in mine as well. It’s really not clear that you have to order this separately when ordering an IPhone SE 202/2022 screen repair kit. Is this the case?
Frustrated, I ordered a compact package where everything was encapsulated. Useless suction tools could not separate the screen. If it is unable to decouple the screen, then why sucking suction tools you have provided.
For my kit the triangle pick was stuck inside the box with the screen not with the other tools maybe it's also there for you
Y’all are getting far, FAR too detailed with some of this stuff…. Measuring and marking the pick that you won’t actually use to open the device?!? lol that’s kinda funny. Just heat it up, grab a spudger, and the back just pops right off! The iFixit tech need to stick to the KISS method more often, you know KEEP IT SIMPLE STUPID!!! Like l, for reals, I’ve been doing this stuff for YEARS and using iFixit guides regularly and this is just ridiculous at this point!
Will the phone still work if the sensor assembly on the back of the screen is damaged?
I don't have a pick, but how much better are these picks than an old credit card for opening an iPhone 13 mini?
The pick in my iFixIt kit was packed with the battery, not with the rest of the toolkit.
-
-
-
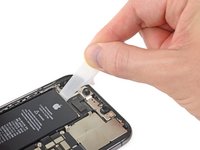
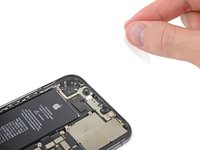
Lay overlapping strips of clear packing tape over the iPhone's screen until the whole face is covered.
-
If you can't get the suction cup to stick in the next few steps, fold a strong piece of tape (such as duct tape) into a handle and lift the screen with that instead.
-
-
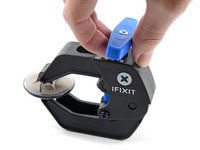
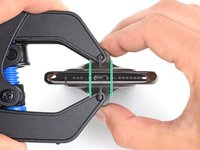
crwdns2935267:0crwdne2935267:0Clampy - Anti-Clamp$24.95
-
Pull the blue handle backwards to unlock the Anti-Clamp's arms.
-
Slide the arms over either the left or right edge of your iPhone.
-
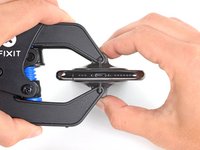
Position the suction cups near the bottom edge of the iPhone—one on the front, and one on the back.
-
Squeeze the cups together to apply suction to the desired area.
-
-
-
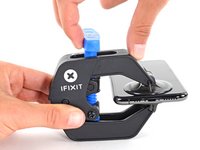
Pull the blue handle forward to lock the arms.
-
Turn the handle clockwise 360 degrees or until the cups start to stretch.
-
Make sure the suction cups remain aligned with each other. If they begin to slip out of alignment, loosen the suction cups slightly and realign the arms.
-
-
-
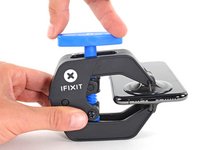
Heat an iOpener and thread it through the arms of the Anti-Clamp.
-
Fold the iOpener so it lays on the bottom edge of the iPhone.
-
Wait one minute to give the adhesive a chance to release and present an opening gap.
-
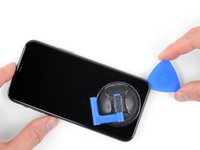
Insert an opening pick into the gap under the screen and the plastic bezel, not the screen itself.
-
Skip the next three steps.
If the display is separating from the plastic, and the plastic is not rising in the middle, then you have forgotten step 1! The screws that hold the plastic to the bottom are still there! Stop fighting it, and go back to step 1! I made this mistake on my livestreamed repair on my youtube channel, somehow I managed to get it out with the screws attached, hopefully my display works! I gave up on the anti-clamp, used a hand suction on the bottom right corner with heat gun, used pry tool on the bottom right corner, and used another spudger along the middle which I guess bent the holes the screws go in so that it released the front. I also skipped over the slide action that is necessary. Also the adhesive on my phone was so intense it was a continual battle. Hopefully my display works!
-
-
-
Use a hairdryer or heat gun or prepare an iOpener and apply it to the lower edge of the iPhone for about a minute in order to soften up the adhesive underneath.
I used a regulated heating gun, 180 degree celsius, 60 percent airstream, moving constantly around the edges for two minutes - works great for me.
-
-
-
If you're using a single suction handle, apply it to the bottom edge of the phone, while avoiding the curved portion of the glass.
-
-
-
Pull up on the suction cup with firm, constant pressure to create a slight gap between the front panel and rear case.
-
Insert an opening pick into the gap under the screen and the plastic bezel, not the screen itself.
-
-
-
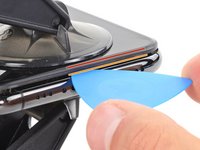
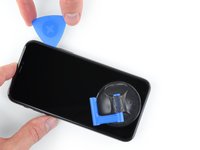
Slide the opening pick around the lower left corner and up the left edge of the iPhone, slicing through the adhesive holding the display in place.
-
-
-
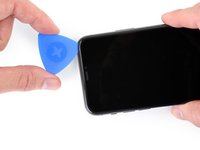
Re-insert your pick at the bottom edge of the iPhone, and slide it up the right side to continue separating the adhesive.
-
-
-
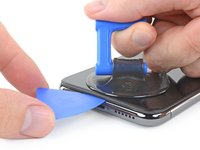
Gently pull the right edge of the display down slightly (in the direction of the Lightning port).
-
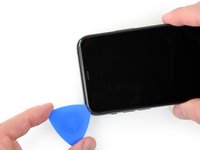
Insert your pick into the top-right corner of the phone.
-
-
-
Continue pulling the display down (toward the Lightning port) as needed in order to make a gap large enough for the pick.
-
Slide the pick to the top left corner and cut any remaining adhesive securing the display.
-
-
-
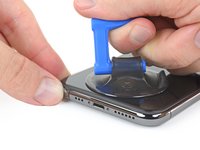
Pull on the small nub on the suction cup to remove it from the front panel.
-
-
-
-
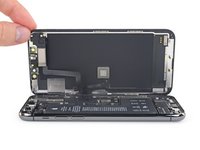
Open the iPhone by swinging the display up from the left side, like the back cover of a book.
-
Lean the display against something to keep it propped up while you're working on the phone.
-
-
crwdns2935267:0crwdne2935267:0Magnetic Project Mat$19.95
-
Remove two 1.3 mm long Y000 screws securing the battery cover bracket.
I have the Mako Driver kit. The Y000 in that doesn’t work. it doesn’t seem to work for these screws. Almost feel like the tip needs to be ground down to fit the Y screw.
German translation says "3 screws” but there are only 2.
p2 works better here
-
-
-
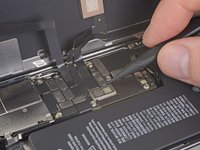
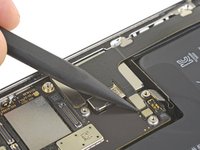
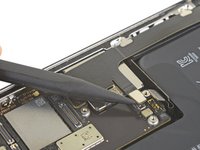
Use a spudger or a clean fingernail to pry the battery connector up from its socket on the logic board.
-
Bend the connector slightly away from the logic board to prevent it from accidentally making contact with the socket and providing power to the phone during your repair.
-
-
-
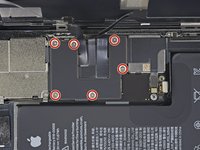
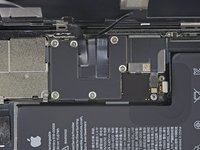
Use a Y000 driver to remove six 1.3 mm screws securing the logic board cover bracket.
-
-
-
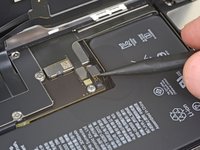
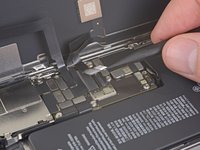
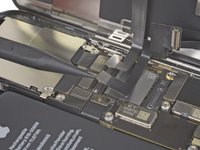
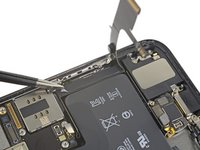
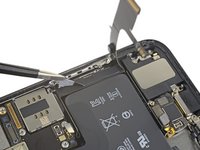
Use a spudger or a fingernail to disconnect the OLED panel cable connector.
My screen never activates upon reassembly, despite the phone vibrating to various inputs etc. I guess I damaged the cable? By pins, do you mean the pins of the cable damage, or the pins on the logic board damage? Need to know what to do.
-
-
-
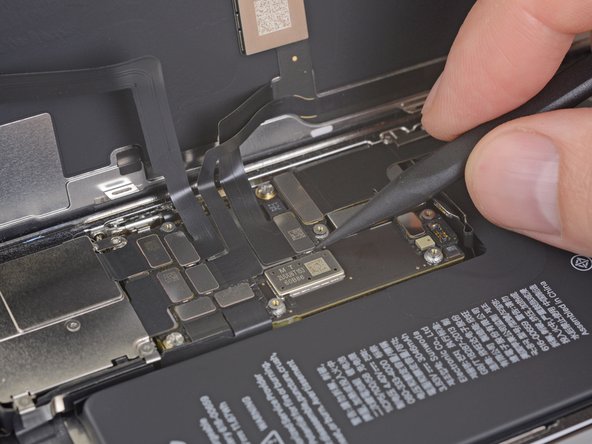
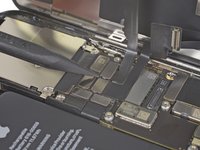
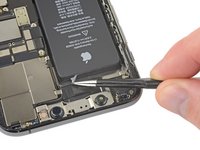
Use a spudger or a fingernail to disconnect the front sensor assembly cable connector.
-
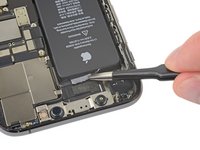
Use a spudger or a fingernail to disconnect the digitizer cable connector.
-
-
-
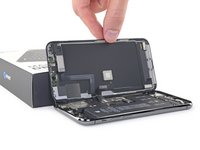
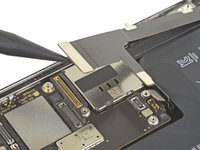
Remove the display assembly.
Between steps 20 & 21, use a Y000 driver to remove two 1.3 mm screws securing the sensor cable cover bracket, then carefully remove the long and narrow bracket.
-
-
-
Use a Y000 driver to remove the four 1.5 mm screws securing the lower battery connector cover.
-
-
-
Remove the lower battery connector cover.
-
-
-
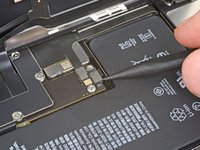
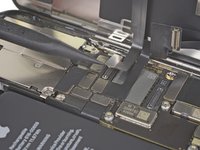
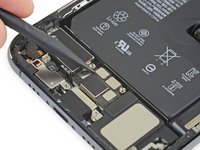
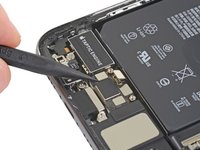
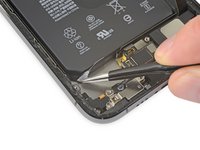
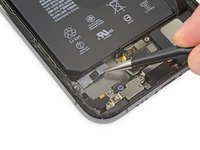
Use a spudger to disconnect the lower battery flex cable by prying it straight up from its socket.
-
-
-
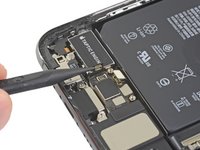
Use a spudger to disconnect the Taptic Engine flex cable by prying it straight up from its socket.
-
-
crwdns2935267:0crwdne2935267:0Standoff Screwdriver for iPhones$5.49
-
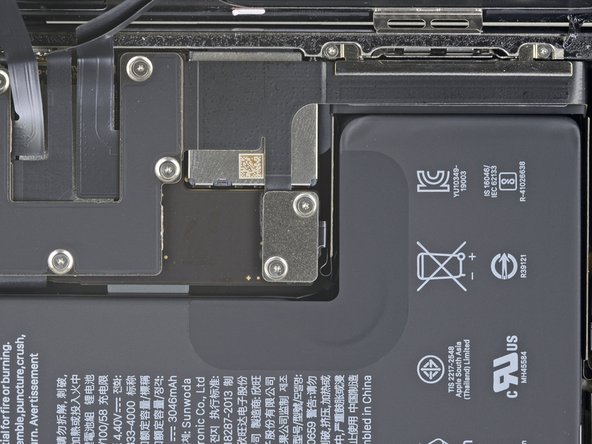
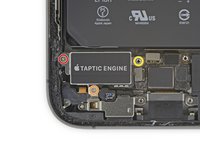
Remove the three screws securing the Taptic Engine:
-
One 1.9 mm-long Y000 screw
-
One 1.4 mm-long Y000 screw
-
One 4.1 mm-long standoff screw
-
-
-
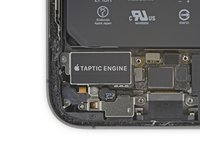
Remove the Taptic Engine.
-
-
-
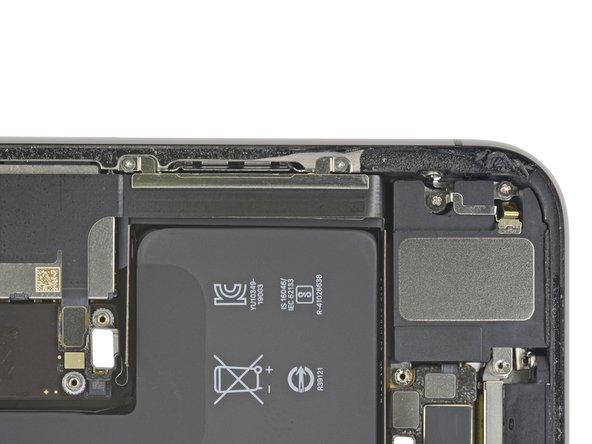
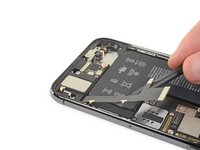
Use a Y000 driver to remove the two 1.4 mm screws securing the Lightning flex cable bracket.
German translation says "3 screws” but there are only 2.
-
-
-
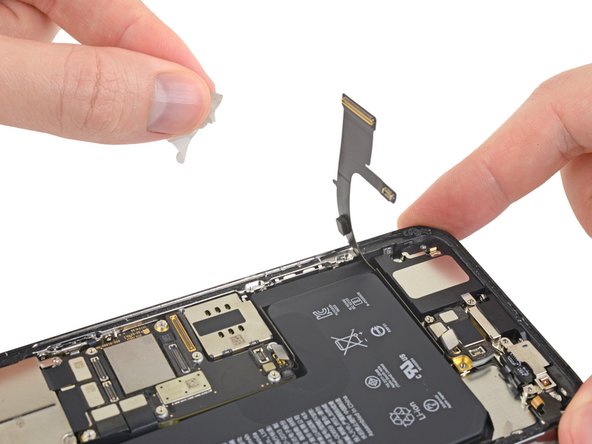
Remove the flex cable bracket.
-
-
-
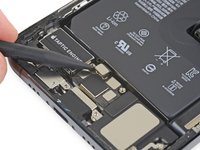
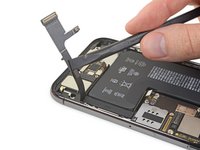
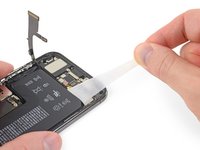
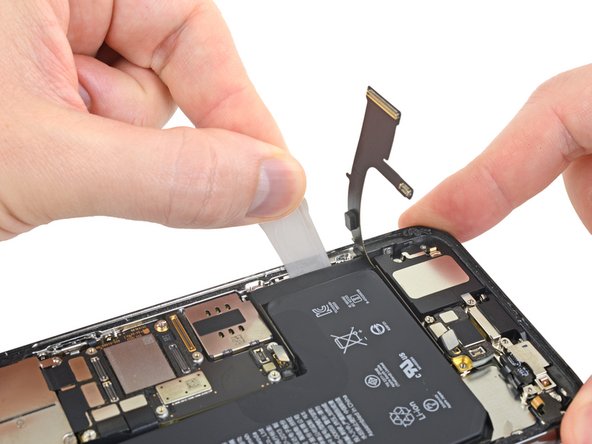
Pry up to disconnect both of the Lightning flex cable connectors from the Logic board.
-
-
-
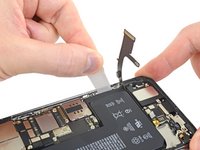
Gently lift the Lightning flex cable and bend it slightly toward the bottom edge of the iPhone for better access to the battery underneath.
-
-
-
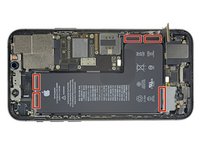
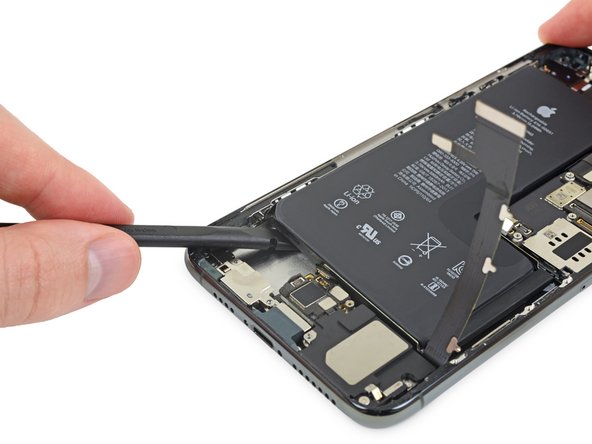
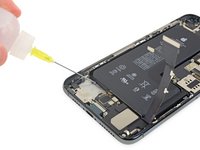
Each piece of adhesive has one or two black pull-tabs at the end, which are lightly adhered to the side edges of the battery.
Don't just pull the tabs as visualised as they will snap. Instead get two tweesers, pull a little with one, then grab in the inbetween with the other, then release the outer, pull the inner, then grab the inbetween with the prior outer, continue to repeat. You can make some more progress that way. I tried a lot of alcohol over the hour, but in the end a heat gun on the back plate until the battery got warm to touch worked easy peasy via prying. I've livestreamed this and will go on my youtube.
-
-
-
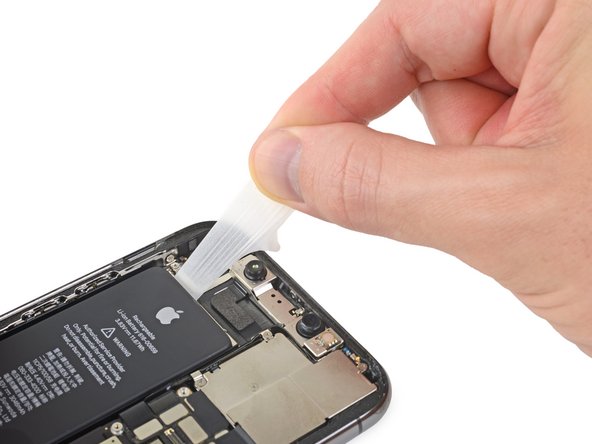
Peel down the first battery adhesive pull-tab to un-stick it from the bottom edge of the battery.
Keine Ahnung ob das Relevant ist aber ich habe nun nach 4,5 Jahren Nutzung vorgehabt den Akku zu tauschen, da ich schon eine Weile unter 80% bin. Ich habe mir die Anleitung zum Austauschen des iPhone 11 Pro Akkus angeschaut und großzügig bestellt, so dass ich sogar einiges mehrfach habe. Nun wollte ich das umsetzen aber hier bei Schritt 37 und bei den folgenden Schritten um diese Laschen rauszuziehen raste ich fast aus. Es funktioniert überhaupt nicht wie abgebildet. Es löst sich super schwer ab und wenn man die Lasche abgehoben hat kommt man niemals mit den Fingern hin um daran zu ziehen. Das ist utopisch! Die ersten zwei Laschen sind gerissen und die dritte Lasche aus Schritt 41 ist die schlimmste. Ich bin sehr enttäuscht. Ich rate jedem davon ab es selbst zu versuchen und lieber einschicken zu lassen, dann können sich Profis damit rumschlagen.
-
-
crwdns2935267:0crwdne2935267:0Tweezers$4.99
-
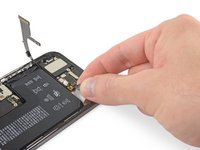
Grab the pull tab with your fingers and slowly pull it away from the battery, toward the bottom of the iPhone.
-
Pull hard enough to maintain tension on the strip, but don't force it. Give it plenty of time to stretch and un-stick from under the battery.
-
Don't press down on the battery. Hold the iPhone firmly by its sides.
-
Keep the strip flat and unwrinkled. Try to pull evenly on the whole strip, rather than pulling mainly in the middle or on one side.
-
Pull at a low angle so the strip doesn't snag on the edge of the battery.
-
If the adhesive strip breaks off, try to retrieve it using your fingers or blunt tweezers, and continue pulling—but do not pry under the battery.
-
-
-
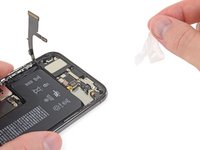
Peel down the battery adhesive pull tabs to un-stick them from the top edge of the battery.
-
-
-
Grab both pull tabs at the same time, and slowly pull to stretch the adhesive away from the battery, toward the top of the iPhone.
-
Follow the same procedure as with the previous strip: don't press down on the battery, keep the strip flat and unwrinkled, and pull at a low angle.
-
If the adhesive strip breaks off, try to retrieve it using your fingers or blunt tweezers, and continue pulling—but do not pry under the battery.
-
-
-
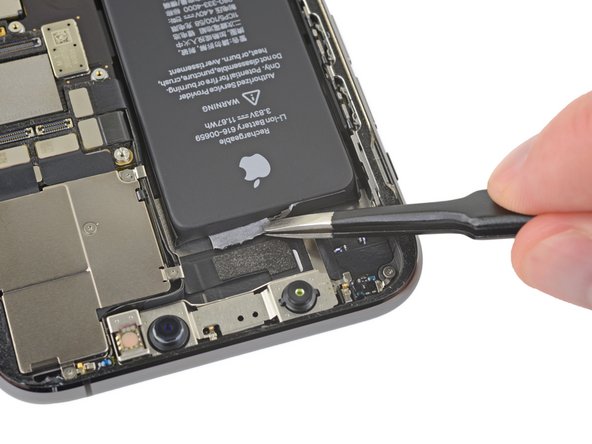
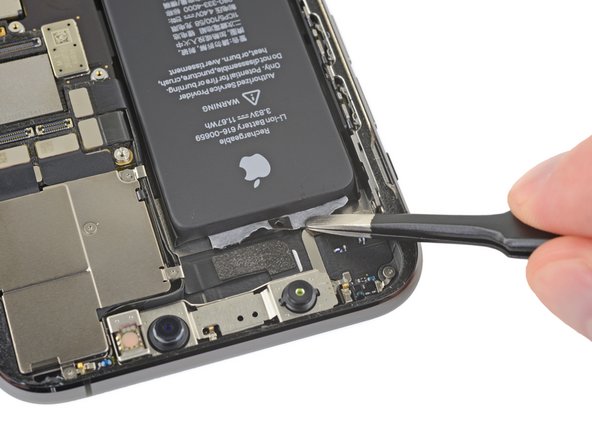
Peel up the two remaining battery adhesive pull-tabs to un-stick them from the right edge of the battery.
-
-
-
Using the same procedure as before, pull both tabs at the same time to stretch and remove the remaining adhesive strip holding the battery in place. Try not to snag the adhesive on the edge of the iPhone.
-
If you removed all the adhesive strips successfully, skip the next step.
-
Otherwise, continue with the next step below.
Die Zwei vorherigen Laschen sind alle gerissen und egal wie langsam und behutsam man es rauszieht es funktioniert Null! Und hier kann man nicht mal ziehen. Es wird dargestellt, als ob man da mit 2 Fingern rankommen könnte um zu ziehen, aber das ist ein schlechter Witz. Bei allen dreien geht das nicht und hier am schlechtesten!
-
-
-
If you're still having trouble removing the battery, apply a few drops of high concentration (over 90%) isopropyl alcohol under the edge of the battery in the area of the broken adhesive strip(s).
-
Wait about one minute for the alcohol solution to weaken the adhesive.
-
Use the flat end of a spudger to gently lift the battery.
it too me a long time to remove the battery. After about an hour of repeated alcohol applications, I ran a piece of dental floss under the battery.
Ich bin seit über ner Stunde dabei alle 1-2 Minuten Isopropanol 99,9% an den Stellen wo die Laschen sind reinzukippen. Es tut sich rein garnichts...
Don't just pull the tabs as visualised as they will snap. Instead get two tweesers, pull a little with one, then grab in the inbetween with the other, then release the outer, pull the inner, then grab the inbetween with the prior outer, continue to repeat. You can make some more progress that way. I tried a lot of alcohol over the hour, but in the end a heat gun on the back plate until the battery got warm to touch worked easy peasy via prying. I've livestreamed this and will go on my youtube.
-
-
-
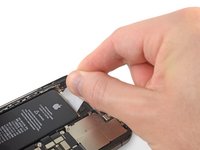
Remove the battery.
-
If there's any alcohol solution remaining in the phone, carefully wipe it off or allow it to air dry before installing your new battery.
-
Adhere the battery, disconnect it, and continue reassembling your device.
Sir i have one question should i used iphone 11 pro battery in iphone x .sir both batery connectors are same
Danke für die super Beschreibung. Folgende Hinweise:
Ich habe eine Dichtung für den Display erneuert. Das hat bei mir insgesamt 3 Anläufe gebraucht. also hier sollte man sich mehrere Dichtungen besorgen, damit man auch 2-3 x probieren kann.Führe nach dem Zusammenbauen einen erzwungenen Neustart durch. Dadurch können einige Probleme vermieden und eine eventuelle Fehlersuche vereinfacht werden.
Zusammenbauen auf diesen Schritt bezogen, also sobald der Akku drin ist oder ganz am Ende wenn alles zusammengebaut ist?
Akkuklebe streifen funktionieren wie hier schon erwähnt nicht zu lösen wie sie sollen, eben so waren die Flachbandstecker an meinem Ersatzakku von iFixit alle an den falschen stellen gebogen, man muss mühsehlig nacharbeit leisten, da die Stecker sonst nicht passen. Erstes und letztes mal für mich.
-


Compare your new replacement part to the original part—you may need to transfer remaining components or remove adhesive backings from the new part before installing.
To reassemble your device, follow the above steps in reverse order.
Take your e-waste to an R2 or e-Stewards certified recycler.
Repair didn’t go as planned? Try some basic troubleshooting, or ask our iPhone 11 Pro Answers community for help.
crwdns2935221:0crwdne2935221:0
crwdns2935229:083crwdne2935229:0

crwdns2947412:013crwdne2947412:0
Is the waterproof lost?
The replacement battery comes with a new seal, but I wouldn’t trust that too much.
very nice and very hepful instructions. keep it up…
Schwierig, aber effektiv. Man braucht volle KONZENTRATION
Is there any way to remove the “Important Battery Message” notification that’s constantly on the home screen for settings?
You could take the board off of the old battery, reset it, and replace the one on the new battery with it. I’m not too familiar with the process though.
Great guide, thank you! This was my 4th battery replacement in an iPhone. One more saved from the trash heap.
Beware: my ifixit replacement battery had 0% charge. When I tested my repair by attempting to power on the phone, nothing happened. I feared I broke something in the process and nearly re-did all the steps! As I was preparing to have to buy a new phone, I thankfully decided to plug it in, and it powered on!
Same case here! After having an extremely hard time with the old battery adhesive I also put it on the charger before closing to make sure that everything turned on.
Lakoniy -
I fixed it!,
This was an impressive experience from start to finish and I got my wish...I earned an "enhanced understanding" about what goes on beneath the hood of this amazing little product I use for so many things throughout the day. When I read that I should expect to spend 2 hours on this project I laughed and thought "30 minutes max". It took 2 hours...but it was an utterly fascinating 2 hours! Lastly...I was unaware that screws could be made that small. I have repaired a lot of things in my days...these were the tiniest threaded fasteners I have ever seen. Wow!
Thanks iFixit!
Aparelho bonito. Fácil de mexer. Ótimo Tutorial
Am Entfernen des alten Akkus und den Press-Fix-Steckern des neuen Akkus wäre ich fast verzweifelt, aber nach 3h hat es im ersten Anlauf geklappt. Kein weiteres Werkzeug war nötig und das iPhone sieht aus wie neu.
Eine etwas längere Reparatur, da die "alten" Klebestreifen sich nicht ziehen lassen wollten und viele Schrauben zu lösen waren. In Kombination mit Wärme und Isopropanol dann doch geklappt. Leider ist der ifixit Ersatz Akku von den beiden Anschlüssen nicht masshaltig, was angesichts des Preis/Leistung Verhältnis enttäuschend ist.
I am having difficulty accessing the disassembly steps to remove all of the components from the rear case. This web site stops at step 1. I am not sure how to access the rest of the steps. Can you help. Domingo Rochin
Mingo59 - crwdns2934203:0crwdne2934203:0