crwdns2915892:0crwdne2915892:0
Follow this guide to replace the screen and battery assembly on your Samsung Galaxy S22 Ultra.
This guide is written for the screen and battery assembly. The assembly consists of the screen, battery, and frame together in one part. Be sure you have the right part before you begin the repair.
Note: The upper 5G mmWave antenna can't be swapped between US (908U) and international (908B/E) model frames.
Note: Retaining water resistance after the repair will depend on how well you reapply the adhesive, but your device will lose its IP (Ingress Protection) rating.
crwdns2942213:0crwdne2942213:0
-
-
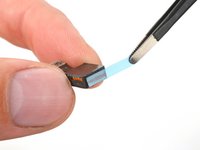
Insert a SIM eject tool, bit, or straightened paper clip into the SIM card tray hole on the bottom edge of the phone.
-
Press the SIM eject tool into the SIM card tray hole to eject the SIM card tray.
-
Remove the SIM card tray.
-
-
-
Push the button at the base of the stylus.
-
Remove the stylus.
-
-
-
Heat an iOpener and apply it to the right edge of the back cover for two minutes.
I try to find the correct celsius value to heat the bag or direct temp to the sides of the phone. A reference should be a good thing to have. I have a heat bed I use to heat it up. I think 80c can work
The iOpener did not heat up enough to preform this step. I had to use a heat gun to soften the adhesive. Only takes about 30 seconds to get enough heat on the phone to start to be able to pull the shells apart.
-
-
-
While you wait for the adhesive to soften, note the following:
-
There's adhesive securing the back cover around the perimeter of the frame.
-
-
-
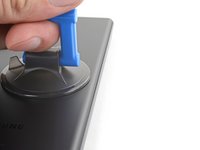
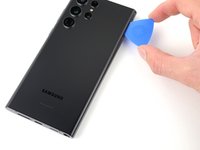
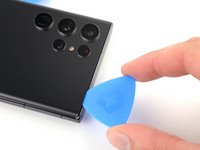
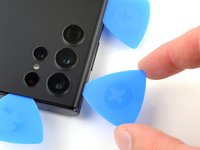
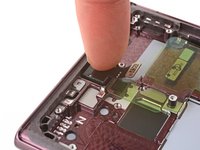
Apply a suction handle to the back cover, as close to the center of the right edge as possible.
-
Pull up on the suction handle with strong, steady force to create a gap between the cover and the frame.
-
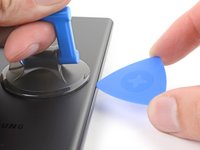
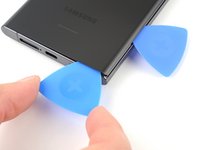
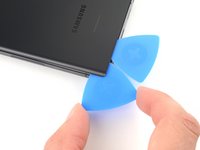
Insert an opening pick into the gap.
I found the suction cup included with the kit did not allow enough leverage to slide the pick into the phone. I ended up having to purchase their Anti-Clamp "Clampy" as well.
Once I used "Clampy" with a heat gun, the phone opened right up. -
-
-
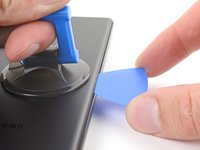
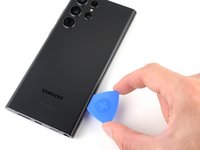
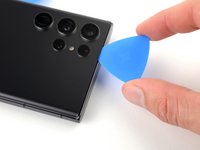
Slide the pick back and forth along the right edge to slice through the adhesive.
-
Leave the pick inserted near the bottom of the right edge to prevent the adhesive from resealing.
-
-
-
Apply a heated iOpener to the bottom edge of the back cover for two minutes.
-
-
-
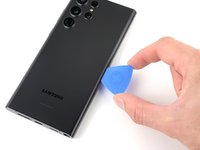
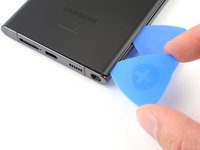
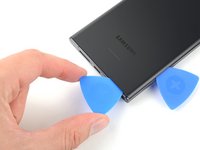
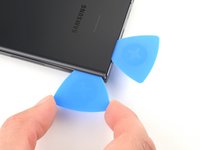
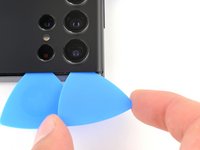
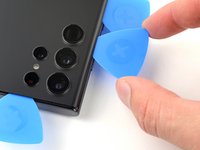
Insert a second opening pick at the bottom right corner.
-
Angle the pick upward to match the curved edge and rotate it around the bottom right corner.
-
-
-
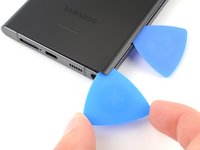
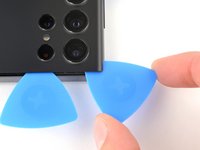
Slide your opening pick to the bottom left corner to slice the adhesive.
-
Leave the pick in the bottom left corner to prevent the adhesive from resealing.
-
-
-
Apply a heated iOpener to the left edge of the back cover for two minutes.
-
-
-
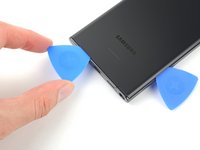
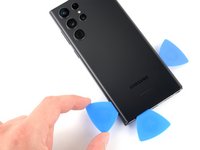
Insert a third opening pick at the bottom left corner.
-
Angle the pick upward to match the curved edge and rotate it around the bottom left corner.
Take your time with this corner, I ended up breaking the rear glass here. I found sliding the pick in deeper and cutting the adhesive from the inside out worked the best.
-
-
-
Slide your opening pick along the left edge to slice the adhesive, stopping when you reach the power button.
-
Leave the pick in the left edge to prevent the adhesive from resealing.
-
-
-
Heat an iOpener and apply it to the top edge of the back cover for two minutes.
-
-
-
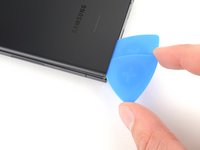
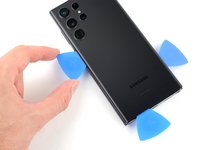
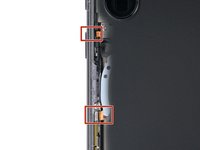
Insert an opening pick in the gap at the top right edge.
-
Angle the pick upward to match the curved edge and rotate it around the top right corner.
-
-
-
Slide the pick to the top left corner to slice the adhesive.
-
Leave the pick in to prevent the adhesive from resealing.
-
-
-
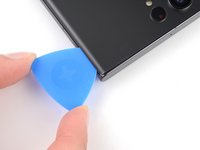
Insert an opening pick in the gap at the top left edge.
-
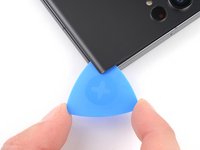
Angle the pick upward to match the curved edge and rotate it around the top left corner.
Just use the very tip of the pick, go deeper when you feel it slide without much resistance. You will know when you get through all adhesive. The feeling is much more smooth.
-
-
-
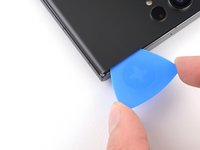
Slide the pick toward the bottom camera to slice through the remaining adhesive, stopping before you reach the power button.
-
-
crwdns2935267:0crwdne2935267:0Tweezers$4.99
-
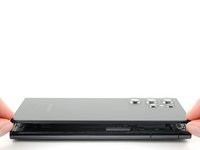
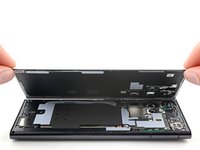
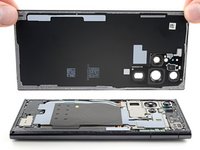
Grab and remove the back cover.
-
This is a good point to power on your phone and test all functions before sealing it up. Be sure to power your phone back down completely before you continue working.
-
Remove any adhesive chunks with a pair of tweezers or your fingers. Apply heat if you're having trouble separating the adhesive.
-
If you're using custom-cut adhesives, follow this guide.
-
If you're using double-sided tape, follow this guide.
-
-
-
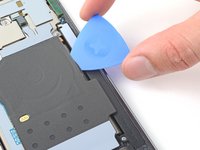
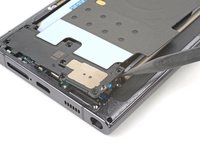
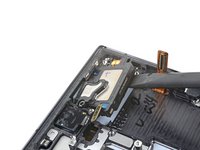
Insert an opening pick between the right edge of the wireless charging coil and the battery.
-
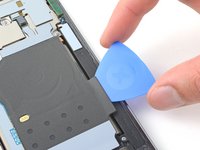
Slide the pick along the right edge to separate the adhesive.
Apply a bit of heat here as well, with either a hair dryer of heat gun. It doesn't hurt. The pick has trouble cutting otherwise.
-
-
-
Use the pointed end of a spudger to pry and disconnect the NFC antenna press connector from the motherboard.
-
Repeat for the wireless charging coil press connector.
-
-
-
-
Use your Phillips screwdriver to remove the five 3.5 mm-long screws securing the NFC antenna and charging coil.
Easy screws to loose. I use a magnetic mat so I can keep track of them.
Blue painters tape also works, due to very weak adhesive. Just set screws of the back until reassembly. -
-
-
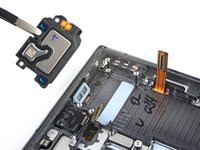
Use your Phillips screwdriver to remove the six 3.5 mm screws securing the loudspeaker.
-
-
-
Insert the pointed end of your spudger between the upper right corner of the loudspeaker and the frame.
-
Pry up to unclip the loudspeaker from the frame.
-
-
-
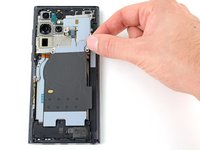
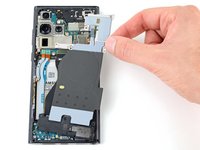
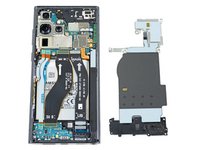
Grab and remove the NFC, wireless charging coil, and loudspeaker from the frame.
-
-
-
Use the pointed end of your spudger to pry up and disconnect the battery press connector.
When reassembling, plug phone in and turn on. Make sure everything is connected correctly.
-
-
-
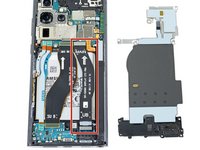
Use the pointed end of your spudger to pry up and disconnect the lower 5G mmWave antenna press connector.
-
-
-
Use your Phillips screwdriver to remove the two 3.5 mm-long screws securing the antenna bracket.
-
-
crwdns2935267:0crwdne2935267:0Tweezers$4.99
-
Insert the pointed end of your spudger between the lower screw mount of the antenna bracket and the frame.
-
Pry up on the bracket until you can grab it with blunt nose tweezers or your fingers.
-
Remove the lower 5G mmWave antenna.
-
-
-
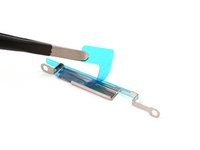
Remove the antenna and connector from the old bracket.
-
Remove the L-shaped adhesive liner from your new bracket.
-
Place the antenna in the bracket's recess with the connector fed underneath the longer screw mount.
-
Remove the thin adhesive liner on the outside of the bracket before installing it in the frame.
-
-
-
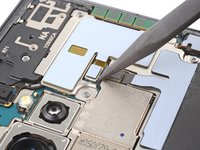
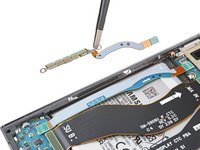
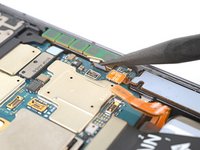
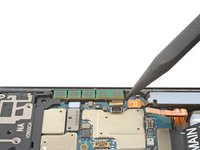
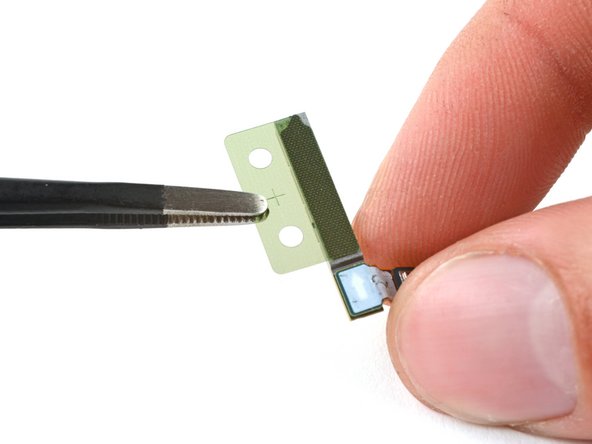
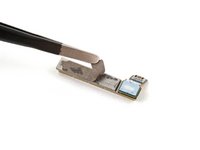
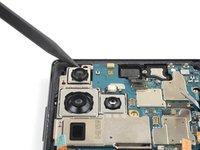
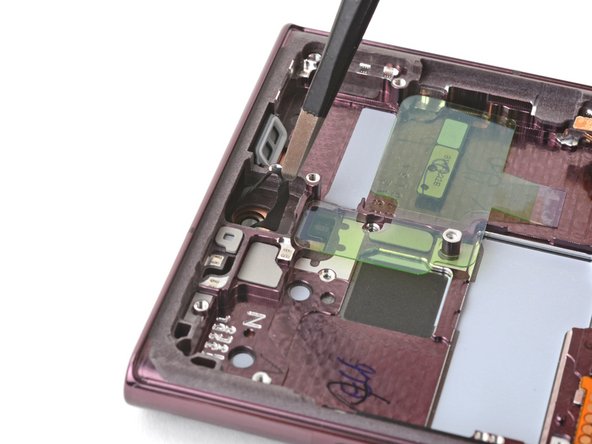
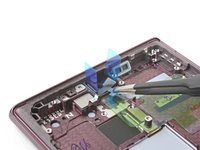
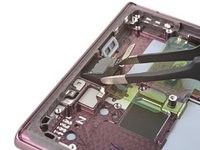
Use the pointed end of your spudger to pry up and disconnect the upper 5G mmWave antenna press connector.
-
-
-
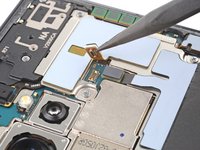
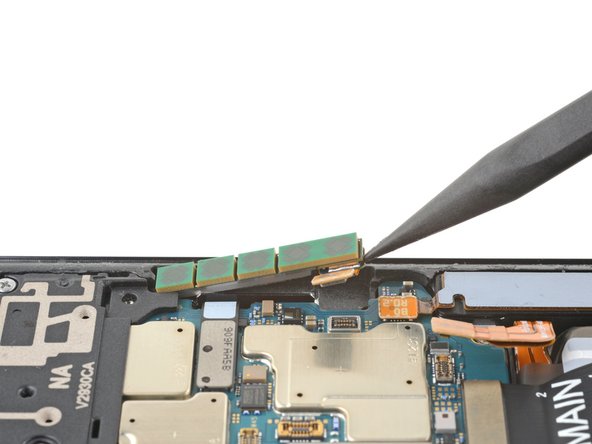
Insert the pointed end of your spudger in the gap between the bottom edge of the 5G mmWave antenna and the motherboard.
-
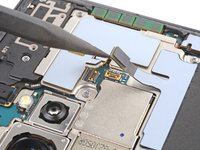
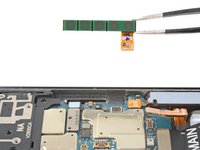
Pry the antenna out of its recess until you can grab it with your fingers or blunt nose tweezers.
-
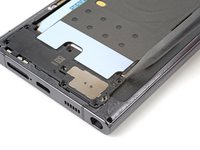
Remove the upper 5G mmWave antenna.
-
-
-
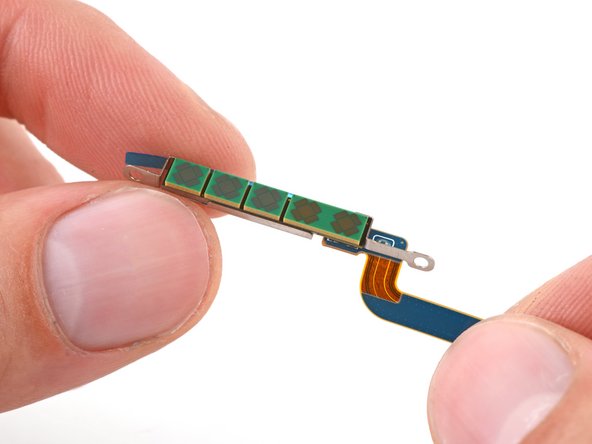
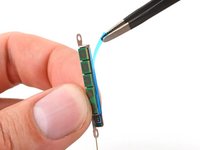
Remove the existing adhesive from the antenna with blunt nose tweezers or your fingers.
-
Remove the clear liner from your new adhesive.
-
Apply the new adhesive to the bottom of the antenna, with its round end farthest from the connector.
-
Remove the green liner from the adhesive before reinstalling the antenna in the frame.
-
-
-
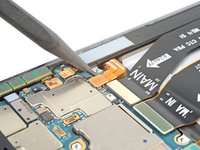
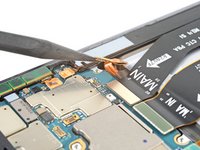
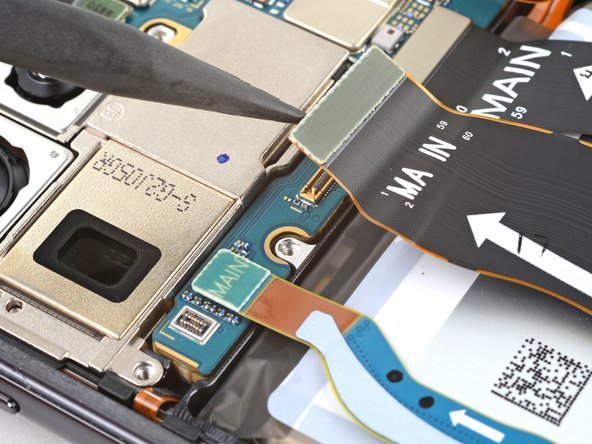
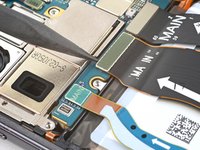
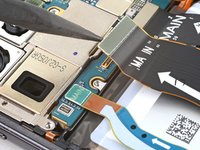
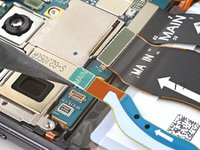
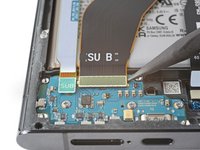
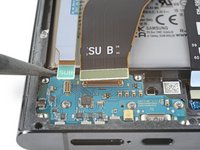
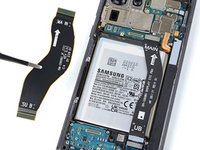
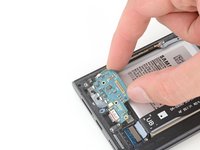
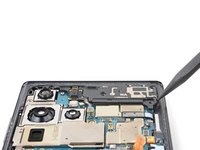
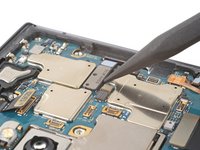
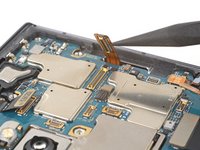
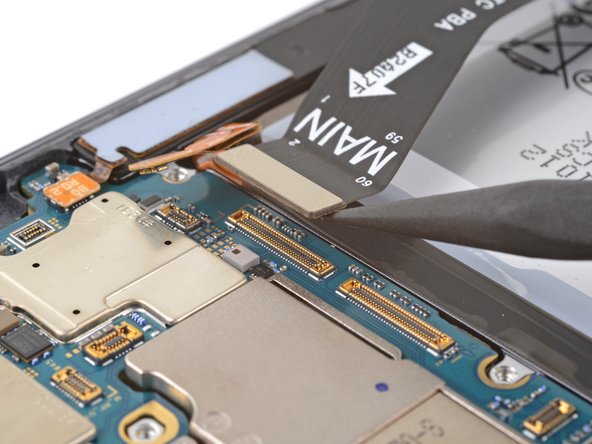
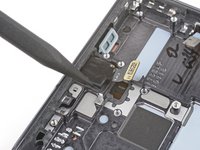
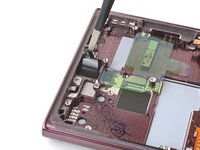
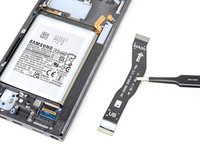
Use the pointed end of your spudger to pry up and disconnect the primary interconnect cable from the motherboard.
-
Repeat for the secondary interconnect located to the left of the primary cable.
-
-
-
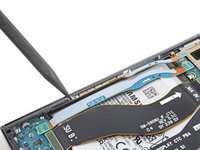
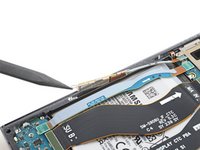
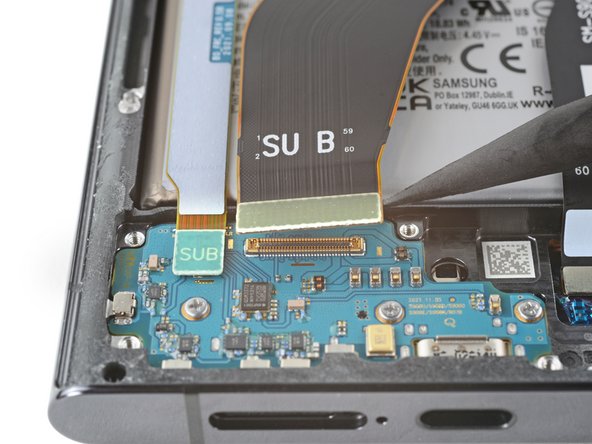
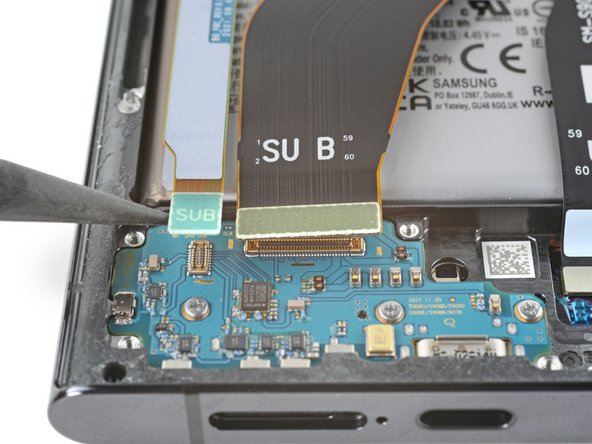
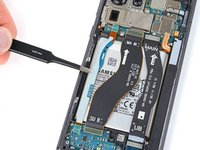
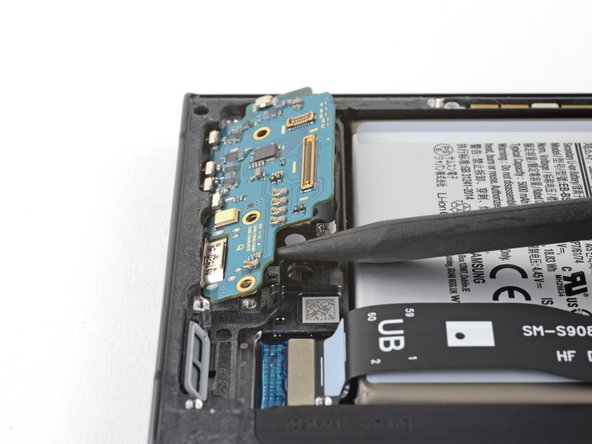
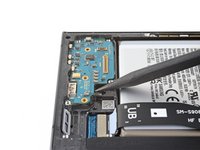
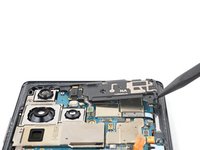
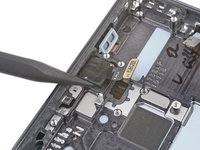
Use the pointed end of your spudger to pry up and disconnect the primary interconnect cable from the charging board.
-
Repeat for the secondary interconnect cable.
-
-
-
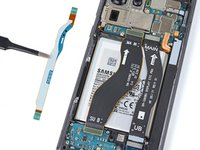
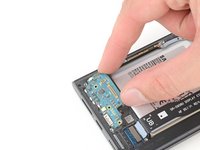
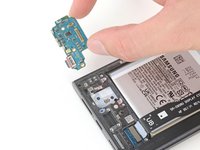
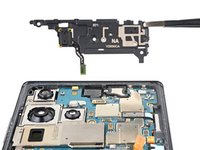
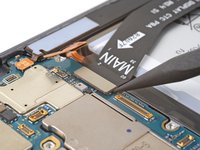
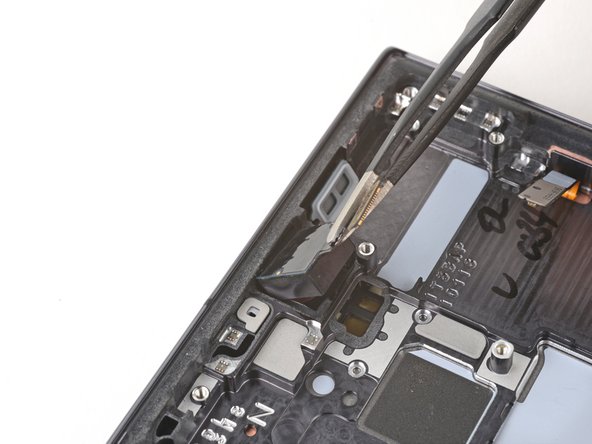
Grab and remove the interconnect cables from the frame.
Reassembly: Remove battery protective if you haven't already.
-
-
-
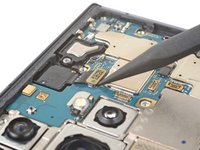
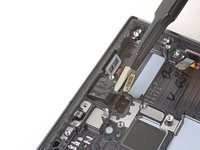
Use your Phillips screwdriver to remove the three 3.5 mm-long screws securing the charging board.
-
-
-
Insert the pointed end of your spudger under the charging board opposite the USB-C port.
-
Pry the charging board up from its recess until you can grab it with your fingers.
-
-
-
Grip the charging board by its corners and slide it out of its recess in the frame.
-
Remove the charging board.
-
-
-
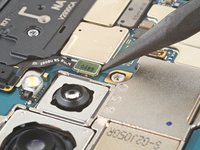
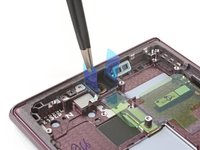
Use the pointed end of your spudger to pry up and disconnect the laser autofocus module press connector.
-
-
-
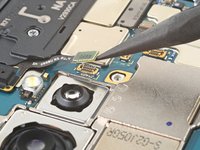
Use your Phillips screwdriver to remove the three 3.5 mm-long screws securing the motherboard cover.
-
-
-
Insert the pointed end of your spudger between the bottom right corner of the motherboard cover and the frame.
-
Pry up on the cover to unclip it from the frame.
-
Remove the motherboard cover and laser AF module.
-
-
-
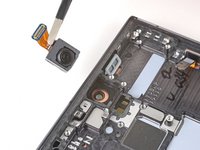
Use the pointed end of your spudger to pry up and disconnect the front-facing camera press connector.
-
-
-
Use the pointed end of your spudger to pry up and disconnect the fingerprint reader press connector.
Not the fingerprint reader - this is for the S Pen features
Cheap OLED screens (not original) won't have this connector and the s pen doesn't work.
S22Ultra -
-
-
-
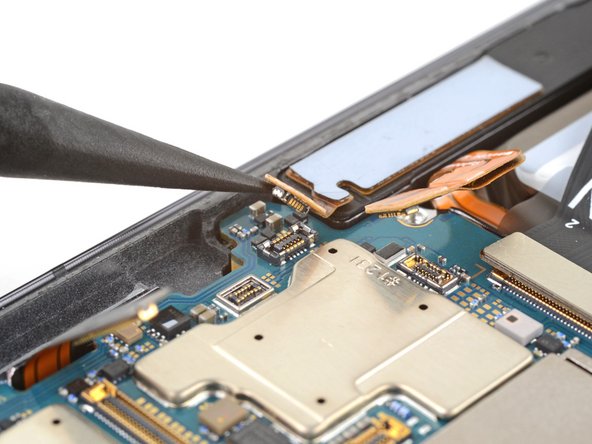
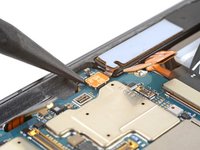
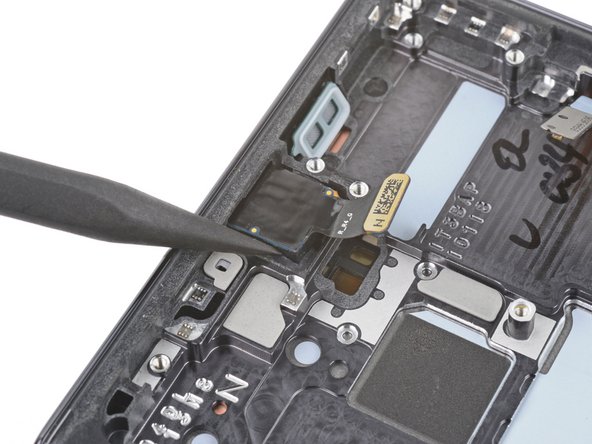
Use the pointed end of your spudger to pry up and disconnect the screen press connector.
-
-
-
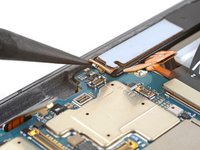
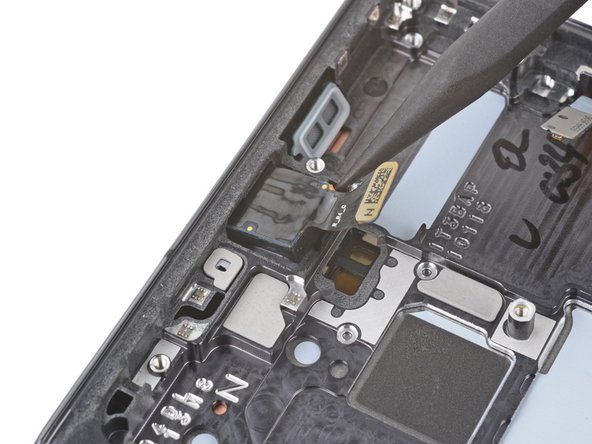
Use the pointed end of your spudger to pry up and disconnect the stylus' press connector.
-
-
-
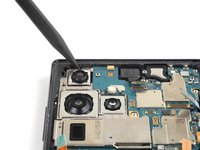
Use your Phillips screwdriver to remove the 3.5 mm-long screw securing the motherboard.
-
-
-
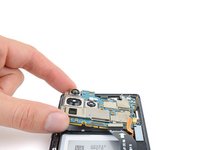
Insert the pointed end of your spudger between the top left of the motherboard and the frame.
-
Pry the motherboard up until you can grab it with your fingers.
-
-
-
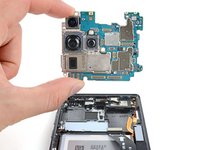
Grab the motherboard by the left edge and remove it from the frame.
5 ribbons to lift.
Front camera
Fingerprint readerScreen (if still attached)
Stylus
Battery
-
-
-
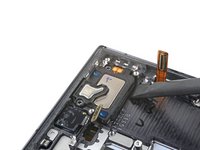
Use your Phillips screwdriver to remove the two 3.2 mm-long screws securing the earpiece speaker and vibration motor.
-
-
-
Insert the flat end of your spudger underneath the bottom edge of the earpiece speaker and vibration motor.
-
Pry the earpiece speaker and vibration motor up from its recess and remove it.
-
-
-
Heat an iOpener and apply it to the top of the screen for two minutes.
-
-
-
Use the pointed end of your spudger to pry the front-facing camera from its recess.
-
-
crwdns2935267:0crwdne2935267:0Tweezers$4.99
-
Use a pair of blunt nose tweezers to grab and remove the front-facing camera from its recess.
-
-
-
Remove the black adhesive liner from the front-facing camera recess.
-
Peel and remove the foam liner from the new frame.
-
-
-
Remove the two large clear rectangular liners from the adhesive sheet and place the adhesives on the sides of the camera recess.
-
Remove the liner from the main adhesive piece and place it in the center of the camera recess with its pull tab facing the bottom of the frame.
-
Remove any adhesive residue from the front-facing camera module.
-
Remove the liner from the thin piece of adhesive and place it on the top edge of the camera.
Don't forget the liner with the pull tab. Almost messed up
-
-
-
Remove all four blue adhesive liners from the camera and the frame.
-
Insert the front-facing camera into its recess in the frame and apply pressure to secure it.
-
-
-
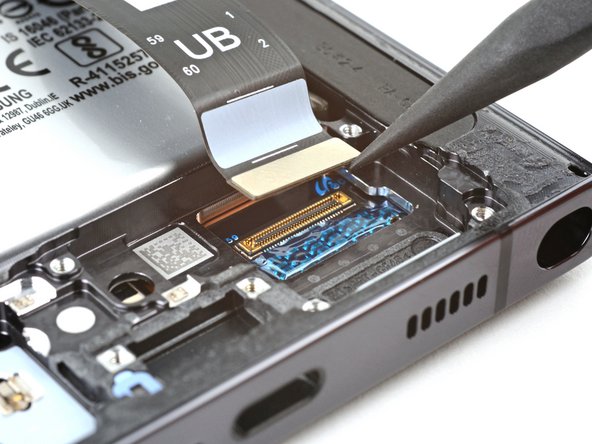
Use the pointed end of your spudger to pry up and disconnect the display cable press connector.
-
-
-
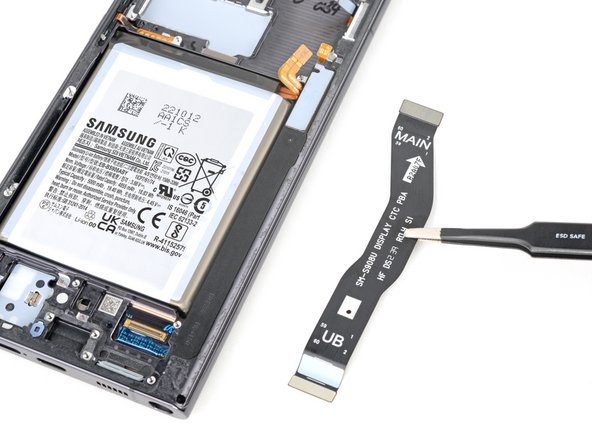
Grab and remove the display cable from the frame.
-
-
-
You're now left with the screen and battery assembly.
-


To reassemble your device, follow these instructions in reverse order.
Take your e-waste to an R2 or e-Stewards certified recycler.
Repair didn’t go as planned? Check out our Answers community for troubleshooting help.
To reassemble your device, follow these instructions in reverse order.
Take your e-waste to an R2 or e-Stewards certified recycler.
Repair didn’t go as planned? Check out our Answers community for troubleshooting help.
crwdns2935221:0crwdne2935221:0
crwdns2935229:037crwdne2935229:0

crwdns2915084:0crwdne2915084:0

Guide Team crwdns2935289:0Guide Teamcrwdne2935289:0
Staff
crwdns2931471:09crwdne2931471:0
crwdns2935297:012,954crwdne2935297:0
crwdns2947412:035crwdne2947412:0
What about the adhesive when reassembling? Do I need to apply more? Or, does the original adhesive, reseal itself?
Hi! The Samsung Self Repair kit includes replacement adhesive to seal up the back cover. As mentioned in Step 18, follow this guide to clean your phone and apply the adhesive with an official replacement. If you don't have replacement adhesive, cut your own adhesive using double-sided tape, as described in this guide. Note that water resistance depends on how well you reapply your adhesive.
If you don't have access to either of these options, and your existing adhesive is in great condition, you may temporarily reuse the existing adhesive. I recommend shaping the adhesive exactly how it was before disassembly, and heating it with a heat gun or hair dryer to soften it before installing your back cover. Exercise caution when heating the phone, and follow this guide as a reference for heating your device.
So I have a stupid question but I was told that if you had a different color phone that the Amoled screen had to match the casing of the phone or it would affect the effectiveness of the screen and the calibration. This sounds so incredibly stupid to me but is this true?
Anything regarding part compatibility is important to us. May I ask where you heard this, and in what context? My initial reaction is that the screens are compatible, since there is no calibration software, anyway. There is only fingerprint sensor calibration.
@cashewclay I'll second what Marie said - I've heard the same when I called one of the authorized samsung repare centers, they said that they have had multiple odd issues when screen mismatched the back of the phone. Agree that it sounds weird.
Been following this guide and unfortunately the replacement screen with frame I got has a different bracket for the Upper 5mm wave antenna, so it doesn't fit back into it. The new one has a little bump out in the middle of the silver bracket (and the molded frame itself). The old one is as pictured here in the guide. The antenna part has a perfectly straight edge, so there's no way to get it in to fit. Any ideas?
Figured it out - to anyone reading this! The 5mmWave radio is different in the Intl models vs the USA "U" models and the frame has a different molding and the aren't compatible! I ordered a replacement screen and frame, from a reputable US vendor, listed as the U model and all the packaging too- and it wasn't. You'll see various parts listed all over online for sale that says 908U or 908B/E interchangeable. They are not! The shell is different so the upper radio antenna doesn't fit and it's impossible to make it fit. You need to make sure you're truly getting the U model frame with any replacement screen.
Mike W -
and if i buy only the screen without the frame but in the publication it has an international version and my cell phone is the us version if it is the same compatible or only the version finished in u is compatible, my mobile phone is the sm-s908u1 please help where to buy
LEO LEO -
Pretty good guide. Had my screen replaced in about 3 hours, took my time to avoid cracking the back glass and was good to go. Had to reheat the i-opener tool about 7 times lol.
The only issues i had was the adhesive for the lower 5G antenna. The adhesive was stuck to the clear plastic much more than the green one, so i had to apply it "flipped" where the bump on the top faced the left instead of the right. Also had an issue with the upper 5g antenna adhesive as it was way too stuck to the plastic and half of it separated when i peeled it off, even when i carefully tried to slice one edge with a razor to promote separation and curling the plastic back. This is however an issue with samsung and not ifixit, obviously.
Overall impressed with the kit.
Oh, and the spudger tool doesn't work too well to remove the front facing camera as it just bends. Use the blunt end metal pliers instead but just be careful.
S pen won't connect after completing this repair. Tried multiple. No luck.
I see where you disconnect stylus module, is this accessible if I were to open up the ultra s22 ultra myself? Can I just press into place firmly? Or did I get faulty Samsung Genuine Equipment?
Hi James, I would first recommend trying the troubleshooting solutions provided here: https://www.samsung.com/us/support/troub...
If nothing works, we can check if it could be a physical issue. It's best to check software before opening up your phone again! Feel free to reply here with your findings.
Any knowledge on when these screens will be back in stock?
Check back next week and we should have them back!
I am lucky to have picked a repair kit and screen last time it was in stock. E-mail notification was almost mandatory as they sold out fast!!!
That being said, my repair was quick and easy to follow along with this guide.
Thank you.
Right to repair is good for everyone!
Thank you for the feedback, Stephan! I'm glad your repair went well.
Does this kit include the actual glass of the screen and the digitizer?
Correct. This kit is the entire screen, attached to the frame and battery.
Oh my god, I was following this guide and in the part when you have to remove the wireless charging thing, I broke the screen ribbon ☠️, I didn't know it was passing below, I had to order a new one, people be careful with this stage
For future fixers, the step in question is Step 19 of this guide. An appropriate picture and some text is now added to help prevent this!
i can't seem to open self repair assistant apk. i can't calibrate finger recognition.
If you haven't done so, already, I'd recommend posting this as a question in the S22 Ultra Answers Forum.
Is it possible to just replace the glass on the screen? Or must you replace the entire screen/battery assembly if the touch screen still functions but the outer lens is cracked?
If you can find a replacement part that is just the screen, you may be able to follow this guide (which is for the S21 Ultra—the specific instructions will vary) to remove just the screen and glass panel.
Thank you, I used this guide a few days ago once my part arrived and I completed the repair within 1 1/2 hours. Posted on IG as well. Did this to my personal device first before I offer it up to potential customers. Not as difficult as made to seem. You just have to be patient!!! Thank you again to the author of this tear down/guide and to iFixit for having the parts and tools needed. Need to find out the warranty on tweezers though they seem to bend/break very easily.
Does the battery and screen (not with kit, that was out of stock, just the part that includes both the screen and battery) come with adhesive? If not, should I purchase the back, front, or both adhesive parts to replace the screen and battery?
Hi Beecat,
The part should come with at least the front camera adhesives. The only other adhesive you'll need to complete this repair is the back glass adhesive. Have you already purchased your part?
Just wondering, could I use the 908U frame for a 908B phone?
FYI, the part did NOT come with camera adhesive (see my previous message)
Also, in step 56, there is a plastic bit not in the original frame (the transparent greenish one) that's never explained.
Se puede instalar una pantalla de s22ultra sm s908u para remplazar una rotación del modelo sm s908b.
disculpa ahora que no esta esa pantalla disponible algun otra idea como comprar una pantalla genuina para el sm-s908u1 ayuda porfavor con un enlace gracias
For step 55 can you use double sided tape somehow?
Hey there, Zephyrshop. For context, this adhesive functions just to keep the front-facing camera in place and aligned with the cutout in the display panel. If you can cut adhesives to the right shape and feel confident that the camera won't move or rattle when the phone is potentially dropped, then you should be fine to use double-sided adhesive. We recommend very strong tape such as Tesa or 3M, so long as you can cut it small enough.
what heppens when i vice verse the Mainboard Flex Cable i connect the main and the sub, does it damage the phone?
Hi, greetings from Finland. I ordered a replacement screen, but it came only with a screen panel. How can I get the broken screen replaced on my old frame with this new part? It seems this guide is for a replacement part where the screen and frame are already glued together.