crwdns2915892:0crwdne2915892:0
Follow this guide to replace the fan on your Sony Playstation 4.
Unplug your PS4 before beginning any repairs.
crwdns2942213:0crwdne2942213:0
-
-
Grip the PS4 with both hands along the gap in the top cover.
-
Push the glossy side of the top cover with your thumbs until it pops to the side.
-
Lift the glossy top cover up and back to remove it from the PS4.
-
-
-
Use a Phillips screwdriver to remove the 6.5 mm screw securing the hard drive bracket to the enclosure.
-
-
-
Pull the hard drive bracket out of the enclosure.
-
-
-
Flip the PS4 upside-down with the back side facing towards you.
-
-
crwdns2935267:0crwdne2935267:0Tweezers$4.99
-
Use tweezers to remove the two stickers in the center of the back of the PS4 exposing two case screws.
-
-
-
Use tweezers to carefully remove the plastic screw covers in each corner, exposing two more case screws.
-
-
-
Remove the four 7.2 mm Torx security screws on the back of the PS4.
-
-
-
Use your thumbs to lift the lower case up and off the PS4.
-
-
-
Use a pair of tweezers to pull the power supply cable straight out and disconnect the power supply unit from the motherboard.
-
-
-
Remove three 9.7 mm-long TR8 Torx security screws.
-
Remove two 41 mm-long Phillips screws and brackets.
-
-
-
Lift the power supply straight up and out of the PS4.
-
-
-
Use the tip of a spudger to disconnect the antenna cable from the motherboard.
-
-
crwdns2935267:0crwdne2935267:0Tweezers$4.99
-
Use a pair of tweezers or your fingers to grab the antenna cable and move it out from the cable guides.
-
-
-
-
Use a pair of tweezers or your fingers to thread the antenna cable out from underneath the optical drive cable.
-
-
-
Remove the 9.7 mm Torx security screw securing the antenna.
-
-
crwdns2935267:0crwdne2935267:0Tweezers$4.99
-
Use your fingernail to press down on the metal release lever of the ribbon cable on top of the optical drive.
-
Use your fingers or a pair of tweezers to disconnect the ribbon cable by pulling on the black tab.
-
-
-
Use your fingernail to press down the metal release lever for the ribbon cable connected to the motherboard.
-
Use your fingers or a pair of tweezers to disconnect the ribbon cable by pulling on the black tab.
-
Set the ribbon cable aside for reassembly.
-
-
-
Use your fingers or a pair of tweezers to disconnect the optical drive cable from the motherboard.
-
-
-
Use your fingers or a pair of tweezers to remove the optical drive cable from the cable guides that hold it in place.
-
-
-
Remove the four screws securing the optical drive.
-
Three 9.7 mm Torx screws
-
One 6.2 mm Phillips screw
-
-
-
Lift the optical drive straight up and out of the PS4.
-
-
-
Remove the two 9.7 mm Torx screws securing the upper case.
-
-
-
Lift the upper case up and back to remove it from the PS4.
“Significant force” is a bit of an understatement. It’s like it’s superglued together..
You absolutely should not need a lot of force for this. In the picture above, press upward using the left thumb from under the outer lip of the cover. You may need to pull it slightly toward you as well. Once that half is lifted, the right-hand side is still firmly attached. Keeping the left-hand side of the top separated, flip the unit over. Along the right-hand side, press the outside lip with your thumb about 2 thumb-widths down from the corner. There is a tab here and once released, the cover comes off easily and off in the back. Otherwise, you’ll be placing stress vertically (and rotationally) on the first tab on the side.
I appreciate this feedback – thank you. This sounds like a safer method. I’ll test it on our guide unit and update the procedure.
THIS SET OF INSTRUCTIONS FROM YOU, IS ABSOLUTELY SENSATIONAL.
I got this cover off quite easily. Still some resistance, but I didn't need this significant force at all.
THANK YOU!!
:)
Cary B -
There is a piece of plastic underneath the casing here. The PS4 I worked on got so hot on the inside that part of the plastic started to melt and warped some inside the metal plate underneath. This made it tricky to open the case, but by using spacers I managed to get it off.
I found an easier method for myself is to have the console upright and pointed away from myself. From this position, wrap your fingers over the top of the cover, hooking it in its front with the last digits of each finger. This allows you to press with your palm into the top of the console and pry in an upward/outward motion. This feels safer as it took much less force to disengage the problematic clip.
-
-
-
Remove the twelve 9.7 mm Torx screws securing the upper EMI shield.
In my PS4, there is a small black Philips screw behind where the power lead connects to the motherboard. That screw connects the EMI shield to the inner metal where the power supply sits.
I had exactly the same thing, and mine is a fairly old model of PS4. Confused me for a moment until I spotted it.
Tom G -
Can confirm this.
This screw was on mine. To anyone reading this, flip the PS4 over and look where the pain in the ass power supply connector is.
Black screw right there.
If you have that screw of course. :)
Cary B -
-
-
-
Remove the two 15.6 mm Phillips screws.
-
Gradually unscrew the pressure plate by turning each screw one half turn at a time.
-
Alternate between the two screws to maintain even pressure on the pressure plate.
why does my PS4 have some metal thing attaching the plate to the metal beneath it?
My PS4 also has 2 metal rings around each screw hole and 4 metal pieces 2 on each side closing in the same shape as the pressure plate as you take the pressure plate off?
How strong do you tighten the screws when re-applying the plate?
To the max, or stop one to two turns before?
I've tightened mine until the screws became taut and I've not had any stability issues.
hazelrat -
Insure you put it back with the bump down (flex down). On the older PS4, the pressure plate is directly on the PCB. Also agree that the screw will bottom out. It is not a standard screw, but has different diameters. The CPU is on the opposite side. On the inner shield (some steps below) is the aluminium body going (thermally) to the heat fins. Clean any residual thermal paste on the inner shield so that new paste applied to the CPU has good contact. The pressure plate is over the (decoupling) capacitors and the CPU is on the opposite (bottom) side. Also, the replacement fan connector does not match the main board. Save the old fan connector and you may have to solder it to the new fan.
Yes, it also has a 2nd plate that hovers over the decoupling caps and applies pressure to the area of the CPU package below. The pressure 'bar' is pushing on the 2nd plate to keep good contact with the heat sink on the inner shield. Clean out all the fins on the heat sink of dust, etc and clean/fluff the gasket parts so they have a good seal.
-
-
-
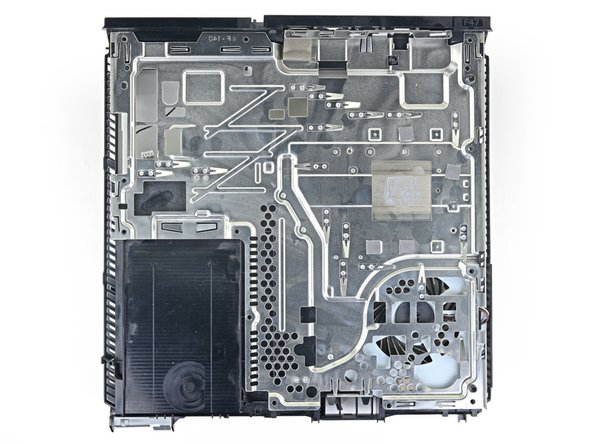
Remove the upper EMI shield.
This is the 2nd PS4 I have disassembled and on both units I have found there is a black Phillips screw securing the upper EMI shield. This should be mentioned in the teardown as the EMI shield cannot be removed completely without first removing this screw and you risk damaging the EMI shield in the process . To locate the screw turn the unit over and you will see a small black Phillips screw located near the power supply prongs. There will be a set of arrows pointing to the screw. Once you remove this screw then you can fully release the upper EMI shield.
Ditto. This is my first time disassembling a PS4. EMI shield didn’t lift off easily on one corner. Noticed the black Phillips screw holding it in place. I scrolled up in the tutorial to see if I missed it. Easy enough.
All the ps4's I opened had this one Phillips screw. And I've cleaned/repaired ~12 units. So I think it's safe to assume that (almost) every one of them have it.
throw it way, electromagnetic fields dont exist
-
-
-
Insert the flat end of a spudger in between the fan cable and the motherboard.
-
Twist the spudger to lift the connector straight up and disconnect it from the motherboard.
Mir ist der Stecker leider von der Platine gerissen 🫣 kann man den wieder dran löten?
The wires came out all seperate and the bit on the ps4 broke. What do i do?
-
-
-
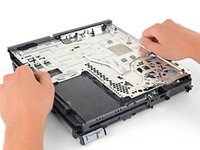
Grab the edge of the motherboard on the front of the PS4.
-
Lift the motherboard until the USB ports clear the PS4 case.
-
-
-
Lift the motherboard out from the PS4.
That shiny metal cover box on the opposite side of the hdi port shown in picture 30 at the very front is showing over heating signs I guess very brown around the edges I think is causing my PS4 not to show up on tv any ideas how to fix that hdi port looks fairly good to me but the black plastic port shows burnt signs as well that's on the same side of the HDMI port but the shiny metal cover is on the opposite side
-
-
-
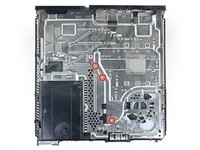
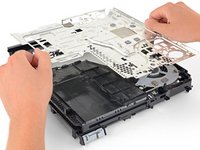
Remove the three 6.2 mm Phillips screws from the lower EMI shield.
-
-
-
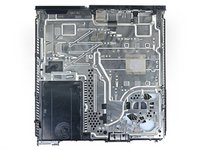
Lift the lower EMI shield and heatsink straight up out of the PS4.
-
-
-
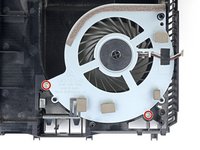
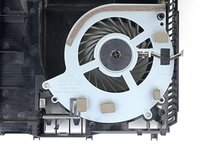
Remove the two 6.2 mm Phillips screws from the fan.
The screw located to the far left in the picture above is in a different place in my PS4. In mine it is located in the hole at the very top right hand corner of the fan right next the the black plastic post that secures it in place. The other screw is located in the same position as shown above.
Agree. Screw on top left is wrong. That screw is for EMI plate. The right screw is top right.
Hi Munir, thanks for pointing this out, are you doing this repair on a PS4 Pro or PS4 Slim?
Same comment about the location of the screw that shows up on the bottom left. You can see it's in the wrong place because it isn't there when lifting the EMI shield in the second picture of step 33, and the EMI shield has an arrow on it pointing to the actual screw location (barely visible in the photos, but visible).
Model is CUH-1004A
It’s the screw to the top right and the screw pictured on the left comes down through the lower EMI shield
-
-
-
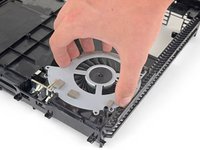
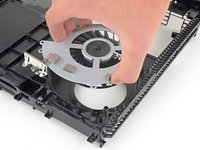
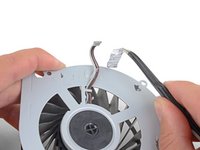
Lift the fan straight up out of the PS4 shell.
When installing the new fan, the holes may be slightly out-of-spec. If the fan is not completely seated, I suggest making a minor adjustment to the hole that is off with a Dremel bit. (the ball-like one worked for me). Tried to use a regular drill bit and power drill but couldn’t cut it. Dremel bit had it expanded perfectly in seconds. In my case, the errant hole was the one that fits into a plastic post, closest to the corner and at the bottom of the picture above.
-
-
crwdns2935267:0crwdne2935267:0Tweezers$4.99
-
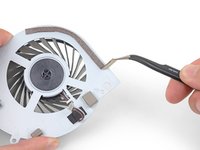
Use a pair of tweezers to carefully remove the foam padding strip from the fan.
what happen if i don’t get all of them on there correctly?
what happen if i don’t get all of them on there right?
The padding strip was too degraded to remove intact. Instead, I purchased a rectangular felt strip from the hardware store. I inked the existing pad and used it as a “stamp” on the peel-away part of the felt pad and cut with scissors. Placed new curved strip onto new fan and trimmed height with X-acto blade.
-
-
-
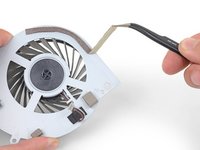
Remove the foam padding pieces from the fan.
My original fan did not have any pads to transfer. Used foam weather stripping instead.
-
-
-
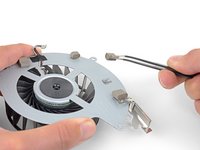
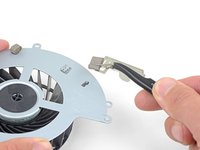
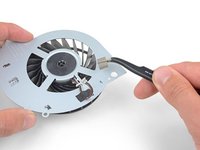
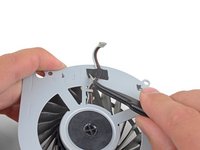
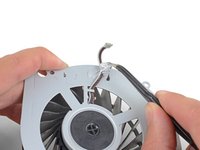
Remove the adhesive strip securing the fan cable.
-


To reassemble your device, follow the above steps in reverse order.
Take your e-waste to an R2 or e-Stewards certified recycler.
Repair didn’t go as planned? Check out our Answers community for troubleshooting help.
Compare your new replacement part to the original part—you may need to transfer remaining components or remove adhesive backings from the new part before installing.
crwdns2935221:0crwdne2935221:0
crwdns2935229:0288crwdne2935229:0

crwdns2947412:035crwdne2947412:0
Great guide, but where to buy a fan for the ps4?!
Look one ebay, that's where my store gets the majority of out parts from. considering we fix computers.
Will this guide work with the CUH-1200 model?
excellent camarade !
Beaux travail !
Attention au principe de peter... Niveaux d'incom.......
je déconne !
P.S. Ne pas se ronger les ongles ca evite les pinces a épiler !
je déconne pas !
Inversement ce pas très esthétique...
Change rien !
My PS4 has been overheating so I decided to take it apart and clean it. I cleaned it well but it still over heats the fan will try to start up but cuts back off plz help
Replace the fan ... Yours works intermittently that probably means ut has a bad bearing.
Does the Model work for the CUH-1116A ????
Does the fan recommended work for the Model CUH-1116A if not do you know where you can recommend me to get one that's compatiable for it thank you.
Well, after replacing the fan, triple checking every thing and plugging it back in…. I got nothing. No power at all.
took it all apart three times to make sure all cables, connections and touch sensors were making contact. Still nothing.
With the bad fan in it at least still powered on befor this.
Many help appreciated !
Did you find a solution
Did you find a solution? I’m currently having the same issue!
This was a great guide! I successfully completed the repair today. Thanks for the comprehensive steps and accompanying photos.
Thank you very much for this repair instructions. I do have one question. At the top of metal plate of the fan are none of the four (I guess) cooling pads shown on the pictures. With which material can I replace them (thickness?)? Thank you in advance.
My power button doesn’t work, but the eject works and the console seems to be running fine when I turn it on with my controller. Any ideas on what I did wrong?
This worked: https://youtu.be/L5Sp39M0O6Q
Megan -
I followed the guide with no issues, but when I hooked my ps4 up again and pressed the power button, the console beeped, I got the blue light, but then it turned off. No fan, no screen, nothing.
The power button works, and there is power - otherwise I wouldn’t get a beep.
So I took it apart and reinstalled the old noisy fan. When I put it back together, same result.
Anyone have any ideas what the problem could be?
Nice man. Very very so good your guide.
Did this repair, fan is better but now my PS4 cuh-1116a won’t read any game discs?! It did beforehand but I did notice there is a bracket on the top of my optical drive? Is it in the wrong way? Could a wire being loose cause this and if so which one? Any help is appreciated thanks.
After I replaced the fan and thermal paste and reassembled my ps4, I have NO POWER at all. I have disassembled and reassembled countless times to make sure I didn’t miss something. All wires are correctly placed. Someone please help!
https://www.easeus.com/resource/how-to-f...
There is also a risk of frying components with static electricity if your were touching all over the motherboard.
Cleaned out the dust and when I put it back together everything worked perfectly, and the stock fan is now silent.
my playstation is now booting in Safe Mode… please help!
My fan circuit was damaged so i try to power the fan by an external 12V 1.5 amp power supply (your typical adapter 230v-12v)
However when i connect brown wire with +12v and the black one with Minus- , it spins for a couple seconds then stops.
Repeatedly does the same .
So my question is, where is the grey wire for and where do i connect it? Is it a speed regulator? Can i add the grey wire with the plus or the minus?
Great guide. Used it to replace the fan on my PS4 launch edition.
I followed this guide step by step, things were going smoothly… after several hours I reach the finish line, I plug it all in get it hooked up, ready to play ,,, bam smoke and sparks come out the back and now its toast. .
My PS4 layout does not look like this in step 1? My model is CUH-1215A
Ps4 turns on but when I load a game the red line appears and it shuts off.
Sam rules!!!
I replaced the thermal paste and now it's working great. No more overheating red light. Silent as a fish running full throttle. Thank you so much for making this for us!
Thank you! Worked like a charm. The worst part was that it died right before the weekend so I had to wait longer to get the new fan. It was actually a pretty fun repair.
why so much things just to get to the fan?
It is because the EMI shield has to be removed to access the fan screws, unfortunately.
Thank you. Great guide. I used it to disassemble my PS4 to clean it. Works great!
İnanılmaz güzel bir rehber. PS4’ün sesinden eser kalmadı. Teşekkürler…
An amazing guide. Fan noise completely gone. Thanks…