crwdns2915892:0crwdne2915892:0
This repair guide was authored by the iFixit staff and hasn’t been endorsed by Google. Learn more about our repair guides here.
Follow this guide to remove or replace a broken or malfunctioning screen on your Google Pixel 7a.
To calibrate the display’s fingerprint reader, follow this guide. Genuine Google replacement screens come with the fingerprint reader already attached. If your replacement screen doesn’t have a pre-installed fingerprint reader, you’ll need to transfer the original fingerprint reader to your new screen and recalibrate it to retain functionality.
You'll need replacement screen adhesive in order to complete this repair.
Note: Any repair can compromise the water resistance of your phone. Retaining water resistance after the repair will depend on how well you reapply the adhesive.
crwdns2942213:0crwdne2942213:0
-
-
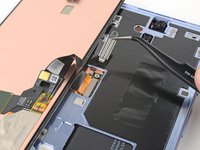
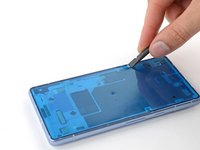
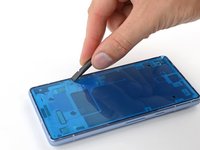
Unplug any cables from your phone and fully power it down.
-
-
-
Apply overlapping strips of packing tape to the cracked glass until the whole screen is covered.
-
-
-
Use a hair dryer, heat gun, or hot plate to heat the top edge of the screen until it's almost too hot to touch.
-
-
crwdns2935267:0crwdne2935267:0Jimmy$7.95
-
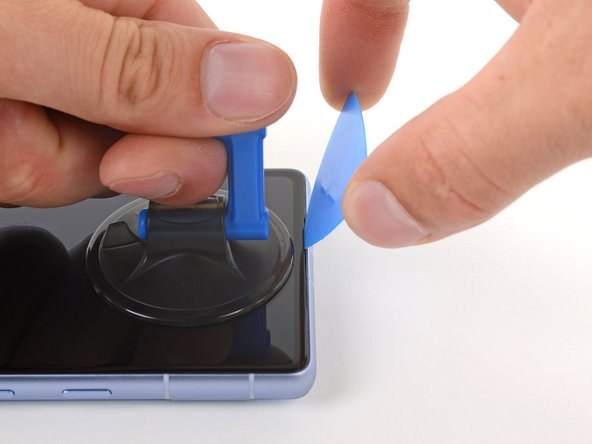
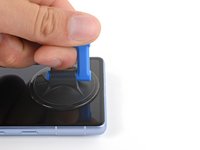
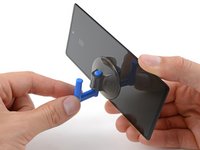
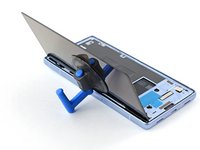
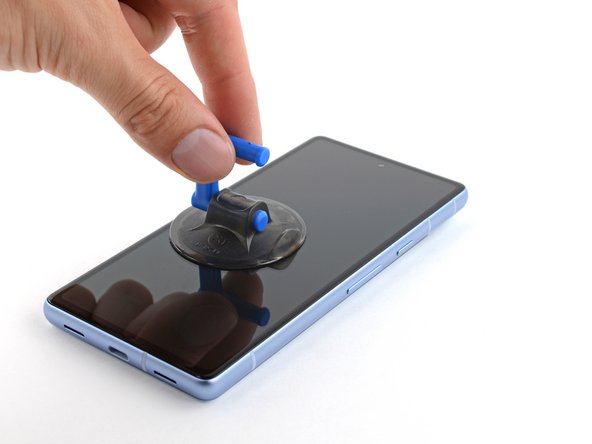
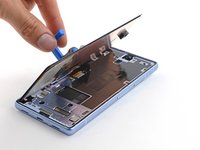
Apply a suction handle to the center of the top edge of the screen.
-
Pull up on the suction handle with a strong, steady force.
-
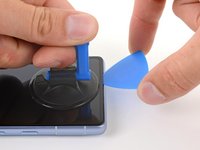
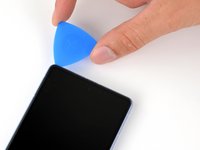
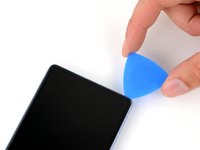
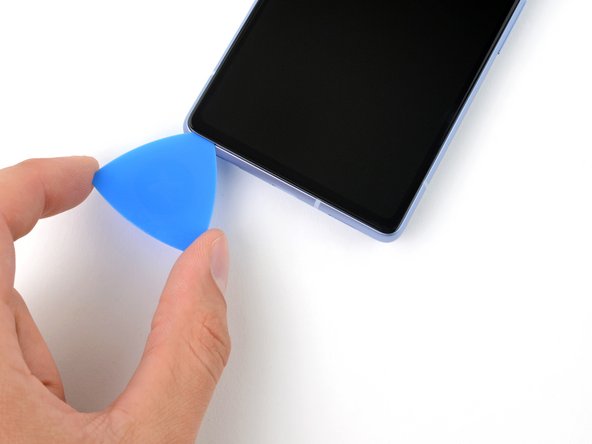
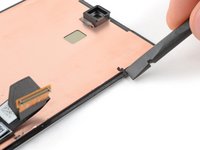
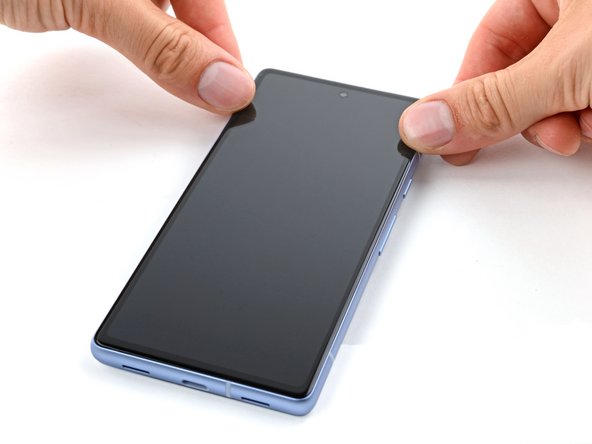
Insert the tip of an opening pick into the left side of the earpiece speaker cutout.
-
Firmly press the pick into the cutout and lower it flat to the screen until it slides under the glass.
I was replacing a shattered screen and none of the methods worked:
1. I couldn't get the suction cup to seal against the screen
2. None of the tapes I used (packaging, duct, & gorilla) would adhere to the screen
I ended up using a craft knife to pry open the seal. The opening picks worked great on the non-shattered portions of the screen. This step took me a few hours to troubleshoot
I second Parker's comment, if your screen is badly shattered like mine, a craft knife does the trick. You'll scratch the edge of the frame, but there's no avoiding that. Don't be scared to crack the screen more with the knife, you can take if off shard by shard if you have to. At some point you'll have enough leverage to remove the display part as one big piece and then just scrape off any leftover glass and adhesive once the Screen is removed.
I third these comments. Enter through the earpiece speaker like the guide says and chip away the glass little by little. Put tape over the section you're cracking so glass doesn't fly everywhere. Rinse and repeat with more small sections of tape. It's a pain, but after you get the edge glass off, the lcd will be loose. I tried iso, I tried heat, but nothing moved this screen. It even broke my suction cup.
Replacing the screen is pretty straight forward with the guide. I would get the Jimmy tool. This tool makes it super easy to remove the old screen.
As other comments mentioned, the pick supplied is too thick to lift the screen. I found a method to open it without the Jimmy tool and without breaking the screen. Follow all steps as mentioned but use an utility knife just for the initial lift of the screen (1mm depth is enough, 2mm max). That creates enough gap for the plastic pick to get inside and slide around all edges.
-
-
-
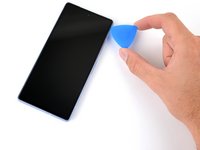
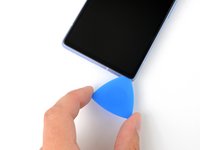
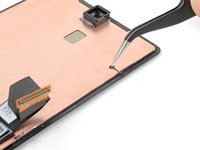
Slide your pick back and forth across the top edge of the screen to separate the adhesive.
-
-
-
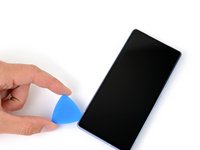
Slide your pick down the right edge to separate the adhesive.
-
-
-
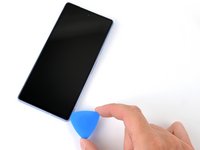
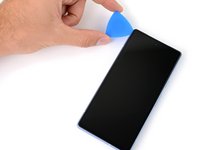
Slide your pick to the bottom left corner to separate the bottom edge adhesive.
-
-
-
Slide your pick to the top left corner to separate the left edge adhesive.
-
-
-
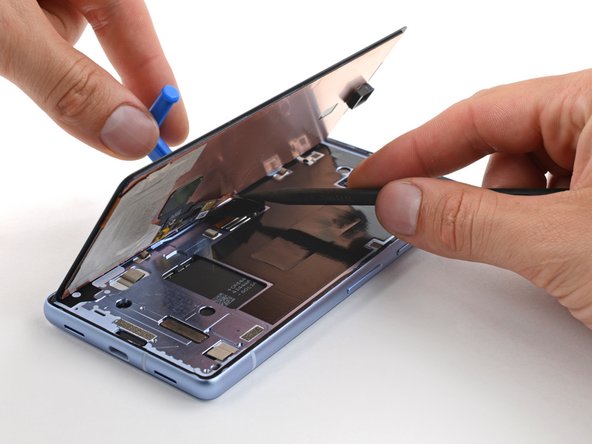
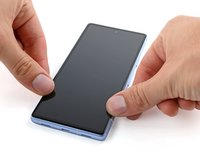
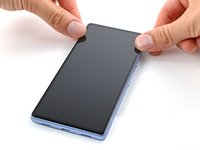
Swing the right edge of the screen open, like turning the page of a book.
-
Lay the screen over the left edge of the frame.
You also have to deal with the square adhesive strip (the one you replace in steps 14 and 17). I ended up forcing the phone open because I was throwing away the old screen.
I'm not sure how you'd do it if you wanted to avoid damaging the screen -
-
-
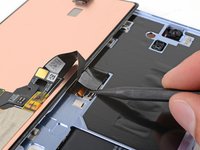
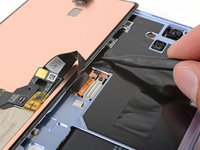
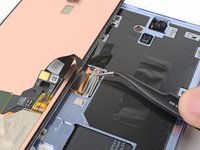
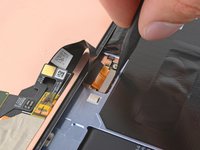
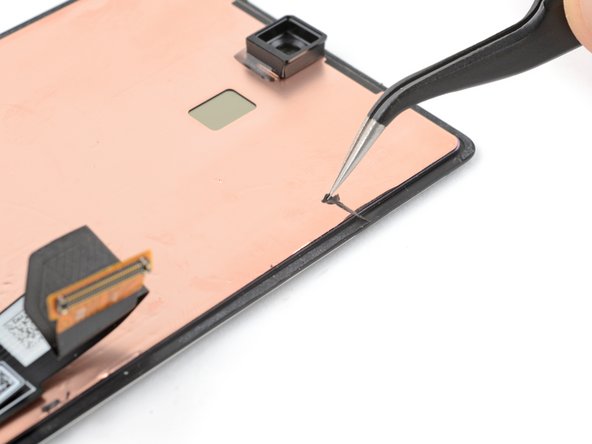
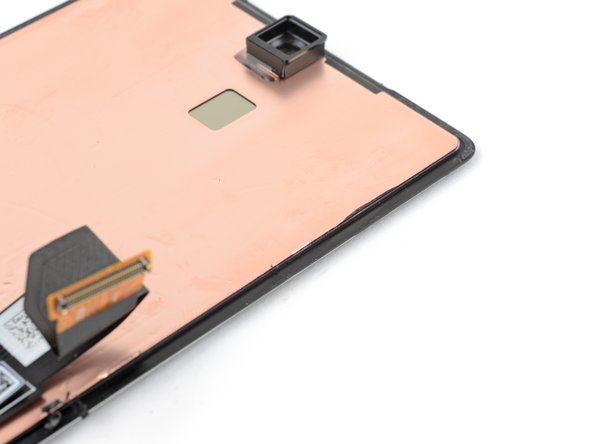
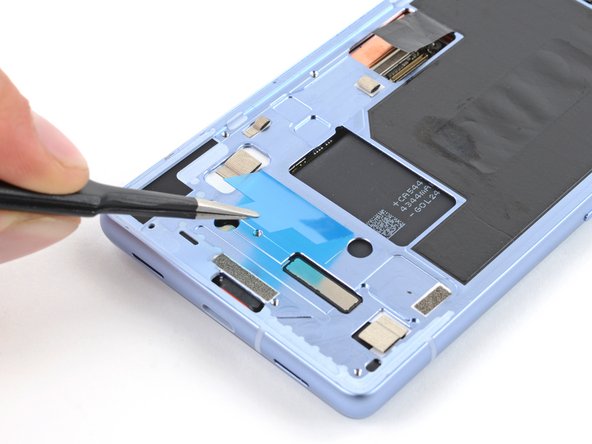
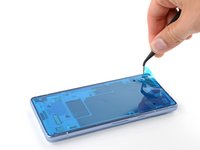
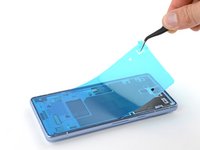
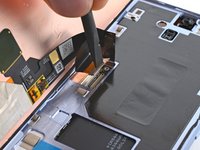
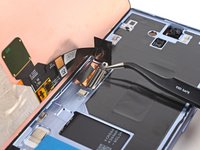
Move the flap of graphite film away from the screen connector.
-
-
-
-
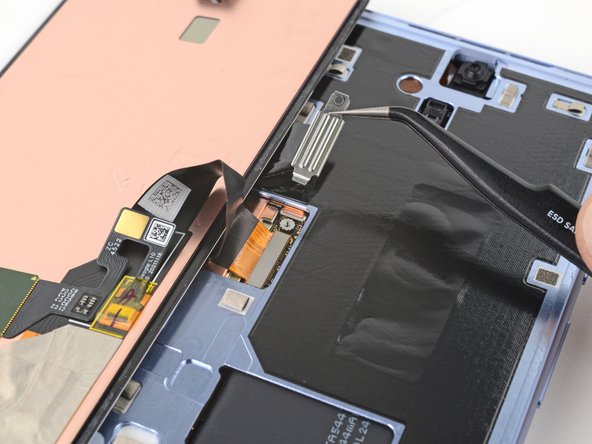
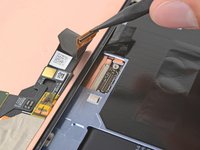
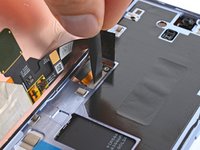
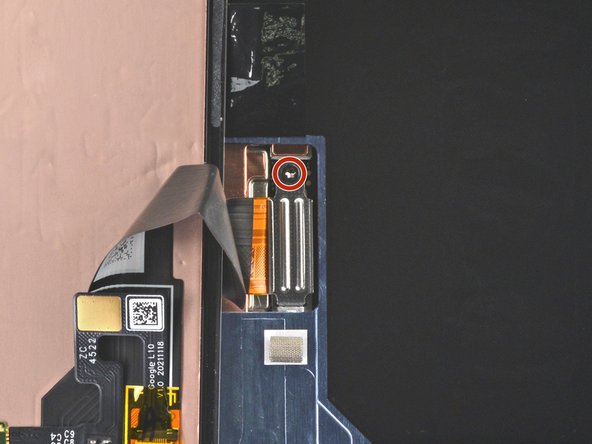
Use your 3IP Torx Plus driver to remove the single 2 mm screw securing the screen connector cover.
-
Remove the cover.
I lost my screw during this process and am trying to find another online. A 2 mm 3IP Torx Plus screw doesn't seem to exist. Are you sure this is the right one? I tried a 2mm socket head screw just to see if it was the same pitch and size, but it was way too large.
I also need a replacement screw. Anybody have any luck finding one?
I ended up ordering a variety pack off Amazon. The M1*2mm screw seems to fit.
-
-
-
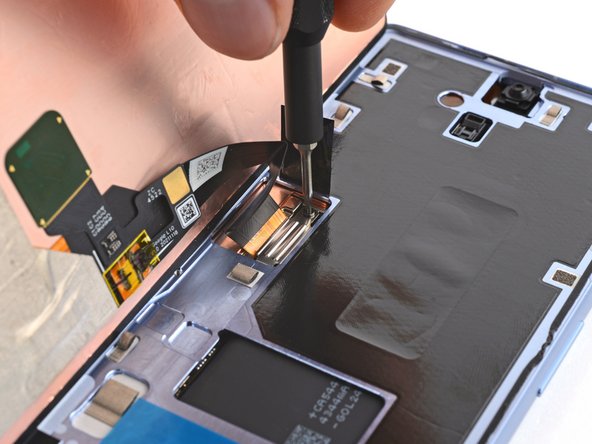
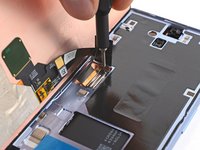
Use the point of your spudger or a fingernail to pry up and disconnect the screen press connector.
-
-
-
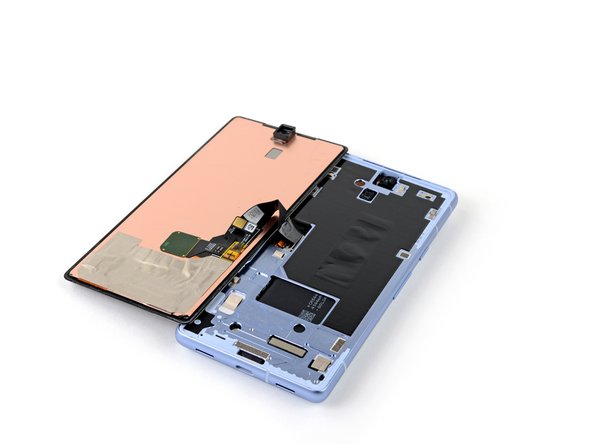
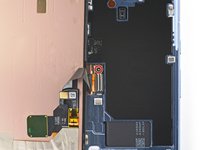
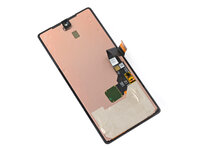
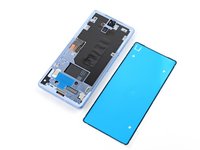
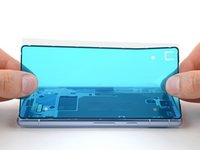
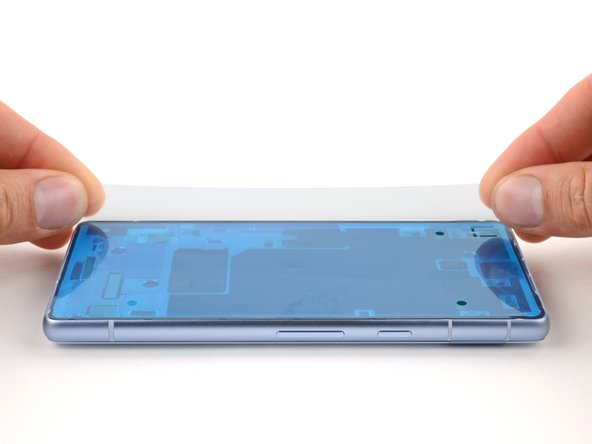
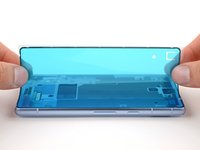
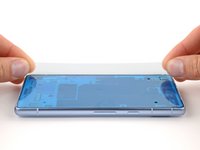
Remove the screen.
-
When handling your screen, grip it by its edges.
-
When placing the screen on your work area, make sure nothing is touching the bottom of the screen. Consider placing it on a soft, lint-free cloth.
-
-
crwdns2935267:0crwdne2935267:0Tweezers$4.99
-
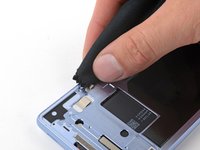
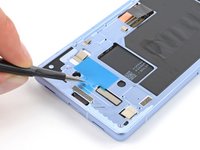
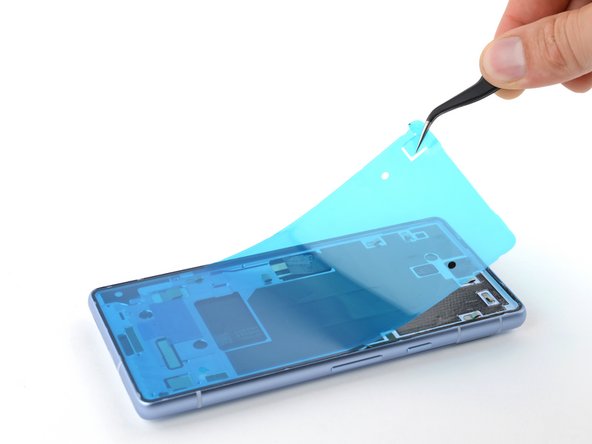
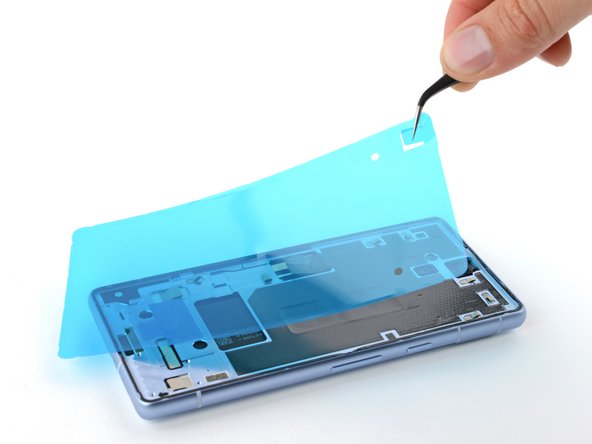
Use blunt nose tweezers or your fingers to peel and remove the square piece of adhesive near the battery cutout.
-
-
-
If you're reusing your original screen, peel and remove the old adhesive from the perimeter of the screen.
-
-
crwdns2935267:0crwdne2935267:0Microfiber Cleaning Cloths$3.99
-
Use a pipette or syringe to apply a few drops of highly-concentrated isopropyl alcohol (over 90%) to the perimeter of the frame.
-
Wipe the residue away using a lint-free or microfiber cloth.
-
-
-
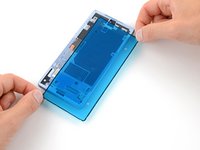
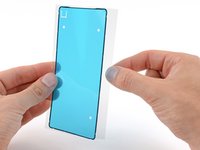
Peel the square piece of screen adhesive from its large liner.
-
Apply the adhesive to the frame in the same location as the old adhesive, just below the battery cutout.
-
-
-
Before removing any liners from the screen adhesive, hold it over the frame to make sure it's oriented correctly.
If you bought the "Fix Kit" version of this, the screen adhesive comes pre-installed on the replacement screen.
Is this the small blue "line" at the edges of the screen? Since on the pictures, it seems that the blue adhesive has the full screen size?
I was confused by the same thing - ifixit, would be helpful to include a close-up of the pre-installed adhesive here. I spent an embarrassing amount of time looking for a screen sized blue adhesive sheet where I unboxed the screen-kit, was going to message you then finally saw the narrow blue pre-install.
-
-
-
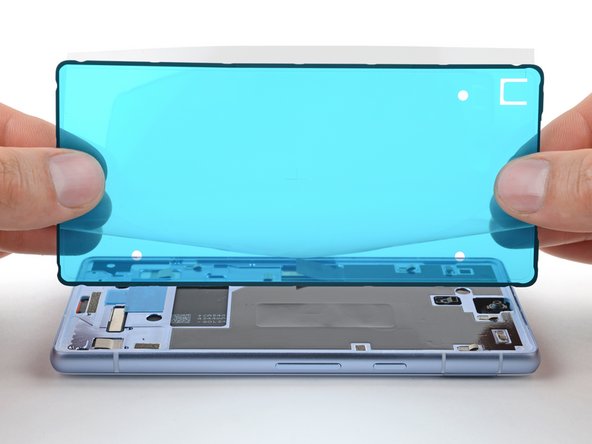
Peel up the right half of the large adhesive liner. Don't remove the whole liner, yet.
-
Hold the adhesive by its short edges, with the right long edge of the liner folded back to expose the adhesive.
-
Lay the right long edge of the adhesive onto the frame.
-
-
-
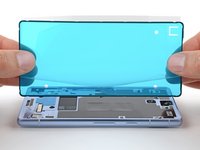
Slowly lay the rest of the adhesive onto the frame, peeling away the large liner as you go.
-
-
-
Use the flat end of your spudger to press along the perimeter of the adhesive and secure it to the frame.
-
-
-
Grab the blue liner pull tab in the upper left corner.
-
Slowly peel and remove the liner.
-
-
-
Apply a suction handle to the left side of the replacement screen, with the handle facing left.
-
Prop up your screen on the left side of the frame.
-
-
-
Connect the screen cable by aligning it over the socket and pressing on one side until it clicks into place before fully pressing it down.
I had to undo the 180 degree bend in the screen cable on the replacement screen, and re-bend it a few millimeters back so the connectors would align with the screen in position. Just a small extra step that might be needed depending on the replacement part you got.
-
-
-
Insert the screen connector cover into its slot in the logic board.
-
Use your T3 Torx driver to install the 2 mm 3IP Torx Plus screw and secure the screen connector cover.
Achtung! nicht zu feste anziehen - nach fest kommt bekanntlich locker. Man kann die Schraube allerdings ordentlich festziehen.
Ich habe es allerdings zu gut gemeint und mir den Schraubenkopf abgebrochen.
Jetzt kommt mein Displaystecker dann wohl ohne Schutzabdeckung aus....
-
-
-
Peel and remove the blue liner from the square adhesive on the frame.
-
Your replacement screen may have extra protective liners covering the front camera or sensors. Check the entire screen and remove any remaining liners.
There should be an overview of the liners that need to be removed. I did not remove the liner over the selfie camera and had to reopen the screen.
My replacement screen had a circular sticker on the fingerprint reader with a "+" icon in the middle. I tried to gently remove it since the photos did not have the sticker, but it wouldn't come off easily so I decided to leave it on. After finishing the repair, my fingerprint sensor worked perfectly.
All that to say, if your fingerprint reader has the same sticker, it is not necessary to remove it. But do check the selfie camera and screen cable, which both had liners on my replacement.
-
-
-
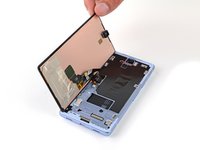
Hold the screen just above the frame by the suction handle.
-
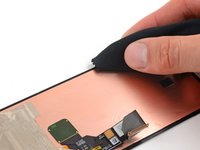
Use a spudger to fold the flap of graphite film back over the screen cable.
-
Press the screen into place.
-
-
-
Remove the suction handle.
-
Firmly press around the perimeter of the screen to secure it to the frame.
-


To calibrate the display’s fingerprint reader, use Google’s Pixel Update and Software Repair tool.
Take your e-waste to an R2 or e-Stewards certified recycler.
To run a diagnostics test with the built-in Pixel Diagnostic tool, click here.
Repair didn’t go as planned? Try some basic troubleshooting, or ask our Answers community for help.
crwdns2935221:0crwdne2935221:0
crwdns2935229:069crwdne2935229:0

crwdns2915084:0crwdne2915084:0

Guide Team crwdns2935289:0Guide Teamcrwdne2935289:0
Staff
crwdns2931471:09crwdne2931471:0
crwdns2935297:013,438crwdne2935297:0
crwdns2947412:029crwdne2947412:0
This guide worked well for me and I was able to replace my screen despite it being severely cracked - expect a lot of screen breakage and glass pieces if that's the case! I set everything in a tray to minimize glass fragments going all over.
Once the screen was installed, the wrapper for the iFixit provided screen has a label that says "UDFPS calibration required" with a QR code.
This takes you to a Google site that tells you how to set up fingerprints on your phone. I don't think that link is helpful.
I needed to go to https://pixelrepair.withgoogle.com/udfps where Google has a tool that allows easy updating of the fingerprint sensor software on your phone, which is a requirement after a new screen is installed. Open that site on a computer (PC or Mac, no ChromeOS, no tablets) and follow the instructions, which include connecting your phone via USB cable.
I had trouble with the calibration step. I ended up having to install the Google USB driver. I downloaded it here and followed this guide, using the Windows 10 instructions for Windows 11
the link worked for me, thank you so much @hanschun.
I was going to flash my phone, but I just checked this guide again, and I scrolled past the iFixit link, and stumbled at your comment
Thank you again
The guide worked very well. Although it was very hard to remove the old display (I have two left hands, all thumbs), I was able to exchange it. Thank you very much!
Just replaced my phone 7a screen using the available kit. It was next to impossible to get the old screen off using the heat and pry tools. Would definitely recommend getting their jimmy tool. I ended up shattering the old screen on purpose using a punch tool and peeling the glass off the digitizer and frame. This was easiest for me without ordering another tool. Would NOT recommend doing it this way! The other deviation from these instructions is that the screen replacement version sent to me (10/2023) had the screen adhesive already applied to the screen. Made it much easier to install since there was no human error applying the screen adhesive to the phone frame first then lining up the screen. Definitely an improvement! Overall, took me way too long to complete, closer to 2+ hours due to the issues getting the old screen off. But certainly manageable by any DIYer. Would definitely buy from iFixIt again in the future if needed.
You just described my experience exactly. Busting the old screen was awful but it worked. Without better tools, I can't imagine getting that screen off there!
Jeff -
The customers screen was Spider-Webbed pretty badly, and it was a brand new phone basically so the new adhesive was very sturdy. With a few attempts at reheating well under the point you couldn't touch it and finding the text that states to start at the left side of the top speaker, it broke free. The screen was sturdy enough to apply heat and use a jimmy to pull up while attempting to evenly distribute the weight and it worked. Took some force pulling up, somewhat effort commanding to do while making sure you aren't using any part of the internal organs or cosmetic exterior as leverage. With the brand new old spidered screen now out of the way, the rest of the clean up process was a breeze. I did not quite get though why I was provided with a T2 in the screen kit that didn't fit. I am glad I had the client spend the extra for the tool kit with the T2, T3, and T4! I do have them as well in another kit, but I would rather not use a toolset designated for different tasks. Great guide and genuine parts as always. Thanks again! 1.5 Hrs.
The absolutely hardest part was getting the old screen off. Everything else was relatively easy, a bit slow trying not to damage anything. But instructions were straight forward and because my phone had all the latest updates it worked straight away especially with the finger scanner.
Ultimately I had to use a steel butter knife at the top left where the speaker phone is to pry it open. I had gotten my phone so hot that the back glass cover's glue started to separate and yet the front was still locked in like a rock.
Im a first timer doing a self repair kit and yeah hopefully won't be anytime soon in the near future took me over 2.5 hours which most of the time spent was just on the glass cover.
I bought my 7a as a discounted warranty return, and I am pretty sure the screen had already been replaced once! So I managed to crack the replacement... Repair went well total time just less than 2 hours.
Getting the screen off went easily with heat from a hairdryer and the iFixit picks. Hardest part for me was attaching the new cable and re-fitting the screen connector cover, then driving in the small screw. But I have shaky hands!
Two warnings for others:
1) I messed up by wiping alcohol onto the selfie camera while I cleaned the adhesive off the frame! Now my selfie camera is clouded around the bottom. Luckily I hardly ever use it...
2) I nearly accepted to wipe my phone while trying to re-activate the fingerprint reader. You don't need to do that! My mistake was putting the phone into "recovery mode" before plugging it into the computer. Just leave it in fastboot and the website detects that you need to re-install the fingerprint reader software. Then reboot two times and it will work.
Worked great, thanks ifixit dudes and dudettes!
I forgot to reinstall the little bracket that holds the ribbon cable connector in place... but I'll keep it around in case i actually need it some day.
We're glad your repair went well! That bracket is just responsible for keeping the screen connector in place. The only danger is that it may suddenly disconnect following the device hitting the ground or flexing a severe amount.
Merci beaucoup pour ce tutoriel grâce à laquelle la réparation n'était pas trop difficile.
J'ai mis 2 heures pour la réparation , dont 1,5heure pour enlever l'ancien écran car il était cassé en milles morceaux: j'ai doncdû chauffer au fur et à mesure et enlever les petits morceaux d'écran brisés un par un le long du contour.
Ensuite nétoyage des restes de la colle et des petits débris de verre avec le petit outils en plastique fourni.
Cette version d'écran venait déjà avec le pourtour adésif sur l'écran, donc beaucoup plus facile à installer que dans le tuto.
Seule petit problème: le software pour mettre à jour le lecteur d'emprunte digitale ne reconnaissait pas le 7a sur mon PC. J'ai du installer les drivers pour cela.
Un grand bravo à toute l'équipe de Ifixit pour cette super solution de remplacement d'écran.
Nous sommes heureux que votre Pixel fonctionne à nouveau ! Merci de partager votre expérience.
Just replaced the screen, the screen was shattered which made it complicated. Couldn't find a way in the screen on the top. Eventually after removing small pieces of glass it was possible. I used a Jimmy to open it more and get under the screen itself then I could remove it in a few tries. Did scratch the screen a little bit, but installing was easy. The steps do not mention peeling off the blue liner of the edges of the genuine replacement screen.
Have the same experience as others with the not being able to use suction cup, and also I couldn't get the plastic pick or a craft knife further than the sides of the earpiece speaker cutout because of the shattering glass. Countinued to break the glass around the edges, ..absolutely excruciating(!) So after reading this guide I turned my phone off and started the repair at 19% battery. And when I restarted hours later (without any charging) my phone was at 100%. How, what, I really truly don't understand.. Didn't even connect a cable for the fingerprint sensor config as I don't use it. I accidentally made a scratch to the black tape/material covering the battery when removing glass, could this somehow have caused the 80% extra battery level?
Remplacement réalisé en environ 2h. Si c'était à refaire ce serait réglé en 30 min.
Le décollage n'a pas fonctionné chez moi malgré le sèche cheveux le lisseur et le iopener...
Le plus simple est de faire levier en partant du haut parleur puis j'ai arraché l'écran en faisant attention aux morceaux de verre.
Attention à bien localiser la nappe pour éviter de l'arracher et faire attention à ne pas endommager ce qu'il y derrière l'écran.
Rien de sorcier si c'est fait calmement.
Le scotch sur l'écran permets de ne pas projeter du verre partout.
Après un bon nettoyage le montage du nouvel écran est très simple. Le résultat est parfait chez moi.
Bien suivre le protocole pour installer le capteur d'empreinte, penser à installer le pilote sur Windows et activer le mode développeur sur le téléphone.
Le kit de réparation n'est pas impératif si vous avez du scotch, un embout torx T3, un tournevis plat très fin, une petite pince et un outil assez fin qui ne marque pas pour nettoyer la colle
Dispo si besoin d'aide.
I just completed this repair two days ago with the replacement screen from this site.
As others have said, removing the glue around the screen with a hair dryer seemed impossible. I ended up shattering the screen, ripping it off with knife between the glass and the foil like material, followed chiseling off any remaing glass around the edges.
Don't be be klutz like me and accidently turn the phone on while removing the screen. Keep your fingers away from the buttons.
I didn't damage anything, but I didnt know for sure until I had the new screen installed.
Once the screen was removed the install of the new one was pretty straight forward. Calibrating the finger print scanner was pretty easy too. Make sure you follow the directions in the order they are listed in this guide.
Please note, if your screen comes with the adhesive pre-installed, you will have to remove the blue liner from the edge of the back of the panel, and from the aperture for the camera (both on the back side of the screen.
Really good guide.
Minor improvement suggestions: I think it should mention the rips on the inside of the new screen tho (over the camera lens hole and around the adhesive). Also applying the suction cup centrally is not possible, considering the labels on the screen rip, but it worked equally well for the purpose applied towards the bottom of the screen.
absolutely not worth trying with the picks the ifixit kit comes with, I was hopeful but they were too thick to even fit in the earpiece let alone pry it, and pixel's adhesive is very very very strong, if your screen is shattered youre better off peeling it away, i shattered mine to peel as i was impatient for a jimmy to arrive. The rest of the process once the screen is off is well written and very easy to follow, seems to be working fine : ] I wish the kit came with a jimmy instead of iopener, seems cheaper and more helpful
100%. the Jimmy should be included instead of the picks.
Benji D -
hi ! screen replacement went well, the fingerprint sensor works but not the proximity sensor. did I forget to remove a protective plastic? I've read the guide again, I see no such thing but I've read about it on a pixel 5 guide.
Careful!! The guide doesn't mention that there is a sticker over the proximity sensor and it will prevent it from working if you forget to remove it. I made that mistake and now I have a phone without a working proximity sensor. I won't go through the suffering of removing the glue again
Very thorough guide, thank you.
I ended up cooking the old screen pretty good with a heat gun to get the adhesive to release- all the way to permanently changing the color and having to use rags to hold the heated phone- I'm hoping that didn't damage anything else, but TBD.
I lost the screw that holds the ribbon cable in place. It appears to be an m1x2mm, fyi.
The ribbon cable on the new screen was bent in the wrong place. So it required a little extra care and force to set the screen into place.
This is a very thorough guide. Thank you iFixit team. As suggested in a previous comment, I used a craft knife initially to create a wide enough gap to get the blue pry tool into the speaker gap. This did leave some scratch marks on the phone case though. I then used the blue iFixit pry tool rather than the opening picks to lift the screen. This worked really well (I only find the opening picks in the box when I completed the job!!).
There is a rubber hood over the proximity sensor which I needed to remove from the old screen and fit to the new screen.
I had to run the finger print sensor calibration twice in order to get it to work.
Once I completed that the phone is like new and fully functional. My wife is very happy to have a working phone again.
The guide worked really well. My screen was shattered pretty good and therefore getting it off was a bit of a project. Protect your eyes!
Pay attention to the little rubber cap on the proximity sensor just below the front camera. In my case it stuck to the old screen and the sensor failed to work after the first try. I ended up opening the screen again (which was super easy compared to the original one) to properly place it again. Images for steps 24 and 25 show how it should be positioned.
Ordered the kit and thought, why not, I've had to change a few screens in the past and also ordered the Anti-clamp tool too.....This tool does not work on this phone. Due to the raised camera section on the rear I had to try and remove from the bottom of the screen. Even with the suction tape applied over the rear and side edges, the clamp still pulled the back panel off, while the screen remained firmly in place. The picks also wouldn't get between the frame and screen and i couldnt go in from the speaker section at the top due to how badly the screen was shattered there. It just splintered and the glue wouldn't give way. I gave up with the anti-clamp and I ended up buying a steel spudger from amazon, grinding it down nice and thin and then this eventually got the screen to separate. After this, the rest of the repair was easy. Just make sure you peel the protective film off the camera lens cage. I didn't notice it was there at first.
Overall happy given that I have a new and functioning screen for my Pixel 7a. I want to leave comments just to fill in some of the gaps between the instructions here and the kit you get from IFixIt.
The kit comes with 3 bit drivers and the screen itself came with another driver. Out of these drivers, you will only need ONE of them to the do the screen repair (Torx T3).
Taking off the old screen is NOT at all easy. Especially if cracked, because it will shatter and crack further as you try to get under it to cut the adhesive. It took me about 3 hours to do this repair and over 2 hours of that was just taking the old screen off.
BUY THE JIMMY TOOL. Was saved by a razor blade I had lying around. The IFixIt pics will not cut the adhesive (at least not when screen is cracked).
BUY THE CLAMP TOOL. If you watch the video on Pixel 7 Pro they use a clamp tool that looks like it works. The suction tool provided does not.
MAKE SURE YOU HAVE ISOPROPYL ALCOHOL AND AN EYE DROPPER. This helps greatly in removing adhesive.
I managed to swap the badly cracked screen on my wife's Pixel 7a.
Removing the screen was way scarier than what is shown here but since the screen did not need to survive I kept going on. Producing lots and lots of small shards of glass. DO WEAR EYE PROTECTION IF YOU NEED TO DO IT AS I DID! Those glass particles do fly everywhere. Be careful and check for any cables and connections under the screen but you do not need to worry too much about the 2 to 3 mm of depth when using the picks. Focus on removing the black goo along the edge of the display. Clean the rim up nicely before installing the new display. Once you got the old stuff out it is really just a walk in the park.
Once everything is up and running go directly to googles fingerprint calibration tool. Do not follow the link provided on the sticker on the display unit. This will/might spare you another scary journey through rescue mode territory.
If you purchased the iFixit kit, now is a good time to ensure you have all the parts: If you go to the kit page, and expand Kit Contents, you'll see the full list. The full list contains links to details on adhesive sets. These links are also in this guide document, in the upper right, in a scrollable window.⏎
⏎
Newer batteries seem to come with the 1IP Torx Plus bit taped in the tray of the battery part tray (Repair Part box). It is not in the Tools, found in the Repair Tools box (if you purchased the Fix Kit).⏎
⏎
Familiarize yourself with all the parts, including the six adhesive items. Ensure none of the components fell behind the parts tray and are left in the parts box (they are tiny adhesive tabs). The adhesive is VERY sticky. Don't remove the backing until you are ready to use, and then be prepared to lay the piece in place once ANY contact is made. Removal, even an edge, to better align an adhesive part is often not possible(!). The adhesive will stretch and bunch up.⏎
⏎
As noted at the beginning of the guide, proper installation of the adhesive is required to maintain water resistance, but also to transfer heat correctly.
Chris Romer - crwdns2934203:0crwdne2934203:0