crwdns2915892:0crwdne2915892:0
This repair guide was authored by the iFixit staff and hasn’t been endorsed by Google. Learn more about our repair guides here.
Use this guide to replace the screen for your Google Pixel 6a.
For your safety, discharge the battery below 25% before disassembling your phone. This reduces the risk of fire if the battery is accidentally damaged during the repair. If your battery is swollen, take appropriate precautions.
Your new replacement screen will come with the fingerprint reader already attached. If not, you will need to reinstall the original fingerprint reader to your new replacement screen and recalibrate the reader to maintain its functionality.
You'll need replacement adhesive in order to complete this repair.
crwdns2942213:0crwdne2942213:0
crwdns2936621:0crwdne2936621:0
-
-
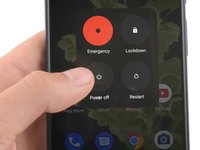
Fully power off your phone and unplug any cables.
-
-
-
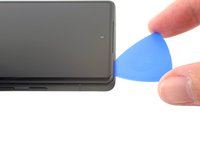
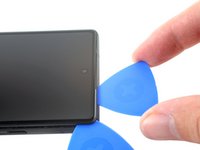
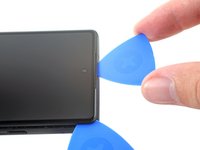
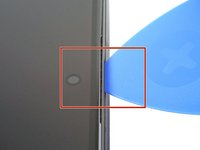
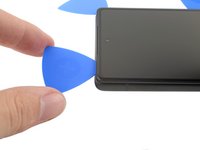
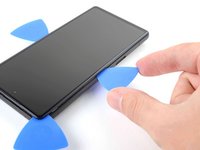
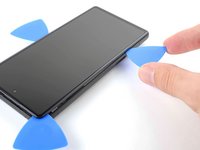
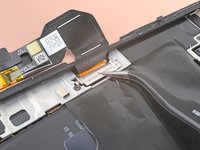
Screen seam: This seam separates the screen from the rest of the phone. Do not pry at this seam.
-
Bezel seam: This is where the plastic bezel designed to protect the screen meets the frame. It's held in place by plastic clips. This is where you should pry.
Don't actually perform this step now - read a few more steps first!
If changing the glass on only would you not separate the screen seam?
It's pretty stupid, that most Pixel dissasembly videos don't talk about the two different seams.
On the first one I've opened it was very hard, because I've applied not enough heat before and maybe also because it was the seam that losses together with the screen bracket, which seems harder to open in one step.
The 2nd one came off pretty easy after first enough heat was applied and then I had to searately remove the screen bracket to get out the mainboard - BUT then only the top seam opened and the screen bracket itself remained in the case. So how to fix that? Is there another seal available for it, just add small amount of B-7000 or what is the best way to seal it well? -
-
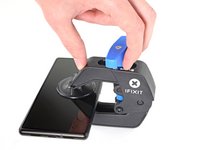
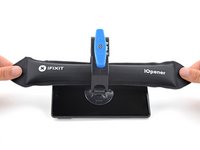
crwdns2935267:0crwdne2935267:0Clampy - Anti-Clamp$24.95
-
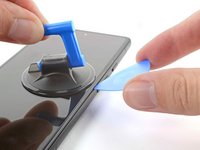
Pull the blue handle backwards to unlock the Anti-Clamp's arms.
-
Slide the arms over the right edge of your phone.
-
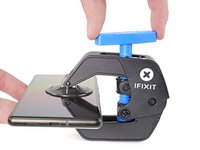
Position the suction cups near the middle of the right edge of the phone—one on the front, and one on the back.
-
Squeeze the cups together to apply suction.
-
-
-
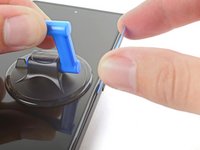
Pull the blue handle forward to lock the arms.
-
Turn the handle clockwise 360 degrees or until the cups start to stretch.
-
Make sure the suction cups remain aligned with each other. If they begin to slip out of alignment, loosen the suction cups slightly and realign the arms.
-
-
-
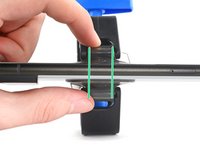
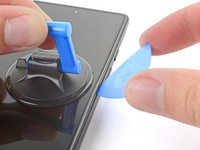
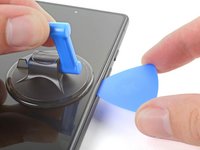
Heat an iOpener and thread it through the arms of the Anti-Clamp so it lays on the right edge of the phone.
-
Wait one minute to give the adhesive a chance to release and present an opening gap.
-
Insert an opening pick under the screen frame when the Anti-Clamp creates a large enough gap.
-
Skip the next two steps.
-
-
-
Heat an iOpener and apply it to the right edge of the screen for two minutes.
What's a good temperature to set to hotplate to for a repair like this?
I used a hair dryer to heat up the adhesive. Unfortunatly the IOpener did not work for me. Even with the hair dryer, it was quiet difficult to soften the adhesive. It might have been due to the phone beeing only a few months old.
It was quiet difficult to seperate the screen, but it eventuelly worked. I feel like it took the heat a while to move through the cover and heat up all of the adhesive. After almost giving up, I tried again after a few minutes without heating it again and it suddenly worked. So keep that in mind.Agree with LetsTryThisNext's comment -- it takes a while for the adhesive to loosen. Expect to be at it for 20, 30 minutes -- with the iOpener not working (for me either), re-microwaving the iOpener, then hair dryer, then suction cup not sticking, etc. Good idea to give it a few minutes between each heating attempt.
The iOpener worked for me - once I got the expectation right that it was going to take a while.
Went through about 5-6 cycles of:
* Heating for 40 seconds (1100W microwave); applying to phone for 2 minutes; heating for 30 seconds; applying to phone for 2 minutes; allow to cool for 10 minutes
Could probably have done with one more cycle to get glue even more sticky TBH but when it lifted it was obvious.Took me 3 heat cycles with the iOpener. Basically I did 30 seconds in 1000W microwave and left to heat adhesive for 5 mins, then after stuggling to get the pick in for a few minutes, I did 10 seconds microwave then a couple of mins warming adhesive and a couple of mins failing to get the pick in. Then on 3rd attempt after anothe 10mseconds in the microwave, i got in easily. Seems like the adhesive really takes a while to melt. I also improved my technique with the suction cup which seemed to help lift the screen. Once you are in it is easy to release the remaining clips.
Hair dryer on high for about 10 seconds did the trick. Had to blowdry it about 3 times. iOpener did not get hot enough
iOpener did not work for me as well. The hairdryer approach, as Leon mentioned, worked for me, too. I used the Jimmy tool to get access for the picks.
I started with a single edge razor blade and made 1-2 inch cuts to the bezel seam, then applied the opener with a hair dryer on low about 6 inches away. After no more than 2-3 minutes I applied the suction cup, and used a combination of the straight edge razor and picks to open the screen. It was very easy.
The iOpener worked for me, but I went for multiple applications to loosen the adhesive. I think the pins are too big and that's the main issue for people. I used a thin cutter to make a wedge. It probably ran the risk of some damage to the battery. I'd recommend something plastic, thin, and preferably somewhat wide to make enough space for the iFixIt wedges.
The iOpener worked for me. I just insisted on using it until the screen visibly moved upward (some creaking is also noticeable). It was heated for 35/45 seconds with 800 watts in the microwave oven every 10/15 minutes.
-
-
-
-
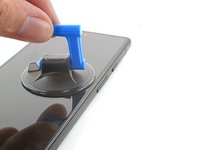
Apply a suction cup to the screen, as close to the center of the right edge as possible.
-
Pull up on the suction cup with strong, steady force to create a gap between the bezel and the frame.
-
Insert an opening pick into the gap.
Would be helpful to have alternative solutions offered here for those with shattered screens, since suction cups don't work.
Hi Paul.
Thank you for your comment! I have updated the step to provide an alternative solution for shattered screens.
Would just like to note that in my particular case even tape or super glue did not work, due to the screen being shattered right along the spot where you need to place the suction cup. I ended up resorting to inserting a razor blade into the seam to open it just enough to insert the pick.
I'm in the same boat as mkirwin no amount of pulling with the suction cup worked, I had to use a razor blade to get the seam separated enough to insert a pick. Maybe I didn't heat up the adhesive enough but that stuff is super strong
If your suction cup is not working properly: Heat it up a little bit and it will have a lot more suction.
Ditto, needed to use a razor blade to get it started. Thank you mkirwin & Tanner D for posting that tip here.
I'm having trouble pulling on the suction cup, keeping the phone down and inserting the pick all at the same time. The suction doesn't hold unless I use my other hand to keep the phone down, but then I can't use the pick. Is there a way Im supposed to keep the phone locked down?
Would something like this suffice in lieu of a razor blade?
I, too, cannot a gap with the suction cups.
After hours of not getting any movement at all, I ended up putting a hot pack (like for a sore back) under the phone and the iOpener on top, on the right side, and that was enough to get through this step...
This is really misleading, the iOpener doesn't work very well to heat it up, I've spent hours on this, and the tabs are definitely not enough to get it started on their own.
Same as the above comments, got nowhere with the opener + pick, had to jam a razor blade in first, and then used picks.
same as others, needed metal to open the initial gap in the side of the screen. A razor blade worked right away after struggling with the plastic picks for 30 minutes. A tiny, pixel-sized dot of damage to the entry point but you would have to look very close to see it.
If your screen is broken, the suggestion of using tape is not a bad one at all. I did end up pulling glass shards off the old screen too.
Pick is nowhere near good enough to start the process, and the suction cup is really weak. I didn't have an iOpener because I didn't want to buy it. I had one or two cracks near the middle of the screen, not that bad but enough that pulling the suction cup just made it come loose. I had to 1) apply packing tape to the screen, 2) soak the suction cup in a bit of near-boiling water for a minute or two, 3) use the edge of my pocket knife (had no razor blades), and most importantly 4) hold the phone with the bottom edge against my chest, top edge in my off-hand, point the screen toward my offhand, and pull the suction cup with my offhand. This position was WAY easier than having the phone flat on the desk.
If the screen glass is particularly broken and/or the suction cup has lost elasticity: rely heavily on clear wide packet tape by putting a smooth layer on the screen and sticking another raised layer over it so you can grip it with your hand.
Use the Jimmy if the opening pick is not thin enough to fit through the slot, being extremely careful not to smear the phone shell and not to abruptly insert the pick inside the phone causing serious damage to internal components. Then use it to create just enough space to insert the first pick, then continue with the picks.The Jimmy is also useful for cutting the strands of adhesive that stick to the screen and make it difficult to separate from the shell, while keeping in mind the warnings in the previous point.
-
-
-
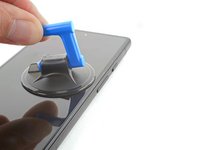
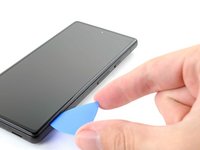
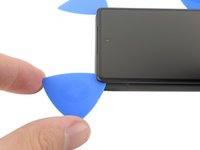
While still applying suction, pivot the pick upwards to a steep angle.
-
Carefully push the pick in while prying to reposition the opening pick into the bezel seam.
Unfortunatly my plectrums I got with the pro tool kit bent way too easy to open up this first crack between screen and housing. But the reason might have been, that the adhesive was not soft enough yet
I gave up with the suction cup. My screen was too cracked. Instead, after applying heat to loosen the glue, I used a very tiny flat head precision screwdriver to prise the screen open. Not recommended as it leaves a tiny scratch, but saves a lot of hassle. See also https://www.youtube.com/watch?v=vxdaaTd7....
I too had to go beyond the suction cup and other tools purchased and resort to 99% alcohol to partially dissolve the adhesive. This allowed me to get hold of the screen while getting a pick under the edge.
-
-
-
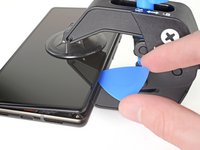
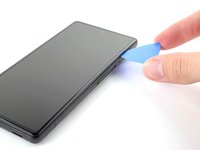
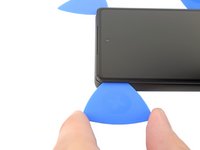
Slide the pick along the right edge to release the plastic clips securing the bezel to the frame.
-
Position the pick at the top-right edge before moving to the next step.
-
-
-
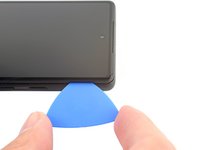
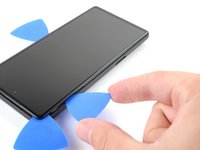
Rotate the opening pick around the top-right corner of the phone to release the clips.
-
Leave the opening pick in the top-right corner to prevent the clips from re-locking.
-
-
-
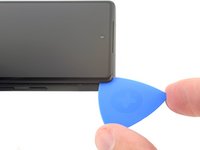
Insert a new opening pick into the gap you just created.
-
Slide the pick along the top edge to release the clips.
-
-
-
Rotate the opening pick around the top-left corner of the phone to release the clips.
-
Leave the opening pick in the top-left corner to prevent the clips from re-locking.
I found that using the side of the pick instead of the point made it easier to keep from over-inserting the pick and it provided more area to keep the glass separated from the frame. It was also easier to slide it around the edges this way. Still had to use the point to get under the frame initially.
-
-
-
Insert a new opening pick into the gap you just created.
-
Slide the pick along the left edge to release the clips.
-
Repeat the rotating and sliding procedure for the remaining edge.
-
-
-
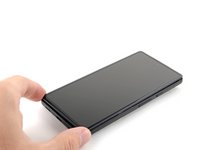
Lift the right edge of the screen up and towards the left side of the device, like opening a book.
-
Rest the screen upside down and parallel to the frame before continuing.
-
-
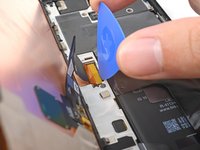
crwdns2935267:0crwdne2935267:0Tweezers$4.99
-
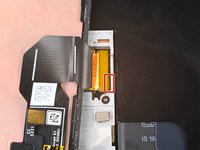
Use tweezers to bend the bottom side of the bracket upwards, releasing the metal clip.
-
Remove the display cable bracket.
Does anyone know what happens if I lost the metal clip to secure the display cable?
Hi Emmanuel.
Oh no! Unfortunately, this clip is pretty important for securing your screen's press connector, and we don't sell it separately. You should be fine as long as you don't drop your phone...but you may be able to tape it down with some masking tape as a rough fix. Another alternative would be to find a destroyed Pixel 6a and scavenge the clip.
I'm confused about the instructions and the pictures. The pictures imply that the clip should be bent, but the text may describe the method that I applied:
I inserted tweezers at the left side of the clip (there where the springy part snaps under a metal tab). By carefully placing each 'tweeze' of the tweezer on both sides of the tab, it is possible to gently pushing the springy part to the right, and then it releases without having to deform that entire bracket.
After re-reading the instructions, that may be what is implied, but if one were to look at only the pictures it could suggest something different.Yes I did Hugo's method and it worked well. Using tweezers I directly pried the springy part from under the metal tab.
Similar to above, struggled to pry this off based on the description+photos, needed to consult a separate video and a bit of trial and error to eventually release it.
If you look right at the bottom end of the bracket there's a couple sets of holes right next to the screw. If you insert each end of the tweezers into those holes and tilt the tweezers the bracket pops right out.
Danielle is right! It's absolutely the case! Dang thing flew out!
Thank you Danuelle! Worked perfectly!
The tip from danielle worked, but I got a little spark from the metal tweezers! I hope that didn't damage anything too badly. Maybe use a toothpick or something like that to push the metal bit in.
I forgot to replace the bracket after putting the screen back on, what are the chances it is fine?
-
-
-
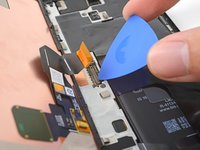
Insert the tip of an opening pick under the bottom right edge of the display cable press connector, right above the nearby screw hole.
-
Pry up and disconnect the display cable press connector.
be incredibly careful when removing and installing the cable, the many tiny components along the edge and under the tab are incredibly fragile. This is one of, if not, the most important step.
At this step I had some trouble to reattach the connector. When I pushed down one side the other would pop up again. I solved the issue by carefully pressing down both sides with the tweezers.
silly me totally forgot to reattach "The display cable bracket is secured with metal clips." soooooo maybe tell silly people like me to do that at the end lol. phone will work, but i feel if i drop it the cable may disconnect.... oh well
Aleksander Szadurski (Max209) - crwdns2934203:0crwdne2934203:0
Don't put the ribbon back in until you have cleaned the old adhesive off and installed the new adhesive!
I'm struggling with the reattachment. I think I've got it and then when I try to test the screen I'm getting nothing. Even tried to attach my old cracked one and nothings happening.
Does this mean I've damaged something?
Obviously the most critical step.
When reassembling 2 things helped me:
1/ You can actually let the new screen rest on the phone at a 90+ degrees angle (thanks to the small plastic edges on the screen) , which leaves you both hand free2/ You can gently unfold the display cable to make it more flexible
During reattachment, make sure you fully plug in the cable. I tested as indicated by turning on the screen and all seemed good. Closed down the screen and then realised it was not reacting to touch... Was very worried but reopening it, turns out I hadn't fully plugged in the screen connector. All good now
I think this is why my screen was defected in the first place. I did not have to do anything to remove the cable. It came off just by looking at it!
Follow very carefully the specific guide for connecting the press connectors.
before you pop off the connector the first time, take a fine tip felt marker and make some marks on the connector across to the surrounding board, to help you align it before pressing down when you are re-assembling. I'd make a fine horizontal line and a fine vertical. As fine a sharpie as you can find. I don't think you should use pencil, graphite conducts electricity, and would rub off too easily.
-
-
-
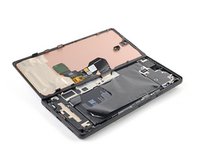
When handling your screen, grip it by its edges.
-
When placing the screen on your work area, make sure nothing is touching the bottom of the screen. Consider placing it on a soft, lint-free cloth.
-
-
-
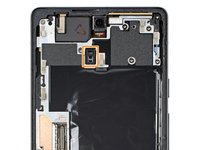
Remove the screen.
-
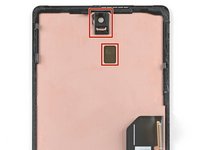
If you replaced your screen, check the front-facing camera hole and the sensor cutout on your replacement screen, and remove any remaining liners.
-
Check your phone if the proximity sensor's rubber gasket is missing—it might be stuck to the back of your old screen. Replace it if necessary.
-
This is a good point to test your phone before sealing it up. Temporarily connect your screen, power on your phone, and make sure it works as expected. Before continuing with reassembly, power off your phone.
-
Follow this guide to replace the screen adhesive.
-
If you're installing a new screen, follow this guide to calibrate the fingerprint sensor.
Don't forget the display cable bracket folks! This was my first at home repair and Im kicking myself forgetting the bracket.
me too RIP so sad
I just did the same thing. I feel like I pressed the connector down well enough but I wonder how long this will last until it comes loose.
This step should have been made more obvious in the guide.
How long did it last without the bracket? Same mistake here
The fingerprint sensor calibration is impossible to complete in some cases. No matter what, I get an error "Your phone's current software version: TQ2A.230305.008.E1 is newer than this repair tool has." from the google software updater. This indicates it is a known issue "https://issuetracker.google.com/issues/2... not fixed for a year. The Google USB driver does not help if you're not on Windows and get this error. I tried on both mac and linux, no dice.
I'm SOL without a fingerprint sensor. Screen works again though, and everything else went ok with the repair.
A couple of sweaty freaky steps in there - but was able to complete successfully as a first time repairer
For anyone with issues with the Fingerprint Calibration: just spent a few hours so I figured I should post my solution.
I kept going to https://pixelrepair.withgoogle.com/udfps and being met with error messages.
Here's what to do:
1. Go to https://developer.android.com/studio/run... and choose "Download the Google USB Driver ZIP file (ZIP)." From there, ensure you know where the USB Driver is saved.
2. Put your phone into Fastboot Mode by shutting the phone down and then starting it with both the bottom volume button and the power button.
Do not have your phone all the way in Rescue Mode or it won't work
3. Connect the phone to your PC via. USB
4. Go to Device Manager and look under "Other devices" until you find your phone
5. Right click and choose "Update Driver" and choose "Browse my computer for drivers"
6. Click "Browse" and navigate to your downloaded driver from step 1, choosing "ok" and then "next." The driver update should go through.
7. Go to https://pixelrepair.withgoogle.com/ and follow it!
I followed this and worked perfectly, no more incompatibility issues of the software not working due to new os update.
thanks
Thank you very much for posting this -- I was helping a friend replace his screen and we would have been stumped without these directions!
zlsmith -
This worked perfectly for me as well. First I was a little worried I didn't reattach the display properly because the error message said (German): "Fingerprintsensor kann nicht gefunden werden.". However, the calibration process fixed the problem! Yay!
You absolute legend!!
I have followed all the above steps but get the error:
Couldn't find the unique calibration software for this device
Can anyone help?1. Go to https://developer.android.com/studio/run... and choose "Download the Google USB Driver ZIP file (ZIP)." From there, ensure you know where the USB Driver is saved.
2. Put your phone into Fastboot Mode by shutting the phone down and then starting it with both the bottom volume button and the power button.
Do not have your phone all the way in Rescue Mode or it won't work
3. Connect the phone to your PC via. USB
4. Go to Device Manager and look under "Other devices" until you find your phone
5. Right click and choose "Update Driver" and choose "Browse my computer for drivers"
6. Click "Browse" and navigate to your downloaded driver from step 1, choosing "ok" and then "next." The driver update should go through.
7. Go to https://pixelrepair.withgoogle.com/ and follow it!
When doing the fingerprint calibration and putting the phone into Fastboot Mode: Keep it on the screen with the red triangle (i.e. don't press the "Start" button) when plugging it in to your computer.
This was failing for me until I got it all the way into rescue mode. I had the fastboot screen up and rescue mode selected, but it would not connect at the website. Once I hit the button on 'rescue' and it went into rescue mode, then it connected. Then it told me my software was up to date and I didn't need a new install.
Is there a way to recalibrate the fingerprint without the equivalent of a factory reset?
I replaced the screen through a professional and purchased it from here. I calibrated the fingerprint sensor correctly, but the proximity sensor is not working! Anyone with the same problem? Any help?
IMPORTANT NOTE - if you buy the screen "part only" it does not come with adhesive!
If you already have the tools (and I have all the iFixIt stuff), ordering the "part only" means you'll have to get the adhesive separately, with another postage charge. Quite frustrating! Yes I suppose it's written down somewhere...
This looks to be no longer true--October 2024 I received a screen adhesive with my screen, and had ordered a separate one, so now I have two.
EMC -
It was written in the repair guide but I missed it somehow as well. Mine part didn't come with adhesive so I wouldn't count on that - better to order the adhesive as well.
Hi, the repair guide tells to Check the "camera area" and the "Sensor area". My replacement Display only has the black plastic part in the camera area shown in the picture. The black plastic part in the Sensor area is not there. I also checked the packaging but it is not inside. Did anybody else have this issue?
Thanks!
Hi Markus!
Thanks for pointing this out. It looks like the replacement screen didn't come with the black sensor bracket. We'll adjust the instructions shortly to cover this. Sorry for the inconvenience.
If you still have your original screen, please transfer the bracket over. The bracket is adhered to the screen with light adhesive. Use an opening pick to pry it up. If it feels difficult, heat the bracket with an iOpener and try again.
If you can't find the bracket on your original screen, it may actually still be attached to your phone. Check the motherboard as the bracket surrounds the sensor on it.
Hi Arthur,
You are right. The replacement does not come with the bracket. It was also not in my original display but your second hint to check the phone hit it. The bracket ist still attached to the sensor.
Thanks for your Support!
Markus
Markus -
I bought several screens for 6, 6a and 7. I always have to repeat the fingerprint calibration a few times until it works.
Last one, for a 6a, changes the colour temperature randomly and also is really dark under the sunlight, and a few issues else. I think this is not related to software but a defective screen. What do you think?
Similar to Miles' comment. The instructions in the How to Calibrate page should be modified. Steps are missing/in the wrong order. From a Windows machine, you can download the USB driver from Google, yes, but the USB driver cannot be installed to the phone via Device Manager until after you have booted the phone into Faststart mode and then connected to the USB cable.
For anyone who has problems calibrating the fingerprint sensor, I happened to find a pretty good solution. The only problem is that you need another Android device like a tablet or phone.
1. Go to https://pixelrepair.withgoogle.com/carri... on the working Android device
2. Follow the instructions until you are in fastboot mode on the repaired device
3. Do not select the rescue mode!!!!
4. Simply connect your repaired phone to the working Android device via USB
5. Press "Connection" on the working device and follow the instructions.
Once you have selected your repaired device, everything will go very quickly until your repaired phone reboots and your fingerprint sensor can be used again.
I already tried this with the rescue mode, but the fingerprint error was still not fixed. I accidentally connected my phone without selecting rescue mode and everything went pretty quickly to success.
Translated with DeepL.com (free version)
My Chromebook worked the best. Just had to fastboot and connect to Chromebook - no downloading files or anything. Spent two hours with no success going the Windows way.
David M -
bonjour.
il est ecrit "C'est un bon moment pour tester votre téléphone avant de le refermer. Reconnectez votre écran temporairement, allumez votre téléphone, et vérifiez toutes les fonctions. Avant de continuer le remontage, éteignez le téléphone et déconnectez l'écran.".
je ne comprends pas "deconnectez l'ecran" ??? si le but est de poursuivre le remontage il faut le laisser connecté après vérification, non ?
MerciBonjour @donnadieuf32097, vous avez raison ! Merci de la remarque. Le tuto a été changé en fonction. J'espère que vous avez pu mener à terme votre réparation ! Bien à vous, Claire
This actually went quite smoothly. Much easier repair than the previous time I did a repair (I think that was on my Pixel 3a or 4a or something). I remember in the past attaching the adhesive was a nightmare and it got totally tangled in itself, but applying it this time with the multiple liners was a breeze. In this repair, removing the old adhesive took the most time, easily 40 minutes. Total repair time was probably more like 2-2.5 hours because of the old adhesive.
Removing the old adhesive will take a long time.
After the fall, my Pixel has the top corners of the metal shell slightly flattened making the final part of reassembly difficult: the new screen remained raised at the top of the phone by a millimeter. To fix it, I laid the phone with the screen facing down and on top of a mouse pad to avoid damage from scratching or breaking the glass; I pressed my fingertips on the back of the top edge steadily and energetically until I heard the click of the plastic clip securing the screen. The screen looks brand new now.
I'm deeply confused- I ordered the screen and it just barely doesn't fit my phone. The clips prevent it from getting in. Even with the clips broken it's still just a quarter/half mm too large to get in there. I checked my amazon order, model's GX7AS, so the screen should have fit but right now I can't make it fit without removing the hard plastic exterior. Any tips guys?
Before attaching it to the phone, carefully remove the screen holder, which is placed to prevent the screen from bending or breaking. No need to cut the clips.
Alex26GC -
Please combine the advice in this guide with the adhesive guide. You need to make it super clear that once the old screen is removed, the next step is to clean off the adhesive, take off the first (of three) lining of the adhesive (the clear lining), stick it to the phone, and remove the second (blue) lining, and leave on the final lining, before preparing the new screen, attaching the ribbon cable and the bracket, then remove the final (thin blue) lining of the adhesive and stick the phone in. The whole “do every step in reverse” thing doesn’t make sense because of the cleaning off of old adhesive and applying new adhesive. Separating it into two articles doesn’t make any sense and once I realised my mistake I had to remove the ribbon cable a second time to put on the new adhesive.
-


Compare your new replacement part to the original part—you may need to transfer remaining components or remove adhesive backings from the new part before you install it.
To reassemble your device, follow these instructions in reverse order.
To run a diagnostics test with the built-in Pixel Diagnostic tool, click here.
Repair didn’t go as planned? Try some basic troubleshooting, or ask our Google Pixel 6a Answers community for help.
crwdns2935221:0crwdne2935221:0
crwdns2935229:0213crwdne2935229:0


crwdns2947412:090crwdne2947412:0
How do I glue the new screen to make it waterproof.
My screen replacement of my 6a was a success. Thank you IFixit :) Very good kit with good tutorial :)
Just replaced the screen and it is a GREAT REPLACEMENT. Only issue is the fingerprint reader isn't working. Issue is with google NOT this replacement screen. I haven't been able to find a solution. Even when trying to install google's "Install fingerprint calibration software". I have an appointment with "Ufixit" to see if they can resolve it. Google's tech said it isn't a common issue but just wanted to share my experience.
Also...Install steps only show how to take the screen off. Steps to install would be helpful because there are some tips to aligning/applying the adhesive that would be helpful to consumers.
the new display's fringer sensor must be replaced with the same(old screen's).
Jon, the comment immediately above mine is incorrect. You do NOT need to replace the new fingerprint sensor with the old one. It's built into the screen. I don't know how you'd even do this. The iFixit page for the screen itself, as well as the instructions above, and so many commenters, all point out that the fingerprint sensor will need to be recalibrated after replacement. As others noted, make sure you've got the Pixel USB drivers installed and that Windows can see your phone. Do the screen replacement as described. Then go to the pixelrepair.withgoogle.com page, shut down the phone, reboot in fastboot mode and install the calibration software. It's all there on the Google page. Once connected, it took about 5 seconds for Google to update/calibrate my sensor. I booted the phone, logged in with a PIN and then tried several apps secured with fingerprint. They all opened like normal. I was able to fingerprint back into the phone. It works fine.
In the end I was able to get everything working. BUT, there needs to be a reassembly process. I was finally able to make it work, but it isn't terribly intuitive. Just simple instructions for the adhesive like this side down and peel this first, etc. would be really useful. I ended up with incomplete adhesion (and thus incomplete water resistance) because the adhesive failed to easily remove from the backing. I'm sure it's because I did something wrong, but I was on my own for this part.
Likewise, the fingerprint reader recalibration is very poorly documented on Google's site, requiring that you hop around until you click the right places to download the right USB drivers, unzip them, navigate through Windows device manager, install new drivers, and then finally complete the process of resetting the fingerprint reader. Took me almost an hour of cursing to get this working (heck, took 15 minutes just to get it to the fastboot screen...very finicky).
Anyway, good first 15 steps. Just wish there were 30 or so.
Maybe iFixit has updated the page since you wrote this. But the answer to both of your questions is in step 17. The link to the page for applying new adhesive and screen installation. And the link directly to the Google USB driver. One-click, download. Unzip, right-click on the .inf file and you're installed. The link to the Google fingerprint page is there, with instructions on how to boot to fastboot mode.
Replaced my screen successfully but as Jon and Paul pointed out there is a number of things I wish I knew / understood during the repair :
## Backup your phone (mandatory)
- Fingerprint calibration will require that you reset your phone so back it up now.
## Screen adhesive
- Buy some screen replacement glue (B7000 glue or B7010 adhesive)
## Fingerprint reset
- On first boot everything will be fine EXCEPT the fingerprint reader that need "unrollment"/calibration.
- A QRcode link is printed on the new screen but use the link provided by ifixit in the introduction of this repair (https://pixelrepair.withgoogle.com/udfps)
- Before you install the software on the pixel you will need a computer and the right USB driver : search "Google USB Driver" or go to https://developer.android.com/studio/run...
- Once you have completed the procedure on pixelrepair.withgoogle.com the fingerprint reader still won't work
- You need to reset your phone to factory settings (be sure to back it up before)
- Voilà
First, it is very upsetting to buy that screen and install it to finally discover that the fingerprint reader is not working.
I see that you got yours working, but i just can't get mine working. To resume: I can see my pixel 6a when i lunch the https://pixelrepair.withgoogle.com/udfps application in normal mode. But if, i put my pixel in FastBoot lunch the app, and plug the pixel to the usb port. It doesn't see it.
Any clue? The pc is a HP Envy.
daniel -
i cannot get my volume up rocker to work. I have cleaned out the phone with compressed air and inspected the button. I am not sure what to do.
For anyone wondering - you can replace the screen, "install" the fingerprint calibration software at https://pixelrepair.withgoogle.com/udfps and restore full functionality of the fingerprint reader in the replacement screen WITHOUT needing to wipe/reset your phone. The google tool even says as much, but I wanted to confirm that, for me, it indeed did not require a device data wipe.
I just received my repair kit this morning. Took me less than 30 minutes following the instructions you guys gave was spot on. I haven’t seen my wife smile so big in a long time. Thanks I fix it. Will be coming to you from now on 10 out of 10.❤️🙏👍
I got the screen for PIxel 6A and I have no skills in replacing a phone screen. The instructions on this page were helpful. The suction cup was not helpful.
What I learned:
If you can't get under the screen, then a pocket knife works good to wedge under it and pry it up.
If your phone is on, but the screen it not lighting up/working, then you need to really push the connector into the phone. If it's loose, then it's not going to send a signal. You shouldn't be depending on the bracket to hold the connector in place.
The items I found useful in the tool kit were the tweezers, the picks, and the alcohol prep pad. I probably should have cleaned the old glue away better, but honestly my phone is in a case, I think it will be alright.
The instructions should have contained reassembly instructions. And some more options for removing the screen, especially when it's shattered. The suction cup did not work, the packing tape I had wasn't strong enough. Eventually got it with duct tape. Also some instructions or video on how exactly to hold the phone while pulling with the suction cup would be helpful. That was rather tricky. I needed three or more hands which I was unable to sprout on short notice.
Make sure you remove the small protective film over the selfie-camera hole (if there is one) or your selfie camera will be waaay out of focurs.
Comment to above: It's a small white piece of fabric tape about 1/2 inch long over the camera and onto the back of the display. Note that there is something that looks like a bigger neater piece of tape on the bottom and you shouldn't pull THAT off - its also on the back of the old display so you can just compare that two and pull the single piece of tape off over the camera on the new display as explained above to make them look similar.
I can't complete this repair...I have two problems:
1. I can't get the bezel to come away from the screen enough to fit an opener in. I heated the screen for up to 10 minutes with the iOpener and it does not seem to get hot enough or I am not able to get enough leverage to pull the screen away from the bezel. The phone is only weeks old, not sure if newer or older is supposed to make this more difficult.
2. There should be specific instructions on applying the adhesive and replacing the screen, the "just do everything in reverse" doesn't seem very helpful here. This doesn't seem as straight forward as that.
Great tutorial, I have experience replacing other screens and doing such repairs so the tutorial was easy and t the point. I had the toolkit from a few years ago and it worked flawlessly, had to heat the adhesive a bit first to get the device to open, all went smooth after that. Thank you!
Help! I dropped and shattered the screen and replaced it according to the guide, but the screen still isn't working! I can tell the phone is turning on because holding the power button gives the quick double-vibration from activating Google Assistant, and I can power-cycle it by pressing and holding power and volume up for 10-ish seconds (I know it's power cycling because the Google Assistant double-vibration stops working and then starts working again a minute later). I've tried reseating the display connector a few times now, and I don't see any bent pins so I'm sure I'm aligning it correctly. I haven't sealed it up yet because I wanted to test it first, but the display should work even if it's not glued in, right? What else could be going wrong? Is it most likely that I destroyed more than just the screen when I dropped it, or is there something else I can check?
I'm having a similar situation, were you able to resolve it?
I just got my Pixel 6a screen replacement and I noticed several plastic tabs around the perimeter. the removal instructions refer to these as well. my broken screen does not have these tabs. the new screen does turn on when I test it, but I do not see how I can get it to go back together without removing the tabs. I confirmed that my phone is a Google Pixel 6A under the system settings tab.
Thank you to Jerry. I forgot to follow the directions for removal of screen as mine was spidered in two spots and also at the Right side start point. Went back and got the plastic frame out.
This repair absolutely cannot be done without the Anti-Clamp. The screen is held in such a way there's no way to get it off without it, unless you want to fight it and risk the screen.
I managed to do it without the anti-clamp, but my original screen wasn't too badly cracked (just one corner) and it took me 2 tries with the heat pad to get it. It really was a struggle, though, trying to figure out how to hold the phone down without pushing down on the screen too much at the same time. It took me around 15 minutes to remove the screen by pressing down at the very top and bottom while pulling up on the middle... probably worth buying the anti-clamp to skip the struggle.
sorry auf deutsch ....... was bedeutet bei displaykauf ...... mit Rahmen? ...... ohne Rahmen? Ich muss nur das display bei meinem pixel 6a wechseln, weil kaputt. Es funktioniert alles, nur das Glas ist kaputt ...... danke für eine Antwort.
La partie deu recalibrage de L'appareil ne fonctionne tout simplement pas!
J'arrive à mettre mon téléphone en mode Fast Boot mais le téléphone n'apparait pas dans la liste dans ce mode. Si l'appareil est en mode normal, il apparait...
I did it! I gotta say my behind was puckered pretty tight trying to figure out how to get that ribbon cable back on! In the end, I watched a couple of youtube videos of people doing it, and (like them) used my finger to push down one side instead of trying to use the spudger. It would be nice to give people some extra guidance or a really close up picture of the positioning of the cable for reassurance, because it was a struggle!
Good guide, though. I appreciate it! Fingerprint sensor is working after using the linked tool as well AFTER installing the USB driver, which was also linked 😄
The adhesive was stubborn to clean off, but everything else went smoothly and everything works!
My Pixel 6a screen replacement was a success thanks to this guide.
I followed all the instructions, including the adhesive replacement guide. My only issue was that the iOpener didn't provide enough heat to loosen the glue when opening the phone, however, the hair dryer did the job.
- With enough heat to soften the adhesive, screen removal was easy with zero damage to internal components or connectors.
- Adhesive reapplication guide was perfect (be sure to properly remove old adhesive)
- Fingerprint sensor calibration worked on first try (be sure to install Google USB Driver before attempting, and restart phone after calibration).
- I did not have to reset my phone.
- I did not have to re-register fingerprints
- I haven't experienced any screen discoloration or touch issues
NOTE
The included suction handle is functional, however the Anti-Clamp is the better tool for the job. Sadly, I didn't purchase a Anti-Clamp, so I substituted with a suction cupped wall hanger to be able to get suction and pull from both sides.
Do this after the screen is installed to get the fingerprint reader to work again. Very easy. fingerprint reader not working after screen replacement
I just followed this guide for installing the screen, with the tools and adhesive. I am so impressed. It went so smooth and was very comprehensive. I was a little apprehensive about the iOpener, but it worked well, first try, for me.
My pixel 6a was dropped, and while the screen displays just fine and shows no damage, it no longer responds to touch input. Is screen replacement the means to fix this? Or is that some other part?
Sounds like the same issue I had. No obvious damage to screen, but touch input did not work. I bought the screen, and I think I did the repair correctly because the screen powers on and looks fine, but still doesn't respond to touch input. :(
If anyone has any recommendations, I'd love to hear them, but at this point, I am wondering if there is some component within the phone itself (rather than the screen) that allows the touch input to work. If you only have a problem with touch input, be warned that the screen replacement may not be able to fix it.
A. R. M. -
The issues you're experiencing with touch on your new screens may be due to touch calibration. During the touch calibration process, even while your phone appears off, nothing should touch the screen at any point. If anything touches the screen during calibration, including screen protectors, tape, or debris, or if you're holding the device, the touch calibration can fail and cause problems.
Maybe iFixit has updated the page since you wrote this. But the answer to both of your questions is in step 17. The link to the page for applying new adhesive and screen installation. And the link directly to the Google USB driver. One-click, download. Unzip, right-click on the .inf file and you're installed. The link to the Google fingerprint page is there, with instructions on how to boot to fastboot mode.
I searched and accessed this Japanese page on July 8th, 2023, but Google Pixel 6a Screen can only be shipped to the US and cannot be shipped to Japan.If so, I would like you to delete this Japanese page or delete the link to on the product page.
Is there also an instruction on only replacing the screen, but not the complete display? Considering the screen is like 15€ and the full display almost 100€, I'd like to try only the screen. But I don't find any instruction on it.
These guides, tools and adhesive kit made this a pleasurable screen replacement. Many thanks to all involved in making this a better alternative to using a phone shop.
Great Kit! As a first timer I replaced the screen by following each step and I have to say the instructions are superb! After the new screen is installed I connected the phone to my computer. First installed the USB drivers then calibrated the fingerprint sensor as instructed. However the sensor did not work at first. I had to reboot my phone in Fast Boot mode again and follow the calibration steps one more time. Second time was the charm. It works flawlessly. I am very glad to have purchased the kit from ifixit. Thank you guys for guiding us to be able to repair our own devices. I am very surprised that the phone looks brand new, no one would be able to guess the screen was replaced. I greatly appreciate it guys, Thank you.
I changed the screen, but the new one has a yellow hue. Could that be an issue with plugging the connector? Or something else?
The screen replacement worked great. But, I my fingerprint sensor did not work. I did a factory reset and restored my phone from my backup. I then tried to install the fingerprint calibration software. This is where I got stuck. Windows says I have the latest USB driver, I reboot into Fast Boot without an issue. The problem is that I can't connect to my pixel 6a, it does not appear in the compatible device list. It shows up in the list if I start the phone, I can select it, but then it says that it can't connect. I've repeated the steps many times, and I don't know what to do. Thank in advance for any suggestions.
It was the Google USB driver update that tripped me up. Following the instructions to the letter was the fix.
John -
Fantastic instructions. Thank you. I had a challenge with the suction cup (see my comment for that bit of the instructions for workaround), but other than that the whole thing went smoothly. The final step of using the Google calibration software is essential.
Great guide! At a time when every penny counts as well as having some general tech knowledge and time to fix my screen, I saved a lot of money doing this, especially when someone else's asking price to replace the screen was quite close to the cost of the phone brand new. I didn't need to be a technician to do this, just confident enough to use some tools and having enough attention to detail to follow the guide thoroughly. Thanks for existing, will use these guides again when necessary, and I'm happy to get the parts off you instead of some shifty looking ebay business.
Getting the old screen off kinda sucked, but everything else was a breeze. You're gonna have to calibrate the new screen with google's proprietary tool but that's pretty easy too
You guys are awesome, you know that? After almost 2 hours of work, everything works again. Thanks a lot. Greetings from Belgium
This worked really great. The only issue/annoyance I had was to do with recalibrating the fingerprint sensor - basically when I downloaded the driver Windows said it had the most up-to-date driver (it didn't). I then had to download Android Developer Studio to push the correct driver to Windows. Once I did this the fix worked perfectly. In hindsight it may have been easier to uninstall the driver in Windows, and then install the one found in the guide.
I can't even get the screen to start, no matter how much I use the heat pad or the blue tabs, nothing works.
Great kit and guide - screen repaired in about 2h.
I found getting the screen off a little difficult. The bottom pad of the Anti-Clamp kept coming off, and it was awkward to thread the (hot) iOpener through the clamp (I feared ripping it). In the end, the left-hand side of the screen came loose before the heated right-hand side! I had no problem opening it from there and making my way around.
Be prepared to spend a while getting the glue off the frame. Isopropyl alcohol is a must to do this well.
As others have said - take your time, particularly with the connector.
Perfect guide, first time DIY repair an didn't break the phone 👍
Congratulations, Jorge! We're glad it went smoothly.
Great great kit and explanation. the actual removing of the screen took 5 minutes. taking off the adhesive of the p[hone and applying t he new layer took about 30 minutes because its a delicate task. applying the new screen took 2 minutes. calibrating the fingerprint sensor took about 40 minutes because i needed to figure out and READ all instructions to be able to perform the calibration using Android Studio. but overall am happy to report that the phone is as good as new now and in fully working condition.
one note I have about the it is that it would've been great if we get a pouch or hard plastic kit bag since this kit is useful for many other things and maybe future screen replacements. the kit is sturdy and I am really happy with it and I intend on keeping it for a long long time. Thank you IFixit.
I was able to replace it perfectly. Took me about two hours, but don't have experience.
*** Removing the old screen. Using the heated iopener was more straightforward than I thought, however it took a bit of practice to pull with enough force on the suction cup
** Removing metal clip. It was slightly tricky to remove it. Used the flat pick. Be careful about it flicking up in the air from the force
* Removing the display connector. Very easy with the pick
**** Cleaning off the old glue. This was pretty tough. The small metal tweezers were quite helpful here. Also I ended up using a qtip in 90% isopropyl alcohol with most of the cotton removed
** Applying the new sticker. Wasn't so bad. It lines up well.
***** Reconnecting the display. The flex cable was isanely hard to connect. Starting with one side first is the key
* Applying metal clip. This was very straightforward.
*** Applying screen. It wasn't bad actually. Have to be a bit careful
*** Software fixing fingerprint. It took a few tries and some issues with driver
Thank you for this wonderful guide. Worked flawlessly. Only problem was, my new Screen didnt have the black rubber near the proximity sensor and i didnt know how to transfer the old one. So sadly my proximity sensor doesnt work anymore. Other than that I am enjoying a smartphone just like new :)
Does new screen comes with finger print sensor
Yes, it does. At list mine did
I bought a new screen through you guys but the fingerprint doesn't work. I have done the reboot option and sadly factory reset my %#*@ phone for no reason at all. What's a way I can get this to be fixed because I would like to get back the fingerprint option?
Is it possible to remove the screen without breaking it, if it's slightly cracked ?
I replaced the screen on my phone and everything seemed to be in order. About a day after some usage the screen got a yellow tint to it. Did I mess something up?
I was able to replace the screen of my Pixel 6a!
Advice:
- Take your time warming the screen with the iOpener
- Be gentle with the pics while opening the screen to make sure not to damage the internals
- Remember to place the display cable locker
- Don't panic if you get a message saying the new fingerprint sensor is not working
- In my case, I had to first update the Drivers on my Windows so that my Pixel 6a would be recognized
- Make sure to restart your Pixel after you are done with the fingerprint sensor calibration - only then the fingerprint sensor will work
I'm glad I can now use this device for another few years with guaranteed Google updates. This was the main reason for me to get this phone.
Thanks to this guide and a couple youtube vids I was able to get my good old pixel 6a back in action with just $100, can't beat that.
Everything went smooth and worked flawless asides from one super amateur mistake I made which I'll leave in case others read this and avoid it:
When removing the old screen, make sure the whole thing comes off, not just the glass, lest you end up wasting 20 minutes like me wondering why the new screen won't fit on the phone lol.
Ifixit is the best. I know about ifixit for almost 2 decades. I ordered their tools and from time to time batteries for phones and iPads.
This time I ordered the pixel 6a screen fix kit, followed all instructions listed on their website and fingerprint calibration and everything works well. Thank you for all the help!
works great..thank you
Ci sono riuscita! Telefono come nuovo, grande soddisfazione:)
Ho avuto solo un paio di difficoltà:
1) nel primo inserimento, il plettro deve infilato quasi verticalmente ed affondare nella cornice, o non riuscirete a scalzare il display.
2) assicuratevi di reimpostare il pulsante di accensione per l'ON/OFF disattivando altre funzioni. Mi è successo di riaccendere il telefono inavvertitamente e non sono più riuscita a spegnerlo, col display mezzo smontato, ho rischiato un cortocircuito.
3) abbiate la pazienza di levare tutte le tracce del vecchio adesivo, anche bagnare appena la punta dello strumentino nel solvente per unghie può aiutare a raggrumarlo in palline ed eliminarlo.
4) per il collegamento al PC, occorre un cavo usb con il connettore colorato di blu. Vuol dire che il cavo è 3.0 e supporta la connessione di scambio dati. Con un normale cavo usb il Pixel non si collegherà al PC.
Grazie per le guide, sono state chiarissime!
Buon lavoro:)
It is easy to set the driver for fingerprints sensor. You are free to use the Google provided information, and there is enough information for many situations. I was able to set mine in less than 15 mins (as a first time self-repair). Just needed to do an extra step of updating google USB driver. And then, in browser fingerprints sensor driver update went smooth as butter ;) Wish y'all luck with your repairs)
screen works fine, however it seems to be misalignment with phone frame.
Clipping the phone i can hear all 3 corners click but bottom left corner is not flat with the new screen. Gap is large enough for me to easily put my finger nail in and remove the whole screen with ease anyone else had this problem and would force gluing it shut solve the problem
Nope, my screen fitted fine with no gap. Check again and compare to the photos in this guide.
Everything went as planned. Purchased the new screen. Installed it using the screen replacement guide. Had a bit of trouble getting the finger print sensor calibrated but got it working in the end. Great advice and tips in the comments section that really helped. Thank you
BEST quality Google parts. Very very easy install.
Yesterday I replaced my broken screen for a new one (replacing the screen was fairly easy). I removed the old screen. Connected the new screen and everything was working (screen and touscreen.) After that I needed to place the adhesive in the phone. After placing the adhesive and reconnecting the screen, the touchscreen stopped working. The screen itself is functioning perfectly, but the touchscreen does not respond at all.
What can I do?
Because when I do have to reopen the phone again, the glue will break again.
Hopefully someone can help me!
Tuto vraiment parfait, j'ai réussi à remplacer par moi-même l'écran que j'avais accidentellement brisé. La partie la plus compliquée est incontestablement le démontage de l'écran d'origine. J'ai réussi à m'en sortir avec le iOpener, la ventouse et les médiators. J'ai tout de même dû faire un 2ème passage de iOpener et insister dans la durée: peut-être 5 à 10 minutes à tirer régulièrement avec la ventouse tout en essayant de glisser le mediator. Il faut vraiment insister. Petite inquiétude au moment du nettoyage du cadre, où j'ai accidentellement rallumé le téléphone (solution: https://themobilehunt.com/turn-off-googl...). Enfin, au 1er allumage le lecteur d'empreintes ne fonctionne pas. J'ai déroulé la procédure https://pixelrepair.withgoogle.com/udfps... . Au 1er redémarrage (automatique) faisant suite à l'installation du logiciel, le lecteur d'empreintes ne marchait pas, cependant j'ai par la suite forcé un redémarrage et tout est rentré dans l'ordre.
Bonjour @christophemyot Félicitations pour cette réparation :) merci beaucoup pour ce retour enthousiaste et ces infos très précieuses ! Je vous invite à cliquer sur le bouton "Vous avez réussi, bravo ! Donnez 30 points à l’auteur !" en bas du tutoriel, pour exprimer votre reconnaissance aux personnes qui ont rédigé le tutoriel. Au plaisir de vous accompagner lors de vos futures réparations ! Bien à vous, Claire
Alex Diaz-Kokaisl Why this tutorial don't have the step when you install the adhesive layer
Fairly easy way to replace a faulty or broken display. Do take care while stripping the phone of the display-glue. I found scratching with small pliers to work best.
If replacing a display steps 16 and 15 might be easier with 3 hands, as the new display connection cable is rather stiff. Thanks for the guide!
Just finished the installation, followed the instructions really closely and everything was a success including re-calibrating the fingerprint reader which was very quick and easy and did not require a factory reset. Less impressed with the IOpener which proceeded to squirt liquid all over me and the table after 30 seconds in the microwave. But phone is completely fixed so thanks IFIXIT.
Like a complete newbie I accidentally pried at the screen gap instead of the bezel seam.
Screen is intact but now separated from the the small frame that clips it to the rest of the phone. Is there a way I could glue it back somehow ?
Screen replacement was easy but new screen is very slow in response. When typing have to write slowly or it misses a lot of letters out. Help!
It worked for me! I run grapheneOS, and I do not use the fingerprint scanner, but the phone looks to be working completely fine now. I just had a lot of trouble turning it off at first.
What I'll also say that this took me about 3 hours in total. The time-consuming parts were the iOpener heating, the screen being carefully pried off, and plugging it back in. Otherwise, it wasn't too difficult or lengthy.
What I'll say is that the basic clamp didn't really help me with a smashed screen, but it worked out in the end with some wedging. Careful not to damage the battery if you do that!!! Oh, and, read all the comments next to steps, and all the guides in advance. It might save you a lot of trouble.
I have repaired a lot of cell phones and laptops until now as an amateur. This was my first collaboration with ifixit and I am absolutely satisfied.
Part arrived in a very nice package with the right tools and fixing was successful and more than pleasant.
thank you ifixit
Thanks ifixit for the tutorial and the whole kit. It works great for my first screen change !!
Excellent end result; comprehensive and detailed guide, easy to follow.
However it is normal to encounter some difficulties, I wrote some tips from my experience in the comments above in the guide.
Word of caution: patience. And all will be well.
Hi iFix it! Not a single hiccup on the replacement after a badly cracked screen! The kit had everything, is anyone's asking, as the 22nd of november 2024 the adhesive is inlcuded in the complete kit (which costs only 4 eur more, i strongly suggest it even if it's only for the suction cup and the hot pillow. Both incredibly useful.
The guide is very well written, if I may just need to REALLY be annoying, maybe mentioning the the retaining spring for the ribbon cable connection of the screen can be very hard to pull off. I was afraid to pull, but then i finally just went for it.
This was my first screen replacement and I'm glad i've chosen a Pixel phone and iFixit to replace it.
Thanks!
Edit: contrarily to some users say, if done correctly the calibration process for the fingerprint sensor does not reset the phone memory.
Thanks to the Video and step by step guide my 6a has a new display, thank you iFixit for selling repair kits for my 6a!
Made it through a few moments ago, thanks a bunch iFixit !
Just to confirm from early 2025 that fingerprint activation (calibration) is still working for Pixel6a. In general I was unable to download calibration tool using Linux, even with working adb daemon and enabled dev options. Sounds that, I got either not latest chrome or missing some extra permissions for my user - found nothing in chrome logs and dev console, so switch to Windows
In Windows 11, everything just works even without a driver installation. Just plug, go to site https://pixelrepair.withgoogle.com/udfps and follow the guide. BUT...
IMPORTANT, my first try with google fingerprint calibration tool ends badly. Browser procedure ends successfully, saying to reboot phone.... however after rebooting my phone stuck at boot - saying "No command". Workaround was to start procedure of reinstalling pixel software from main page (https://pixelrepair.withgoogle.com/carri...). It fails in the middle, but unlock phone. Ive reboot windows, go back with "udfps" procedure - all good this time.
J'ai bien réussi le changement d'écran de mon pixel 6a. Il faut être patient. Le plus long était d'enlever l'ancien joint du téléphone. Ce serait mieux si le kit de réparation contenait plusieurs lingettes imbibées d'alcool car il il y en avait qu'une. La deuxième opération délicate est le branchement de la nappe du nouvel écran. On ne voit pas la broche donc on ne peut se fier qu'à la position en observant bien au préalable, il faut avoir de bons yeux et ne pas trembler. Grâce à quelques pauses j'ai réussi à connecter la nappe eurékà! Donc globalement en suivant pas à pas le tutoriel, sachant que c'était une première, j'ai mis quand même 4 heures à tout faire. Tout fonctionne nickel, super content et merci à l'équipe Ifixit pour proposer ce kit qui est vraiment très utile voire génial. Si possible, afin de l'améliorer ajoutez juste des lingettes (4 ou 5) pour enlever l'ancien joint du téléphone et dans le tutoriel donnez plus de détails sur le branchement de la nappe ça rassure au moins :)
Mein IFixit Kit war bereits geöffnet, auf der Innenseite des Fingerabdrucksensors klebte ein IFixit Sticker. Funktioniert daher nicht und wird heiß
For those that need to run the calibration software for the fingerprint sensor, this would be the case for all pixel handset, go to the following website, using google chrome web browser only;
pixelrepair.withgoogle.com
if your phone is automatically detected it should take seconds to run the scrip and all will be good, if your device doesnt show up then you will have to install drivers etc.
Bonjour je viens de remplacer mon écran avec succès mais il ne pas pas en charge le fingerprint. Comment faire?
For people who struggle with yellow colors when the brightness is at maximum, see this page, it saved my phone ! https://www.reddit.com/r/mobilerepair/co...
I can't turn off the phone because the screen is broken. Hence why I am trying to replace it.
fixedgerald - crwdns2934203:0crwdne2934203:0
I managed to turn my phone off by playing with the buttons on the side. I can't tell you exactly how I did it, but it is possible.
YuropeCat - crwdns2934203:0crwdne2934203:0
Strongly recommend before you start, get a headlamp like for camping and make sure it's charged up good. Even next to a bright south facing window I had difficulty with the shadows inside the phone and along the edges. Headlamp helped.
EMC - crwdns2934203:0crwdne2934203:0
Fully turn off the device by holding down the Volume Up button and the Power button.
Emanuele Artusi - crwdns2934203:0crwdne2934203:0
For me, I needed to hold all three, Power, Volume Up, and Volume Down, for ~20 seconds.
Ramekin - crwdns2934203:0crwdne2934203:0