crwdns2915892:0crwdne2915892:0
Use this guide to replace a worn-out or dead battery in your Apple Watch Series 5.
This guide shows the procedure on the cellular/LTE version of the watch, but the GPS-only version is similar.
If your battery is swollen, take appropriate precautions. For your safety, discharge your battery below 25% before disassembling your watch. This reduces the risk of a dangerous thermal event if the battery is accidentally damaged during the repair.
During the display opening procedure of the Apple Watch you might damage the force touch gasket. If you separate the gasket layers or cut the cable, you'll also need to replace the Force Touch gasket itself.
You’ll need replacement adhesive to reattach components when reassembling the device.
crwdns2942213:0crwdne2942213:0
-
-
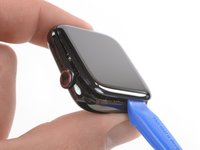
Before starting repairs, take your watch off the charger and power it down.
-
If your touchscreen is broken and you can't power off the watch, use this alternate method to power it down.
-
-
crwdns2935267:0crwdne2935267:0Safety Glasses$3.19
-
Because the gap between the screen and watch body is so thin, a sharp blade is needed to separate the two. Read the following warnings carefully before proceeding.
-
-
-
Prepare an iOpener (or use a hair dryer or heat gun) and heat the face of the watch to loosen the display adhesive.
-
Leave the iOpener on the watch for at least two minutes to fully heat the screen and soften the adhesive holding it to the case.
How long should it take for applied heat to melt the adhesive? I feel like I've been heating and reheating this iOpener for days.
@samuelkurnit The heat doesn't melt the adhesive, but helps loosen the adhesive and hopefully makes it more pliable for the next step. Just mentioning this to dissuade any thought of a person solely relying on heat to open up the watch. It took me 3-4 continuous hours of heating and prying with a knife to open up my watch.
I used both the iOpener and a heat gun at a distance. I probably did around 5-6 rounds of the iOpener. It came open PERFECTLY. Patience is a must. I use a very flexible broad flexing knife for the open. It took the fear out of cutting my hands and also avoided scratching the watch.
Just take your time and go slow. You will get there with time and patience. I probably did the open in about 20 minutes. -
-
-
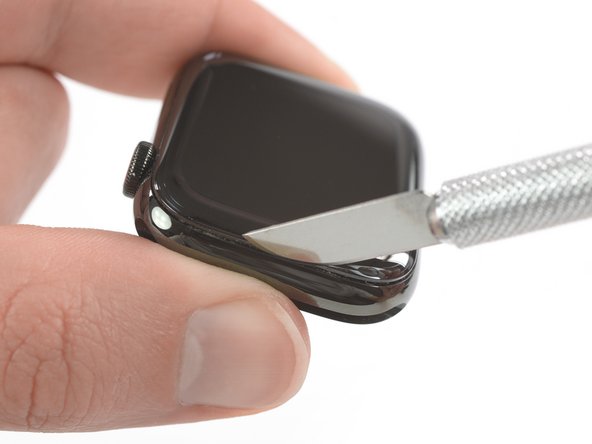
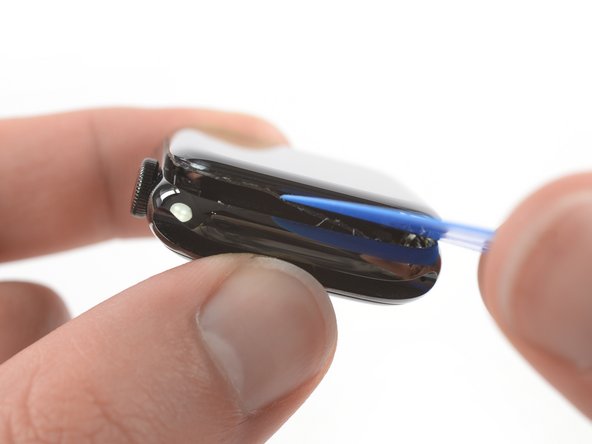
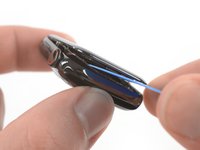
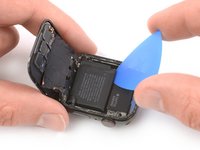
Place the edge of a curved blade into the thin gap between the display and the outer case. Start at the short side of the display, closest to the digital crown.
-
Press firmly straight down into the gap.
-
Once inserted, tilt the blade to pry the display open slightly.
I just could not break the seal without using some gentle heat!
-
-
-
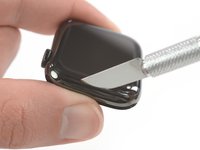
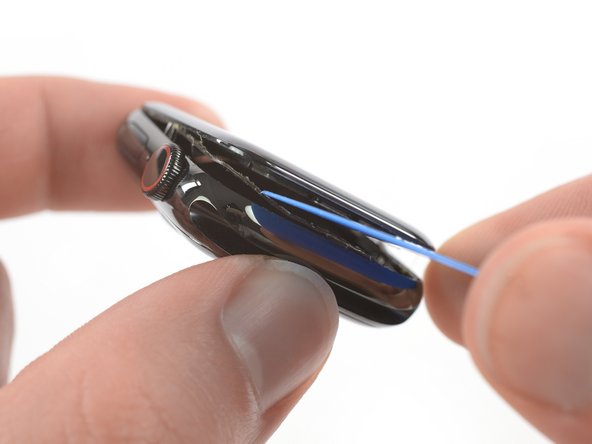
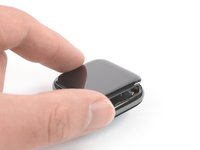
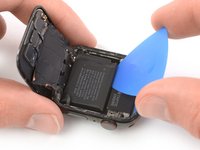
Once you've opened a small gap with the curved blade, remove the blade and insert the thinner edge of an opening tool into the gap.
-
Push the opening tool into the gap, using your thumb as a pivot to lift the display open a bit farther.
-
-
-
-
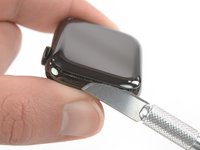
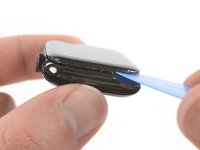
It's likely that the force touch sensor will stick to the display frame instead to the watch's body. In this case, insert an opening pick under the display and carefully separate the Force Touch gasket from the display.
-
Slide the pick around the display to separate the adhesive between the Force Touch gasket and the display.
What happens if the Force Touch Gasket is intact, but simply has come loose from the frame in spots?
I have the same Issue: I will clue the Force Touch sensor back to the frame with T-7000 Clue. So i hope it works.
-
-
-
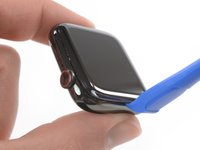
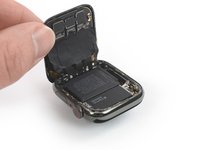
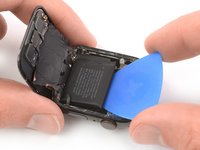
Carefully lift the display open like a book.
-
-
-
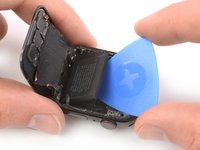
Lift the screen until there's enough space to access the battery.
-
Insert an opening pick between the battery and the Taptic Engine.
-
-
-
Slide the opening pick along the edge of the battery to loosen the adhesive.
-
Use constant, steady pressure to slowly pry the battery up, separating it from the adhesive securing it to the mainboard.
-
-
-
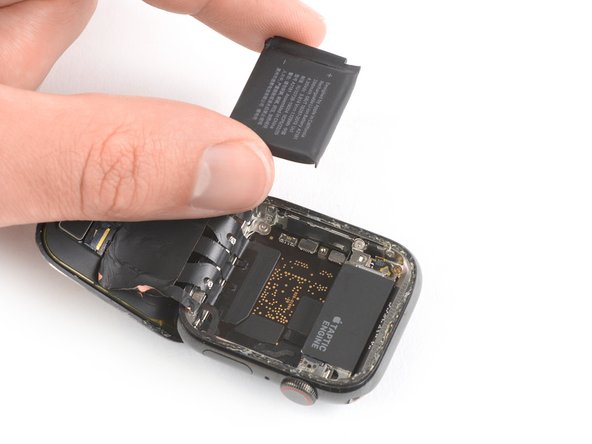
Carefully lift the battery to a 75-degree angle.
-
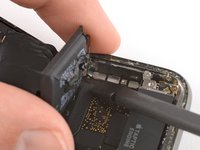
Remove the 1.1 mm-long Y000 screw.
Ma il cacciavite Tri Point Y000 è quello da 0,6mm? grazie
@ellycelli 1,1 mm indica la lunghezza del gambo della vita e non ha niente da fare con il diametro della testa della vita.
-
-
crwdns2935267:0crwdne2935267:0Tweezers$4.99
-
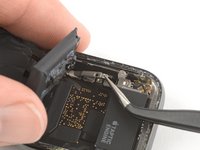
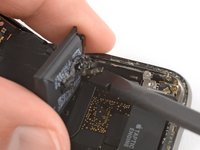
Use a pair of tweezers to remove the metal plate covering the battery connector.
-
-
-
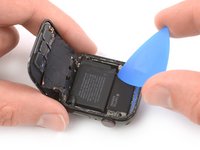
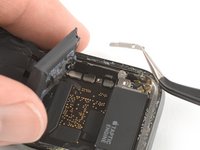
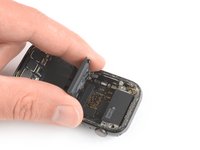
Use the flat end of a spudger to pry up and disconnect the battery flex cable.
-
-
crwdns2935267:0crwdne2935267:0Tesa 61395 Tape$5.99
-
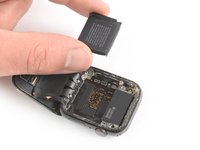
Remove the battery.
-
Follow the resealing guide to reseal your watch after reassembly.
I did use Tesa tape to restick the screen but I think the E6000 would be easier to apply and provide a full all round watertight seal.
-


If possible, turn on your device and test your repair before installing new adhesive and resealing.
Secure the new battery with pre-cut adhesive or double-sided adhesive tape. In order to position it correctly, apply the new adhesive into the device at the places where the old adhesive was located, not directly onto the battery. Press the new battery firmly into place.
To reassemble your device, follow these instructions in reverse order. Apply new adhesive where necessary after cleaning the relevant areas with isopropyl alcohol (>90%).
For optimal performance, calibrate your newly installed battery after completing this guide.
Take your e-waste to an R2 or e-Stewards certified recycler.
Repair didn’t go as planned? Try some basic troubleshooting, or ask our Answers community for help.
crwdns2935221:0crwdne2935221:0
crwdns2935229:040crwdne2935229:0


crwdns2947412:08crwdne2947412:0
Since WatchOS 7 removed 3D Touch functionality on all Force Touch enabled watches, will damaging or disconnecting the Force Touch gasket affect the functionality of the watch or will the software brick it?
Any tips for applying the adhesive strip without removing the screen? Is removing the screen recommended to seat it properly?
Does the resealing adhesive strip go in between the screen and force touch gasket, or the force touch gasket and the case?
Hi David,
here is a general resealing guide that might help you. Depending on your force touch replacement part you‘ll need one two or no adhesive strips.
If your force touch was never removed you need to place new adhesive on top of it the adhere the screen. If your force touch has adhesive on the bottom side it is the same. Adhere the force touch into the watch frame and place adhesive on top of it to adhere the screen. If there is adhesive on the top of the force touch you need to place the adhesive strip beneath.
If your force touch didn‘t come with any adhesive preinstalled you need adhesive tape below to secure it to the watch frame and on top to secure the screen.
Hi @schnabel , thank you for you reply. I am in the middle of replacing the battery. I managed to save the force touch sensor from getting damaged, but I need to be re-adhere it to both surfaces. Can I use 2 of these adhesive strips on either side?
Apple Watch (44 mm Series 4/5) Screen Adhesive
Hey David, I guess this should work for your repair! But make sure to remove all the adhesive leftovers from your old force touch, screen and watch housing before reinstalling the force touch (for example with a Q-tip and high concentration isopropyl alcohol >90%). Otherwise the new double adhesive and force touch sandwich might become too thick and you won‘t be able to close the watch seamlessly.
Just finished sealing mine up and am now weighing it down with some books. I'm new to repairs so this one took many, many hours for me. I used ifixit manufactured or recommended products for everything from the tools to the battery to the seals. What I've learned or experienced:
1. It took me an an embarrassing three hours to cut/pry open the display from the outer case. I almost always have a wrap-around case on my watch so I wonder if that may have added difficulty by constantly pressing the display and the outer case together.
2. In the frenzy to open up the watch, my blade accidentally went deeper into the watch than recommended by this guide. I did destroy the gasket, and needed to remove it completely after opening up the watch. However, I noted that the most up-to-date watchOS obviate the need for the force touch gasket so I did not install a replacement when putting back my watch together.
3. I received two defective ifixit replacement batteries. Customer service was helpful and the 3rd battery worked.
Does replacing an Apple Watch battery with a third party component automatically restore battery health to 100 % in the watchOS settings app or will there also be a warning message about non genuine parts like in iOS with battery health not showing anymore after replacement? Thanks for answering.