crwdns2915892:0crwdne2915892:0
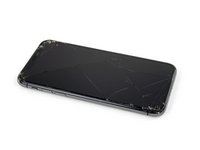
If your iPhone XS screen is cracked, not responding to touch, or not showing a picture when your phone is powered on, use this guide to restore your iPhone to working order with a new screen, a.k.a. display assembly.
The combined earpiece speaker + sensor assembly affixed to the back of the display is paired to your individual iPhone from the factory, so you must transfer it from your old display to your new one during any display replacement. It contains the flood illuminator, which is part of the biometric Face ID security feature. If it is damaged or replaced, Face ID will cease to function, so take extra care not to damage any of these components during this procedure. If damaged, only Apple can restore Face ID function.
Note: True Tone functionality is disabled after a screen replacement, even when using an original Apple screen.
crwdns2860944:0crwdne2860944:0
crwdns2860947:0crwdne2860947:0
crwdns2875812:0crwdne2875812:0
-
-
Power off your iPhone before beginning disassembly.
-
Remove the two 6.9 mm-long pentalobe screws at the bottom edge of the iPhone.
-
-
-
If your iPhone has a cracked screen, keep further breakage contained and prevent bodily harm during your repair by taping over the glass.
-
Lay overlapping strips of packing tape over the iPhone's display until the whole face is covered.
-
If the broken glass makes it difficult to get a suction cup to stick in the next few steps, try folding a strong piece of tape (such as duct tape) into a handle and lifting the display with that instead.
How to detect my Iphone what screen it is, OLED or LCD?
It’s OLED. You can find the specs here, https://support.apple.com/en-us/HT201296
When you find your phone, at the bottom of the description click on, See the tech specs…
mcr4u2 -
The included suction cups were stiff and worthless. They would not lift the screen. Also, I tried every type of tape on the screen to help the suction cups stick without success. Heavy duty suction cups were for my bathroom also failed. However, I had an old GoPro mount with some preapplied double sided 3M VSB tape and stuck that on the screen near the bottom. Magic! This method had the added bonus of being able to use a GoPro attachment as a handle to lift the screen, and propped up the screen like a kickstand in step 12.
Very cool! Thanks
Antonio -
My screen was pretty stuck… would not budge. Heated, super glued the suction cup, tried gorilla tape. Ended up doing the GoPro mount with 3M VSB tape method mentioned. Worked great. That 3M tape is the bomb.
The included suction cup took a few tries but ended up working for me.
If you have flat feeler gauges (for adjusting engine valve tappet clearance, ignition points … old school) the .003 thick goes right in. Work your way up until you can get the pick or supplied pry tool in.
where can I buy 3M VSB plis!!
3M VHB tape is at auto stores and other big box stores, or online.
I used the tweezers that came with the replacement screen and jammed one of them into the glass and that eventually worked. Heating with a blow dryer is also important. The suction cup was helpful in loosening the adhesive for sure, but just not enough to get the display to come out.
-
-
-
Use a hairdryer or heat gun or prepare an iOpener and apply it to the lower edge of the iPhone for about a minute in order to soften up the adhesive underneath.
-
-
-
If the plastic depth gauge is attached at the center of the iSclack, remove it now—it's not needed for larger phones like the iPhone XS.
-
Position the suction cups near the bottom edge of the iPhone—one on the front, and one on the back.
-
Press both suction cups firmly into place.
-
-
-
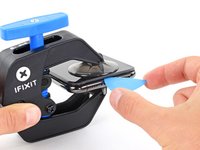
Hold onto your iPhone securely and close the handle of the iSclack to slightly separate the screen from the rear case of the phone.
-
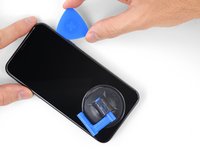
Insert an opening pick into the gap under the display on the lower edge of the iPhone.
-
Skip the next two steps.
pay attention to not insert tools between glass and plastic display frame, as I do.
(insert separation tool under plastic frame)
-
-
-
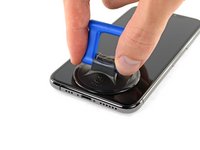
If you're using a single suction handle, apply it to the bottom edge of the phone, while avoiding the curved portion of the glass.
-
-
-
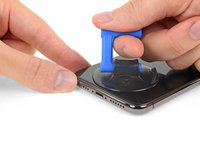
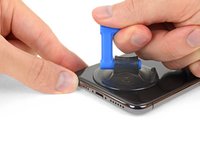
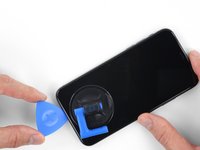
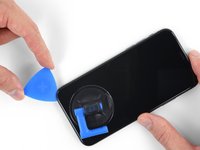
Pull up on the suction cup with firm, constant pressure to create a slight gap between the front panel and rear case.
-
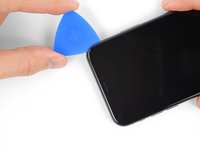
Insert an opening pick into the gap.
-
-
-
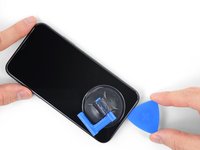
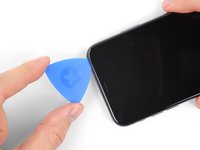
Slide the opening pick around the lower left corner and up the left edge of the iPhone, slicing through the adhesive holding the display in place.
-
-
-
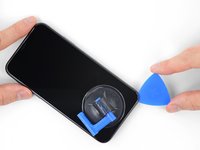
Re-insert your pick at the bottom edge of the iPhone, and slide it up the right side to continue separating the adhesive.
-
-
-
Slide the opening pick around the top corner of the display, while gently pulling or wiggling the display down in the direction of the Lightning port.
-
Slide the pick to the opposite corner and cut any remaining adhesive securing the display.
-
-
-
-
Pull on the small nub on the suction cup to remove it from the front panel.
-
If you used an iSclack and it's still affixed to the iPhone, remove it now.
-
-
-
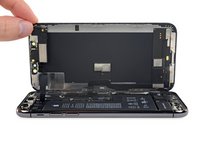
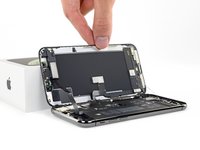
Open the iPhone by swinging the display up from the left side, like the back cover of a book.
-
Lean the display against something to keep it propped up while you're working on the phone.
Open from the LEFT. Photo confused me and I came very close to damaging my phone by opening from the wrong side.
-
-
-
Remove five screws securing the logic board connector bracket, of the following lengths:
-
Three 1.0 mm Y000 screws
-
One 1.3 mm Y000 screw
-
One 3.7 mm Phillips screw
The ribbon makes the 1.3 mm screw a little tricky. Use one hand to hold the display at a 90 degree or smaller angle to create the slack necessary to get the screw driver in place.
I tracked my screws by using my kids fridge magnets to hold each screw size and placing a piece of masking tape below with the screw size.
I stripped a screw ugh
-
-
-
Remove the bracket.
During reassembly, pause here to check function. Gently reattach the top of the display to the base to test face ID.
-
-
-
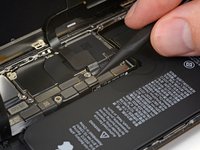
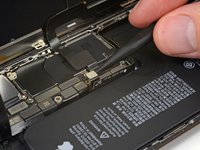
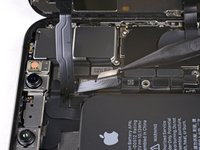
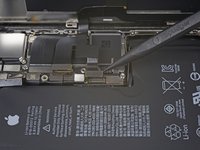
Use a spudger or a clean fingernail to pry the battery connector up from its socket on the logic board.
-
Bend the connector slightly away from the logic board to prevent it from accidentally making contact with the socket and providing power to the phone during your repair.
-
-
-
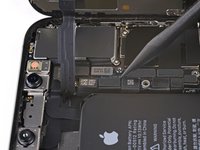
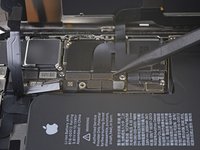
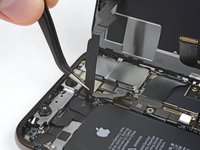
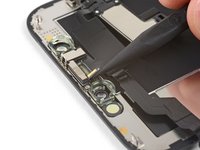
Use a spudger or a fingernail to pry up and disconnect the front panel sensor assembly connector.
In my phone the connector made poor contact with the socket resulting in no sound audible through the phone receiver/headset. There was an overhang of insulation close to the socket which I believe may have prevented a good connection. So if you have these kinds of audio problems you might see if this is the problem.
-
-
-
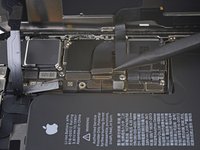
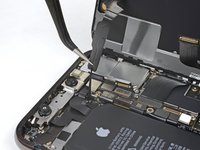
Use a spudger or a fingernail to disconnect the OLED panel cable connector.
Shine a bright light here to help you align the connector. Eventually, the right side snapped in first.
On reassembly, use the pad of your fingertip to reconnect.
-
-
-
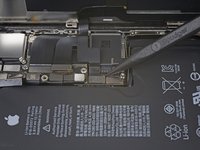
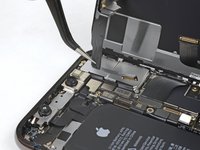
Use a spudger or fingernail to pry the digitizer cable connector up from its socket.
Reassembly: reconnecting the press connectors upon reassembly was so hard, even for the ones not seated in a recessed location !! It took me two days to get them reconnected. What helped me was to shine bright lights on all sides of the iPhone and then hold the iPhone vertically like a book and press it in that way. They are now all in, but the touchscreen functionality has disappeared :( so I will need to reconnect that one.
-
-
-
Carefully lift the cable until the adhesive separates.
Will replacing camera and sensors fix damaged face I'd
No, FaceID will be disabled because the original sensors are paired with the logic board.
-
-
-
Remove the display assembly.
I wish the reassembly directions were separate. I forgot to pause here to do the waterproof seal.
-
-
-
On the back of the display assembly, peel back and remove any tape covering the hidden screw at the lower right corner of the speaker housing.
-
-
-
Remove the three Y000 screws securing the speaker/sensor assembly:
-
One 1.3 mm screw
-
One 1.4 mm screw
-
One 1.9 mm screw
While disassembling, I missed that these are all Y000. Prior list specifies in the bullets, but this list specifies in the text preceding the bullets.
-
-
-
Using a spudger, gently pry under the top edge of the speaker assembly, and flip it over—down and away from the top edge of the display.
-
-
-
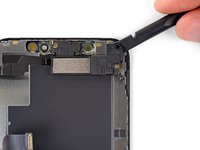
Use a hairdryer or heat gun or prepare an iOpener and apply it to the top front of the display for about a minute, in order to soften the adhesive securing the sensors.
-
-
-
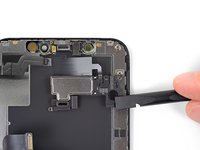
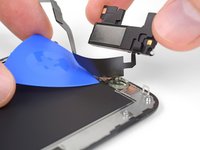
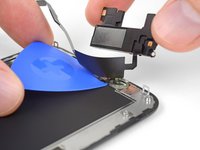
Carefully slide the edge of an opening pick underneath the flex cable below the microphone.
-
Twist gently to separate the microphone, while being careful not to strain or damage the flex cable.
-
If needed, use the point of the spudger to finish separating the microphone from its notch in the front panel. If the microphone remains difficult to separate, apply more heat.
-
-
-
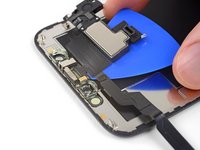
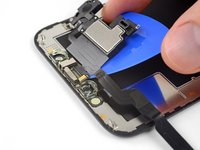
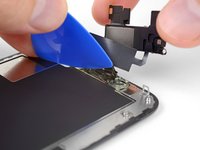
Working left to right, slide an opening pick beneath the flex cable and underneath the proximity sensor + flood illuminator module.
-
Gently wiggle and lift to separate the module from its notch in the front panel.
-
-
-
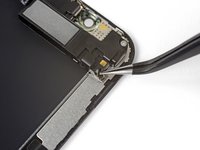
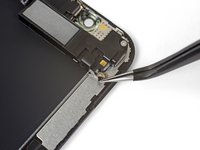
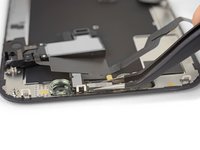
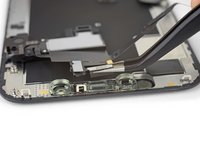
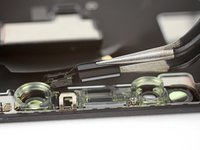
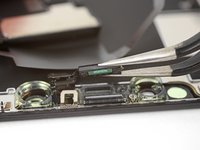
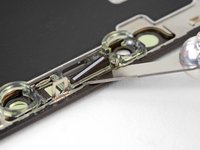
Use tweezers to wiggle the ambient light sensor and lift it from its notch in the display.
-
-
-
If you successfully removed the entire ambient light sensor, as shown in the first photo, continue to the next step below.
-
If the white diffuser strip detached and remains embedded in the display, as shown in the second photo, you will need to carefully lever it out along the top edge using a thin blade or pry tool. Re-applying heat first may make this task a bit easier.
-
-
-
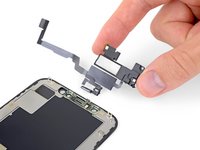
Remove the earpiece speaker and front sensor assembly.
-
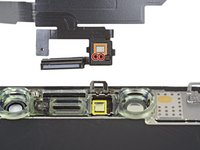
Proximity sensor
-
Flood illuminator
-
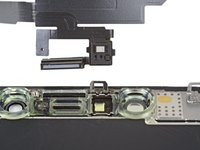
The module must be positioned so that these components are not obstructed by any adhesive.
This picture is upside down compared to the prior step, look carefully to ensure proper alignment.
-
Compare your new replacement part to the original part—you may need to transfer remaining components or remove adhesive backings from the new part before installing.
To reassemble your device, follow the above steps in reverse order.
Take your e-waste to an R2 or e-Stewards certified recycler.
Repair didn’t go as planned? Check out our Answers community for troubleshooting help.
crwdns2869486:0crwdne2869486:0
crwdns2878426:0152crwdne2878426:0
crwdns2917036:028crwdne2917036:0
It would be better if you provided some guidance on moving the iPhone XS Front Camera and Sensor Holder from the old display to the new one since the part you deliver does not include it. In order to remove it I ended up having to use my heat gun which warped the plastic and ultimately caused me to have to buy a replacement. Does it require adhesive? I still don’t know and it gets conveniently ignored in your guide and repair videos on YouTube. I’m quite frustrated.
Sorry about that! That’s no fun at all. iFixit’s replacement screens are meant to include that component; I’ll ask for someone to check and make sure it’s not left out in the future. However, it’s normally pretty easy to remove using mild heat and/or a few drops of isopropyl alcohol, with some gentle wiggling and prying. Then you carefully position it on your new screen. Adhesive is helpful, but once you screw down the earpiece speaker over the top, it should be perfectly secure regardless.
My phone screen feels a little loose after reassembly. Mostly in the top left area if I push it.. is this normal?
Short answer: Yes. Long answer: If you have adhesive on it that can hold the screen down. If you don’t it’s $5 and super easy to put on. It is kind of normal for the screen to be a little warped, I have done replacements on iPhones without reapplying adhesive and when applying heat it can warp it a tiny bit. The adhesive can help with this a lot. I strongly recommend you get it to hold your screen down.
Thanks a lot for this great instruction!
Sorry for a stupid question, is the digitizer and lcd screen one unit? Long story short, the screen is not cracked but the lcd somehow got damaged.
Hi Reggie,
The digitizer and OLED panel are pretty intricately attached to each other and are sold together as one unit. You may be able to replace the OLED panel without replacing the digitizer, but that would require specialty tools.
Bello, Después que tengas un buen ojo y buen pulso.
Se ve y se siente igual que el original.
Lo mega recomiendo!
Is there one time to make a video with a ‘really smashed’ screen?
You always show good screens on any repair you do videos or photographs.
This a positive critic, not a lament.
I hope you do understand what I mean.
Hi, I have one problem and I really hope to find somebody with answers. I need to replace an iPhone XS screen but…. My original screen doesnt have these metallic parts you use to clip it to the rest of the phone. The screen I have ordered had them and also was a tiny bit too long for my phone. This is all so very weird because I can't find any other types of screen online. Seems almost like my phone is a problem. Have you ever encountered such problem? You can reach me by email roza.francois@gmail.com
Hi. i also have the problem like fracois. Could you help me please?! You can reach me by email under dcs.privat@gmail.com
Greetings,
Daniel
Where are you guys ordering parts from? Try taking pictures of both your phone and the old/new screens and post your question in our Answers forum—you’re more likely to get help there.
Hi Jeff. Thank you for your request.
1. I ordered the part on ifixit.
2. As soon as possible i will post both photos. I hope you can me help me soon, because i am struggeling with no having a mobil device at the moment.
Greetings,
Daniel
Thanks for the replacement and instructions, since I replaced the screen of my previous iPhone 6 and iPhone 4 and several more for friends, it just took me around 10 minutes.
Luckily I bought the complete set with the tools, I did not know they used Y000 screws and would not have had a screwdriver for it if there wasn’t one included.
Hello, thank you for the guide and kit, everything was great but there was a problem: the space where the square part with the Proximity sensor and Flood illuminator go, originally on the original Iphone screen had a square little mirror like part (like in your tut pictures), in your Oled replacement screen set it is round and much bigger. Is this a problem?
I ask this cause now the auto-brightness is finnicky, the Iphone dims hard like (brightness auto drops), i don’t think i damaged the ambient light sensor , i was extremely slow and methodical, removed the glue carefully from the two near parts before, didn’t strain the cable, the ambient light sensor came out easily enough, slowly but steadily. Also i think if it would be broken, it would not work and dim the brightness. Could it be related to the fact that the sensor is not glued down like it was before? The screws were carefully put back in the exact order and no glue fell into/onto the sensors. Thank you
Hello. After replacing the display every many while I use it it turns black screen, then I have to lock and unlock it and it lights up again. Could you advise me something? Or is the display faulty? With the original it does not. Thanks.
Is it impossible to install a new screen and make it flush with the sides? Using an iFixit replacement unit. No matter how well I align and how much I press, it’s raised… which is really annoying
The install went ok - 2 things should be mentioned….1. does the blue film on the replacement screen need to be removed Yes or No, 2. IF the touch sensor is not working mention trying a hard restart 1st it would have saved me a ton of time and frustration… I assembled, reinstalled the old screen since it was working before, since it didn’t work either, disassembled, and reassembled the replacement part several times to troubleshoot why it wasn’t working. Those screws are sooo small its a wonder I didn’t lose any. None the less, after a hard restart, the touch sensor is working great and the phone is operating as designed. I was going to replace the back glass & ordered the part but there’s no way I am going into that after doing this- its not my phone. I put packing tape over the glass and put it back into the cover. A few hours of time is way cheaper than purchasing a new phone :)
Thanks for the suggestion about the hard restart! If the blue film is lightly adhered to the replacement screen, it is a liner and should be removed.
Super fantastic, company Ifixit <3 we love you, well I do at least, find it so sweet that I ordered a new screen, and I receive a small candy with the packet. Thanks, many times o7 great instruction!
The two screen connection modules with pins closest to the bottom are impossible to connect. They keep popping out making it impossible to put the cover on. Any tips?
The screen replacement went flawlessly. All the functions work perfectly. I have no problems with 3D Touch, nor with FaceID. The only thing that doesn’t work any more is True Tone. Thank you for the guide.
Just replaced a cracked screen. Took some time but finally managed to do it. Now have a beautiful screen and and a perfectly working device.
Paul L.
Great guide! Unfortunately I now have stripes across the screen (left-right). They are only visible on even grey backgrounds, so it’s not a big issue. Guess I bought a cheap screen, https://www.phone-parts.dk/iphone-xs-ska...
good day ,,, when i were replaced the charger port, and after making the settings, the device make turns off and restarts. !!?
I replaced my screen yesterday and the guides were perfect. Unfortunately, when I went to bed and had my screen on its dimmest setting I noticed that the colors were massively distorted toward the red end of the spectrum. I’m worried that I received a faulty product. The screen otherwise functions perfectly and colors are all normal at any other brightness setting. Please help!
These are not authentic apple screen replacements. I’ve received two different replacement screens now and they’ve both had issues. The first worked mostly fine except when the screen brightness was on its lowest setting the screen would have a strong reddish hue and the resolution would get noisy. The replacement that was sent has different problems, and now I wish I had just kept the original. This one is over saturated, struggles to have even dimming at the lowest brightness setting, the glass itself is not perfectly smooth, and the screen is somehow strangely sensitive, which makes typing and general use of the phone more difficult. At this point I wish I just took it to a certified apple repair shop.
Thanks again.Very clear, step by step. Doable in 60 minutes. All is working well from the first time!
Vlad.