crwdns2915892:0crwdne2915892:0
iPhone batteries are rated to hold 80% of their capacity for up to 500 charge cycles, which lasts roughly 18-24 months for most users. After that, your iPhone may need to be charged far more frequently, and iOS may warn you that performance is affected (in other words, your phone will run slower). Use this guide to replace your battery and restore your iPhone to like-new performance.
If your battery is swollen, take appropriate precautions.
Note: After the repair, your iPhone may display a warning about the “genuineness” of the battery, even when using original Apple parts. If your iPhone functions normally, you can safely ignore the warning.
For optimal performance, after completing this guide, calibrate your newly installed battery: Charge it to 100% and keep charging it for at least two more hours. Then use your iPhone until it shuts off due to low battery. Finally, charge it uninterrupted to 100%.
crwdns2942213:0crwdne2942213:0
crwdns2936621:0crwdne2936621:0
-
-
Power off your iPhone before beginning disassembly.
-
Remove the two 6.9 mm-long pentalobe screws at the bottom edge of the iPhone.
-
Opening the iPhone's display will compromise its waterproof seals. Have replacement seals ready before you proceed past this step, or take care to avoid liquid exposure if you reassemble your iPhone without replacing the seals.
-
-
-
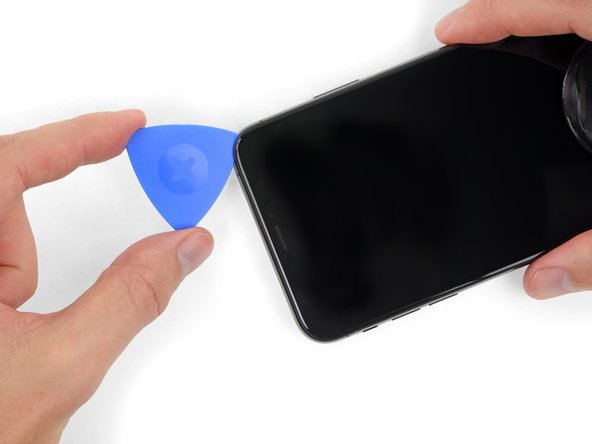
Measure 3 mm from the tip and mark the opening pick with a permanent marker.
Got to step 2 and realized the fix kit doesn't include an opening pick! Looks like a guitar pick, and I have those lying around. Is that expected? Looks like the pick is used in many steps below. There's a little blue crowbar that isn't mentioned in the instructions. Perhaps that replaces the opening pick?
Hi! I can't see which guide you were using when writing this comment. Can you reply here with which guide and fix kit you used?
I see you posted this in Meta. I hope it's resolved soon! In the meantime, a guitar pick may work well enough for your repair.
what fix kit?
My fix kit didn't include an opening pick either
Make sure you check inside the black boxes after emptying them. My pick was stuck inside one of the boxes.
My AliExpress refurbished screen came with a pick that has a coin-like circle that pops out, so no modification was necessary
the picture shows 3 cm but the description says 3 mm's. Which one is it?
That is a misunderstanding. It is a ruler with a scale for cm, it shows 0.3 cm, i.e. 3 mm.
VauWeh -
Oh, come ON!
Big Ed -
It will ALWAYS be millimeters on a phone, but this step is ridiculous, skip it!
@leifdewolf I wouldn't skip it for a first repair.
It's not an Ifixit KIT if it doesn't include everything. You'll need to order the opening pic separately. Or head to Walmart like myself and look for guitar pics. Hopefully, this will work just as well.
No pick in mine as well. It’s really not clear that you have to order this separately when ordering an IPhone SE 202/2022 screen repair kit. Is this the case?
Frustrated, I ordered a compact package where everything was encapsulated. Useless suction tools could not separate the screen. If it is unable to decouple the screen, then why sucking suction tools you have provided.
For my kit the triangle pick was stuck inside the box with the screen not with the other tools maybe it's also there for you
Y’all are getting far, FAR too detailed with some of this stuff…. Measuring and marking the pick that you won’t actually use to open the device?!? lol that’s kinda funny. Just heat it up, grab a spudger, and the back just pops right off! The iFixit tech need to stick to the KISS method more often, you know KEEP IT SIMPLE STUPID!!! Like l, for reals, I’ve been doing this stuff for YEARS and using iFixit guides regularly and this is just ridiculous at this point!
Will the phone still work if the sensor assembly on the back of the screen is damaged?
I don't have a pick, but how much better are these picks than an old credit card for opening an iPhone 13 mini?
The pick in my iFixIt kit was packed with the battery, not with the rest of the toolkit.
-
-
-
Lay overlapping strips of clear packing tape over the iPhone's screen until the whole face is covered.
-
If you can't get the suction cup to stick in the next few steps, fold a strong piece of tape (such as duct tape) into a handle and lift the screen with that instead.
-
-
crwdns2935267:0crwdne2935267:0Clampy - Anti-Clamp$24.95
-
Pull the blue handle backwards to unlock the Anti-Clamp's arms.
-
Slide the arms over either the left or right edge of your iPhone.
-
Position the suction cups near the bottom edge of the iPhone—one on the front, and one on the back.
-
Squeeze the cups together to apply suction to the desired area.
-
-
-
Pull the blue handle forward to lock the arms.
-
Turn the handle clockwise 360 degrees or until the cups start to stretch.
-
Make sure the suction cups remain aligned with each other. If they begin to slip out of alignment, loosen the suction cups slightly and realign the arms.
-
-
-
Heat an iOpener and thread it through the arms of the Anti-Clamp.
-
Fold the iOpener so it lays on the bottom edge of the iPhone.
-
Wait one minute to give the adhesive a chance to release and present an opening gap.
-
Insert an opening pick into the gap under the screen and the plastic bezel, not the screen itself.
-
Skip the next three steps.
-
-
-
Use a hairdryer or heat gun or prepare an iOpener and apply it to the lower edge of the iPhone for about a minute in order to soften up the adhesive underneath.
besteht da die Gefahr das sich das Displayglas vom lcd löst?
Besteht da die Gefahr das sich der Kleber vom Displayglas löst?
-
-
-
If you're using a single suction handle, apply it to the bottom edge of the phone, while avoiding the curved portion of the glass.
-
-
-
Pull up on the suction cup with firm, constant pressure to create a slight gap between the front panel and rear case.
-
Insert an opening pick into the gap under the screen and the plastic bezel, not the screen itself.
I need help. I inserted the pick under the screen, but above the touch screen. When I lifted it, all I see is the silver touch screen instead of the interior of the iPhone. How do I to opening the screen the right way from here?
-
-
-
Slide the opening pick around the lower left corner and up the left edge of the iPhone, slicing through the adhesive holding the display in place.
-
-
-
Re-insert your pick at the bottom edge of the iPhone, and slide it up the right side to continue separating the adhesive.
Comment répare un Face ID XS max
Bonjour @jenkeydany62670 Les capteurs Face ID était appairés à la carte mère en usine, il n'est possible de les remplacer qu'avec une nouvelle "paire". Ou bien, il faut se tourner vers un centre de réparation Apple officiel.
-
-
-
Slide the opening pick around the top corner of the display, while gently pulling or wiggling the display down in the direction of the Lightning port.
-
Slide the pick to the opposite corner and cut any remaining adhesive securing the display.
-
-
-
Pull on the small nub on the suction cup to remove it from the front panel.
-
-
-
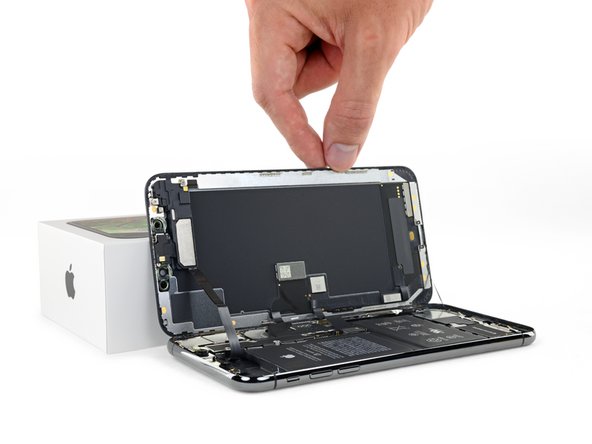
Open the iPhone by swinging the display up from the left side, like the back cover of a book.
-
Lean the display against something to keep it propped up while you're working on the phone.
-
-
crwdns2935267:0crwdne2935267:0Magnetic Project Mat$19.95
-
Remove four Y000 screws securing the logic board cover bracket, of the following lengths:
-
Two 1.1 mm screws
-
One 1.5 mm screw
-
One 3.7 mm screw
Hi i'm Daniel, the guide is perfect!!! I'm enjoying my brand new ifixit Battery!!!
-
-
-
-
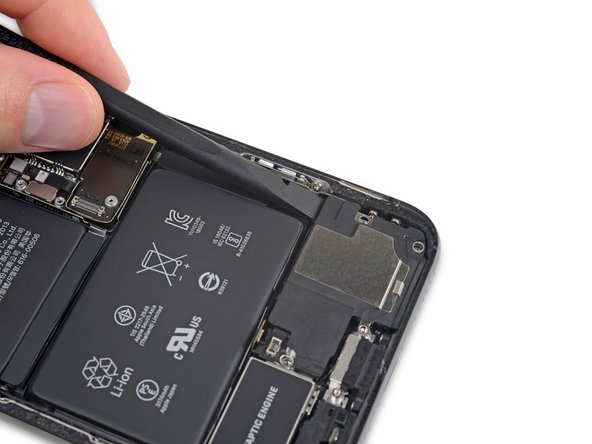
Use a spudger or a clean fingernail to pry the battery connector up from its socket on the logic board.
-
Bend the connector slightly away from the logic board to prevent it from accidentally making contact with the socket and providing power to the phone during your repair.
-
-
-
Remove the three Y000 screws securing the display connector bracket:
-
Two 1.5 mm screws
-
One 1.1 mm screw
I am replacing the screen for the 2nd time - the first repair was done by someone else, and the first 2 screws are 1.5mm and the last screw is 1.1mm… If I put the screw back in am I risking Long Screw Damage?
I think that the outside screw (red one, one the right) is actually 1.5 mm or something longer than 1.1. Looked that way to me.
From the top, the screws are: 2 x 1,5mm + 1 x 1,1mm
I can confirm the above comments on the screw length. Pls correct it in the description!
Thanks for all your comments! I'll amend this step.
Hi, I just changed the screen on my XS Max and for this bracket I used 2 x 1.1 mm and 1 x 1.5 mm.
Starting from left to right:
- left 1.1 mm (I tried with 1.5 mm like in the above picture but I felt that it didn't wanted to go deeper so I didn't forced and I tried it in the middle and it fit perfectly)
- middle 1.5 mm
- right 1.1 mm
For the two brackets I had 7 screws, I aligned them on the desk by length and I had 2 x 1.5 mm, 4 x 1.1 mm and 1 x 3.7 mm.
Good luck and I hope it will help someone!
-
-
-
Use the point of a spudger or a fingernail to disconnect the front panel sensor assembly connector.
-
-
-
Use a spudger or a fingernail to disconnect the OLED panel cable connector.
-
-
-
Use a spudger or fingernail to pry the digitizer cable connector up from its socket.
Mine still won’t respond even after reseating any ideas? Ground issue?
-
-
-
Carefully lift the cable until the adhesive separates.
-
-
-
Remove the display assembly.
No olviden que para que pase el Face Id tienen q cambiar el flex que va encima de la camara delantera con mucho cuidado ya q si le ponen otro flex no funcionara.
-
-
-
Remove the five 1.4 mm tri-point Y000 screws securing the bracket below the Taptic Engine and main speaker.
La imagen no corresponde con un caso real de XS MAX. Tenedlo en cuenta a la hora de volver a montar el dispositivo.
Tornillo Tri-point = Tornillo de tres puntas
What should I do if I stripped one of the Y000 screws. Not sure if it got rusted from water damage.
-
-
-
Gently lift to unstick and remove the bracket, being careful not to bend it.
-
If necessary, apply a little heat with a hair dryer or heat gun to soften the adhesive. (Putting an iOpener on the bracket is not recommended, as this may bend the spring contacts along the top.)
-
-
-
Remove the 1.3 mm tri-point Y000 screw securing the speaker connector cover.
-
-
-
Push the speaker connector cover towards the battery, and then lift to unclip and remove it.
-
-
-
Use the tip of a spudger to pry up and disconnect the speaker connector.
-
-
crwdns2935267:0crwdne2935267:0iFixit Precision 4 mm Screwdriver Bit$2.99
-
Remove the three screws securing the speaker:
-
One 2.7 mm Phillips screw
-
One 2.9 mm standoff screw
-
One 3.1 mm standoff screw
-
-
-
Insert a spudger under the top edge of the speaker, near the edge of the iPhone's case.
-
Gently pry up and lift the top edge of the speaker slightly.
-
-
crwdns2935267:0crwdne2935267:0Tweezers$4.99
-
While prying up the speaker, use tweezers to peel away the plastic bumper strip from the top edge of the speaker.
-
-
-
Hold the speaker by its side edges and rock it side-to-side, separating the adhesive securing it to the bottom edge of the iPhone.
-
Pull the speaker away from the bottom edge of the iPhone until the adhesive gasket separates.
-
-
-
Remove the speaker.
Welche Dichtung soll hier verwendet werden?
After pulling the speaker out, watch that the adhesive didn’t bring the plastic speaker hole and small grill membrane insert out. If it wiggles out a little, push it back in. I thought it was remaining adhesive and removed them both by mistake- a headache to put them both back.
-
-
-
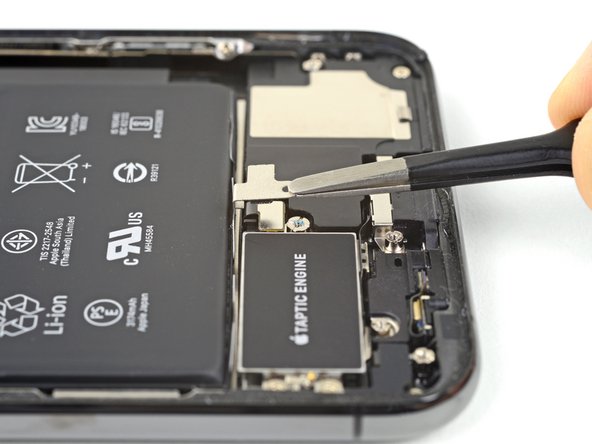
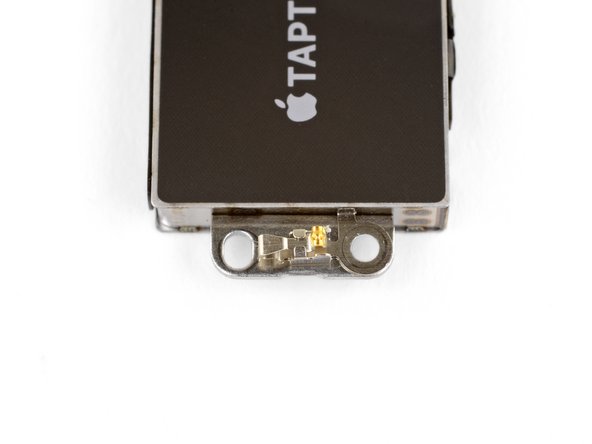
Use a spudger to disconnect the Taptic Engine flex cable by prying it straight up from its socket.
-
-
-
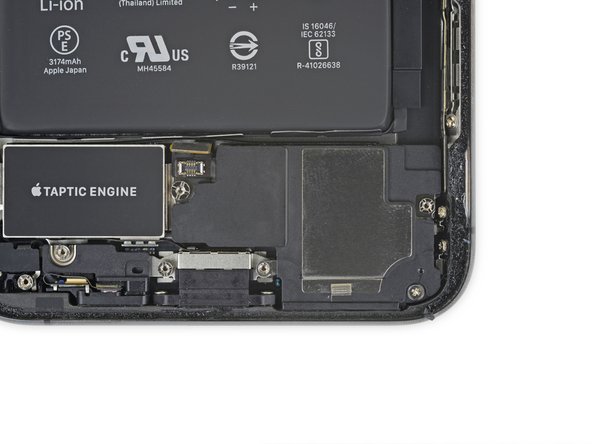
Remove the two 1.9 mm Phillips screws securing the Taptic Engine.
-
-
-
Grasp the plastic bumper strip and carefully lift it over the speaker connector.
-
-
-
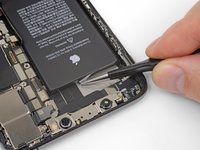
Each piece of adhesive has a black pull-tab at the end, which is lightly adhered to the side edge of the battery.
-
-
-
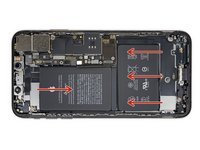
Separate the first battery adhesive tab from the bottom edge of the battery.
-
-
-
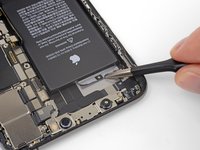
Repeat the above step to separate the remaining two adhesive tabs from the bottom edge of the battery.
-
-
-
To increase your odds of success:
-
Don't press down on the battery. Hold the iPhone firmly by its sides.
-
Keep the strips flat and unwrinkled as you pull.
-
Pull very slowly, giving the strip time to stretch and separate. It takes around 15-30 seconds of stretching to remove each strip.
-
Pull at a low angle so the strip doesn't snag along the bottom edge of the battery.
-
If a strip does break off underneath the battery and cannot be retrieved, move on to the other strips and then continue with the additional steps below.
-
-
crwdns2935267:0crwdne2935267:0Tweezers$4.99
-
Grab one of the outer battery adhesive tabs and slowly pull it away from the battery, toward the bottom of the iPhone.
-
Pull steadily, maintaining constant tension on the strip until it slips out from between the battery and the rear case.
-
-
-
Repeat the previous step to remove the strip on the opposite side, leaving the center strip for last.
-
-
-
Remove the center strip, being very careful not to snag it on the speaker flex cable.
-
-
-
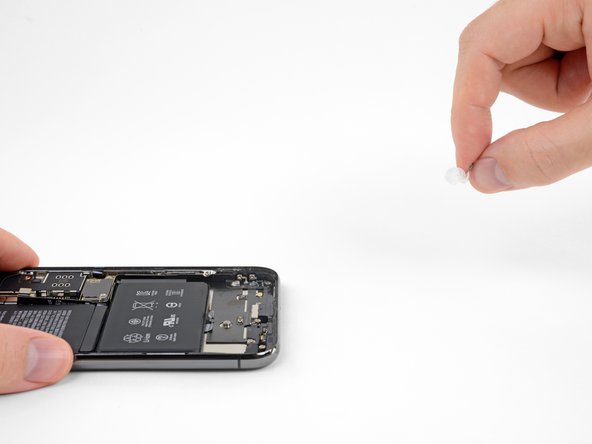
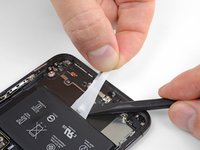
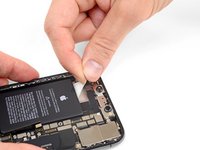
Peel and separate the pull tab on the final adhesive strip, on the top edge of the upper battery cell.
-
-
-
Pull and remove the final adhesive strip.
-
If you removed all four adhesive strips successfully, skip the next step.
-
Wait about one minute for the alcohol solution to weaken the adhesive. Use the flat end of a spudger to gently lift the battery.
-
-
-
If any of the adhesive strips broke off and the battery remains stuck to the rear case, prepare an iOpener or use a hair dryer to heat the rear case directly behind the battery.
-
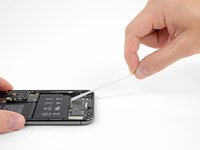
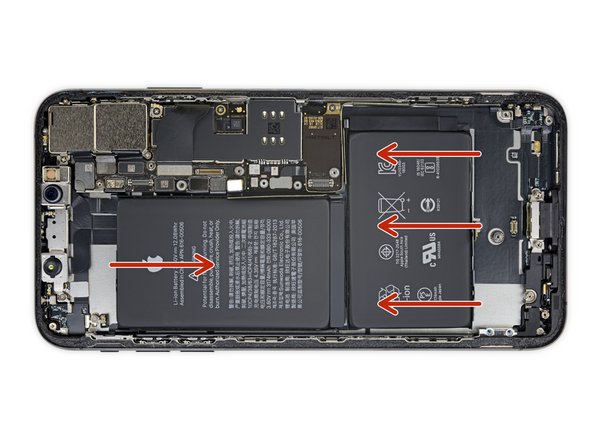
Flip the iPhone back over and thread a strong piece of string (such as dental floss or a length of thin guitar string) underneath the battery.
-
Pull the string from side to side in a sawing motion to separate the adhesive. This can take some time since the adhesive is slow to deform, but with patience it will come free. Do not deform or damage the battery.
-
Start from the top or bottom edge of the battery, and pull toward the middle. Don't pull the string through the middle third of the battery, or you may damage the ribbon cables or the wireless charging coil directly underneath.
-
-
-
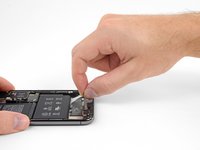
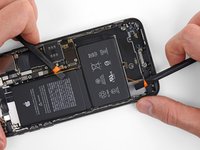
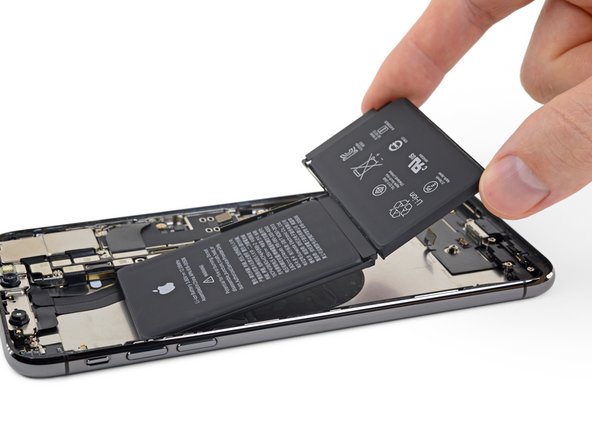
Grasp the battery from the bottom edge and remove it from the iPhone.
-


Compare your new replacement part to the original part—you may need to transfer remaining components or remove adhesive backings from the new part before installing.
To reassemble your device, follow the above steps in reverse order.
Take your e-waste to an R2 or e-Stewards certified recycler.
Repair didn’t go as planned? Check out our Answers community for troubleshooting help.
crwdns2935221:0crwdne2935221:0
crwdns2935229:083crwdne2935229:0


crwdns2947412:07crwdne2947412:0
Fine little tutorial.. I do miss however a tutorial for the volume flex cable. Is it somehow connected to the wireless charging pad inside (underneath the battery?).
Warum werden eigentlich die ganzen Bauteile entfernt? Hab bei meinem 6s die Schritte übersprungenen und mit angewinkeltem Display, den Akku getauscht. Hat perfekt funktioniert, also warum? Elektrische Trennung?
Is there a way to remove the important battery message ? The notification won’t go away.
Yet another excellent guide. Followed it to the letter and completed another successful repair. These guides are invaluable. Thank you
Does anyone have an answer to my issue I’m currently facing? Bought a refurbished iPhone XS Max online and looks like the seller has replaced the battery, however the phone is experiencing technical difficulties as it keeps switching off and restarting every 1 minute or so. Could this be because they didn’t use a genuine apple battery as a replacement or they just didn’t fit the battery correctly when replacing it? I really appreciate if anyone could help, would save me a tonne of money that apple will probably charge me if I go to them for help.
They probably used a “amazon” battery the best way would be to replace it your self.
Ein Hinweis darauf, wie man das Batteriemanagement-Board vom alten Akku auf den neuen Akku überträgt wäre als Add-on sicher hilfreich. Der Aufwand ist überschaubar (Werkzeug wird benötigt), und dann erscheint auch die Meldung mit der Batterienachricht nicht mehr.