crwdns2915892:0crwdne2915892:0
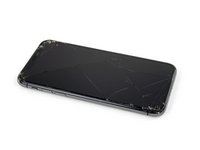
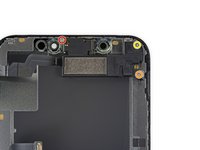
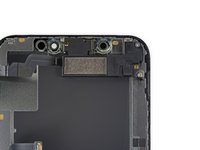
Follow the steps in this guide to remove, transfer, and/or replace the earpiece speaker and front sensor assembly in your iPhone XS. This assembly includes the earpiece speaker, microphone, ambient light sensor, flood illuminator, and proximity sensor.
This assembly is paired to your individual iPhone from the factory, so you must transfer it from your old display to your new one during any display replacement.
The flood illuminator forms part of the biometric Face ID security feature, and Face ID functions will fail if the original component is damaged or incorrectly installed. Replacing it with a new part will also cause Face ID to fail, so take extra care not to damage any of these components during this procedure. If damaged, only Apple can restore Face ID function.
crwdns2942213:0crwdne2942213:0
-
-
Power off your iPhone before beginning disassembly.
-
Remove the two 6.9 mm-long pentalobe screws at the bottom edge of the iPhone.
-
-
-
Measure 3 mm from the tip and mark the opening pick with a permanent marker.
Got to step 2 and realized the fix kit doesn't include an opening pick! Looks like a guitar pick, and I have those lying around. Is that expected? Looks like the pick is used in many steps below. There's a little blue crowbar that isn't mentioned in the instructions. Perhaps that replaces the opening pick?
Hi! I can't see which guide you were using when writing this comment. Can you reply here with which guide and fix kit you used?
I see you posted this in Meta. I hope it's resolved soon! In the meantime, a guitar pick may work well enough for your repair.
what fix kit?
My fix kit didn't include an opening pick either
Make sure you check inside the black boxes after emptying them. My pick was stuck inside one of the boxes.
My AliExpress refurbished screen came with a pick that has a coin-like circle that pops out, so no modification was necessary
the picture shows 3 cm but the description says 3 mm's. Which one is it?
That is a misunderstanding. It is a ruler with a scale for cm, it shows 0.3 cm, i.e. 3 mm.
VauWeh -
Oh, come ON!
Big Ed -
It will ALWAYS be millimeters on a phone, but this step is ridiculous, skip it!
@leifdewolf I wouldn't skip it for a first repair.
It's not an Ifixit KIT if it doesn't include everything. You'll need to order the opening pic separately. Or head to Walmart like myself and look for guitar pics. Hopefully, this will work just as well.
No pick in mine as well. It’s really not clear that you have to order this separately when ordering an IPhone SE 202/2022 screen repair kit. Is this the case?
Frustrated, I ordered a compact package where everything was encapsulated. Useless suction tools could not separate the screen. If it is unable to decouple the screen, then why sucking suction tools you have provided.
For my kit the triangle pick was stuck inside the box with the screen not with the other tools maybe it's also there for you
Y’all are getting far, FAR too detailed with some of this stuff…. Measuring and marking the pick that you won’t actually use to open the device?!? lol that’s kinda funny. Just heat it up, grab a spudger, and the back just pops right off! The iFixit tech need to stick to the KISS method more often, you know KEEP IT SIMPLE STUPID!!! Like l, for reals, I’ve been doing this stuff for YEARS and using iFixit guides regularly and this is just ridiculous at this point!
Will the phone still work if the sensor assembly on the back of the screen is damaged?
I don't have a pick, but how much better are these picks than an old credit card for opening an iPhone 13 mini?
The pick in my iFixIt kit was packed with the battery, not with the rest of the toolkit.
Many of these comments are PURE GOLD. Seriously y’all, if you’re not sure if it should be 3mm or 3cm or whether you could find and use an alternative pick, mending an IPhone really isn’t for you. Find a responsible adult and get back to doing something simpler…
-
-
-
Lay overlapping strips of clear packing tape over the iPhone's screen until the whole face is covered.
-
If you can't get the suction cup to stick in the next few steps, fold a strong piece of tape (such as duct tape) into a handle and lift the screen with that instead.
-
-
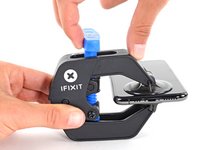
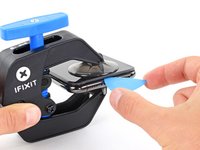
crwdns2935267:0crwdne2935267:0Clampy - Anti-Clamp$24.95
-
Pull the blue handle backwards to unlock the Anti-Clamp's arms.
-
Slide the arms over either the left or right edge of your iPhone.
-
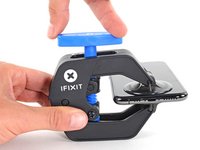
Position the suction cups near the bottom edge of the iPhone—one on the front, and one on the back.
-
Squeeze the cups together to apply suction to the desired area.
The anti clamp is a much needed tool
It makes opening the phone a breeze.
Lon
-
-
-
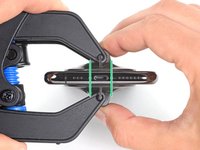
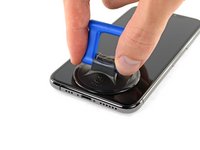
Pull the blue handle forward to lock the arms.
-
Turn the handle clockwise 360 degrees or until the cups start to stretch.
-
Make sure the suction cups remain aligned with each other. If they begin to slip out of alignment, loosen the suction cups slightly and realign the arms.
-
-
-
Heat an iOpener and thread it through the arms of the Anti-Clamp.
-
Fold the iOpener so it lays on the bottom edge of the iPhone.
-
Wait one minute to give the adhesive a chance to release and present an opening gap.
-
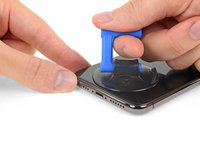
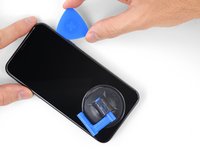
Insert an opening pick into the gap under the screen and the plastic bezel, not the screen itself.
-
Skip the next three steps.
-
-
-
Use a hairdryer or heat gun or prepare an iOpener and apply it to the lower edge of the iPhone for about a minute in order to soften up the adhesive underneath.
-
-
-
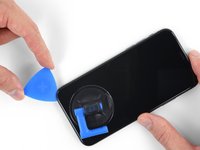
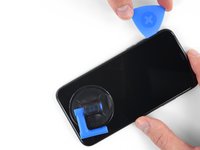
If you're using a single suction handle, apply it to the bottom edge of the phone, while avoiding the curved portion of the glass.
-
-
-
Pull up on the suction cup with firm, constant pressure to create a slight gap between the front panel and rear case.
-
Insert an opening pick into the gap under the screen and the plastic bezel, not the screen itself.
It seems like I need a third hand to do this. To hold the phone; hold the suction cup; and push the pick in the space.
-
-
-
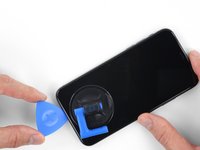
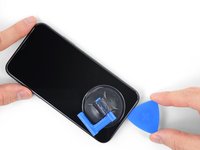
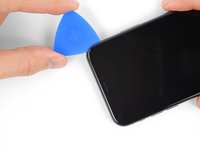
Slide the opening pick around the lower left corner and up the left edge of the iPhone, slicing through the adhesive holding the display in place.
-
-
-
-
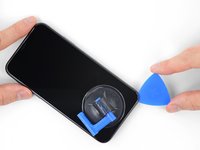
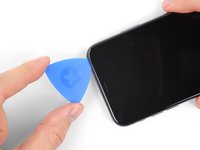
Re-insert your pick at the bottom edge of the iPhone, and slide it up the right side to continue separating the adhesive.
-
-
-
Slide the opening pick around the top corner of the display, while gently pulling or wiggling the display down in the direction of the Lightning port.
-
Slide the pick to the opposite corner and cut any remaining adhesive securing the display.
-
-
-
Pull on the small nub on the suction cup to remove it from the front panel.
-
-
-
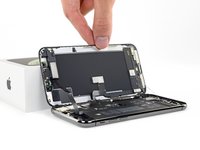
Open the iPhone by swinging the display up from the left side, like the back cover of a book.
-
Lean the display against something to keep it propped up while you're working on the phone.
Open from the LEFT. Photo confused me and I came very close to damaging my phone by opening from the wrong side.
-
-
crwdns2935267:0crwdne2935267:0Magnetic Project Mat$17.96
-
Remove five screws securing the logic board connector bracket, of the following lengths:
-
Three 1.0 mm Y000 screws
-
One 1.3 mm Y000 screw
-
One 3.7 mm Phillips screw
The ribbon makes the 1.3 mm screw a little tricky. Use one hand to hold the display at a 90 degree or smaller angle to create the slack necessary to get the screw driver in place.
I tracked my screws by using my kids fridge magnets to hold each screw size and placing a piece of masking tape below with the screw size.
I stripped a screw ugh
Where can i buy a One 1.3 mm Y000 screw
FYI: I used a tiny piece of scotch tape to hold those 1mm screws in place while aligning the magnetic screwdriver. Otherwise they are so tiny the magnetic bit pulls them right out the hole.
-
-
-
Remove the bracket.
During reassembly, pause here to check function. Gently reattach the top of the display to the base to test face ID.
-
-
-
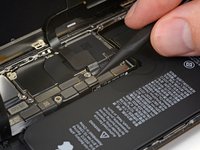
Use a spudger or a clean fingernail to pry the battery connector up from its socket on the logic board.
-
Bend the connector slightly away from the logic board to prevent it from accidentally making contact with the socket and providing power to the phone during your repair.
-
-
-
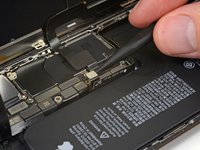
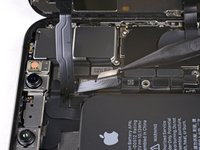
Use a spudger or a fingernail to pry up and disconnect the front panel sensor assembly connector.
In my phone the connector made poor contact with the socket resulting in no sound audible through the phone receiver/headset. There was an overhang of insulation close to the socket which I believe may have prevented a good connection. So if you have these kinds of audio problems you might see if this is the problem.
-
-
-
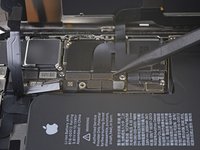
Use a spudger or a fingernail to disconnect the OLED panel cable connector.
Shine a bright light here to help you align the connector. Eventually, the right side snapped in first.
On reassembly, use the pad of your fingertip to reconnect.
-
-
-
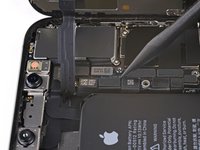
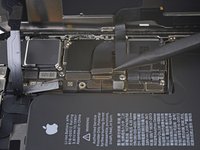
Use a spudger or fingernail to pry the digitizer cable connector up from its socket.
Reassembly: reconnecting the press connectors upon reassembly was so hard, even for the ones not seated in a recessed location !! It took me two days to get them reconnected. What helped me was to shine bright lights on all sides of the iPhone and then hold the iPhone vertically like a book and press it in that way. They are now all in, but the touchscreen functionality has disappeared :( so I will need to reconnect that one.
-
-
-
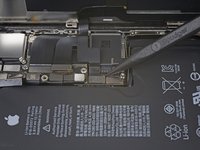
Carefully lift the cable until the adhesive separates.
Will replacing camera and sensors fix damaged face I'd
No, FaceID will be disabled because the original sensors are paired with the logic board.
-
-
-
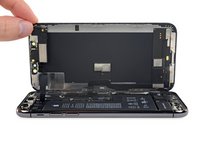
Remove the display assembly.
I wish the reassembly directions were separate. I forgot to pause here to do the waterproof seal.
Geez, I blazed right past that small line to replace the waterproof seal. Needs to be called out much larger.
-
-
-
On the back of the display assembly, peel back and remove any tape covering the hidden screw at the lower right corner of the speaker housing.
-
-
-
Remove the three Y000 screws securing the speaker/sensor assembly:
-
One 1.3 mm screw
-
One 1.4 mm screw
-
One 1.9 mm screw
While disassembling, I missed that these are all Y000. Prior list specifies in the bullets, but this list specifies in the text preceding the bullets.
-
-
-
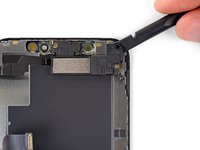
Using a spudger, gently pry under the top edge of the speaker assembly, and flip it over—down and away from the top edge of the display.
-
-
-
Use a hairdryer or heat gun or prepare an iOpener and apply it to the top front of the display for about a minute, in order to soften the adhesive securing the sensors.
-
-
-
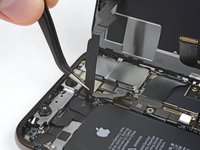
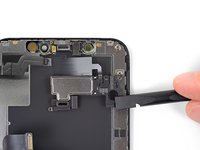
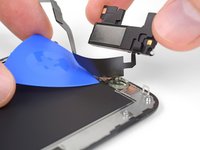
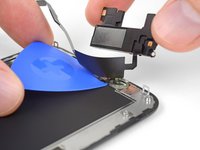
Carefully slide the edge of an opening pick underneath the flex cable below the microphone.
-
Twist gently to separate the microphone, while being careful not to strain or damage the flex cable.
-
If needed, use the point of the spudger to finish separating the microphone from its notch in the front panel. If the microphone remains difficult to separate, apply more heat.
-
-
-
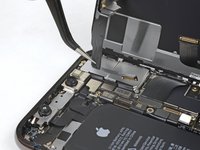
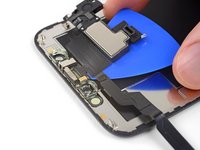
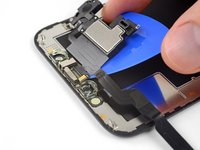
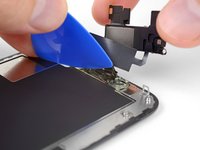
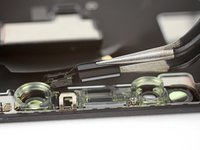
Working left to right, slide an opening pick beneath the flex cable and underneath the proximity sensor + flood illuminator module.
-
Gently wiggle and lift to separate the module from its notch in the front panel.
-
-
crwdns2935267:0crwdne2935267:0Tweezers$4.99
-
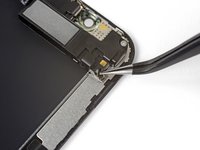
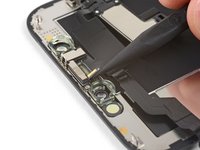
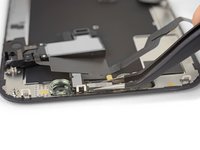
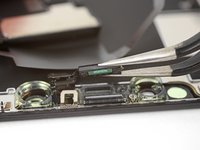
Use tweezers to wiggle the ambient light sensor and lift it from its notch in the display.
-
-
-
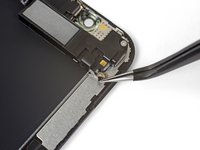
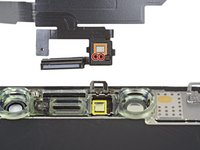
If you successfully removed the entire ambient light sensor, as shown in the first photo, continue to the next step below.
-
If the white diffuser strip detached and remains embedded in the display, as shown in the second photo, you will need to carefully lever it out along the top edge using a thin blade or pry tool. Re-applying heat first may make this task a bit easier.
-
-
-
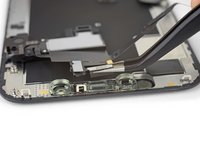
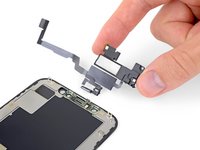
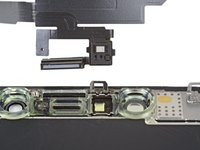
Remove the earpiece speaker and front sensor assembly.
-
Proximity sensor
-
Flood illuminator
-
The module must be positioned so that these components are not obstructed by any adhesive.
This picture is upside down compared to the prior step, look carefully to ensure proper alignment.
What is that hole that is on the opposite side of the proximity sensor? Is it necessary any adhesives or special filter to put it back on the bracket?
Hi Rafael! The hole is for the front-facing microphone. You should be able to reuse the existing adhesive on the screen. If you're transferring it, you can cut a square of double-sided tape such as Tesa tape, poke a generous hole in the center of the square, and apply it to the cable with the hole.
Ich habe nicht darauf geachtet, wo ich das Plektrum ansetze und so das Display von dem eigentlichen Rahmen getrennt. Dadurch hatte ich etwas Schwierigkeiten... Es ging aber auch, die Sensoreinheit und den Rahmen im Nachhinein auszubauen und dann die Einheit aufs neue Display zu setzen. So oder so, es hat geklappt und das iPhone funktioniert wieder tadellos.
-


Compare your new replacement part to the original part—you may need to transfer remaining components or remove adhesive backings from the new part before installing.
To reassemble your device, follow the above steps in reverse order.
Take your e-waste to an R2 or e-Stewards certified recycler.
Repair didn’t go as planned? Check out our Answers community for troubleshooting help.
crwdns2935221:0crwdne2935221:0
crwdns2935229:027crwdne2935229:0


crwdns2947412:014crwdne2947412:0
My iPhone xs face I'd isnt working . Can changing front cameras and sensors will fix it ,
no, cameras are not part of the prox module located on the display itself. you have to switch the prox module from the old display to the new one, the bundle of prox sensor, ambient light sensor, receiver, top mic and face id module. or run repaircal on new display assembly with NEW prox module etc OR ELSE face ID won’t work
26nn -
My iPhone XS’s Face ID stopped working yesterday suddenly. I tried all the standard stuff like resetting Face ID and restore, so it’s definitely a hardware problem.
When trying to set up Face ID, the phone detects a face but always says to move the phone up or down. Likewise, in selfie portrait mode in the camera, it keeps saying move farther away.
So if I were to change the front sensor assembly, it wouldn’t work anyway?
Hi Daniel,
You are correct. FaceID hardware is paired to the logic board—replacing the hardware will disable FaceID.
Can you tell how to make face id still work after changed this part ?
Hello,
Please can you explain so we all understand the connection of replacing the earphiece speaker on this way and Face ID function? Will it work or not! What is confusing is that face id projector is on another flex, below battery…but I don’t understand what part that face id is using is on this new part you replaced. Face ID is on both flex or how is working. Why simply replacing this earphiece with new flex will cause faliure in face ID. Please explain!!!! Thank’s
Hi Kobra,
The flood illuminator on the earpiece speaker module is paired with the logic board and will cause Face ID to not work if it is replaced.
Hello!
What will happen if the 3 screws that secure the ear/sensor assembly down are not placed back in order?
Hi, If I replace iPhone XS Earpiece Speaker with this new one, my FaceID will stop working? please clarify.
The flood illuminator on the earpiece speaker module is paired with the logic board and will cause Face ID to not work if it is replaced.
hi, i need to replace the display and ear speaker on my iphone xs. replacing ear speaker and display will make face id still working? sorry but i am little confused. just wanna make sure if i buy display and ear speaker replacement am i all set?
No, Face ID will be disabled after the replacement of the earpiece speaker due to apple pairing the flood illuminator sensor to the logic board so if you want Face ID to work you will have to get apple to do it because they pair components to the logic board because they like money and don't care about their customers. That is all.
Face ID stopped working after iphone XS was under water, and now letter "y" not working any ideas please on what do do....
My sensor assembly has been broken. In this case, the face ID data must be retrieved to update the new face ID cluster to replace it.
Appreciate!
Der Original Akku ist codiert. Egal, ob man einen zweiten Apple Original Akku oder einen neuen Fremdakku einbaut erscheint bereits in den Einstellungen eine "Wichtige Batterienachricht" mit einem roten Punkt. "Unbekanntes Bauteil" und die "Informationen zum Batteriezustand" sind nicht verfügbar. Diese Nachricht verbleibt immer und nervt auf Dauer immens.
Der Akku muss angelernt werden und dieses können von jetzt an nur authorisierte Apple Servicebetriebe und diesen ist es durch Apple verboten die notwendige Info weiterzugeben.
Dies ist nicht zu verwechseln mit der bereits bekannten Rekalibrierung seit iOS 14.5.
Seit dieser neuen Codierung kostet der Akkutausch bei Apple auch nicht mehr 75 € sondern aktuell 99 € (Stand Novmber 2023 in Deutschland).
Damit sind künftig alle nicht authorisierten Servicebetriebe raus - denn wer will schon dauernd diese Mitteilung auf dem Bildschirm haben?
Überlegt vorher, ob unter diesen Bedingungen ein eigener Akkutausch noch sinnvoll ist .....
Manfred Wachtel - crwdns2934203:0crwdne2934203:0
Lieben Dank @manfredwachtel ! Mehr Infos dazu haben wir auch in unserem Blog zusammengefasst: https://de.ifixit.com/News/78890/teileko...
Sandra Hiller -