
iPhone SE Battery Replacement

crwdns2944107:0crwdnd2944107:0Sam Goldheartcrwdnd2944107:0crwdnd2944107:0crwdnd2944107:09crwdnd2944107:0crwdne2944107:0
crwdns2944111:0Maw 24, 2024crwdne2944111:0
crwdns2915892:0crwdne2915892:0
crwdns2942287:0crwdne2942287:0Use this guide to bring life back to an iPhone SE that no longer holds a charge, and replace your old battery with a new one.
The SE battery is not compatible with the iPhone 5s battery. If your battery is swollen, take appropriate precautions.
The adhesive strips securing the battery are not re-usable, so you'll want to have a supply of replacement adhesive strips on hand before you begin. Alternatively, you can secure the battery using a piece of double-sided tape.
For optimal performance, after completing this guide, calibrate your newly installed battery: Charge it to 100% and keep charging it for at least two more hours. Then use your iPhone until it shuts off due to low battery. Finally, charge it uninterrupted to 100%.
crwdns2942213:0crwdne2942213:0
crwdns2942269:0crwdne2942269:0
crwdns2942337:0crwdne2942337:0

crwdns2943213:0crwdne2943213:0


crwdns2943215:0crwdne2943215:0
- Isopropyl Alcoholcrwdns2942747:0crwdne2942747:0crwdns2943225:0crwdne2943225:0crwdns2931591:0Amazoncrwdne2931591:0


crwdns2944105:0crwdne2944105:0

crwdns2936621:0crwdne2936621:0
-
-
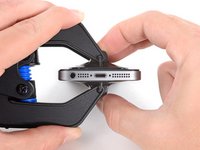
Power off your iPhone before beginning disassembly.
-
Remove the two 3.9 mm Pentalobe screws from either side of Lightning connector.
-
-
-
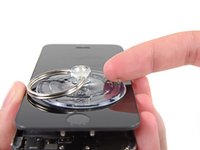
If your display glass is cracked, keep further breakage contained and prevent bodily harm during your repair by taping the glass.
-
Lay overlapping strips of clear packing tape over the iPhone's display until the whole face is covered.
-
-
-
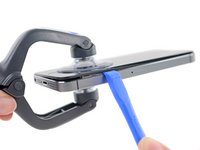
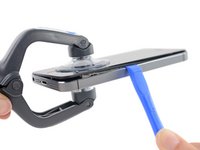
Regardless of the tool you use, you need to be sure you pull up the entire display.
-
If the glass begins to separate from the plastic, as shown in the first image, slide a plastic opening tool between the plastic frame and the metal phone body to pry the metal clips out of the case.
-
-
crwdns2935267:0crwdne2935267:0Clampy - Anti-Clamp$24.95
-
Pull the blue handle backwards to unlock the Anti-Clamp's arms.
-
Slide the arms over either the left or right edge of your iPhone.
-
Position the suction cups near the bottom edge of the iPhone just above the home button—one on the front, and one on the back.
-
Squeeze the cups together to apply suction to the desired area.
-
-
-
Pull the blue handle forwards to lock the arms.
-
Turn the handle clockwise 360 degrees or until the cups start to stretch.
-
Insert an opening pick under the screen when the Anti-Clamp creates a large enough gap.
-
Skip the next two steps.
-
-
-
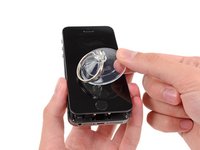
If you don't have an Anti-Clamp, use a single suction cup to lift the front panel:
-
Press a suction cup onto the screen, just above the home button.
-
-
-
While holding the iPhone down with one hand, pull up on the suction cup to slightly separate the home button end of the front panel from the rear case.
-
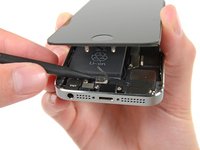
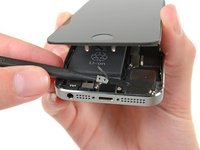
With a plastic opening tool, gently pry the edges of the rear case down, away from the front panel assembly, while you pull up with the suction cup.
-
-
-
Pull the plastic nub to release the vacuum seal on the suction cup.
-
Remove the suction cup from the screen.
-
-
crwdns2935267:0crwdne2935267:0Tweezers$4.99
-
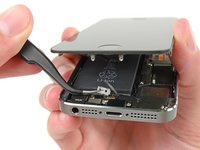
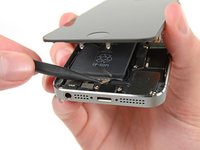
Open the phone just enough to reveal the metal bracket covering the home button cable.
-
Only the phone's original home button assembly will be capable of using the Touch ID functionality. If you rip the cable, installing a new home button will only restore ordinary home button functions, not the Touch ID features.
-
Use the tip of a spudger to push the bracket free and remove it with tweezers.
-
-
-
-
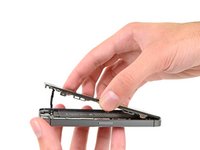
Use the tip of a spudger to pry the home button cable connector up out of its socket.
-
-
-
Once the connector has been released, pull the home button end of the assembly away from the rear case, using the top of the phone as a hinge.
-
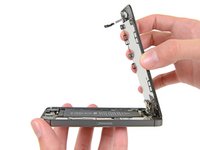
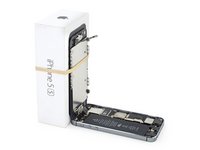
Open the display to about a 90º angle, and lean it against something to keep it propped up while you're working on the phone.
-
Add a rubber band to keep the display securely in place while you work. This prevents undue strain on the display cables.
-
-
-
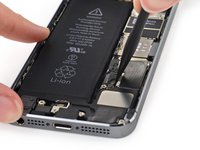
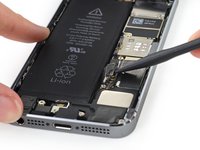
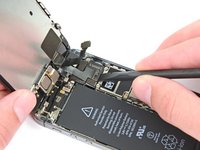
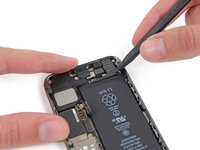
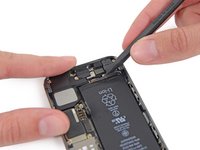
Remove the two 1.6 mm Phillips #000 screws securing the metal battery connector bracket to the logic board.
-
-
-
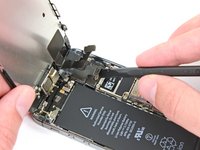
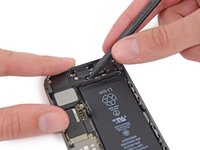
Remove the metal battery connector bracket from the iPhone.
-
-
-
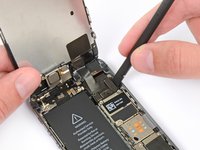
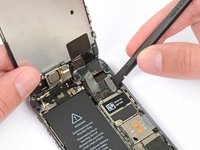
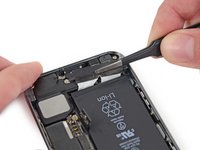
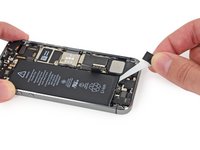
Use the flat end of a spudger to gently pry the battery connector up from its socket on the logic board.
-
-
-
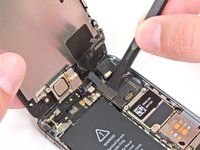
Remove the following screws securing the front panel assembly cable bracket to the logic board:
-
One 1.7 mm Phillips #000 screw
-
One 1.2 mm Phillips #000 screw
-
One 1.3 mm Phillips #000 screw
-
One more 1.7 mm Phillips #000 screw
-
-
-
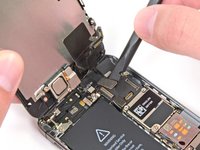
Remove the front panel assembly cable bracket from the logic board.
-
-
-
Use a spudger or a fingernail to disconnect the front-facing camera and sensor cable.
-
-
-
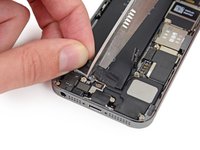
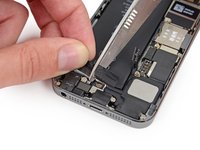
Finally, disconnect the digitizer cable connector.
-
-
-
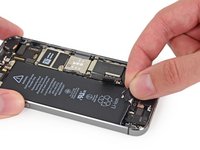
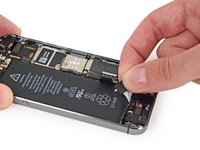
Remove the front panel assembly from the rear case.
-
-
-
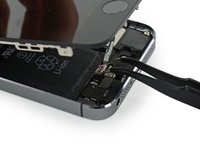
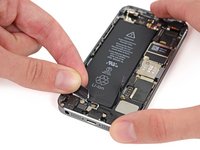
Run the tip of a spudger between the battery and the headphone jack to unfold the battery adhesive tab.
-
-
-
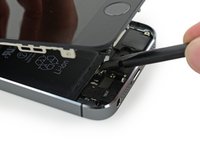
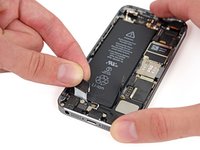
Pull the battery adhesive tab away from the phone.
-
Cut the black battery adhesive tab between the two white adhesive strips, separating them.
-
-
-
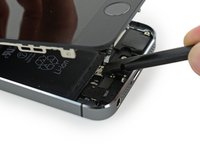
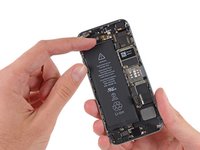
Slowly pull one of the battery adhesive strips away from the battery, toward the bottom of the iPhone. Pull the white portion of the strip when possible, the black tab may fall off.
-
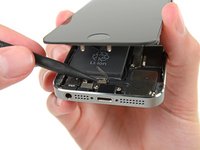
Pull steadily, maintaining constant tension on the strip as it slips out from between the battery and the rear case. For best results, pull the strip at a 60º angle or less.
-
Be careful not to snag it on any of the other internal iPhone components.
Watch how it is done in the video! I broke mine by continually "pulling straight up" and didn't realize you are suppose to follow the edge of the battery.
+1. This guide should clarify the "pull around the corner" part. Preferably with pictures.
Another vote for this! Watch the video to see how you pull the adhesive around the corners and sides of the battery!
I had watched the video and I tried to work the strip around the sides, but couldn't get it to go without worrying it would tear on something. I just pulled up at an angle, slowly and steadily, and they both came out fine, like the instructions say.
The tape tabs broke almost immediately upon pulling up just a little bit (less than in the video). My phone is over 2 years old, and maybe the plastic weakens over time. I used a hair dryer on the back of the phone to soften the adhesive and the green prying tool in the iFixit repair kit to pry up the edge of the battery along the side wall of the back case. It bent the battery, but it worked to (slowly) pry the battery out without damaging the phone.
Same here - my phone is over 2 years old and both adhesive strips broke when I tried to pull them out. This step looks so easy in the video, but it became the most difficult part of this repair. I ended up slowly working strips of plastic under the battery to release it. Someone mentions using a credit card, but I have no idea where you would insert that (without bending/destroying your card).
Anyway, I worked strips of plastic under the battery and used the pry tool and spudger to lift the battery as I did this. The battery bends/deforms while you do this. I was worried that the battery would internally short and heat up, but it didn’t….. just don’t go crazy bending it, and be careful where you pry (so you don’t damage the electronics/switches).
Someone also mentioned using a warm face towel - looking back I wonder if this would have helped, since you could rest the phone on the warm towel while you do this (and keep that adhesive warm the entire time). I
I didn't have any sticky tape to hold the new battery in place, so I only removed the outside adhesive tab and left the inner one. This way I would 'lever' the battery out and the innermost tape-strip stayed in place, which was helpful to see the new battery in place. carefull though, you have to lever the battery out very slowly, very very slowly ... but it does work.
yeah this wrong. the video has it right. just toasted both of my strips, thanks!
there is no way these strips can be stretched (3y o phone) snapped immediately, plus 1st tore on non existent cover imediately
I put on the radiator then used dental floss to start and then two iFixit cards together to pry from home button and outside edges. Didn't notice but I bent the little home button connector guard (not the cover - I didn't have one) but it seemed to make no difference, just bent it back.
I also broke the sticky strips almost immediately so had to prise battery out. it bent a little but came out leaving the strips behind. this has the advantage of having the strips remaining to fix the new battery.
Same problem with strips breaking on a 2 yo phone. Might be a good idea to apply the heat BEFORE trying to pull on the ends.
Mine also broke immediately. Someone else suggested that they be heated before attempting to pull out. That seems like good advice; I think the adhesive hardens with age.
They broke dec 2017
I have done an iPhone 5s and iPhone 6 battery. I can tell you that the adhesive strips sometimes break but when they are going to come out it is best done just by pulling straight out from the bottom. It is better to keep the adhesive strip straight so it does not crimp and the adhesive pulls off equally along the strip. I would not try the pulling from the sides as shown in the video. 3 out of 4 of the strips came out very nicely that way. Also keep re-grabbing the adhesive as close to the battery as you can get it. And go slow. The whole repair is a ton easier if you can pull the strips out without them tearing.
I saw it mentioned somewhere, but be very careful of wedging the credit card at the top side of the battery. There is a flat cable for the volume buttons that I almost scraped off and almost damaged. I would have liked to see a picture of what it looked like without the battery to see that.
Completely wrong.
Perfect - 1st timer here. I got a small face towel, moistened it, wrapped it in cling film, microwaved it until very hot, and rested the phone on it. After about 3 minuted both strips came out very nicely.
My tabs broke too. Like others said, these steps are misleading. You do not pull back as shown. I had to bend the old battery out which sucks.
I had to bend the old battery out which sucks.
MEH! It was OK. I pried it out. It got bent up. I’m not using it again. No biggie.
xtian -
I pulled straight out for both and both broke off right away. I applied heat by way of an athletic hot/cold pack heated in the microwave, and then pried and chiseled the battery out from the case side with an old credit card. I watched the video after I was done - of course. Heating beforehand and pulling the strips around the sides is most likely the best way to go.
Changing 2 batteries back to back, the tabs broke on me the first time. the second time I:
- did not separate the tabs in the previous step
- laid them on the spudger with the spudger across the body of the phone
-rotated the spudger like a spool, keeping the adhesive feeding more or less straight up.
it worked pretty well. one side came completely off and battery removal was easy.
Second this advice! Just used this method and it worked flawlessly. Note: do this in the middle of the spudger, not the tapered end, otherwise the reel will slowly migrate off the tool and then the winding will not longer work. Apply low heat from a hair dryer to the aluminum back first as well. Had been putting off a battery replacement because I hated this step so much, but no longer!
I used this method too, and it worked very well... I did one at a time wound round a pencil laid across the phone and rotated the pencil very slowly... I used a covered hot water bottle for heat and laid the phone on it the whole time while removing the battery... Found this method very easy and had no problems at all and my phone is eight years old, with its original battery...!
this was the hardest part for me. like others, strips broke immediately. i recommend buying a second set of adhesive strips with your kit as i had issues with those as well.
For that it strips need? When I put a new battery inside, do I need the same strips?
My strips broke (of course). I ended up heating a wet washcloth in the microwave and putting it in a sealed sandwich bag. I put the bag on the table and the phone on the bag. I had to pry the bottom end of the old battery to get to the broken strips. It bent some but that allowed me to stick the tweezers underneath to grab hold of a strip to pull. It came out some and broke again so I pried a little more on the battery to get to the strips with the tweezers. Eventually I got all of the strips and was able to remove the battery.
I had the same problem where I ended up stretching it too much. What I did to counter this was just pry the battery open and rip some of the adhesive off then proceeded to pull the thing right off when there wasn’t too much left of the adhesive.
First, I used a wheat bag for my heat source to soften the adhesive (cloth bag filled with wheat grains, which you heat in a microwave, usually to apply to an arthritic joint for pain relief). Retains the heat for a good time and provides a base on which to work (a bit like using a hot water bottle, but without the water and a lot more stable !)
Second, my adhesive strips broke before I got anywhere close to the battery corner ! So I used dental floss. Starting at one corner of the battery, using a sawing motion to reach the other (nearest) corner, then came down the length of the battery. The floss broke about a dozen times, but after about 15-20 minutes it had cut the battery clean away from the adhesive.
I’ve done work on my laptop and one of my favorite tools is a wooden tongue depressor. They’re strong. You can shape them. They’re obviously non-conductive. And, I don’t jack up my Credit Card in the process. HAHA.
My phone is 2-3 years old. I used a hot water bottle (water heated to 140F) and let the phone heat up for approx ~60s. The strips didn’t even get around the corner before they broke. Maybe I should have heated the water to 200F? Maybe I should have heated the phone for 2 minutes?
Scrapping up the goo later, it was really stuck down. I continued to use the hot water bottle, and at no point did it seem to become ‘less sticky’. Eventually I was able to scrape up enough to get a grip. The rest pulled up just like the pictures. Maybe the goo was just not pliable after years of heating and cooling?
I watched the video and tried pulling from the side, no dice. Both strips broke and were irretrievable. After trying dental floss and heat, I pulled the small e string off my electric guitar and wound each end around a pencil. This was so the string didn’t dig into my hand while I used it to slowly “saw” the adhesive off from underneath. Alternately heating and sawing from one end and then the other (make sure the string doesn’t snag on anything while doing this, and also make sure the string doesn’t twist into a loop), I was able to cut through the adhesive and remove the old battery. It was quite a chore, but this was the only thing that worked for me. The adhesive strips were laughing at my puny attempts with plastic cards.
I also ripped off the tag ends, but managed to grab the remaining ~1mm ends of the adhesive strip with a pair of tweezers and twisted to re-establish a secure fixing point and drag both strips out
I succeded in removing one strip but the other broke of, i went on with a credit card as suggested to unstick the other half of the batttery and it kindof worked, but then i used a plastig knife to lossen the remaining adhesive strip underneath the battery and accidentally cut throught the metal shielding of the battery, then i smelled a strange sweet smell coming out of the battery. Immediately put the battery in the backyard, maybe its gonna explode….
the fishing line trick worked extremely well. Very effective. Take your time, pulling it back and forth first from one side of the line then the other. It cut through the adhesive really in no time.
hello i am replacing my iphone 5s battery but i am stucked because the adhesive broke whiles pulling it out
before i started i made sure my battery was 0% but i am afraid that when i mistakenly puncture it with the spudger it might catch fire
please is the battery capable of catching fire when it has no power (0%)?
please can someone give me the honest answers before i continue
thank you
Yes it can catch fire even at 0 %. I had 2 batteries burn totaling the iPhone.
chumblyf -
It felt like the strips pulled out completely, in fact, there was a full layer underneath. When we levered the battery out later, we used a hairdryer from underneath, and during the “heating” (gentle! only lowest setting!) you could lever the battery with a metal piece (I was very careful not to hurt the battery. So we got the battery out with some force appied and slowest movement away from the very sticky wihte stripes… I think, even if you do all according to the manual, be prepared for a hairdryer use from underneath.
Watching the video is helpful for this step. I also put the phone on a heating pad for a couple of minutes to soften the adhesive.
The idea of pulling the adhesive around the battery to each side seemed like a good one, but I think it doesn’t really work if your phone is older than a year. I had a 3-4 year old phone. The adhesive broke near the end on one side and right near the black tab on the other side. I tried the plastic pry tool, but it was threatening to snap, so in the end I got a butter knife and pried the battery out with that. Didn’t think to try and soften the adhesive, but with all the warnings about battery exploding I wouldn’t have tried it anyway I don’t think. The butter knife worked well anyway. The battery ended up a bit deformed, but I never plan to use that battery again anyway. It was defunct, that’s why I was replacing it.
Here’s a method without all that yanking and pulling. You just need a thin screwdriver to wind the adhesive strip onto.
1. First, expose the adhesive strip tabs as shown in Step 24. Cut where they are joined. You will then deal with each strip separately.
2. Expose the the white sticky stuff of the adhesive strip. Don’t pull on anything in case it breaks. You just want to expose the white stuff.
3. I used a thin “jewellers” screw driver. It’s only 1.5mm wide. Get the white adhesive strip onto the tip. The screwdriver shaft will rest on the metal edge of the phone. Protect the edge with some sticky tape. Might need 2 or 3 layers.
4. Simply rotate the screwdriver as if unscrewing. You will wind the strip onto the screwdriver.
5. Continue winding (unscrewing). Do not attempt to pull at the strips - they’ll break. Keep the tip of the screwdriver as close as you can to the battery. Don’t let the strip snag on anything else.
Here’s a pic to explain what’s going on:
I used the spudger to roll the strips, but a pencil will do also. For these you don’t need to protect the metal case edges. And: put the stick like a brigde across both edges, then you dont have to worry to damage something inside.
Trogisch -
Used this technique in conjunction with base of phone lying on a (microwaveable) hot water bottle and both strips came out. Phone is over 4 years old. Thanks for the top tips.
dylanhuw -
If your phone is any older than a year or two, definitely try gently heating the adhesive through the back of the phone case before you try pulling the adhesive. Otherwise, it is almost sure to break!
I started to pull on the strips and immediately noticed they had holes in them, and they quickly broke. I had to do what a few others here said - I used the opening tool as a lever to pry the battery out. Yes, the battery ended up getting bent out of shape, but I got it out. I only worried about puncturing the battery, thankfully that didn’t happen.
Why is it even necessary to put these adhesive strips down? I’ve never seen any other product with a battery require that you tape/glue the battery in place.
Just want to add, easiest thing for me was to heat up one of those gel bead massage therapy pads, stick the phone on top and use a card to pry while its still on the pad…. the constant heat melted it off quite easily!
My strips broke after a few centimeters. So I warmed up the back with the heat pad, then threaded a strong sewing thread behind the batteryattached each ends of the thread to improvised handles (lego bits) and tried to pull the thread under the battery. Did not work. Then got my wife to hold the phone case while I was making a sawing motion with the thread, pulling on handle at the time. That worked super smoothly and the battery was off in a few seconds!
In common with everyone else, the tabs broke off immediately (brittle with age). I rested the phone on a hot water bottle (no microwave here) for a few minutes. Managed to get some fishing line under the battery at the charger / home button end and then gradually (had to keep reheating it) managed the pull the line backwards and forwards, slowly working my way down the battery. And out it popped. Remaining glue came off with a bit of scraping with my finger nail. Probably took about 15 mins to sort this stage out.
The adhesive strips broke right away. I read through these comments & tried dental floss & heavy thread, several times for about an hour, breaking it every time. I heated up a cloth bag of rice, that I use for my knee, in the microwave for three minutes, wrapped it with a kitchen towel & then plastic wrap. I put the phone down on it & began trying the dental floss again. It still kept snapping but I could tell the adhesive strips were moving. I dug into my sewing box again & found a piece of satin ribbon. I wish I had thought of that first, but it worked like a charm! Hope this helps someone else.
None of those methods worked for me and I didn't want the apply any liquid in the phone like alcohol. I was so annoyed as the video is very deceptive. I bet you over 95% of those sticky adhesives will break. In the end, and after 1 hour after carefully trying razor blades, wire, monofilament, heat, and a sharpened spatula. I wrapped the battery in electrical tape at the top and used my pliers and just ripped it out in about 10 seconds. I had pried the battery up about 1 inch to grip it with the pliers. I inserted the new battery, snapped in the connectors and all works fine. I have been repairing apple devices for years and I know what to avoid and when to go slow, so there was nothing that would have been damaged when I went at it with the pliers. I of course did not want to puncture the battery and I didn't. But be careful as it is very 'alive". I just touched one tiny exposed corner of it with the shaft of a screwdriver and sparks flew. The battery was totally flat (no energy) when I did this repair.
Was bei mir mit einem inzwischen richtig alten iPhone SE tadellos funktioniert hat: Mit einer Pinzette aufwickeln. Man greift einen der durchtrennten Strips im rechten Winkel mit einer Pinzette und dreht diese schön langsam, so dass man immer nur einen Fingerbreit des Streifens rausschauen hat. Dann reißt es erstens nicht im unnötig gedehnten rausschauenden Teil, zweitens ist es fast automatisch schön langsam, denn das ist das eigentliche Geheimnis: Adhäsive Klebebänder kann man nur langsam lösen, wie bei diesen fädenziehenden Etiketten, ganz langsam, das braucht Zeit statt Kraft. Und auch nicht um die Ecke, am Rand entlang, sonst wird automatisch eine Seite stärker gespannt, und dort reißt es dann. Schön gerade und langsam, das braucht halt zwei Minuten, aber besser als mit Erhitzen, Lösemittel usw.
Replacing the ifixit battery i installed a couple years ago and it is VASTLY more difficult than removal of adhesive on the original battery. Wish they had improved that aspect specifically.
I ended up using floss and the spudger tool to get the floss under the top corners of the batterieis and worked the floss down. I soaked some floss in rubbing alcohol and kept working. When some space was created behind the battery from the top i dripped some rubbing alcohol down into the space and kepts working with the floss. when there was enough space I used and old credit card to dosome wedging and finished with the floss. Was happy i didn;t have to heat the phone.
-
-
-
Repeat for the second strip.
-
If you removed both strips successfully, skip the next step.
-
Wait about one minute for the alcohol solution to weaken the adhesive. Use the flat end of a spudger to gently lift the battery.
-
-
-
Thread the floss or string behind the upper battery corners, bring the ends together, wrap them around a folded cloth, and pull evenly.
-
-
-
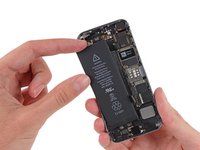
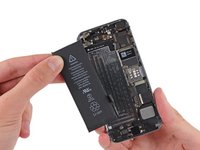
Pull the battery out of the rear case.
-
Adhere the battery, disconnect it, and continue reassembling your device.
-


To reassemble your device, follow the above steps in reverse order.
Take your e-waste to an R2 or e-Stewards certified recycler.
Repair didn’t go as planned? Check out our Answers community for troubleshooting help.
To reassemble your device, follow the above steps in reverse order.
Take your e-waste to an R2 or e-Stewards certified recycler.
Repair didn’t go as planned? Check out our Answers community for troubleshooting help.
crwdns2935221:0crwdne2935221:0
crwdns2935229:0849crwdne2935229:0


crwdns2947412:0142crwdne2947412:0
Trank you vor the tutorial. Everything went good until the re-assembling. I can’t connect the battery to the battery connector anymore. Is it possible that i broke it? It was very easy to disconnect…
Ok I found it out. I tried to to connect the old battery and it fit it with the first try. I compared both and in the new battery some small plastic parts were missing
Hi Nico! It sounds like you may have gotten the wrong battery? The SE has a battery different from both the iPhone 5s and the iPhone 5.
Hi, do you have to remove the screen?
Yes, you do have to remove the screen.
This is a step I disagree with ifixit.com, on. I don’t think removing the screen, nor the cables leading to the screen from the logic board, need to be removed. I followed these directions when I did my first battery swap and regretted removing the screen and the cable connection under the steel shield at the top right. In the process I’ve messed up some of the cable connectors — they’re pretty fragile. Basically now, presumably due to having reconnected them too many times, no longer snap on to the connectors on the logic board.
So no, one does not, nor would I recommend removing the screen, nor the cables connections that lead from the screen to connections on the logic board under the steel plate/shield at the top right corner of the 5S.
AFAICT, the battery can be disconnected from the logic board and extracted from the chassis, without removing the screen and cable connections under that steel shield on the top right corner of the phone.
Rorx -
There is no valid reason to go through the digitizer removal process. It does not in any way encumber battery extraction and replacement, and it just introduces the possibility of tedious complications, not to mention the wasting of ones time. Disregard ifixit on this one.
I see no reason why you have to; just leave it connected and held by a soda can or something. It's just easier if it's out of the way, especially if the battery doesn't come free easily.
Calion -
Successfully reassembled iPhone. Appreciate the tools and the instructions. Please note in the installation of the battery itself to leave a bit of room at the front end to fold over the black adhesive tab. The photo makes it look like the battery abuts the components and black tab. It should not. Leave a gap. I found that the rubber band holding the touch screen vertically mounted to a box to be essential - recommend you do this.
Some suggestions to the iFixit Team regarding instructions. I request that the orientation of the phone is the same in all photos. A bit confusing when the orientation changes from step to step. If necessary at least let the user know when it has changed. It’s stressful enough taking apart the phone to suddenly see a different view (and yes I read the instructions several times before hand). Also ask that you consider putting in steps to reassemble. Reassembling is not the same as reversing assembly. That way steps 10 and 11 could be their own section and not break the flow.
Thanks.
Yes, if using a suction cup (or two) zip tie the phone so it will open only a quarter of an inch at first. Once the screen is free, remove the tie and then you can remove the connector.
Okay after replacing the battery I put the phone Back together and the screen will not turn on the phone is on because it could still get calls and has Bluetooth but the screen will not work even after replacing the projector Is anything I can do or is it done
Well written and very useful instructions. Clearly, small hands and good eyes are very helpful in performing this surgery. I was surprised to discover, after completing the new battery installation, that my iPhone SE powered up with all of its memory intact. I was expecting it to require a re-install and had performed a backup of everything in memory immediately before beginning the battery replacement procedure.
I have replaced the battery and since then I hear only a noise on the headphones. The normal speakers work as usual. Does anyone know the problem or has a solution?
Replaced battery successfully and easily. I didn’t have my iOpener bag handy when I did it, but I set it on the top of a radiator heater for a couple minutes removed the adhesive without issue. I also skipped the screen removal steps.
非常感谢作者的分享,我很有收获~
Are the two pink strips in the replacement battery package replacement adhesive strips?
Hi @rozgnatt, they sure are! Follow the adhesive strip replacement guide to see photos and get instructions!
I found that I could easily skip steps 17-22 (removal of screen), which saved quite a bit of time in the whole process! The battery, hence the phone, is performing excellently, with no problems!
**But I should note that the old battery was able to be removed by stretching the old adhesive strips without them breaking, so heat was not needed. I don’t think it would have been possible to keep the screen connected if a heat gun or hair dryer had been required to break the adhesion of the battery to the back case. Steps 17-22 would have been required in that instance. Thanks!!
I plan on following this guide to replace my battery. I also need to remove dust from my front and rear facing camera. Do you think it is possible to use compressed air or a handheld rubber air blower to get rid of the dust around the camera during the process of battery replacement? Otherwise I think I will have to perform some extra steps to open up the rear and front facing cameras.
Hi and thanks for this great how-to! I had it on-screen yesterday when I successfully replaced my iphone SE battery. It took about 3 hours ;~} I went very slowly and used magnifying glasses. I had a kit, which is necessary as some of these tools aren’t common. The biggest, lengthiest problem was removing the old battery. I didn’t heat the back of the phone and just tried to pull the adhesive strips out. They both broke, so I was in a pickle. I used a hairdryer and a very thin flexible metal strip to finally get it out, a bit the worse for wear! A tip: I used a piece of tape with ends fastened to my anti-static bag work surface. As I took each tiny screw out, it was put on the tape in the exact configuration it was in the phone and the how-to pix. I kept the phone oriented as the photos too, so reassembly went smoothly. But I’d lost the adhesive strips that came with the new battery, so I used double-sided tape behind the new battery. I hope to never deal with that iphone adhesive again!
Ditto that you might want to skip Steps 17-22 (screen removal). It IS safer to follow those steps (if you accidentally bump the screen too hard, you could rip the cables), but it is not necessary. I followed these steps, but when I reassembled everything, the screen had lines, the touch screen didn’t work at all, and it wouldn't stay powered off(!) after forcing a power-down. I had to disassemble the phone AGAIN, with the power still running, and (after disconnecting the battery to shut it off), re-seat the three screen cables. One or two of them had probably come loose. Thank God it all worked after that. I don’t think I would mess with those steps if I did it again.
Also, a tip for heating the glue: if your battery is getting hot during use (like mine was), just run the phone for a bit before doing this replacement. :) It’s good to drain the battery first, anyway.
Thanks, iFixit, for the awesome kit!
I did exactly ass the video and guide said no problem and when i go to start the phone my screen is all messed up and half on it has black stripes and the other half is either black or white, what happened
Cheap product. Battery does not work. Will work with add on Mophie battery, not with the one I replaced, so it’s not the phone. Needed to fix for a long trip, now I need to buy new phone. Will note in every review I can find.
Ty for good tutorial , but my iphone keep rebooting after 1 min internet browsing , or phone call , even youtube cant run more than 2 min. After rebooting battery is on 1% and rises slowly to 10 . I reconnect battery and problem disappear for 2 days and now again . why is that. oh i forgot to tell u that i swap display , housing , and battery in same time
Thank you. The feeling of accomplishment is great. I can’t echo enough to watch the video and read through other people’s comments along the way to help you.
I replaced the battery on my own iPhone SE at first, and everything worked when I had reassembled it. But then I thought doing the same thing on my wife’s iPhone SE would go as smoothly as on mine, but boy, were I wrong. Taking it apart and replacing the battery was no problem, and reassambling it wasn’t either. But when I thought I had finished and tried to start it, nothing happened. It’s completely dead. The battery won’t charge either. So, what to do? I’ve tried reassembling it twice or thrice now too. Did I brick the Phone?
Try charging the new battery for 30 minutes before you give up on it. If it’s still dead, try the old battery again (assuming it still worked when you removed it). If it’s still unresponsive after that, it’s likely something besides the battery was damaged. Good luck!
Thanks for the instructions. One thing that tripped me up when reinstalling the battery is that I placed it too close to the bottom of the phone, which didn’t leave room to fold over the tab on the glue strips and actually bent some of the metal that holds the touch ID cable retaining clip. I ended up cutting off the excess battery tab and using a spudger to pry the metal back to a position where it left room for the retaining clip. It might be nice to note in the reinstallation section that one should leave a little room towards the bottom of the phone.
The battery removal was a beast, as the stretchy bit didn’t go as planned. Had to combine card and floss with a touch of alcohol and heat to get through it. I also didn’t reinstall adhesive. Just in case I need to replace again next year.
Such a pain in the a** but a very satisfying process once done. Thank you iFixit!
I was successful in leaving the display assembly attached and simply used a rubber band to hold it in a vertical position against a stiff box. The steps starting with #17 and their reverse steps can be omitted.
For me, removing the battery was a battle because I couldn’t get a grip on the adhesive bar at the end of the battery. I just used some “gentle” persuasion and a little heat to make the battery give up. Once it was lifted a bit I could get the adhesive strips to stretch in the classic wa. The battery was worse for the wear.
I didn’t know what orientation the clip for the home button should be so I just clipped it into place.
You do need good light and, if possible, a head-mounted magnifier.
Be careful when plugging the new battery in. Be sure it is properly aligned and seats with a satisfying click.
The worse step was pulling the front glass off. It takes time and eventually gives up. Just keep pulling. I had to clean the glass and suction cup with denatured alcohol to achieve a good seal.
I followed all the instructions as detailed. Thank you. The problem now is even after a hard reset the phone shows it is charging but only sits at 3% no matter how long it is left on charge. Also it occasionally shows a lined black with red strips and reboots? Any thoughts? I’ve taken it appear again and check all connections which are okay.
Oh, I've got the same problem. Did you fix your iphone? Have any suggestions?
Thanks for the great tutorial! I had success without completely removing the screen. I used rubbing alcohol while pulling the adhesive strips. Took a good 10 minutes of pulling and stopping every once in a while to add a bit more alcohol, but the strips came out whole. Reminder: make sure the alcohol evaporates before powering on the device (it is not conductive, but it might mix with the adhesive and become conductive).
Thank you, thank you, thank you. Successfully replaced battery in wife’s iPhone SE. It is now charging and all appears OK . I will “recalibrate”, though. This phone has been abused a bit over the years which I experienced during disassembly. [The battery actually had a few bubbles on each side!] And the black tabs on adhesive strips broke off, so had to use gentle heat + isopropyl alcohol (applied with an insulin syringe and needle, which I would highly recommend!) to sufficiently loosen battery for removal. Only two critiques on the very clear instructions: 1) instruction to read through ALL steps AND comments before beginning (something we were taught long ago in school but so easily forget) and 2) note at the beginning that reversal of disassembly process will serve as assembly instructions, so pay attention to good pointers in the comments. Again, Thank you!
Super Anleitung, hat alles geklappt. Die grösste Schwierigkeit war das Entfernen des Displays mit einem normalen Saugnapf, das Display sitzt wirklich sehr fest. Ein weiterer Punkt: Damit der Akkustecker wieder sauber angeschlossen werden kann, muss vor dem Einbau des neuen Akkus das Flachbandkabel analog dem alten Akku vorsichtig zurechtgebogen werden. Wenn der neue Akku bereits eingeklebt wurde, wird es sehr schwierig. Am besten legt man vor dem Einkleben den Akku ins Gerät und testet ob die Position des Akkusteckers passt. Betreffend Zeitaufwand, ich hatte mit den Schwierigkeiten am Anfang etwas länger gebraucht, nach 1h20min war mein iPhone SE wieder Betriebsbereit.
Besten Dank für die Anleitung
Right after battery change, the screen backlight (white iPhone SE, 64 GB) started to flicker. I was worried I damaged the screen cable. Luckily, after charging a few percentage points, the flickering vanished. I did not remove the screen and used the rubber band trick (step 13).
Brilliant guide, super clear pictures were great so I could zoom right in - Many thank!
I was surprised - it was actually quite straightforward! I used the iClick tool and it worked like a dream. The trickiest bit was the reassembly, particularly connecting the home button cable, it was very fiddly.
The main comment I would make about the guide is that it combines instructions for removing the screen and the battery. I found that I didn’t need to disconnect the cables connecting the screen.
I would really recommend reading the comments - I learned a lot from their experiences.
After doing 3 iPhone batteries with adhesive it’s not too difficult. Couple things I’ve learned is…
Pull the adhesive straight out. Not sure why they show pulling the adhesive around the edges of the phone in their video, but I followed that on my first iPhone battery replacement and the adhesive broke off on both sides and I had to pry the battery out. Avoid doing that if possible because it is NO fun! I did cut the adhesive in the middle as shown, but then I was much more successful on the next two phones by pulling the adhesive straight out avoiding it getting caught on nearby objects, avoid tangling and going slowly.
Also, do a couple dry runs with the new battery before attempting to do the final one with adhesive. The little battery clip doesn’t really line up perfect. I attach the battery clip before placing the battery in the phone. Also, watch placement. You will want the battery as close to the top of the phone as possible and not smashed up against the outer edge. Dry runs a very helpful.
Instructions were perfect. The kit is the way to go. Working with the tiniest screws on the planet requires patience. I lost one in the process of reattaching the plate at the top end. Fortunately it didn’t stop the completion as there were three screws that secured that part. You can’t find one when it flips into oblivion. The SE was returned to oneness and works as expected.
I did it! Thanks for the tutorial and the video, and the tools and the great price on the kit/battery. Take your time, go slow, and it’s not that difficult.
STEP 7 - Strongly recommend using a retaining device (tape, band, etc) to prevent cable damage during opening. Despite using care, the sudden release of the clips caused me to over open (approx 2”), which was enough to rip out the home button cable connection to the upper display assembly. Basically, lazy engineering on behalf of Apple not to run the home button cable alongside the display cables like they did in iPhone 5c/6.
I’ve just replaced the battery as per your instructions. The first time I reassembled it nothing worked and had a striped screen. I opened it again and checked all the connections so now it is working except: 1. The touch button 2. The power off button soesn’t seem to do anything.
What could I have done wrong ?
Barry Latchford
Following my last comment I’m pleased to say that I have managed to get the touch button working. However the power off/on button still doesn’t work.
Barry Latchford
At the risk of being boring please ignore my previous two emails and I hope you could possibly answer this.
I have followed your instructions and replaced the my old SE battery with the one you provided and it is working perfectly .
However the power off/on switch compresses but doesn’t work, the side volume control buttons compress but do nothing, and the torch light can’t be turned on.
I have tried resetting everything which was a pain and didn’t solve anything, so I can only imagine it must be something not quite right in the hardware (connections?). Could you possibly give me an indiction of what it might be please?
Barry Latchford
Hello Barry,
did you found a solution ?
I have exactly the same problem, my power button and the volume one’s are not functioning…
Thanks for your answer.
Plalo -
Barry, I’m where you were last year. Power, side volume, mute/sound and torch light inoperative after battery replacement. What did you do to get the light back? Any luck on the other items??
pat -
Hello, I have just replaced my battery and it only seems to charge up to 29% now. Does anyone know a way to troubleshoot that?
-Luke
The bracket under the home button (first thing to come off) is shown the wrong way. I was trying to fit it back on the way shown in the video for ages, before I googled another video where it is shown rotated the right way.
Worked perfect! ifixit is amazing, I can’t believe I just learned about you guys. Will definitely be coming back to you whenever possible.
Reassembled and it powered up but the touch screen isn’t working so I can’t get into the phone. There’s an odd checkerboard pattern on the screen as well now. WTF have I messed up?
Thank you for your tutorial and the great replacement equipment!
The repair process takes some patience. The toughest part was to pull out the adhesive stripes from under the old battery, because they rip easily, so I used a hairdryer to heat the back cover for a short time.
Once I reassembled everything back together, the phone did not boot up, so i reopened it and checked every connector again. Then it finally booted.
The Phone (ios 13.4.1) is now remarkably faster and has noticeably more power at the end of the day.
Tricky! I’m fairly tech savvy but I just ruined my phone attempting this. The second battery adhesive strip tore, I didn’t heat it properly and ruined one of the very delicate connectors trying to prise the battery out. Ooops. Do not attempt this lightly!
Assembly worked fine - but charging it doesn’t work properly. At the beginning, it would only charge to about 40% despite leaving it plugged in over night, then deplete to 1 % and stay there for a quite while. I tried the whole calibration thing (charging to 100%, then completely draining it to 0%, leaving it off over night and charging again) and could gradually get the max charge up to 90 %… but now it seems that the phone is confused or sth. it randomly shuts off at 50%, then, when I turn it back on, it only shows 10% and quickly shuts off again. Then, as soon as it is plugged in again it’s at 50% again. The same thing happens over and over. It’s quite aggravating and I’m at a loss what to do here. Will completely resetting it help at all?
Excellent guide. Just replaced my battery and everything is working fine. Removing the old battery adhesive was definitely the crux. One suggestion I have for modifying this guide is to include the reassembly steps. The disassembly instructions are great and include warnings about potential pitfalls. Those pitfalls exist for the reassembly as well. One that I encountered was misalignment of the new battery. I placed it too far to the right and then there wasn’t room for the width of the rigid portion of the ribbon connector. I was able to connect it, but it pooched out higher than the rest of the components. I thought for sure it would make putting the glass back on impossible, but luckily it fit. It creates a small intermittent dark area on the screen, but the glass appears level and seated all around. Thanks so much!
I have a question, after this battery replacement does the phone get that message about genuine batteries like the Xs and up? Thanks
I replaced a swollen battery using the ifixit kit. The retrofitted SE did not show any adhesive strips, so i heated the backside using a hairdryer on low - then using dental floss to split battery and adhesive strip. I DID NOT remove the screen for the replacement, but kept everything fixed with a rubberband to a small box. Worked fine, sweated a lot - battery is (dimensions) a bit smaller (than the swollen one) but works fine as expected.
What to do if the screen is still popping out after you have replaced the battery?
So, this wasn’t the hardest thing ever, but it wasn’t easy either… end of they day this 42yr old sorta tech savvy guy got er done! Thanks iFixit!
Die Anleituung ist prima und lies sich gut umsetzen. Da mir beide Klebestreifen gerissen sind habe ich dann aber doch deutlich längen gebraucht.
Warum sind die Kommentare in der deutschen Anleitung eigendlich fast alle englisch?
Weil dieses Tutorial ein amerikanisches Angebot ist, das netterweise z.T. auf deutsch übersetzt wird. ;)
The battery replacement on my girlfriend’s iPhone SE was quite easy but the bummer followed right away: the phone wouldn’t boot anymore. It got stuck on the apple logo. Hard resets didn’t help either. I had to do a DFU restore (Device Firmware Update) to get the device back to life. This procedure will remove EVERYTHING from your device. The nessecity of a proper backup before replacing a battery can’t be stressed enough! Luckily, I had done one right before I started working on the device.
Thank You for a great kit and these written instructions which I found more useful than the many video instructions I watched. Please add to the instructions that the phone iPhone SE 1st generation after battery exchange may not fully function until at least 2 hours into the initial charge. When testing my phone after a successful exchange I could make calls and text messages. But time, calendar, compass, Wi-Fi, Cellular internet, and new photo save, all malfunctioned causing me to unnecessarily take the phone apart a 2nd time to recheck all connections, which were good.
After 2 hours of charging the phone rebooted itself and began functioning perfectly.
I hope this post saves someone else the frustration and stress of not knowing that this is a normal process.
Thank You: Allan
Nice, it just takes $95 to spend here and then your own labor to change it. You can get the same thing done for perhaps half the price done by a professional. It’s safer, quicker and less wasteful for the planet (think of the tools you probably won't use again).
I cant believe it, but I did it. The iSclack was a must, though
I have a puffy battery would it be safe to do this by myself? I' have experience and have done battery replacements before but never with a puffy one, or should I just get a new phone instead?
Any hint for replacing the clip above the home button cable plug? Normally I am good in such work, but tried that for more than 30 minutes, without being able to put this cap firmly into position. Thanks.
Broke the home button on the first SE using a single suction cup and tweezer to pry up the screen. Sort of pulled it up too much and likely damaged where the home button plugs in on the board. The rubber pull adhesive broke 8 ways to Sunday trying to get the old battery out. Bought another home button but it wouldn’t work. Ended up simply assigning a floating screen button as the home key via the assistive tech. Then we bought the iSclack. The second SE went muuuuuch better. Pulled up the screen (although put the suction cup over the home button and it finally came up). Put it together but the screen had lines. Should have started it up before putting screen back on. Pulled it apart and fiddled with the screen plug. It works! Coconut battery gives it 104%, as opposed to 88%. The phone has been having issues, might be a combo of 3+ yr old 490 cycles on battery or ios 14.3.
Followed this guide and everything went perfectly! Despite this being labeled as a “Moderate” difficulty, I found this to be a very easy fix! The only “hard” part I came across was removing the old battery with the adhesives, they broke right away and I had to dig for them. All and all though this was a very easy fix and I can’t be happier!
PS: I bought the ISclack and used that to save myself from a ton of anxiety and panic if something went wrong
if you see red and white squares on the screen or if your iPhone SE doesn’t turn on after you palced the new battery on your iPhone, is possible that the problem are the uncorrect connection of some flex cables. If you need, you can test the connections with this procedure: remove the flex cable of the battery, remove and reconnect all the flex cables (you listen 2 or 3 “click” when you connect correctly the flex cables), connect the apple lightning recharge cable with the battery flex cable removed and turn on the iPhone: if you see the Apple Logo, all is connected correctly and you can remove the lightning USB cable. Continue reassembling your iPhone to finish
Excellent guide. iPhone SE worked first time after reassembly. Many Thanks.
Great guide! Battery adhesive removal was a bit hairy, I used the floss trick to get it out. If you need a heat pad and don’t have one: zip lock bag + towel + hot water works in a pinch.
I think the screen removal is unnecessary. That’s because you can just have an old iPhone case standing next to it and with a rubber band attach to it. What I however found difficult was removing the adhesive strips. Both broke off, but luckily I had isopropyl. I improvised with a cutout straw to pour the alcohol in the hard to reach places. Left it for 5 minutes then with a dental floss slowly, but steadily kept removing the adhesive. Until the battery was loose enough to pry up from the phone (CAREFUL: Do NOT puncture the battery. Take time doing this). Lastly, reassembling it was a piece of cake.
Yeah, be REALLY careful pulling the screen off. Mine was super tight, couldn’t even get a crack big enough to put a spudger in, then it got a bit looser to where it would wiggle but still didn’t seem like it would let go. Then it went all at once and ripped the screen attachment plug right out, bending the tiny delicate piece of metal that holds that plug to the phone. Naturally it can’t be bent back, just broke off. The !&&* with this.
I successfully carried out this repair on my iPhone and it now works beautifully.
I then tried to do the same on my wife’s phone, but it opened too quickly/easily and I broke the home button cable. Having now replaced the home button and battery and reassembled the phone the screen is blank.
Might I have damaged the screen ribbon cables when opening the phone (nothing looks damaged) or is it more likely I’ve damaged something else and replacing the screen would just be throwing more money away?
Thanks
Thank you, the guide works like a charm! ♥
The hardest parts were to remove the battery with a broken adhesive and to reattach the Touch ID cable bracket, huh, exhausting.
The tutorial was great. Although I did have some trouble reconnecting the Touch ID cable bracket. It was very finicky, but my grandpa got it eventually.
That worked awesome. Thank you very much for putting this up. Having a happy teenager here now : )
For reassembly, I had trouble getting the battery connector re-seated, because it had pulled out with the bracket, and I didn’t see its original placement. There a two (or three?) small gold dots just above (toward the top of the phone) where the top edge fits — so make sure those dots are visible when you’re trying to place the connector. Also, it fits a bit to the right edge of the phone (away from the battery), compared with the piece above it.
Thank you very much for this guide. It was my first phone dissasembly and I replaced the battery.
It tooked me two hours to disassemble and reassemble. Reassembly instructions are required!
The difficult part of dissasembling was removing the battery. I used a 2.5ml injection to place the Isopropyl Alcohol (99,5%) under the battery and patiently placed the spudger under the battery.
The difficult part of reassembling was putting the screws and plugs back! I inserted the screw into the hole, and as the screwdriver approached, it magnetically pulled the screw out of the hole. I tried to demagnetize everything without luck. I lost 3 screws while trying. What worked was to place the screw in the screwdriver and with extra light and magnifying glass to insert the screw in the hole while it is properly installed in the screwdriver.
Now the battery is good, but the speaker does not work, propably I somehow disconnected it on the process so I have either to reopen it :-( or just use bluetooth.
Thank you, @sam (and everyone else who contributed - including community members’ comments along the way). It was tense - but everything went smoothly! I was brought here by an excellent programme on BBC Radio 4 - ‘Dare to Repair’, presented by Prof Mark Miodownik. If you can find it, it’s well worth a listen - there’s a big heads up for ifixit! (Although it might only be possible to listen within the UK…? ): https://www.bbc.co.uk/programmes/m000vgh...
Awesome job! And great podcast find, we loved that series! Thanks for helping fix the world and daring to repair ;)
Brilliant tutorial….haven’t ever dont anything like this before, and feel like I held my breath the whole way through…but mission complete, and a happy husband on Fathers Day! Thanks
Replaced the battery (and screen while I was at it) and now my phone works but it seems to get hot quickly. I’m afraid to use it. Does anyone know why this would happen?
I recommend performing a hard reset / force restart to see if that solves your problem!
Brilliant guide. Job finished really quickly, no issues at all. Thanks for the guide and boost confidence in self repair!
Awesome guide, though I managed to have a horrible time getting my battery out the second time, too. I also seem to have lost the Touch ID bracket, but its working fine without it.
Excellent guide, Removing the old battery was the tough part along with connecting the home button. I lucked out big time when removing the screen; during the suction cup separation process, the screen suddenly released; the metal clip holding the home button connecter went flying on my lap and the ribbon cable got pulled out. No damage but that could have ended the project right there.
The next phone I did; I used packing tape with just enough slack to allow separation but only about an inch. Good luck everybody- the key ; take your time and stay organized. BTW- the second phone; I didn’t remove the display- those little screws man ?? Just be extra careful; use a rubber band and an old iPhone box as a stand to keep the display hinged open while you work.
Battery replacement 1/1/22 went well; great procedure. BUT… now the power, side volume, and sound/mute buttons don’t work.
What is it I did while changing the battery that caused this??
The repair guide is good, but the repair itself… I found it hard to pull off. The guide says that the repair is of moderate difficulty, but, at least by my standards, it was hard, and I consider myself a tech enthusiast (so I am into this kind of stuff).
IMPORTANT: Be especially careful when you separate the screen of your phone from the metal case. It is really tricky to pull off the right way!!! Blaming Apple here, NOT the iFixit!!! Only by luck I didn’t damage the ribbon cable. And the bracket that this on top of that ribbon cable connector actually got itself ripped out of its placement thus becoming airborne. You may want to put a small piece of clothing on the Home button part of your iphone to prevent this form happening.
Received battery for my iPhone SE 1st gen installed per instructions, cover didn’t want to come off suction kept popping off tried repeatedly a little tug at a time till I seen an opening and used pry tool to unlatch , plugs a little tricky to get lined up to reinstall and cover cable latch also to lock in place other than that just about an hour total to install a battery, home button seemed ok , it’s now on charge
Just completed this for the 4th time, and this time I tried the floss method for removing the battery adhesive (both sides snapped early). If you heat the back of the phone with a hairdryer, the floss method works really well! The floss I used a Glide knock-off.
I remowed the battery with dental floss when the strips snapped.
Bonjour,
Mes 3 moments délicats :
- l’ouverture (j’avais une protection écran que j’ai du remplacer) (peur de casser)
- Enlever la batterie (plastique cassant (j’y suis allé au spudger coté plat et au sèche cheveux)
- Remontage du câble touch id.
Bon fonctionnement après 30 min d’inter (j’y suis allé lentement)
Merci.
I found that an offset spatula is better at removing the old battery than any of the other methods.
I had success after several hours of disconnecting and reconnecting the ribbon cables multiple times and worrying that I had damaged my phone! A couple tips to avoid potential problems:
1. The bottom left corner of the front assembly is thinner, and you can use that gap to pry the screen apart and avoid damaging the Touch ID cable.
2. Be very gentle with reconnecting the cables, especially for the digitizer and screen. Rely on positioning and light force until you feel the connectors “snap” into place, otherwise they may be misaligned and result in display lines, flickering or touch dead zones. If that happens, disconnect and try again. Feeling that “snap” is key!
3. Flicker may be present if your battery is very low (less than 5%) and will go away with charging. This happened to the bottom half of my screen and looked like a backlight LED low-hertz flicker.
Repair went great - iphone SE 1st edition back to life!
Reading all the comments definitely helped. I didn't take the screen off so skipped all those steps. The only hiccup was removing the batter adhesive. Besides that everything went smooth.
Thank you. I had watched several tutorials on youTube but they all missed one very important thing. The length of the four screws to undo the screen. I had tried to replace a battery on a 5s and got the red screen of death. I had almost decided to buy a new phone rather than replace the battery, but your instructions were so clear I decided to give it a try. Worked like a charm. I may still buy a new phone, but I can do it on my terms now. Thanks again.
Good job Sam Goldheart! I replaced the battery in my wife's iPhone SE 1st Gen a coupla months ago and now I just completed a battery change on mine! Fantastic! Great instructions!!! Both times, one of the battery adhesives broke, but I was able to fish them out and complete the job. We both really like our small SE phones and other than the battery, they're fine. Besides that, I got a bunch of respect from the wife, ha! Thank you and our thanks to iFIXit! I fixed it!
I did it. First time fix, really straight forward using the tools and parts I got from Ifixit. Excellent work and thank you.
Replaced battery in SE, agree that screen removal not required, just hold it at 90° with an elastic band and a soup can.
When fitting new battery keep it over towards edge of case and up away from home button before sticking down.
I had a strip screw so it was a pain to take apart. Picture of iPhone is different than the iPhone Se 2 gen. Directions for putting back together would had helped. I watched a utube video and it helped to give me a better idea. Second time I put a iphone battery in an iphone. I wish the tools were labeled better and color coded. Red for opening the phone, blue, green, yellow for the different screws inside. Since I had a striped screw I had to use a box cutter for the side. Battery works and apple did not get more of my money so I am happy with it.
Alles lief wie in der Anleitung beschrieben.👍🙂
I completed the battery replacement along with the lightning connector (I had a bad microphone), it took just under an hour to do both on my iPhone SE first edition. This phone has served me well and will hopefully last until Apple no longer supports the hardware with software updates. I notice that there was threadlocker on the screws when I removed them, I put removable threadlocker on all the screws when I replaced them. I didn't notice instructions to do so, but thought I should mention it. I will post another comment after I see how well the battery performs.
John G.
I took my iPhone SE to the apple store for battery replacement. They broke off the tab, said there was nothing they could do and sent me home :(
I bought the ifixit kit and went for it. I had to leverage the battery out enough to get at the white adhesive strips with tweezers. The old apple battery bent a little, but did not catch fire (it was discharged to 1%). Heating the back of the phone seems to help to soften the adhesive. Once I worked a little of the adhesive strip out, it each case they pulled out and came free without issue. The whole thing took about 2 hours, due the long time trying to slowly get at the adhesive strips.
The phone went back together without problems and seems to be working. What an awesome kit - Thanks for the kit and the great instructions.
A fairly seamless repair using the great instructions. But on starting the reassembly I noticed a loose coaxial wire. On carefully inspection and using a 10X lens, I found where it it lived. in a micro 90º snap-in connector under the metal battery connector bracket. In my attempt to remove that connector, it went flying. I heard it land on my workbench, but alas, even my spiritual stuff finder couldn't help locate it. So, I figured reassembly couldn't hurt, and 10 minuted later I was texting, taking pictures, doing outgoing & incoming calls and checking audio on you-tube. Pretty much everything I use my phone for.
Any ideas what that cable connects and I may or may not ever need? It's a first generation iPhone SE
Hi, is step 17 to step 22 really necessary for the akku replace? Thanks...
Thanks so much for this guide. Love how it's evolved to incorporate so much different feedback. It's really the internet at its finest. Lotsa gratitude for the entire community of fixers.
Patience is paramount. I could've benefited from a better work surface...but all in all it went well. I gave myself a 2-hour window...and I think by the time I was finished it was pretty close to that. I've made enough mistakes in the past with rushing through electronics fixes. Little parts can be exceedingly frustrating. Always good to have extra time set aside.
Zip ties for the screen separation...great idea. Adhesive removal tips were also great. I got one side using a tool and wrapping the adhesive around it. Credit card did the trick for the other side. Reassembly took extra patience.
Very good repair guide and tools from iFixit. It is my second repair and my spare SE works flawlessly now. Thank you.
Make sure in the first step of opening the phone (after removing pentalope screws) you do it very carefully and cautiously. I have been lucky as I have put too much power to open it and simply I have swamped the home button connection apart... But it did not break, so I could have done battery replacement without any problem, according to the guide. Good luck repairers! :)
After repair, Touch ID does not work.
Hi community. I replaced an SE 1st gen battery, seems like a high quality one from Germany “Polarcell, 2100mAh” . It shows 100% health, but drains without much usage, the battery graph goes down in 45* 📉. Also back of the phone gets sliightly warm. Any thoughts on why it happens and if it’s possible to fix?
Thanks a ton!
J'étais un peu stressé avant de commencer, mais tout s'est passé à la perfection ! Un grand merci pour ce tutoriel ;)
3 things went awry: 1) When I opened the iPhone with a suction cup, the home button cable unplugged from the mother board and the retainer popped off. 2) When I removed the metal plate over the battery plug, it was adhered to the plug, and unplugged it, and 3) the instructions say, "just open the phone like a hinge at the top," and "just do the steps in reverse to reassemble." Well, when I put the screen back down, it obviously wasn't closing properly, so I got out the suction cup to open it up and figure it out. And the screen separated from the bezel on one side. So there should be a reassembly instruction that says, "Make sure the tab on top of the screen goes into the slot at the top of the phone, before lowering it into position." It's okay, I've got a replacement screen on order anyway, so I'll glue it to the bezel when it arrives.
I just finished everything and am now calibrating the battery as recommended. Question: Is it normal for the battery to get hot when charging??
I was successful and am very satisfied with the experience, but I have to say the one hour time estimate given -- you've got to at least triple it if you're a beginner. And add in time to just walk away and cool off a few times -- it keeps you from doing anything rash. It became obvious that a crucial use of these walk-away times was to go to another room and read all the user comments, that's where the really useful info was. The disassembly was very hard but reassembly was nearly impossible: I simply couldn't reconnect the three screen ribbon cables -- the connections were so small I couldn't really get the cables and sockets to mate. My solution was a cheat, but it worked very well: I work at a University and was able to sneak into a microscope lab before a class and worked under a low-power USB microscope to watch what I was doing: even with very modest magnification it made those reconnections much, much easier.
Quite as you state, the "just walk away and cool off a few times" technique was an absolute must in the process. I additionally downed a pint of cheap ale during each and every time-out (there were many) in order to further reduce the buildup of anxiety. There was just no other civilized way to proceed. The frustration as you may recall, was that while you wanted to employ a commonsensical pincer grasp on the given thing you were working on to move it into place, you simply couldn't. Oh by the way, hating to break it to you, stated in my own remarks of June 10, 2023, you didn't actually need to remove the screen assembly. That said, your dreadful struggle with the three associated connectors and cables was tragically futile. I just rotated the thing vertically, allowing it to remain fully tethered, and I was none the worst for it. The nice folks at fixit generally take a more cautious risk-averse approach. Thanks for reading. Cheers!
덕분에 교체성공하고 갑니다 Good job!
I think I'll take mine to a shop to get my battery replaced they know what their doing leave it to the professionals there are things I'm good at but things I'm not good at i leave it to professionals.
Thank you iFixit, I now have successfully given my very old SE a new battery and lease of life. As others have commented, there are mainly three tricky steps: 1. opening the phone; 2. removing the battery adhesive strips; 3. replacing the home button connector and plate.
I managed opening the phone relatively easily - used a single suction pad, and carefully prising open at the bottom left corner with the blue opening tool, and as a precaution had used a cable tie (zip-tie) round the phone in case it opened too far too quickly.
The adhesive strips were well and truly stuck to the phone case, and tore as soon as I pulled on them. Following other posts advice, I used the hot towel (damp face flannel wrapped in cling film, and microwaved for 2 mins) and dental floss trick. This worked at the second attempt - I had tried the first time without removing the screen front panel (steps 17-22), but needed more space and better purchase to be able to slide the dental floss through from the top end.
I then had a gunk of adhesive on the phone case resembling chewing gum, which I very slowly and carefully scraped off.
The home button connector replacement was easy by comparison, but still very fiddly, and the plate (as others have noted) needs to be oriented correctly (single clip to the bottom of the phone away from the battery) and then firmly click in.
Very usefull guide . It was first time I performed the battery replacement ....without this wonderful guide , I couldn't have done it....thank you
Some takeaways:
1) The removal of the digitizer assembly is not necessary. I avoided this pesky procedure by securing it in a vertical position, and the thing proved to not be in the way of any steps.Why introduce potential complications when you really don’t need to.
2) The clean removal of the adhesive strips as described can go badly awry. I ended up going the alcohol route, in combination with prying, twisting, and wrangling the old battery into a wretched heap by the time it came loose.
3) Upon careful reassembly, the iPhone stalled at the low charge battery icon on the lock screen, refusing to move any further. I finally remembered to do a hard reset, and ... voilá! This soon produced the grey Apple logo screen much to my effusive delight.
4) It's a somewhat nerve wracking repair. Just be careful, and you can very likely end up with a reinvigorated iPhone SE without further enriching Apple – the very folks that had the unmitigated gall to actually glue in the battery. Embrace your right to repair.
Just replaced the battery and put it in to charge, and the phone was on when I plugged it in. I turned the phone off and it did not show charging so I replugged it in and the phone came on again, is this normal? Thanks
I adore my cute li'l iPhone SE. I was terrified the entire time but managed to complete the task to my delight. GO SLOW and don't be afraid of using controlled force, especially when lifting the screen. All I needed to do is replace the battery, so I stopped at the point where I could lift that out. You do not need to remove the screen if you can control it flopping around. It got interesting when the old battery briefly burst into flames... so don't bend or crush it ;.)
Great guide. I've just completed the battery change, and all seems good, so far.
I would highly recommend using the cable ties when opening the phone, and if your phone is old, heat it from beneath with a microwaved hot, wet towel, wrapped in a plastic bag BEFORE trying to remove the battery adhesive.
If the strips snap early, the advice about a piece of satin ribbon is excellent. Thanks to renatavinnie for that one.
Take your time and read the comments for good advice.
When installing the new battery, when and how do you install the new adhesive strips that come with the battry?
Mein erster Akkutausch bei einem iPhone SE hat Dank des Reparaturkits von iFixit und der Videoanleitung reibungslos funktioniert. Beim Einsetzen des Akkus unbedingt auf die Spaltbreite achten zum Einfalten der Lasche.
Thank you for the tutorial, the parts everything. It’ll make my moms SE last couple more years until the cpu cant. But at least im not paying a leg and a kidney to have it replaced. Shame the new iphones arent as “friendly “ to open. Im scared to do the same to my 12 mini.
Anyway thank you for being one of the ones to enable ppl to do this!
Much to my surprise my phone is still working after fitting the battery. I was sure I'd damaged something. The worst bits were steps 19-21. The adhesive pads on the connectors were displaced and so stuck the connectors together. It was tricky freeing the connectors up individually without damaging them and the same when reconnecting. The battery removal stage was also tricky. I had to use a hair drier to heat the back of the phone and the battery did distort as I levered it out. It was also fiddly reconnecting the touch ID cable - took about 20 minutes before it seated.
Just completed my first battery replacement using this guide.. Found it very useful, using the comments too... My phone is 16 years old now and was on its original battery, so it was certainly in need of replacement... Wound each adhesive strip round a pencil laid across the phone and rotated it very slowly.. Phone laid on a hot water bottle, worked very well both adhesive strips came out without breaking.. My main problem doing this battery replacement was that I am 80 years old now with bad close up vision, and handling the tiny screws and plugs was difficult to say the least...! But all fixed now and my phone is working like new......
If you're an older person like me, then magnifying glasses are helpful. I took my time on this, about two hours - this was my second time replacing an SE battery (first time was three years ago, wife's phone). One of the old adhesive strips broke (Step 26), so I used some extra time to get the old battery out. I also took cleaned accumulated dirt and grim from the inside edges of the case and around the screen, before reassembly. Instructions say to follow disassembly steps in reverse order, but the Touch ID cable bracket installation Step 10 should be done before Step 11. I'm very happy with the results.
Excellent guide! 100%
A very helpful guide. Replacing the battery in my iPhone SE involved more detailed work with small parts and connectors in limited space than I expected. There are several small connectors that are difficult to see and fit into the mating connectors. A sometimes subtle "snap" can confirm the connections. I was able to finish the battery replacement successfully, giving my phone several more years of usefulness. This guide was ESSENTIAL for me to complete the replacement. Thanks!
Lost time and money: I put very precotionally everything back together, plugged in the phone, but the phone doesn’t turn on anymore. I've reopened the phoneone more time, checked everything, but my phone seems dead.
Thankyou anyways ! but now i didn't try to change battery .i fear after i read your guide .🙈😀
Great tutorial. Was able to get my iphone SE working again. Bought it uses and Siri did not work, now it even works. Thanks, much appreciated.
Merci pour ce tutoriel en français. Ce que je craignais est arrivé : les languettes adhésives de la batterie se sont cassées immédiatement sans possibilité de tirer dessus. L'astuce de l'alcool isopropylique est intéressante, mais impossible d'en injecter dessous… jusqu'à ce que je me souvienne que j'avais une micro seringue avec aiguille sous-cutanée. Ça a été très efficace.
I successfully replaced the old battery yesterday. The iPhone is still working properly more than 24 hours later. It has a new lease of life. Thank you for the clear destructions, they worked a treat, along with the comments made by others.
This will definitely make it easier to put the new battery in. iPhone 5s, 5c, and SE Battery Adhesive Strips Replacement A video tutorial on how to put the new battery back into the phone is really missing.
I was able to replace the battery in my old SE for my school project! Such a helpful guide 😊
Completed successfully. This was the most difficult iPhone I have worked on because the phone is so small and there is little room and space to work with. The hardest part was getting the home button connector reattached.