crwdns2915892:0crwdne2915892:0
Use this guide to remove or replace the power button in your iPhone 7. This guide is just for the physical button, and not the electronic switches beneath.
If you need to replace the volume and power control cable, follow this guide.
crwdns2942213:0crwdne2942213:0
-
-
Power off your iPhone before beginning disassembly.
-
Remove the two 3.4 mm pentalobe screws on the bottom edge of the iPhone.
-
-
-
Measure 3 mm from the tip and mark the opening pick with a permanent marker.
How to break your phone more like i probably just buy another one its not worth the hassle geometry dash 2.2
Person who doesn’t know how to read a ruler.
-
-
crwdns2935267:0crwdne2935267:0Clampy - Anti-Clamp$24.95
-
Pull the blue handle backwards to unlock the Anti-Clamp's arms.
-
Slide the arms over either the left or right edge of your iPhone.
-
Position the suction cups near the bottom edge of the iPhone just above the home button—one on the front, and one on the back.
-
Squeeze the cups together to apply suction to the desired area.
Too bad that the instructions use equipment that are not sold with the repair kit that was supposed to be sufficient.
-
-
-
Pull the blue handle forwards to lock the arms.
-
Turn the handle clockwise 360 degrees or until the cups start to stretch.
-
Make sure the suction cups remain aligned with each other. If they begin to slip out of alignment, loosen the suction cups slightly and realign the arms.
-
-
-
Heat an iOpener and thread it through the arms of the Anti-Clamp.
-
Fold the iOpener so it lays on the bottom edge of the iPhone.
-
Wait one minute to give the adhesive a chance to release and present an opening gap.
-
Insert an opening pick into the gap.
-
Skip the next three steps.
-
-
-
Heating the lower edge of the iPhone will help soften the adhesive securing the display, making it easier to open.
-
Use a hairdryer or prepare an iOpener and apply it to the lower edge of the phone for about 90 seconds in order to soften up the adhesive underneath.
-
-
-
Apply a suction cup to the lower half of the front panel, just above the home button.
-
-
-
Pull up on the suction cup with firm, constant pressure to create a slight gap between the screen and the frame.
-
Insert an opening pick into the gap.
I bought a special tool from JerryRigEverything that is a thin, flat metal "knife." It easily made the first cut below the home button and then I used the blue plastic triangles with the 3mm marks to score around the rest of the edges. Careful, slow and patient wins the day here. Careful at the top. Don't just pull up on the screen, definitely push the screen down toward home button as there are a couple of "hooks" holding the screen to the body at the top of phone.
I used an electrician's heat gun for 90 seconds. Worked well. You don't have to pull up on the suction cup very much AT ALL. I bought a special tool from JerryRigEverything that is a thin, flat metal "knife." It easily made the first cut and then I used the blue plastic triangles with the 3mm marks to score around the rest of the edges. I did this in the exact order of the instructions and it worked well. Careful, slow and patient wins the day here. Careful at the top. Don't just lift up on the screen, definitely push the screen down toward home button as there are a couple of clips holding the screen to the body at the top of phone.
-
-
-
Slide the opening pick up the left edge of the phone starting at the lower edge and moving towards the volume control buttons and silent switch, breaking up the adhesive holding the display in place.
-
Stop near the top left corner of the display.
-
-
-
Re-insert your tool at the lower right corner of the iPhone, and slide it around the corner and up the right side of the phone to separate the adhesive.
-
-
-
Gently pull up on the suction cup to lift up the bottom edge of the display.
-
Pull on the small nub on the suction cup to remove it from the front panel.
-
-
-
Slide an opening pick underneath the display around the top left corner and along the top edge of the phone to loosen the last of the adhesive.
-
-
-
Slide the display assembly slightly down (away from the top edge of the phone) to disengage the clips holding it to the rear case.
-
-
-
Open the iPhone by swinging the display up from the left side, like the back cover of a book.
-
Lean the display against something to keep it propped up while you're working on the phone.
-
-
crwdns2935267:0crwdne2935267:0Tri-point Y000 Screwdriver$5.99
-
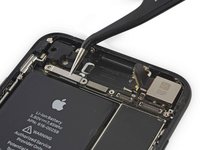
Remove four tri-point Y000 screws securing the lower connector bracket, of the following lengths:
-
Three 1.2 mm screws
-
One 2.4 mm screw
Just FYI, if you have an iFixit set with the PH000 you can use that bit to remove the Y000 if you're in a bind.
dang im such a freak i messed my i phone device up badly
for me a ph0 worked.
-
-
-
Remove the lower connector bracket.
I'am made $84, 8254 so far this year working online and I'm a full time student. Im using an online business opportunity I heard about and I'AM made such great money. It's really user friendly and I'm just so happy that I found out about it. Heres what I do,.for more information simply open this link thank you....
-
-
-
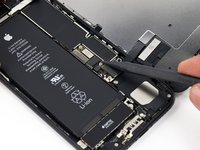
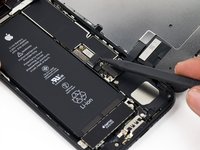
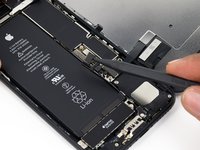
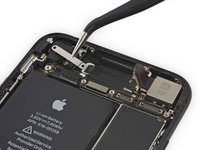
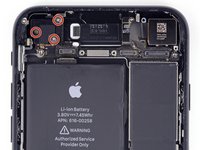
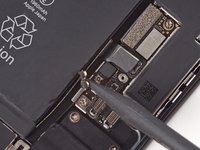
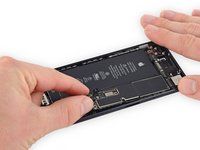
Use the point of a spudger to lift the battery connector out of its socket on the logic board.
-
-
-
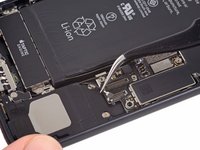
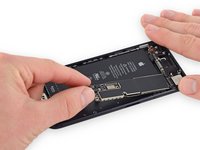
Use a spudger or a fingernail to disconnect the two lower display connectors by prying them straight up from their sockets on the logic board.
Second cable is for touch functionality, you need a new LCD display now
You need an entire new LCD now as it's for touch functionality and is fused to the digitizer sorry for the bad news
-
-
-
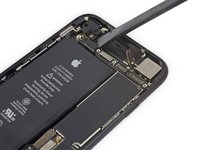
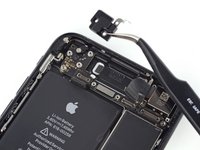
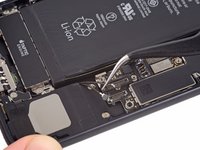
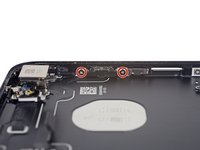
Remove the two 1.3 mm Phillips #000 screws securing the bracket over the front panel sensor assembly connector.
These screws are Y000
Using iFixit’s driver kit, I prefer a PH00 for this, which is larger than the PH000. If you think the PH000 is too big, something is wrong.
I need help please. I followed the instructions step by step and everything has gone well but my screen won’t come on. Taptic feedback works but the screen is black. Checked and re-checked all connectors and everything is as it should be. Any ideas?
Во первых. Не вижу проблем с откручиванием этих винтов, удивлен, что у кого-то это вызывает сложности. А во вторых не понимаю, зачем надо отсоединять эти шлейфы при замене батареи? Они не мешают (так как на 5 или 5s и им подобных) и их можно не отсоединять
-
-
-
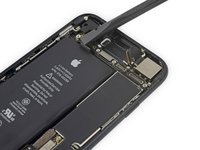
Disconnect the front panel sensor assembly connector from its socket on the logic board.
-
-
-
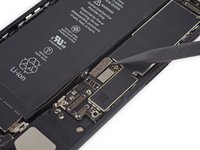
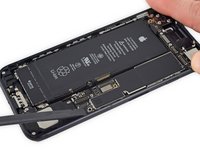
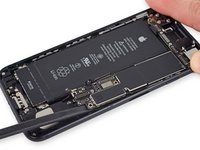
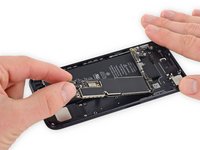
Remove the display assembly.
Thanks for pointing this out Guy!
@trentb28922 Ouch! That’s not normal. Is your phone’s frame bent? Are you having to use a lot of force when you install the display?
-
-
-
-
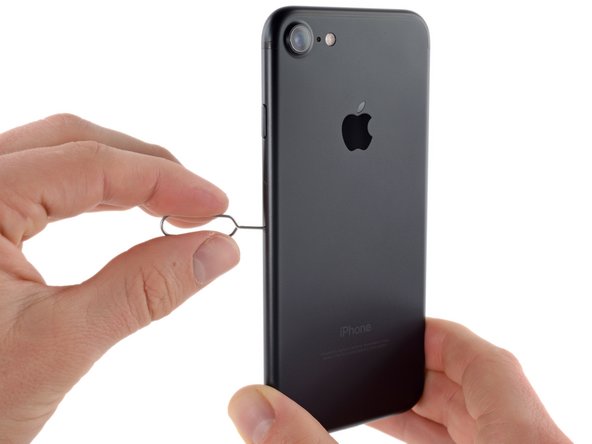
Insert a SIM card eject tool or a paperclip into the small hole in the SIM card tray.
-
Press to eject the tray.
-
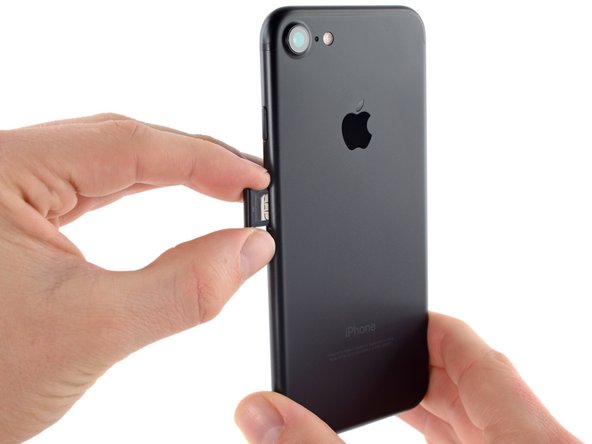
Remove the SIM card tray assembly from the iPhone.
-
-
-
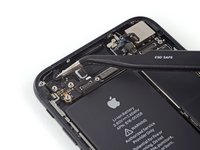
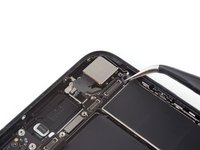
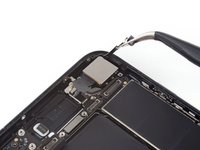
Use the flat end of a spudger to disconnect the rear-facing camera connector.
-
-
-
Remove the following Phillips screws securing the rear camera bracket to the rear case:
-
One 1.3 mm screw
-
One 2.5 mm screw
-
-
-
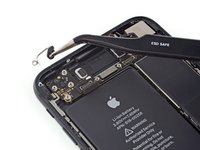
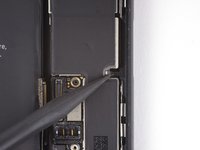
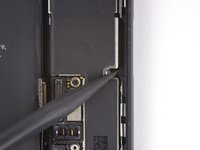
Use the pointed end of a spudger to pry up and disconnect the antenna bus connector, just left of the rear camera module.
-
-
-
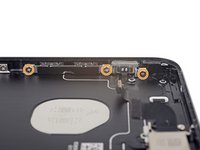
Remove the two 1.2 mm tri-point screws securing the upper cable bracket.
-
-
-
Use the flat end of a spudger to disconnect the upper cable connector.
-
-
-
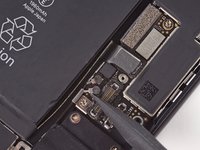
Remove the four Phillips screws securing the Wi-Fi antenna:
-
Three 1.2 mm screws
-
One 1.7 mm screw
-
-
-
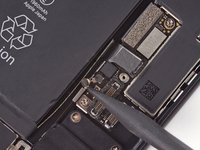
Remove the following Phillips screws:
-
One 1.3 mm screw
-
One 2.2 mm screw
-
-
crwdns2935267:0crwdne2935267:0Standoff Screwdriver for iPhones$5.49
-
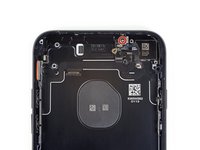
Remove the 2.2 mm standoff screw from the grounding bracket.
-
-
crwdns2935267:0crwdne2935267:0Tweezers$4.99
-
Use tweezers to gently bend the logic board grounding bracket out of the way.
for anyone doing this slightly bend it 50 degrees toward the frame of the phone (to the right) ,
Best of luck
-
-
-
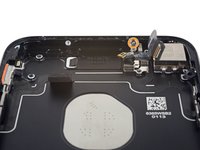
Use the point of a spudger to lift the two antenna cable connectors up off of the sockets on the logic board.
-
-
crwdns2935267:0crwdne2935267:0Tweezers$4.99
-
Use tweezers to gently derout the antenna cables from the metal bracket on the logic board.
-
-
-
Use the point of a spudger to disconnect the lower cable connector.
-
-
crwdns2935267:0crwdne2935267:0Standoff Screwdriver for iPhones$5.49
-
Remove the following screws:
-
One 1.4 mm Phillips screw
-
Three 2.2 mm standoff screws
-
-
-
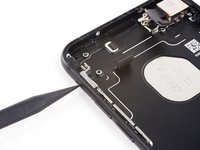
Use the point of a spudger to move the SIM card eject plunger out of the logic board's way.
-
-
-
Use the flat end of a spudger to gently lift the battery connector end of the logic board up.
-
-
-
Lift the battery connector end of the logic board and pull it up and out of the rear case.
-
-
-
Remove the following Phillips screws:
-
Two 1.9 mm screws securing the power button.
-
Three 2.3 mm screws securing the volume buttons.
-
-
-
Remove the following 1.3 mm Phillips screws:
-
One screw beside the rear-facing camera
-
One screw on the rear case
-
-
-
From the outside of the phone, push the hold switch into the rear case with the point of a spudger.
-
This action will free the hold switch and gasket from the rear case.
-
-
crwdns2935267:0crwdne2935267:0Tweezers$4.99
-
Use a pair of tweezers to remove the rear-facing camera.
-
-
-
Moving from power button side of the phone, use an opening pick to separate the adhesive holding the antenna flex cable to the rear case.
-
-
-
Slide the point of an opening pick underneath the antenna flex cable towards the top of the phone, separating the remaining adhesive.
-
-
-
Use tweezers to move the antenna flex cable away from the edge of the phone, freeing the screw bracket from the rear case.
-
Remove the antenna flex cable.
-
-
-
Remove the 2.3 mm standoff screw securing the flash bracket to the rear case.
-
-
-
Use the point of a spudger to gently unseat the flash module.
-
-
crwdns2935267:0crwdne2935267:0Halberd Spudger$2.99
-
Use the blade of a Halberd spudger to separate the adhesive holding the microphone to the rear case.
-
-
-
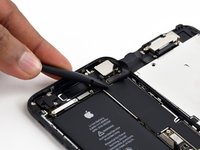
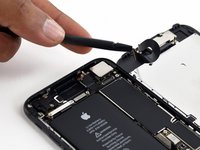
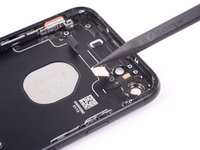
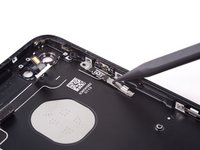
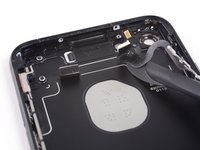
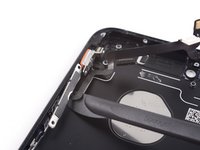
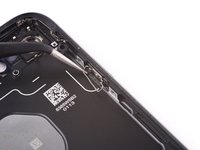
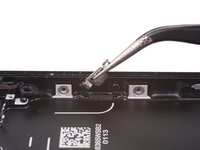
Gently fold the power button module from the edge of the rear case.
-
-
-
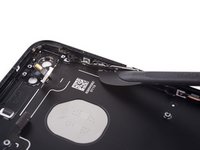
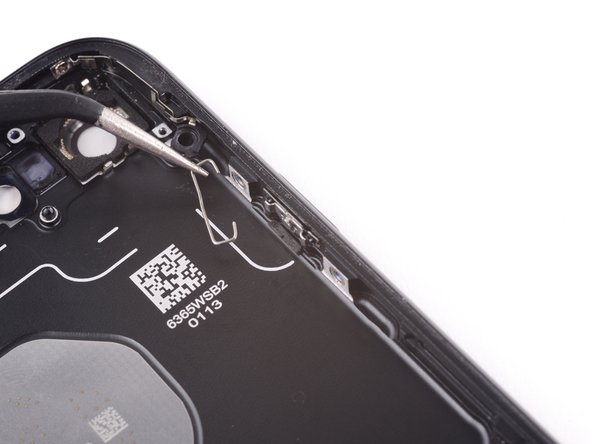
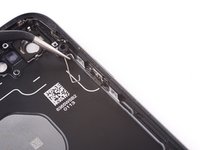
Slide the blade of a halberd spudger under the power button end of the button cable to separate it from the adhesive on the rear case.
-
Continue to separate the adhesive by moving the blade towards the top of the phone.
-
-
-
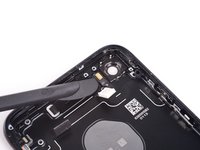
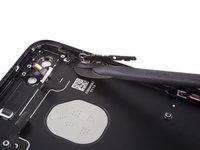
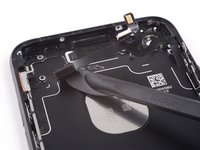
Continue to move the blade of the halberd spudger underneath the power and volume control cable.
-
-
-
Slide the halberd spudger under the volume control portion of the button cable.
-
Gently slide the blade underneath the cable towards the bottom of the phone, separating the remaining adhesive.
-
-
-
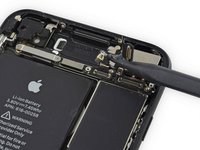
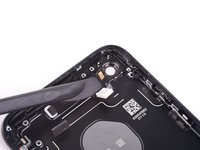
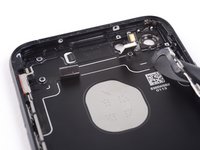
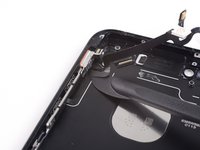
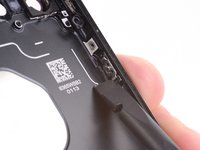
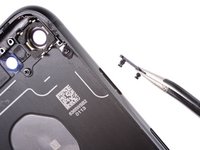
Remove the power and volume control cable.
-
-
-
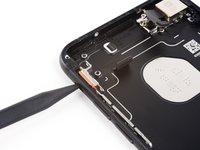
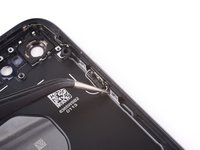
Pull the clip towards the bottom of the phone and lift up to free it from the bracket.
-
-
-
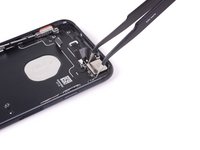
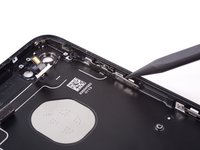
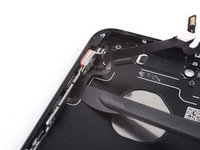
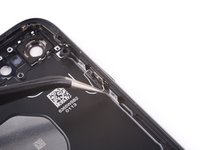
Push the lower end of the power button bracket up off of peg securing it.
-
-
-
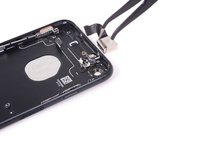
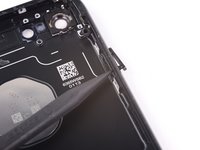
Pull the bracket from the rear case.
-
-
-
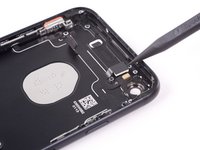
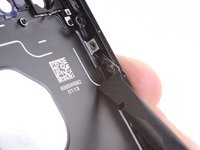
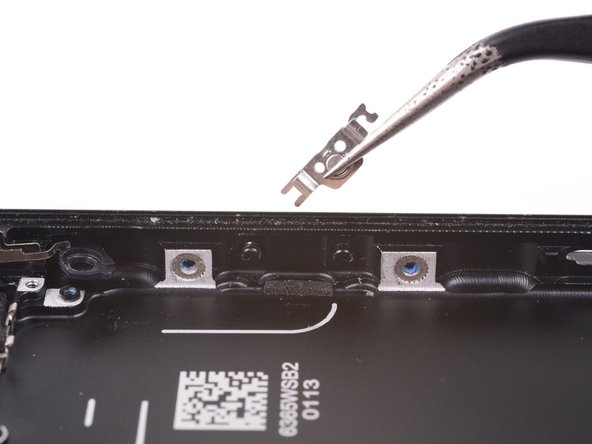
Use the pointed end of a spudger to push the power button cover out of the rear case.
-
Remove the power button cover.
-


To reassemble your device, follow these instructions in reverse order.
To reassemble your device, follow these instructions in reverse order.
crwdns2935221:0crwdne2935221:0
crwdns2935229:023crwdne2935229:0

Sorry Cooper Chase, if you want to change your iphone ringtone 7
Benjamin nguyen - crwdns2934203:0crwdne2934203:0
In the instructions, what does “3.4mm” actually refer to? The included P2 bit has a 4mm shaft, and the bit tip is closer to 0.85mm…which is the same as 0.034”
Gene Merritt - crwdns2934203:0crwdne2934203:0