crwdns2915892:0crwdne2915892:0
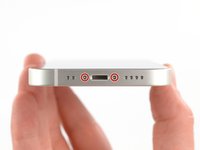
If your iPhone 13 mini screen is cracked, not responding to touch, or not showing a picture when your phone is powered on, use this guide to restore your iPhone to working order with a new screen, a.k.a. display assembly.
Note: On iOS 17.6 and earlier, True Tone and auto brightness functionality is disabled after a screen replacement, even when using an original Apple screen. Face ID is also disabled, unless the iPhone is running iOS 15.2 or newer. On iOS 18 and newer, you can calibrate your new screen using Apple's Repair Assistant to restore True Tone functionality on genuine screens purchased from Apple.
You’ll need replacement adhesive to reattach components when reassembling the device.
crwdns2942213:0crwdne2942213:0
-
-
Power off your iPhone before beginning disassembly.
-
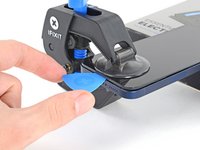
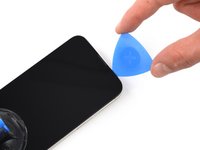
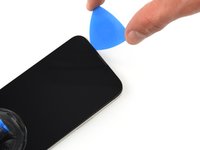
Remove the two 6.8 mm-long pentalobe P2 screws at the bottom edge of the iPhone.
-
-
-
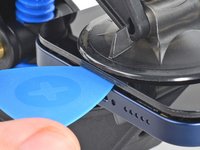
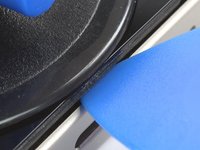
Measure 3 mm from the tip and mark the opening pick with a permanent marker.
Got to step 2 and realized the fix kit doesn't include an opening pick! Looks like a guitar pick, and I have those lying around. Is that expected? Looks like the pick is used in many steps below. There's a little blue crowbar that isn't mentioned in the instructions. Perhaps that replaces the opening pick?
Hi! I can't see which guide you were using when writing this comment. Can you reply here with which guide and fix kit you used?
I see you posted this in Meta. I hope it's resolved soon! In the meantime, a guitar pick may work well enough for your repair.
what fix kit?
My fix kit didn't include an opening pick either
Make sure you check inside the black boxes after emptying them. My pick was stuck inside one of the boxes.
My AliExpress refurbished screen came with a pick that has a coin-like circle that pops out, so no modification was necessary
the picture shows 3 cm but the description says 3 mm's. Which one is it?
That is a misunderstanding. It is a ruler with a scale for cm, it shows 0.3 cm, i.e. 3 mm.
VauWeh -
Oh, come ON!
Big Ed -
It will ALWAYS be millimeters on a phone, but this step is ridiculous, skip it!
@leifdewolf I wouldn't skip it for a first repair.
It's not an Ifixit KIT if it doesn't include everything. You'll need to order the opening pic separately. Or head to Walmart like myself and look for guitar pics. Hopefully, this will work just as well.
No pick in mine as well. It’s really not clear that you have to order this separately when ordering an IPhone SE 202/2022 screen repair kit. Is this the case?
Frustrated, I ordered a compact package where everything was encapsulated. Useless suction tools could not separate the screen. If it is unable to decouple the screen, then why sucking suction tools you have provided.
For my kit the triangle pick was stuck inside the box with the screen not with the other tools maybe it's also there for you
Y’all are getting far, FAR too detailed with some of this stuff…. Measuring and marking the pick that you won’t actually use to open the device?!? lol that’s kinda funny. Just heat it up, grab a spudger, and the back just pops right off! The iFixit tech need to stick to the KISS method more often, you know KEEP IT SIMPLE STUPID!!! Like l, for reals, I’ve been doing this stuff for YEARS and using iFixit guides regularly and this is just ridiculous at this point!
Will the phone still work if the sensor assembly on the back of the screen is damaged?
I don't have a pick, but how much better are these picks than an old credit card for opening an iPhone 13 mini?
The pick in my iFixIt kit was packed with the battery, not with the rest of the toolkit.
-
-
-
Lay overlapping strips of clear packing tape over the iPhone's screenuntil the whole face is covered.
-
If you can't get the suction cup to stick in the next few steps, fold a strong piece of tape (such as duct tape) into a handle and lift the screen with that instead.
Yes, tape to cover the cracks. Guess what also loses adhesion when you apply heat to it,&&^&^$^ tape.
-
-
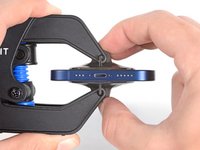
crwdns2935267:0crwdne2935267:0Clampy - Anti-Clamp$24.95
-
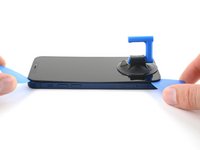
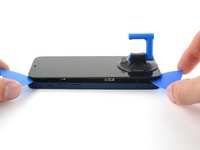
Pull the blue handle backwards to unlock the Anti-Clamp's arms.
-
Slide the arms over either the left or right edge of your iPhone.
-
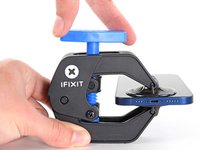
Position the suction cups near the bottom edge of the iPhone—one on the front, and one on the back.
-
Squeeze the cups together to apply suction to the desired area.
-
-
-
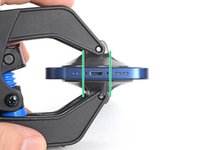
Pull the blue handle forwards to lock the arms.
-
Turn the handle clockwise 360 degrees or until the cups start to stretch.
-
Make sure the suction cups remain aligned with each other. If they begin to slip out of alignment, loosen the suction cups slightly and realign the arms.
-
-
-
Support your iPhone on something sturdy such as a hardcover book so it rests hands-free and parallel to the ground; this makes it easier to work with in the following steps.
-
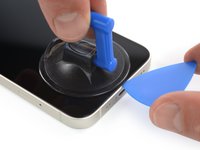
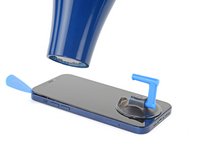
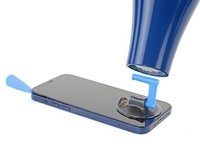
Use a hair dryer to heat along the bottom edge of the iPhone. The screen should feel slightly too hot to touch.
-
Wait one minute to give the adhesive a chance to release and present an opening gap.
-
Insert an opening pick under the screen's plastic bezel when the Anti-Clamp creates a large enough gap.
-
Skip the next three steps.
Make sure as you are prying the screen that the thickness of the screen looks like it does in the picture. Be very careful to slice the adhesive between the bezel and the device not between the screen and the bezel as I did.
i shouldve bought this tool... now i ripped the cable to the screen cuz the screen came off easier than i thought. now i gotta buy a new screen lol since i was just trying to replace the back shell...
-
-
-
Use a hair dryer or a heat gun to heat the bottom edge of the iPhone for 90 seconds or until the screen is slightly too hot to touch.
-
-
-
If you're using a single suction handle, apply it to the bottom edge of the phone, as close to the edge as possible.
-
-
-
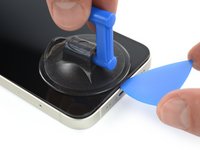
Pull up on the suction cup with firm, constant pressure to create a slight gap between the screen and the frame.
-
Insert an opening pick into the gap under the screen's plastic bezel.
Take care on this step: it's possible to delaminate the glass from the frame holding the screen and vital components together. If you're not aware, you could continue working away (as I did) delaminating the entire glass from the frame only to discover you've messed up. The entire assembly is about 1mm thick and visually looks like two layers (as shown in the last photo here).
I broke my screen here. There is a seam in between the glass and the components. Don’t stick your pick in there or it will break. Stick it below the black bezel
As with Brent above, I managed to separate the glass from the frame. Didn't realise until I was at step 18 below. Everything felt fine and looked unbroken until it was too late. So; the glass / screen could be 2x as thick as you think.
I’m grateful for the words of caution. I really had to take my time on this step. Actually had to reheat the phone multiple times without any success. Then I tried using an alcohol wipe along the edge of the phone, squeezing the wipe to allow some of the alcohol down along the edges. That was the magic touch that finally let the adhesive loose. Patience is the word.
I was doing the heating - pulling process but at a certain point, the screen cracked. Now I can't pull anymore and my screen is destroyed even though it can still work. I don't really know how to repair this...
Even though I read the comments, I crashed the screen. I inserted the plectrum carefully and instantly slipped between the screen and its board. I might have not heated the device enough as I used the iOpener.
I would highly appreciate a better instruction here and a closer zoom on the removed screen.
-
-
-
Use a hair dryer to heat the right edge of the iPhone (the edge with the power button) for 90 seconds or until the screen is slightly too hot to touch.
-
-
-
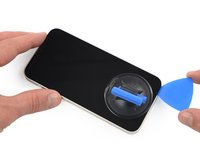
Slide the opening pick around the bottom right corner and along the right edge of the iPhone, slicing through the adhesive holding the display in place.
-
Leave the pick in the top right corner before continuing.
This procedure cracked my screen. Do not move too fast with the pick, and make sure to heat it before hand. Not sure what else can be done to prevent a cracked screen here
cracked my screen to. The pleck sliped cause I was to afraid to damage something intern so it sliped out and cracked the display.
-
-
-
-
Use a hair dryer to heat the top edge of the iPhone for 90 seconds or until the screen is slightly too hot to touch.
-
-
-
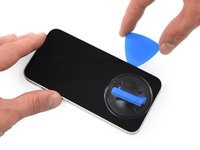
Slide the opening pick around the top right corner of the iPhone to separate the top adhesive.
-
Leave the pick in the top left corner before continuing.
-
-
-
Use a hair dryer to heat the left edge of the iPhone for 90 seconds or until the screen is slightly too hot to touch.
-
-
Wo ist die "linke Seite"? (Blick auf das Display?) Was bedeuten die roten Quadrate auf dem Bild vom geöffneten Gerät? Zur Orientierung wäre es passend, die Lage der Lautstärke + bzw. - Tasten anzugeben.
Immediately ripped left cable here. Have done iFixIt repairs many times. Very disappointed!!
-
-
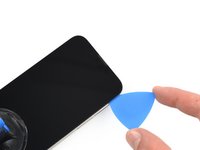
Insert a second opening pick in the bottom left corner of the iPhone.
-
Twist both picks simultaneously until the left edge clips release.
In my opinion, twisting the picks is setting yourself up for disaster. Done too hard, even slowly, and the potential energy buildup in the display at the clips could send the display flying fast enough to rip the cables you’re trying to protect. Unfortunately there is no real good way that I know to open the left side. I managed with only slight difficulty to open it by sliding the puck as you would on the other edges, but being very careful to do it slowly, paying particular attention to how deep the pick is inserted and how far up from the bottom to slide before getting too close to the cable. You can slightly lift the screen enough to see where the cable is so as not to damage it. When you’ve slid the pick close enough that you don’t feel safe sliding it any more there should be enough of a leading gap that you should be able to put another pick in in front of the first on the other side of where the cable is. Once you do that the last clip is right there around mid way up from the bottom of the phone.
-
-
-
Pull on the small nub on the suction cup to remove it from the front panel.
-
-
-
Rotate your iPhone so the right edge faces you.
-
Open the iPhone by swinging the display up from the right side, like the front cover of a book.
-
Lean the display against something to keep it propped up while you're working on the phone.
-
-
crwdns2935267:0crwdne2935267:0Magnetic Project Mat$19.95
-
Remove the 1.2 mm-long Y000 screw securing the battery and display connector cover.
-
Throughout this repair, keep track of each screw and make sure it goes back exactly where it came from to avoid damaging your iPhone.
-
-
crwdns2935267:0crwdne2935267:0Tweezers$4.99
-
Use a pair of tweezers to remove the battery and display connector cover.
This cover has an almost hinge like catch. If the cover is still laying flat you should apply lateral motion toward the battery, taking extra care to not damage the battery connection ribbon.
-
-
-
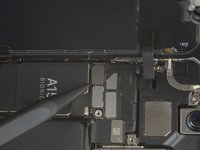
Use a spudger to pry the battery and OLED panel cable connectors up from their sockets on the logic board.
-
Bend the connector slightly away from the logic board to prevent it from accidentally making contact with the socket and providing power to the phone during your repair.
-
-
-
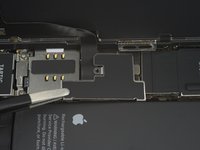
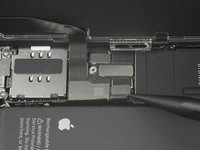
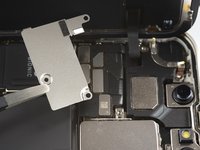
Remove the three screws (securing the front sensor assembly cover):
-
One PH000 1.4 mm-long screw
-
One Y000 1.8 mm-long screw
-
One Y000 1.2 mm-long screw
Please fix your kit! You ship a PH000, but in the video you show a PH00 (and that’s what it is)
-
-
-
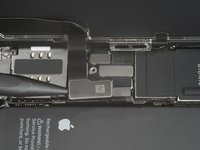
Use a pair of tweezers to remove the front sensor assembly connector cover.
-
-
-
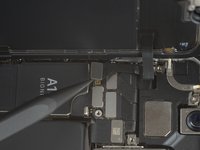
Use a spudger to disconnect the front sensor assembly cable connector.
-
-
-
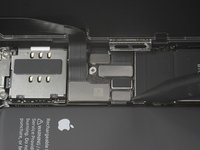
Remove the display assembly.
-
-
-
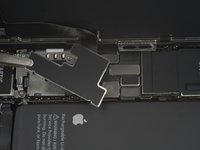
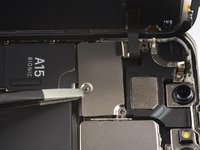
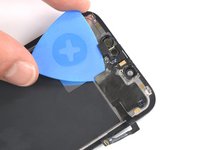
Remove the three 1.4 mm-long tri-point Y000 screws securing the sensor assembly cover.
-
-
crwdns2935267:0crwdne2935267:0Tweezers$4.99
-
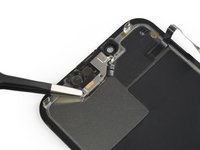
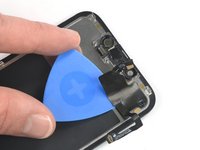
Use a pair of blunt nose tweezers to remove the metal cover.
-
-
-
Use a hairdryer or heat gun or prepare an iOpener and apply it to the top front of the display for 1-2 minutes, in order to soften the adhesive securing the sensors.
-
-
-
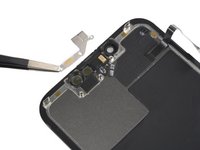
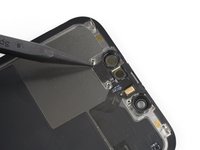
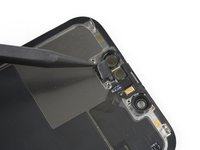
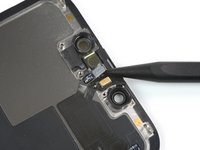
Use the pointed end of a spudger to pry the ambient light sensor out of its recess.
-
-
-
Use the pointed end of a spudger to pry the proximity sensor and the microphone out of their recesses.
-
-
-
Use a hairdryer or heat gun or prepare an iOpener and apply it again to the top front of the display for 1-2 minutes, in order to soften the adhesive securing the sensors.
-
-
-
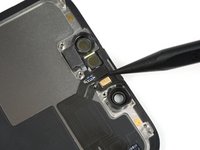
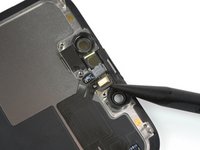
Carefully slide an opening pick underneath the front sensor assembly cable to loosen the adhesive.
-


Compare your new replacement part to the original part—you may need to transfer remaining components or remove adhesive backings from the new part before installing.
To reassemble your device, follow the above steps in reverse order. Apply new adhesive where necessary after cleaning the relevant areas with isopropyl alcohol (>90%).
After your repair, depending on the replacement part, you may be able to calibrate it using Apple's Repair Assistant, available as of iOS 18. Update your device, navigate to Settings → General →About → Parts & Service History, tap Restart & Finish Repair, and follow the onscreen prompts.
Take your e-waste to an R2 or e-Stewards certified recycler.
Repair didn’t go as planned? Check out our iPhone 13 mini Answers community for troubleshooting help.
crwdns2935221:0crwdne2935221:0
crwdns2935229:023crwdne2935229:0


crwdns2947412:09crwdne2947412:0
is the 'The iPhone 13 disables the Face ID function when you replace the screen' issue still happening since IOS 15.2? all the other pages for iPhone 13's mention its been fixed since then, does this apply to the mini as well?
I was scared about this one too, but Face ID seems fine after yesterday's screen replacement.
Artemiy -
Also ich repariere als Hobby häufiger Handys aber das 13er in dem Fall das Mini heute das erste mal und ich muss sagen ich hatte noch nie solche Probleme wie bei dem Gerät. Dazu muss allerdings gesagt sein es war recht stark gesplittert am unteren rand Saugnäpfe und Kleber hat alles sehr schlecht gehaftet. Anfangs klebte der Kleber, vom Display, noch so stark das ich das DisplayGLAS auseinander genommen habe ohne den Rahmen was ich anfangs nicht bemerkte, danach sah das "Display" so aus. Ebenso die schrauben ich habe sonst nie Probleme mit den Y000 schrauben hier habe ich gleich zwei kaputt gemacht und musste diese Aufbohren! Kaputte Schraube / Aufbohren
Am Ende war man erstmal erleichtert das alles funktioniert :)
Hi Jonas, das klingt wirklich nach einem komplizierten Displaytausch und die Bilder sprechen für sich. Danke fürs Teilen deiner Erfahrung und schön, dass die Reparatur am Ende doch noch geklappt hat!
I’ve been told by an Apple repair technician that to keep True Tone and Face ID working, you have to turn off find my.
Turn it off before you change over the display? Is so, how do you do that is your screen is completely bused?
Eine Frage: Sind die Displays von iphone 12 mini und iphone 13 mini identisch und somit untereinander austauschbar? Der Displayconnector sieht gleich, aber das zweite Flexkabel mit den Sensoren scheint anders zu sein. Diese Sensoren könnte ich vom defekten 13er Display nehmen, passt denn der Rest?
My iphone screen damaged and i asked a technician to change the lcd for me but after that face id is working but auto-brightness is not working! I disabled and re enabled this feature but still its not working. how can i fix that? i followed repair assistant to finish the procedure but it couldn't complete and now it shows (Display Unknown). I live in Iran and there is not any apple partner here to fix it for me. is there any way i can fix it myself?
I too replaced the screen of an iPhone 13 Mini, but for me it is the same as for @Farshad Foroughi - auto-brightness is not working anymore. FaceID works perfectly without setting it up again, so I think the sensors were moved to the new screenn without any damage. And I also checked that the sensors do not get dirty and are in place as before. The iPhone runs iOS18, and the repair assistant went through (but also showing it as an unknown display which is probably no original apple part). The repair itself went well and the display works - besides auto-brightness - without any flaws. Setting the brightness manually works fine, so I have no clue what went wrong :( Any Ideas???
However - thanks for the great work @ifixit @Adriana Zwink and all the other contributors!
BUT: When opening the display the first time, be aware that the frame which holds the electronics is quite thick! Lift everything wide enough and do not shove an opening pick between the glass and the frame, this would destroy the display!