crwdns2915892:0crwdne2915892:0
In this repair guide, we show you how to replace the logic board on the iPhone 11
Recommended Tools: Pentalobe screwdriver, Phillips screwdriver, Y-Type screwdriver, Standoff screwdriver, suction cup, tweezers, spudger and heat gun because the display is glued on.
crwdns2942213:0crwdne2942213:0
crwdns2936621:0crwdne2936621:0
-
-
Power off your iPhone before beginning disassembly.
-
Remove the two 6.7 mm-long pentalobe screws at the bottom edge of the iPhone.
-
-
-
Measure 3 mm from the tip and mark the opening pick with a permanent marker.
Got to step 2 and realized the fix kit doesn't include an opening pick! Looks like a guitar pick, and I have those lying around. Is that expected? Looks like the pick is used in many steps below. There's a little blue crowbar that isn't mentioned in the instructions. Perhaps that replaces the opening pick?
Hi! I can't see which guide you were using when writing this comment. Can you reply here with which guide and fix kit you used?
I see you posted this in Meta. I hope it's resolved soon! In the meantime, a guitar pick may work well enough for your repair.
what fix kit?
My fix kit didn't include an opening pick either
Make sure you check inside the black boxes after emptying them. My pick was stuck inside one of the boxes.
My AliExpress refurbished screen came with a pick that has a coin-like circle that pops out, so no modification was necessary
the picture shows 3 cm but the description says 3 mm's. Which one is it?
That is a misunderstanding. It is a ruler with a scale for cm, it shows 0.3 cm, i.e. 3 mm.
VauWeh -
Oh, come ON!
Big Ed -
It will ALWAYS be millimeters on a phone, but this step is ridiculous, skip it!
@leifdewolf I wouldn't skip it for a first repair.
It's not an Ifixit KIT if it doesn't include everything. You'll need to order the opening pic separately. Or head to Walmart like myself and look for guitar pics. Hopefully, this will work just as well.
No pick in mine as well. It’s really not clear that you have to order this separately when ordering an IPhone SE 202/2022 screen repair kit. Is this the case?
Frustrated, I ordered a compact package where everything was encapsulated. Useless suction tools could not separate the screen. If it is unable to decouple the screen, then why sucking suction tools you have provided.
For my kit the triangle pick was stuck inside the box with the screen not with the other tools maybe it's also there for you
Y’all are getting far, FAR too detailed with some of this stuff…. Measuring and marking the pick that you won’t actually use to open the device?!? lol that’s kinda funny. Just heat it up, grab a spudger, and the back just pops right off! The iFixit tech need to stick to the KISS method more often, you know KEEP IT SIMPLE STUPID!!! Like l, for reals, I’ve been doing this stuff for YEARS and using iFixit guides regularly and this is just ridiculous at this point!
Will the phone still work if the sensor assembly on the back of the screen is damaged?
I don't have a pick, but how much better are these picks than an old credit card for opening an iPhone 13 mini?
The pick in my iFixIt kit was packed with the battery, not with the rest of the toolkit.
-
-
-
Lay overlapping strips of clear packing tape over the iPhone's screen until the whole face is covered.
-
If you can't get the suction cup to stick in the next few steps, fold a strong piece of tape (such as duct tape) into a handle and lift the screen with that instead.
-
-
crwdns2935267:0crwdne2935267:0Clampy - Anti-Clamp$24.95
-
Pull the blue handle backwards to unlock the Anti-Clamp's arms.
-
Slide the arms over either the left or right edge of your iPhone.
-
Position the suction cups near the bottom edge of the iPhone—one on the top, and one on the bottom.
-
Squeeze the cups together to apply suction to the desired area.
-
-
-
Pull the blue handle forward to lock the arms.
-
Turn the handle clockwise 360 degrees or until the cups start to stretch.
-
Make sure the suction cups remain aligned with each other. If they begin to slip out of alignment, loosen the suction cups slightly and realign the arms.
-
-
-
Heat an iOpener and thread it through the arms of the Anti-Clamp.
-
Fold the iOpener so it lays on the bottom edge of the iPhone.
-
Wait one minute to give the adhesive a chance to release and present an opening gap.
-
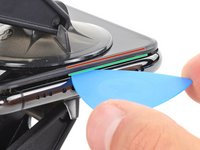
Insert an opening pick into the gap under the screen and the plastic bezel, not the screen itself.
-
Skip the next three steps.
Insert an opening pick into the gap under the screen and the plastic bezel, not the screen itself.
Any suggestions if the screen is broken and the anti-clamp just separates the screen from the bezel?
-
-
-
Use a hairdryer or heat gun or prepare an iOpener and apply it to the lower edge of the iPhone for about a minute.
어짜피 못쓰고 버릴 거라면, 이것보다 인두기를 직접 대는 방식을 추천 합니다. 어짜피 유리라 연기나 반응도 없고 무엇보다 금방 열기가 올라와요.
Gut gehen auch Kirschkernsäckchen. Damit hatte ich Erfolg!
-
-
-
If you're using a single suction handle, apply it to the bottom edge of the phone, while avoiding the curved portion of the glass.
-
-
-
Pull up on the suction cup with firm, constant pressure to create a slight gap between the front panel and rear case.
-
Insert an opening pick into the gap under the screen and the plastic bezel, not the screen itself.
This turned out to be the most difficult part for me. My old ifixit suction cup didn't suck hard enough to generate enough force to pry the display from the case. I ended up applying heat at least a dozen times, and I had to pull up on the suction cup forcefully over and over and over while repositioning it several times. I finally had success inserting my pick into the tiny gap after 30 or so rapid tugs on the suction cup.
I pulled the screen by accident instead of the bottom layer, now what?
I have the same question
After heating (I used a hair dryer for 4-5 mins, moving around whole frame, to make sure was pretty hot, then let sit for 1 minute), insert a razor blade between the bezel and the frame, at the bottom edge. Lever upwards, the screen will easily pull away. You won’t even need the suction cup.
-
-
-
Slide the opening pick around the lower left corner and up the left edge of the iPhone, slicing through the adhesive holding the display in place.
-
-
-
Re-insert your pick at the bottom edge of the iPhone, and slide it up the right side to continue separating the adhesive.
Instructions are confusing as the last step says not to insert at certain points, while this says to slide all the way up the right side - is it that sliding is ok but inserting isn't (whatever that might mean) or just not more than 3mm?
Just slide slightly and the display will rise without problems on all iPhone models, sometimes if I have long nails I even insert a fingernail and lift the display.
Tonynox -
-
-
-
Gently pull the right edge of the display down slightly (in the direction of the Lightning port).
-
Insert your pick into the top-right corner of the phone.
-
-
-
Continue pulling the display down (toward the Lightning port) as needed in order to make a gap large enough for the pick.
-
Slide the pick to the top left corner and cut any remaining adhesive securing the display.
-
-
-
Pull the small nub on the suction cup to detach it from the front panel.
-
-
-
-
Open the iPhone by swinging the display up from the left side, like the back cover of a book.
-
Prop the display up against something sturdy.
-
-
-
To access the screws in the following step, tilt the display by slightly lifting its lower edge.
-
-
crwdns2935267:0crwdne2935267:0Magnetic Project Mat$19.95
-
Use a Y000 driver to remove the three 1.1 mm-long screws securing the battery connector bracket.
During reassembly, I had to connect my phone to the charger before it would power up.
Die Schrauben sind wahnsinnig kurz, tatsächlich winzig klein. Nach dem Herausdrehen könnte es im ersten Moment so aussehen, als habe man die Schrauben ausgebohrt anstatt herauszudrehen, sie sind jedoch sehr schnell gelöst und liegen dann entweder im Gehäuse oder sind neben dem Gehäuse herausgefallen. In jedem Fall sollten sie nie auf den Boden fallen, da sie dann kaum mehr auffindbar wären.
I got to this point thinking/hoping I could eek by with a Y1 orY0 or even a PH000 driver but no such luck. The Y000 is in fact necessary. Finishing this repair will have to wait for now.
ALSO thanks Apple, there is ABSOLUTELY no reason AT. ALL. to use so many random, oddball screw heads, BUT to make self repairs more difficult and expensive. A real F-U to the consumer!
-
-
-
Use a spudger or a clean fingernail to pry the battery connector up from its socket on the logic board.
-
Bend the connector slightly away from the logic board to prevent it from accidentally contacting the socket.
-
-
-
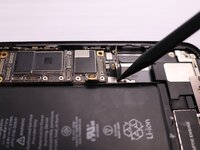
Use a Y000 driver to remove the five 1.1 mm screws securing the logic board cover bracket.
Die Schrauben sind wahnsinnig kurz, tatsächlich winzig klein. Nach dem Herausdrehen könnte es im ersten Moment so aussehen, als habe man die Schrauben ausgebohrt anstatt herauszudrehen, sie sind jedoch sehr schnell gelöst und liegen dann entweder im Gehäuse oder sind neben dem Gehäuse herausgefallen. In jedem Fall sollten sie nie auf den Boden fallen, da sie dann kaum mehr auffindbar wären.
-
-
-
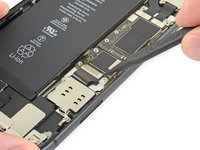
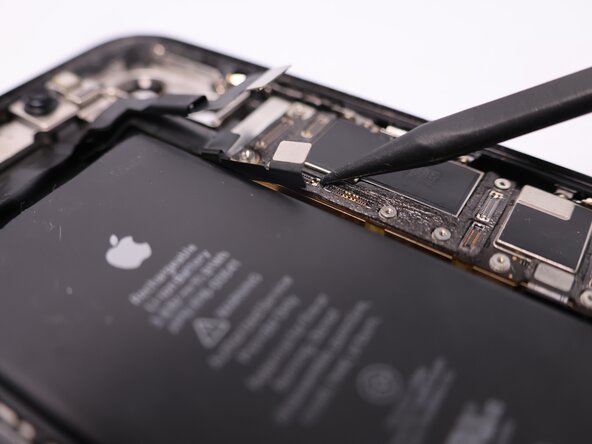
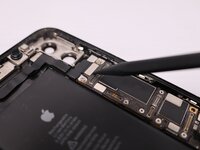
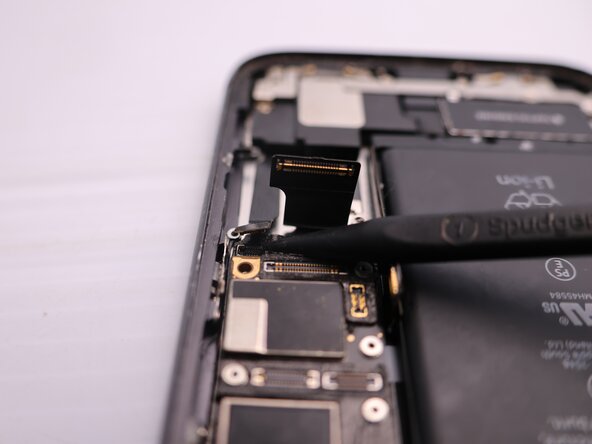
Use a spudger or a fingernail to disconnect the LCD panel cable connector.
-
Disconnect the digitizer connector next to it.
Be mindful when reconnecting LCD panel connector and digitizer connector. It’s looks very similar. These 2 ribbon connectors a slightly different.
Pay attention.
내 아이폰이 디스플레이 분리 단계를 거친 후, 전원이 들어오지 않습니다. 층전기를 꽂아도 배터리에 미세한 전기 반응이 느껴지지 않고, 탭틱 엔진도 작동하지 않게 되었습니다. cpu 온도는 여전히 뜨껍습니다. 내 마더보드가 디스플레이 분리 후 갑자기 고장난건가요?
Hast Du das Problem gelöst?
커넥터 핀을 빼거나 다시 넣기 위해 구부러졌을 수 있습니다. 핀이 구부러진 경우 돋보기 등으로 살펴보고, 그렇다면 적절한 매장에 가져가세요.
Hampter -
Hier war mein Problem schon gelöst. Durch einen Sturz hat sich der Touchscreen Stecker gelöst. Wieder eingesteckt funktionierte die Touch-Eingabe wieder.
-
-
-
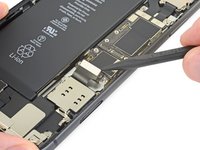
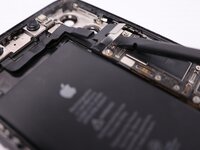
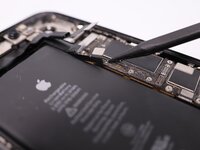
Use the point of a spudger or a fingernail to disconnect the front panel sensor assembly connector.
There needs to be an extra step between 24 and 25 for reassembly, telling folks to apply adhesive here. I got the thing almost all the way put back together before realizing that the adhesive was a single piece that needs the cables to be disconnected in order to apply it.
-
-
-
Remove the display assembly.
After this step its probably a good idea to test the new screen (you dont have to plug in the front camera assembly)
Not a technician, so correct me if I'm wrong: I think that it's at this step of reassembly (before you reattach the screen) that you apply waterproof glue, if you have it.
You are both correct. Testing the screen before putting on adhesive means the screen can be returned if faulty. Many places will not accept a screen return that has adhesive on it.
So if it works apply adhesive at this point. When testing don’t just rely on Apple logo test touch functionality also .
-
-
-
Remove the two Phillips screws securing the rear camera cover:
-
One 1.4 mm screw
-
One 1.3 mm screw
-
-
-
Lift the camera cover from the edge closest to the battery, and remove it.
-
-
-
Use a spudger or a fingernail to disconnect the two camera cable connectors by prying them straight up from their sockets.
-
-
-
Insert the point of a spudger at the bottom right corner of the camera, between the camera assembly and the iPhone's frame.
-
Gently pry up to lever the camera out of the iPhone.
-
-
-
Remove the rear-facing camera assembly.
-
-
-
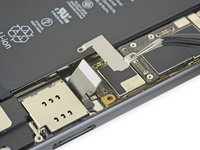
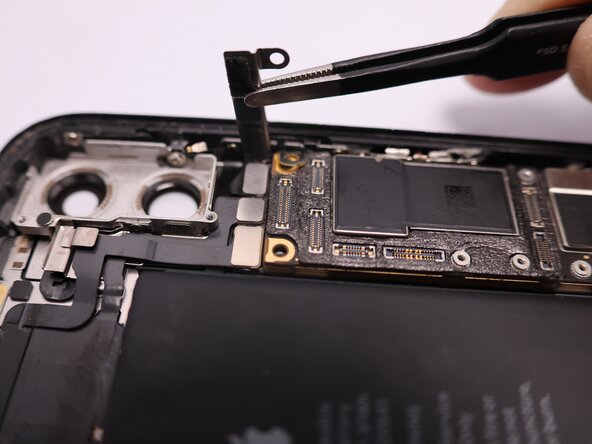
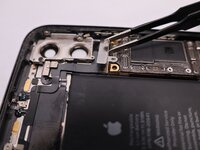
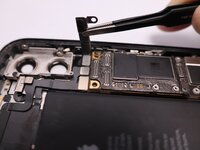
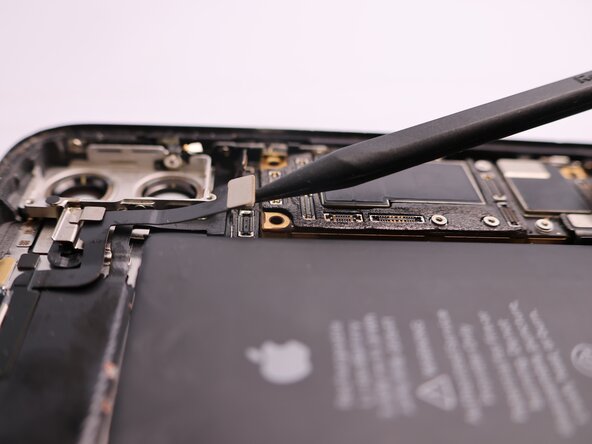
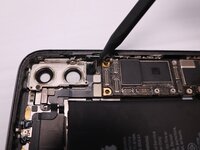
Use a spudger or a fingernail to pry up and disconnect the flex cable for the Lightning connector assembly.
-
-
-
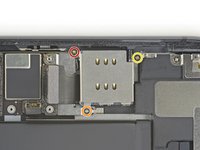
Remove the three Phillips screws surrounding the SIM card reader:
-
One 1.5 mm screw
-
One 1.9 mm screw
-
One 1.6 mm screw securing a grounding bracket
-
Removing the grounding bracket secured by the final screw.
-
-
-
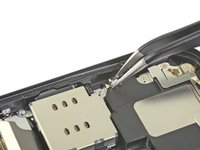
Use a standoff driver to remove the 3.1 mm screw securing the SIM card reader connector bracket.
-
-
-
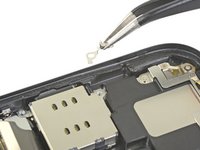
Remove the SIM reader's connector bracket.
-
-
-
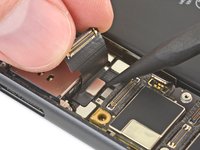
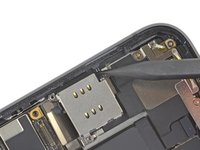
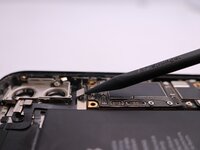
While gently lifting the Lightning connector flex cable out of the way, use the point of a spudger to pry up and disconnect the SIM card reader flex cable.
-
-
-
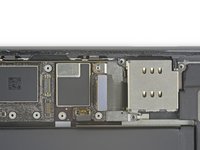
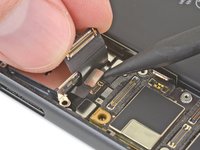
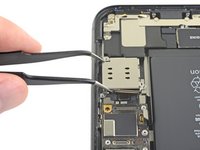
Use the point of a spudger to push the SIM eject plunger out towards the edge of the phone.
-
-
-
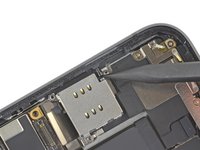
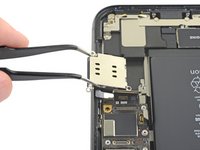
Lift the SIM card reader and slide it toward the outside edge of the iPhone.
-
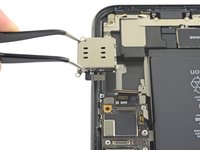
Remove the SIM card reader.
-
-
-
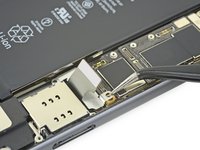
Use a spudger or fingernail to disconnect the two front camera cable connectors by prying them from straight up from their sockets.
-
-
-
Remove the front camera assembly.
-
-
-
Remove the two 3.2 mm standoff screws.
-
-
-
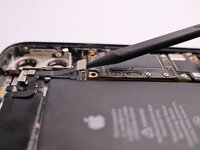
Use a spudger to disconnect the cable connectors for the volume, power, and silent switch.
-
-
-
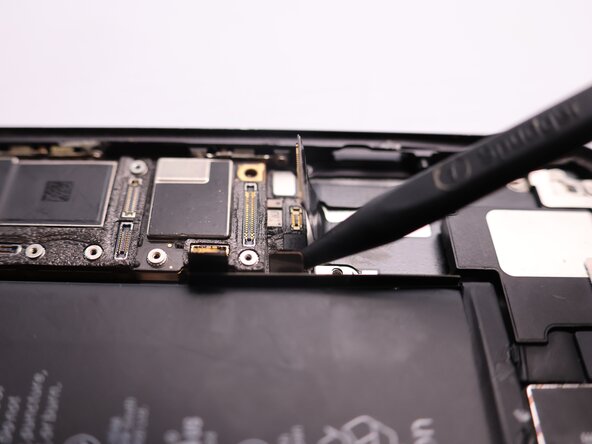
Use a spudger to disconnect the cable connectors for the lighting port and wireless charging coil.
-
-
-
Carefully remove the logic board from the phone chassis.
-


To reassemble your device, follow these instructions in reverse order.
To reassemble your device, follow these instructions in reverse order.
crwdns2935221:0crwdne2935221:0
crwdns2935229:051crwdne2935229:0

crwdns2947412:015crwdne2947412:0
Nice beakdown! Might also use post-processing on stopping point above video view over main pcb to highlight screw location with color coding
Thanks for the recommendation, I’ll take this into account in the following videos.
Arty -
where can I buy a logic board for an Iphone 11
Try AliExpress or eBay
Top, explications claires. Merci pour votre vidéo.
So, I got some Non iCloud locked phones (an 11 and an XR) that are super super terribly busted and broken, but the logic boards are good. If I buy iCloud locked phones with good-condition bodies, can i swap the logic boards into the good bodies? Do I have to swap the sim slot too? What risks do I run?
Hey Jacob! If you put the unlocked motherboard into the locked body, make sure you also transfer the following parts from the unlocked phone:
-Front-facing camera assembly
-Screen-mounted earpiece assembly
-Battery
The new phone combo will work without swapping in the FF camera and earpiece, but Face ID will not be functional. The battery is optional but it will give an annoying "Cannot verify official iPhone battery" message for a few weeks.
So I've had an issue with a few iPhone 11 re-body jobs I've done, where I've swapped all of the components out of a broken iPhone body into a fresh one. Out of about 30 that I've performed, two of them end up with an issue where the phone reboots randomly ever 2-5 minutes. (I've had to replace the phones outright for the customer.) It's not common but it is VERY frustrating.
Any idea what could be causing this? I've disconnected every component except for the battery and screen and it still does the reboot, so I'm certain it's a motherboard issue.
I'm facing the same issue with my phone. It keeps on restarting every 2 minutes or so. I wonder if I can just swap the logic board and fix it. Please let me know if you find a solution. My email is pranav.lamba1@gmail.com.
what does the logic board do?
Why did ifixit switch to video? It's not as helpful as actual steps.
Please let us know it is repairable
does replacing the logic board delete all data on my iphone? i believe my logic board is messed up because i recently bought a screen off you guys and replaced it and it was still black but the iphone was on because it vibrated once i connected it to a charger and i put the new screen on a different iphone and it works. i dont want to swap out my logic board if it erases the data because my iphone isnt backed up
I just manage to change the motherboard on iPhone 11. Im learning iPhone repair, so it was quite a nice feeling.
Is it much harder to change the motherboard on 12 and 13 series compared to iPhone 11?
Gracias, por tu video
the right screws wouldn’t come off
Yusef San Inocencio - crwdns2934203:0crwdne2934203:0
ok one came of but my right wont come of either!!!!
Aisa Jawara -
Hello guys, I still haven't found away to power off the iphone without using the screen. Cheers!
danielaguirre93 - crwdns2934203:0crwdne2934203:0
You can try this.
Quickly Press and release the volume up button.
then Quickly Press and release the volume down button.
then press and hold the power button and wait until it turns off.
worked for me :D
Benóný Egilson - crwdns2934203:0crwdne2934203:0
Where does one get replacement seals? Is this the same as the display assembly adhesive?
Brian Baker - crwdns2934203:0crwdne2934203:0
not of the screwdrivers i have seem to be able to turn the screws
Aisa Jawara - crwdns2934203:0crwdne2934203:0
how do you change battery of an iPhone 11 and still the battery health shows, do you use a software for that?
Great Me - crwdns2934203:0crwdne2934203:0
Battery health won’t show on a non Apple battery.
DON’T forget to discharge old battery before removing it. Very impressive fire (and smoke!) if you puncture it. Ask me how I know
Doug Harrowing - crwdns2934203:0crwdne2934203:0