crwdns2915892:0crwdne2915892:0
Follow this guide to replace the battery in your iPad 5 LTE.
Before you begin, drain your iPad's battery below 25% charge. This will minimize the risk of a dangerous thermal runaway in the event that you accidentally puncture or deform the battery.
Lithium ion batteries contain dangerous chemicals and may catch fire and explode if punctured or mishandled. Use caution.
Parts of this guide were shot with a Wi-Fi model and as such the internals may look slightly different from the LTE model. The procedure is the same for both models except where noted.
Warning: the battery isolation method in this guide is outdated, and may result in irreversible damage to the battery pins of the logic board, effectively destroying it. If you choose to isolate the battery this way, heed all warnings and work extremely carefully. If you choose to complete the guide without isolating the battery, avoid using metal tools except when completely necessary (like when removing screws) to prevent shorting the battery and damaging sensitive circuit components.
crwdns2942213:0crwdne2942213:0
-
-
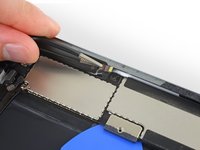
Heat an iOpener and apply it to the left edge of the device for two minutes.
-
-
-
While you're waiting for the adhesive to loosen, note the following areas that are sensitive to prying:
-
Front camera
-
Antennas
-
Display cables
-
-
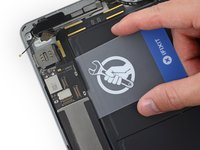
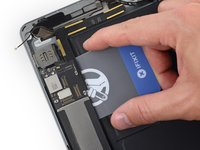
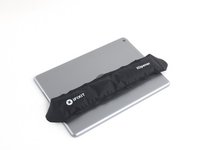
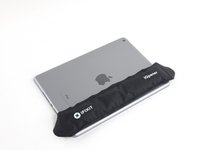
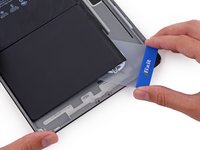
crwdns2935267:0crwdne2935267:0Clampy - Anti-Clamp$24.95
-
Pull the blue handle backwards to unlock the Anti-Clamp's arms.
-
Place an object under your iPad so it rests level between the suction cups.
-
Position the suction cups near the middle of the left edge—one on the top, and one on the bottom.
-
Hold the bottom of the Anti-Clamp steady and firmly press down on the top cup to apply suction.
-
-
-
Pull the blue handle forward to lock the arms.
-
Turn the handle clockwise 360 degrees or until the cups start to stretch.
-
Make sure the suction cups remain aligned with each other. If they begin to slip out of alignment, loosen the suction cups slightly and realign the arms.
-
-
-
Wait one minute to give the adhesive a chance to release and present an opening gap.
-
If your screen isn't getting hot enough, you can use a hair dryer to heat along the left edge of the iPad.
-
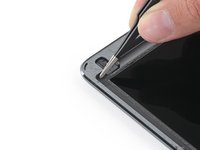
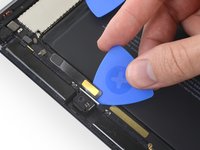
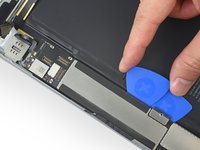
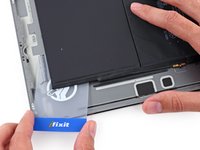
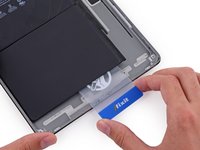
Insert an opening pick under the digitizer when the Anti-Clamp creates a large enough gap.
-
Skip the next step.
-
-
-
Once the screen is warm to touch, apply a suction handle to the left edge of the screen and as close to the edge as possible.
-
Lift the screen with the suction handle to create a small gap between the digitizer and the frame.
-
Insert an opening pick into the gap between the digitizer and the frame.
I had a screen that was lightly cracked, and when I pulled up on the glass it cracked even further and made a mess of my removal. So, I would recommend taping cracks even if you can get suction so that you don’t induce even more cracks.
I actually had a really badly cracked digitizer. Using the suction cup did nothing but shatter the digitizer more. I intentionally drove a flat head screw driver into the digitizer to reveal the recess in the body where they are showing the opening-pick. Working around the edge, the glass shattered. You still need to be careful at all of spots noted in step 2.
Do not go under the digitizer more than the 1 mm along the sides or 3-4 mm at the corners as shown in step 29 using the flat grey ring around the edge for a reference. Direct all of your tool force into the body to prevent slipping into critical parts.
The antennas at either side of the home button were the trickiest part as they were thin and slightly attached to the digitizer. I would recommend using a plastic tool for these parts if you are having to 'scrape' the glass off of the tabs of the antenna.
-
-
-
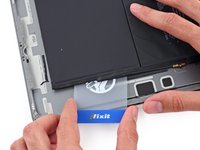
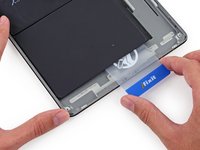
Insert a second opening pick into the gap you just created.
-
Slide the pick toward the bottom-left corner of the device to separate the adhesive.
-
Leave the pick in the bottom-left corner to prevent the adhesive from re-sealing.
-
-
-
If the opening pick gets stuck in the adhesive, "roll" the pick along the side of the iPad to continue separating the adhesive.
-
-
-
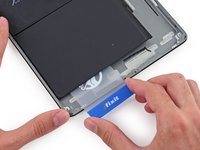
Slide the first opening pick towards the top-left corner of the device to separate the adhesive.
-
Leave the pick in the top-left corner to prevent the adhesive from re-sealing.
-
-
-
Heat an iOpener and apply it to the top edge of the device for two minutes.
-
-
-
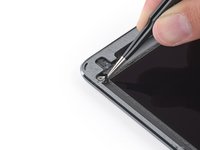
Rotate the pick around the top-left corner of the device to separate the adhesive.
-
-
-
Slide the opening pick along the top edge of the device, stopping just before you reach the front camera.
-
-
-
Pull the pick out until only the tip is between the digitizer and the frame.
-
Slide the pick above the front camera to separate the adhesive.
-
Leave the pick near the right side of the front camera before continuing.
-
-
-
Re-insert the pick and slide it towards the top-right corner of the device to completely separate the top adhesive.
-
Leave the pick in the top-right corner to prevent the adhesive from re-sealing.
-
-
-
Heat an iOpener and apply it to the right edge of the device for two minutes.
-
-
-
Rotate the pick around the top-right corner of the device to separate the adhesive.
-
-
-
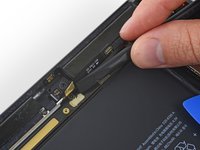
Insert a new opening pick and slide it to the middle of the iPad's right edge.
There are sensitive display/digitizer cables no less than five inches from the bottom edge of the iPad. Insert the pick further down than this, or deeper than 1mm beyond this point and you risk irreparably damaging these cables.
Three inches is much too far down this side of the iPad to use picks.
-
-
-
Heat an iOpener and apply it to the bottom edge of the device for two minutes.
-
-
-
Slide the bottom-left pick to the bottom-left corner to separate the adhesive.
-
Leave the pick in the bottom-left corner before moving to the next step.
-
-
-
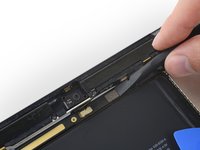
Insert a new opening pick into the gap you just created on the bottom edge of the iPad.
-
Slide the pick over the antenna, stopping just before the home button.
-
Leave the pick to the left of the home button before continuing.
-
-
-
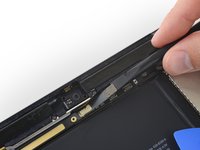
Insert an opening pick into the gap you just created.
-
Slide the pick underneath the home button and towards the bottom-right corner, making sure only the tip is between the digitizer and the frame.
-
-
-
Re-insert the pick and slide it towards the home button to completely separate the bottom adhesive.
-
Leave the pick to the right of the home button before continuing.
-
-
-
Heat an iOpener and apply it to the right edge of the device for two minutes.
-
-
-
Twist the two opening picks on the left corners of the iPad to lift the digitizer slightly, separating the the last of the adhesive in the process.
-
-
-
Lift the left edge of the digitizer upwards to further separate the adhesive along the right edge of the iPad.
-
-
-
While supporting the digitizer, slide an opening pick between the two display cables to separate the last of the adhesive.
-
-
-
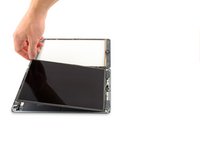
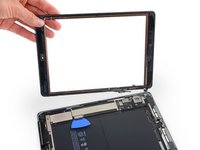
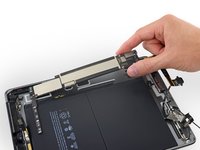
Once all of the adhesive has been separated, open the digitizer like a book and rest it parallel to the iPad.
While reassembling, REALLY make sure the display cables and the home button cable won't be folded / bent while closing the digitizer. I'm not exactly sure what I did, but I broke the home button and touch ID since I bent the home button cable to the point that it broke. These ribbon cables are SUPER fragile.
-
-
-
Remove any tape obscuring the LCD screws.
-
-
-
Remove the four Phillips screws securing the LCD:
-
Three 4.0 mm screws
-
One 4.8 mm screw
-
-
-
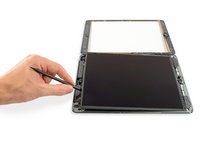
Use the flat end of a spudger to pry the LCD out of its recess just enough to grab it with your fingers.
-
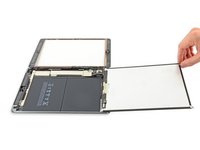
Flip the iPad LCD like a page in a book, lifting near the camera and turning it over the home button end of the rear case.
-
Lay the LCD on its face to allow access to the display cables.
Pictures that better indicate the difference between the remaining adhesive and the two mylar cables (the very cables you are trying to avoid damaging!) would be much appreciated. On my unit the two were very hard to distinguish
-
-
-
-
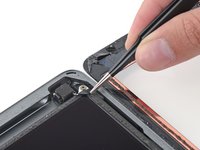
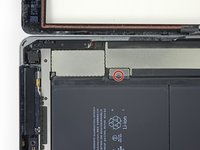
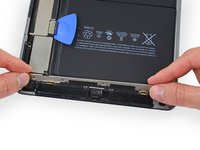
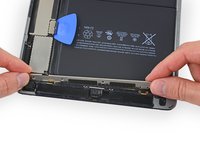
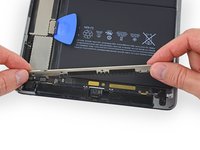
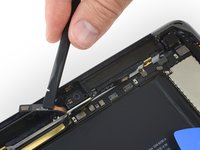
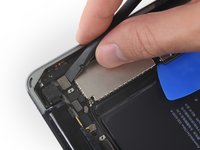
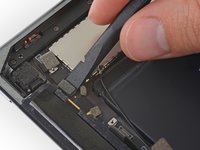
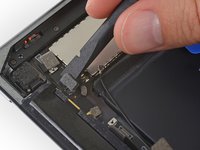
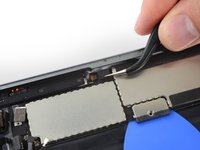
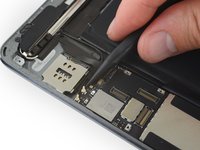
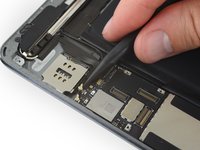
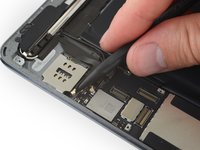
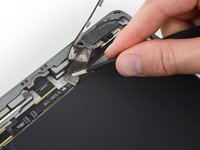
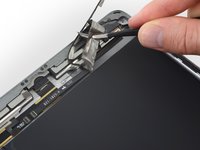
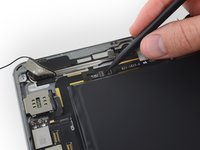
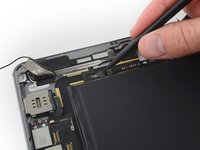
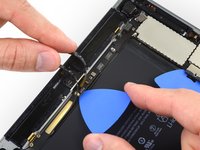
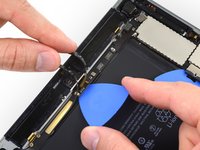
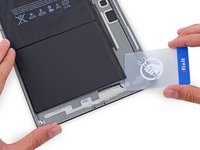
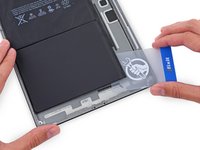
Remove the single 2.3 mm Phillips screw securing the battery connector to the logic board.
-
Leave the blocker there to prevent the battery connector leads from making contact until you have completed your repairs.
The could recommend me since I did not put the wedge first in the connection of the battery and it heated the logic card a couple of minutes, q´l recommend to solve it since it does not turn on
The battery isolation pick didn’t come with my kit. I made my own using one of the regular picks and a pair of scissors.
Would it not be important to note that you are not really “disconnecting” the conduit of the battery from the logic board, but rather isolating the connection?
@dlcatftwin I’m not sure I understand the distinction you’re making. You are fully disconnecting the battery, by opening the circuit and wedging a big insulator in there to keep it from closing again accidentally.
Hello Jeff,
Thank you for responding. one may regard “disconnecting” as actually unplugging or unsocketing a cable connection as actually disconnecting, like in step 37. I could picture a person tugging on the pick thinking that the battery connector actually had to be lifted away from the board.
Probably over-thinking it! ;-)
Regards,
DLC
@dlcatftwin 100% on point. That’s exactly why I’m reading this comment right now. I’ve never heard of a “Battery Isolation Pick” and I was trying to get the connector loose, before realizing it wasn’t coming easy and therefore reading the comments for more info.
Ergo, there is some confusion here that should be noted in the primary instructions.
-
-
-
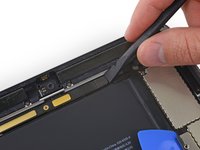
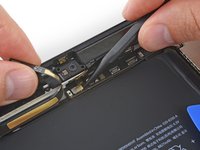
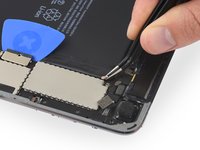
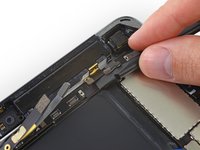
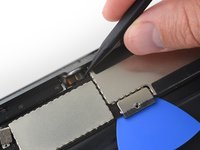
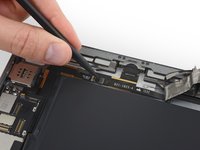
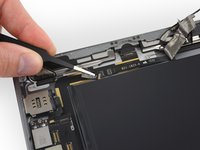
Remove the three 1.4 mm Phillips screws securing the display cable bracket.
The supplied screw driver bit really struggled with these screws.
-
-
-
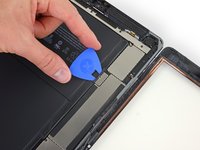
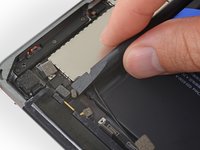
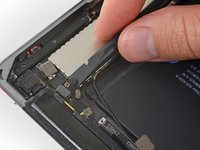
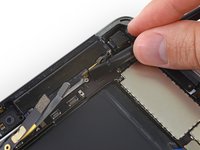
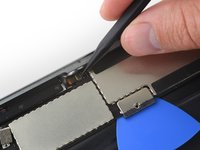
Use the flat end of a spudger to gently pry the display cable bracket straight up from the logic board.
My iPad Air2 is configured differently from that in these photos. The battery connector is next to the display cable connection, and the LCD/glass panel are integral, so that they lift out of the frame together.
-
-
-
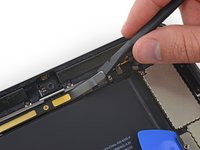
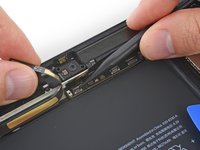
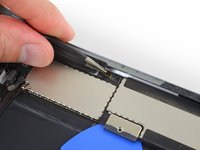
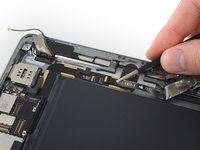
Remove any tape covering the home button ribbon cable connector.
-
-
-
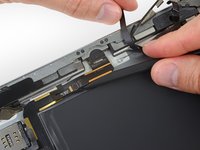
Use the flat end of a spudger to flip the tab on the home button ribbon cable ZIF connector upward.
-
Carefully pull the home button ribbon cable straight out of the ZIF connector.
On reassembly take note of the flap lock on that connection. Sadly I failed to operate it correctly and now have a defunct home button.
-
-
-
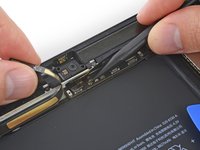
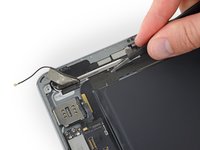
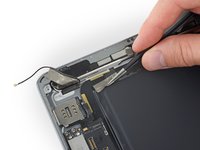
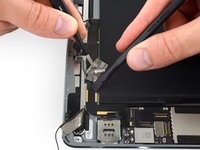
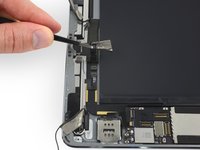
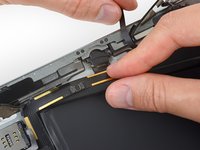
Use the flat end of a spudger or a fingernail to carefully pop the two digitizer cable connectors straight up from their sockets.
When reversing with the new screen , this was the hardest part for me.
The cables needs to fit under the LCD screen, and they kept going out of place when I tried to close the screen in the end.
That meant that I had to remove the LCD again with one hand while holding the digitizer/glass with the other - all while I had already exposed the adhesives.
for me the cables of the new screen were longer that the old one. So even if i put everithing under the lcd, the digitizer didnt close properly. After everything was put back togheter, this side of the digitizer keep popping out.
I do have the same problem.
Anne -
In step 41 - what is the name of the connector in the first picture which he is trying to open
It is a ZIF socket. (Zero insertion force)
Zach -
-
-
crwdns2935267:0crwdne2935267:0Polyimide Tape$9.99
-
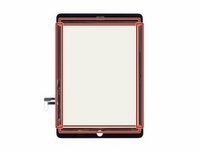
Remove the front panel assembly.
-
If you experience "ghost" or "phantom" touch input issues with your new display, this can be resolved by adding a layer of very thin insulating tape, such as Kapton (polyimide) tape, to the highlighted areas on the back of the panel. iFixit panels come with the proper insulation, and should not require the addition of any tape.
After removing the glass, I'd suggest scraping off any remaining black adhesive off of the iPad's frame. Get every speck. This may be time consuming if you have lost glass integrity and have sticky, splintered shards around the edge of the frame, but you need the frame completely clean of adhesive before you put the new front panel down or else it won't lay correctly in the frame.
This was not as hard as I expected it. I think I was lucky since the adhesive wasn’t properly working anymore, and my display wasn’t too shattered. Took me a about 40 minutes to remove the display. Unfortunately I noticed that my battery had expanded so ordered a new one, waiting for it to arrive before I put it all back together.
-
-
crwdns2935267:0crwdne2935267:0Tweezers$4.99
-
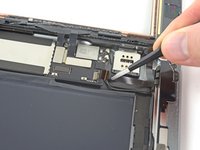
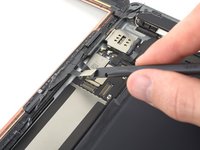
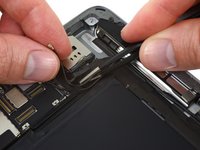
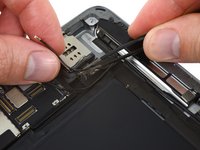
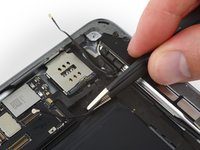
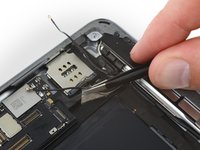
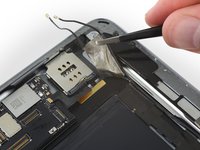
Use tweezers to peel and remove the piece of tape covering the SIM board cable connector on the logic board.
-
-
-
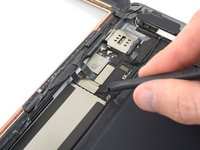
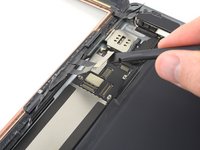
Use the pointed end of a spudger to flip up the retaining flap on the SIM board cable connector.
-
Slide the SIM board cable straight out of its ZIF connector.
-
-
-
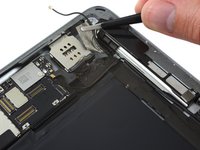
Remove the following screws securing the upper component cable bracket:
-
Two 2.0 mm Phillips screws
-
Three 1.4 mm Phillips screws
At this point you can carefully heat and pry up the battery cells, then heat under the board and lift it up enough to slide the battery out and slide the new battery in place.
-
-
crwdns2935267:0crwdne2935267:0Tweezers$4.99
-
Use tweezers to start peeling back the tape securing the upper component cable bracket.
-
-
-
Slowly peel the upper component cable bracket up out of the iPad—leaving the tape pieces on the bracket to make it easier to reinstall.
-
-
-
Use the flat end of a spudger to disconnect the front-facing camera connector from its socket on the logic board.
-
-
-
Slide an opening pick underneath the front-facing camera cable to break up the adhesive holding it in place.
-
Push the camera cable up with a spudger to reveal a second ribbon cable connector underneath.
-
-
-
Use the flat end of a spudger to gently disconnect the headphone jack ribbon cable from its socket on the logic board.
-
Again, carefully push this second ribbon cable aside to reveal more connectors underneath.
There is tape on the LTE model adhering this socket to the frame underneath.
-
-
-
Use the pointed tip of a spudger to disconnect the microphone cable connector from its socket on the logic board.
-
Use the pointed tip of the spudger to disconnect the GPS antenna cable, directly to the right of the microphone cable connector.
-
-
-
Use the flat tip of a spudger to disconnect the rear-facing camera cable by prying it straight up from its socket on the logic board.
-
-
-
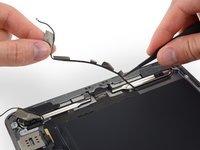
Disconnect the antenna interconnect cable by lifting it straight up from its socket on the logic board.
-
-
-
Use the flat end of a spudger to disconnect the primary cellular antenna interconnect cable from its socket on the logic board.
I accidentally broke the 's' interconnector. where can I buy the replace? Or can i use something similar ? F.e. old antenna in other iphone ? Thank you !
-
-
-
Use the flat end of a spudger to lift the primary cellular antenna connector from its socket on the logic board.
-
-
-
Remove the 1.4 mm Phillips screw securing the primary cellular antenna interconnect cable bracket.
-
-
-
Use the flat end of a spudger to gently fold the primary cellular antenna interconnect cable bracket up and out of the way.
I accidentally broke the 's' interconnector. where can I buy the replace? Or can i use something similar ? F.e. old antenna in other iphone ? Thank you !
-
-
-
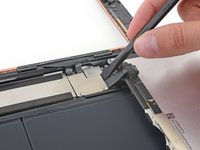
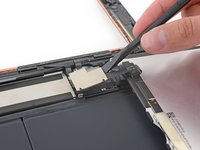
Remove the piece of black tape covering the upper button assembly cable connector.
-
-
-
Use the pointed tip of a spudger to flip up the retaining flap on the upper button assembly cable connector.
-
-
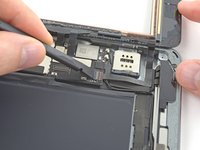
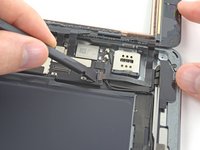
crwdns2935267:0crwdne2935267:0Tweezers$4.99
-
Use tweezers to carefully pull the upper button assembly ribbon cable straight out of its connector.
-
-
-
Disconnect the left and right Wi-Fi antenna cables by lifting them straight up from their sockets on the lower end of the logic board.
-
-
-
Use a pair of tweezers to peel up the tape securing the right Wi-Fi antenna cable near the SIM board.
-
-
-
Repeat the previous step to peel up a second piece of tape directly underneath, securing the left Wi-Fi antenna cable.
-
If you accidentally peeled up both pieces of tape together, carefully peel them apart and separate them before proceeding to the next step.
-
-
-
Four additional pieces of tape secure the left Wi-Fi antenna near the lower edge of the iPad.
-
Peel the tape up from the rear case.
-
Fold the antenna cable out of the way.
-
-
-
Instead, grip the tape just under the speaker and peel it down, away from the edge of the case.
-
-
-
Peel the tape toward the home button to uncover the speaker cable connector.
-
-
-
Continue peeling up the tape away until there is enough slack in the left speaker cable to disconnect it.
-
-
-
Use the pointed end of a spudger to flip up the retaining flap on the left speaker cable connector.
-
Disconnect the left speaker cable by pulling it straight out of its socket.
-
-
-
Use the pointed end of a spudger to flip up the retaining flap on the right speaker cable connector.
-
Disconnect the right speaker cable by pulling it straight out of its socket.
-
-
-
Remove the two 3.3 mm Phillips screws securing the Lightning connector to the rear case.
-
-
-
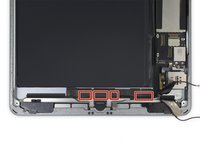
The adhesive is in the form of seven strips of black tape—refer to this step as you work at heating and prying to keep track of where each piece is located.
-
-
-
Reheat your iOpener and lay it over the bottom edge of the iPad to soften the adhesive securing the Lightning port ribbon cable to the rear case.
-
Wait a couple minutes for the adhesive to soften, then move on to the next step.
-
-
-
Slide the flat end of a spudger under the Lightning connector cable to break up the adhesive securing it to the rear case.
-
If necessary, push the left speaker cable gently aside to provide access to the Lightning connector cable.
-
-
-
Lay a warm iOpener over the upper edge of the iPad and let it sit for a couple minutes to soften the adhesive holding the logic board in place.
-
-
-
Carefully insert an opening pick under the logic board, between the front-facing camera and the battery.
-
Slide the guitar pick toward the front-facing camera connector, and stop at the bend in the logic board.
-
-
-
Reheat your iOpener and lay it lengthways on the rear case, directly over the logic board.
-
Wait a couple minutes for the adhesive to soften, then remove the iOpener and move on to the next step.
-
-
-
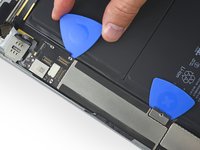
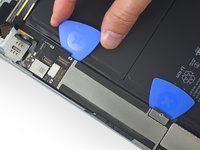
Insert an opening pick underneath the logic board at the corner of the large EMI shield.
-
Slide the pick upwards until you reach the battery connector to break up the adhesive holding the logic board in place.
-
-
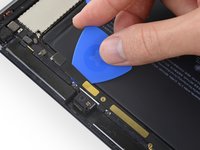
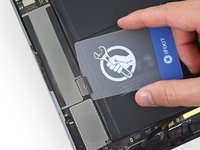
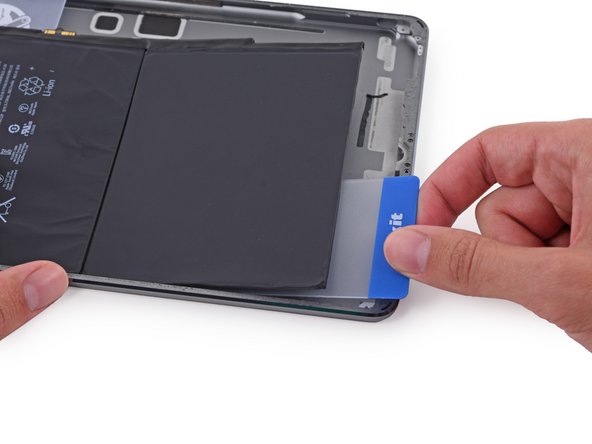
crwdns2935267:0crwdne2935267:0Plastic Cards$2.99
-
Remove the battery isolation pick.
-
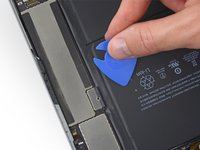
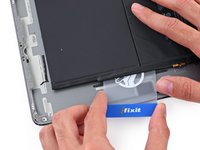
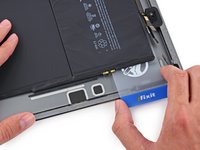
Insert a plastic card underneath the logic board at the battery connector.
-
Slide the card all the way underneath the logic board, separating the adhesive along the outer edge.
-
-
-
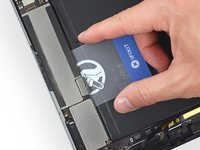
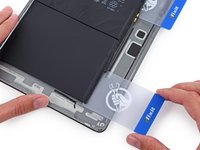
Insert a plastic card underneath the lower end of the logic board, directly underneath the display connectors and Wi-Fi module.
-
-
-
Pull the Lightning connector straight out of its recess in the rear case.
Remove the two screws from the inside of the connector first!
Hi George, thanks for pointing that out. I believe the screws you’re talking about are removed in step 70, is that correct? Let us know if we missed some screws!
-
-
-
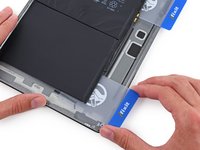
Gently lift up on the logic board from its lower edge and remove the logic board.
-
-
crwdns2935267:0crwdne2935267:0iFixit Adhesive Remover$19.99
-
Reheat the iOpener in the microwave for 30 seconds.
-
Place the heated iOpener in the center of the back of the iPad. Let it sit there for 90 seconds to soften the battery adhesive.
-
Move the iOpener to the right (away from the rear-facing camera), and let the iOpener sit for another 90 seconds.
-
Finally, move the iOpener to the right-hand edge of the iPad for 90 seconds.
-
-
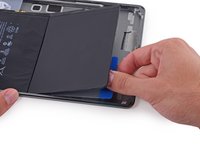
crwdns2935267:0crwdne2935267:0Plastic Cards$2.99
-
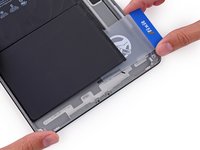
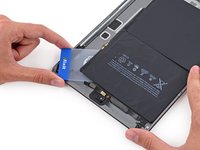
Insert a plastic card under the lower battery cell, at the lower right-hand corner.
Did you skip Step 46 through 100, then this is for you: Because the logic board is still in, you will have less space to loosen the battery pack. Be extra careful not to bend it. Work from the sides that are more accessible like in Step 113 and slowly work your way underneath the battery pack to loosen it all over. As I was loosening the battery I had the heated iOpener underneath the part I was working on. This really helped a lot. And be patient. You do not want to force it.
First of all, thanks @marcelflueeler and everyone else who gave advice on skipping ahead. This is definitely the way to go if you're just changing a battery! Once you've unstuck the battery you'll find you can't pull it out because it's stuck at the terminal though. Don't try and force it here! You'll need to return to step 88 and soften the logic board adhesive so you can pry it up about a cm, then you can lift the battery terminal up and over the locking post that's holding it in place. I didn't realise this and broke a piece of plastic off the old battery terminal, which got lodged under the logic board and prevented a good battery contact until I realised and retrieved it.
-
-
-
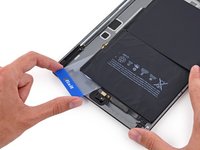
With the card roughly halfway inserted, slide it toward the top of the iPad, stopping before the battery contact post.
-
-
-
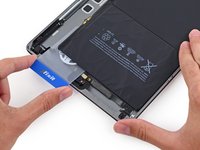
Lift the card up from the rear case slightly to allow it to pass over the battery contact mounting post.
-
Slide the card from the center of the battery cells to the upper right corner of the battery.
-
-
-
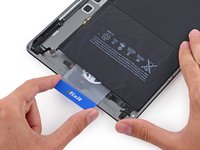
Place a second plastic card about halfway under the left hand battery cell to prevent it from readhering when you reapply the iOpener.
-
-
-
Place an iOpener on the right side of the battery, opposite the cards, to loosen the adhesive.
-
-
-
Slide the card around the lower right corner of the battery.
-
-
-
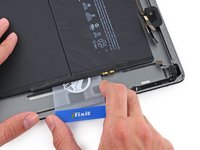
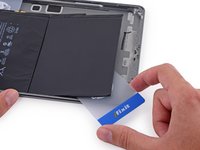
Slide the plastic card to the lower left corner of the battery.
-
-
-
Press the card in further, breaking as much of the adhesive holding in the battery as you can.
-
Place the plastic card underneath the lower left corner of the battery.
-
-
-
Slide the card around the upper right corner of the battery.
-
-
-
Slide the plastic card to the upper left corner of the battery.
-
-
-
Press the card in further, breaking as much of the adhesive holding in the battery as you can.
-
Place the plastic card underneath the upper left corner of the battery.
-
-
-
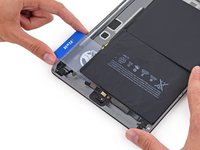
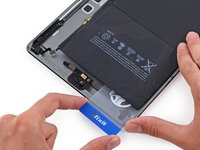
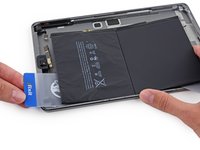
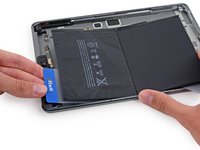
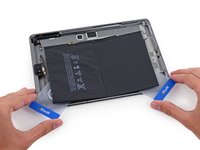
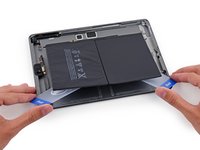
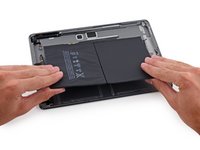
Grip both cards firmly and twist them to lift the battery off of the rear case.
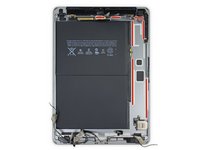
-
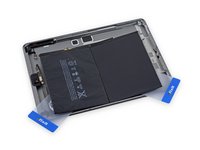
Remove the battery from the rear case.
Finally done !
Apple aren’t stupid are they
It took me nearly 3hrs, but i finally made it. Thanks for the great instructions
New battery installed. Battery wont charge. Any ideas?
REASSEMBLY TIPS:
The adhesive strips that come with the iFixit battery have no labels to say which goes where. Look at them carefully and one side has a blue protective cover that runs the length of each strip. This faces up and is to be removed at the last moment when you’re ready to stick the screen down permanently. One strip has a narrowed section in the long length to clear the glass touch screen cables, so stick this one down first to avoid mistakes.
Before removing the protective strips, close the touch screen and boot the iPad. Test both cameras, wifi and speakers. (I found the rear facing camera connector hadn’t bedded properly which was easily fixed). Clean the screen and remove dust from LCD before bedding in touch screen.
The iFixit site has updated battery calibration instructions which differ from the card packed with the battery:
Charge it to 100% and keep charging it for at least 2 more hours.
Then use your device until it shuts off due to low battery.
Finally, charge it uninterrupted to 100%.
Great tip to boot the iPad before removing the adhesive from the battery. There are quite a few comments here about faulty batteries. Fortunately, mine worked just fine.
The iFixit battery replacement kit worked great! The repair guide is very good also. So glad I didn’t just try buying the battery. While testing everything after finishing the battery replacement, the digitizer, volume controls and the sleep button did not work. I was very happy when I went back in and found the cable connections had just come loose. My wife couldn’t believe I fixed her iPad.
The guide was pretty good but a few comments:
I didn’t liked the iOpener that much. I used an heat gun with good temperature control instead.
Any advice on how to remove the old glue residu would have been welcome. I used a combination of physical scraping and cleaning afterward with isopropyl alcohol.
An extra guide on how to apply the new adhesive strips would also be nice.
Fixed!....The guide is very clear and well laid out. I also had issues with the iOpener not working, I needed more heat, used heat gun with temp control. Also used floss to remove the logic board. Would have appreciated more clearer instructions on adding the adhesive strips.....Thanks
The iOpener is really bad. It isnt hot enough to keep the iPad that cools down to roomtemperature in a few seconds. I used an hair dryer which was also not warm enough but at least made it warm enough to create a gap where I was able to fit my pics under. Unfortunately my Digitizer still died. Battery works but I cannot turn off my iPad now lol
Very good guide to a very tedious project! Thank you for the detailed description of the digitizer separation. I didn’t sever any cables. The iOpener isn’t bad; it’s just too small. This project really requires the Anti-clamp, the acetone/isopropanol adhesive softener, and a heat gun that can be used at a low heat setting. I didn’t try a hair dryer, but I think that it might be too windy. Like other fixers,I skipped steps 47 thru 100 something and took my chances manhandling the battery. I opted to insulate the digitizer with Kapton tape. I only have a wide roll of Kapton, so I stuck it to the stiff plastic backing for the battery, then cut narrow strips and peeled them off the backing. Finally, I’d like to see a show of hands of the people who forgot to put in the four corner screws for the display. Maybe I’m the only one …
I successfully replaced the battery in my A1954. But I stopped at step 40 and then I just pried the old battery with the plastic cards that came with the new battery and some isopropyl alcohol. Next step I pried the logic board upwards with a blue pick around the screw area. The board needs to flex upwards more than you're comfortable with in order to make room for the new battery connector to slide underneath the pick but over the screw hole underneath the logic board. I dint't really feel like gutting the entire housing of all the parts but I was risking damaging both the logic board and the new battery. So do it at your own risk.
-


To reassemble your device, follow these instructions in reverse order.
To reassemble your device, follow these instructions in reverse order.
crwdns2935221:0crwdne2935221:0
crwdns2935229:012crwdne2935229:0


crwdns2947412:02crwdne2947412:0
The battery replacement went off without a hitch, I’ll be honest, at step 50 I started to look at things with a real tech eye. I stopped disconnecting and removing components and took my hairdryer to the back, the battery came up quite easily so I stopped, popped in the new battery right then. After reconnecting everything, using iso to clean the lcd and inside glass, I “dry fit” everything back together, powered it up… nice. Completed new adhesive install and all is good.
Great tutorial, but if you have a good tech background, you can knock off an hour and do it in just over an hour. PS - Hair dryer is a must - take your time on this, once you get past the initial opening of the left side, the rest is a breeze.
Really good guide it was informational start to finish.