crwdns2915892:0crwdne2915892:0
This guide demonstrates how to remove the battery from a Motorola Moto G Power (2020) cellphone.
Before you begin, download the Software Fix app to backup your device and diagnose whether your problem is software or hardware related.
If you have been dealing with issues related to your phone holding a charge consistently, this guide will help breathe some new life into your phone with a new replacement battery!
This guide will walk you through the process of extracting all of the hardware necessary to replace the battery while also helping you to avoid any potential damage that occur.
*Some knowledge of technical terms for the inner hardware of electronics may be helpful.
*On step 8 pay careful attention as there is a risk of damage to your skin and clothing.
crwdns2942213:0crwdne2942213:0
-
-
Position a suction cup securely on the back panel of the device.
-
Insert the opening pick into both sides of the phone and carefully slide it along to open the back panel of the device.
-
-
-
Apply gentle pressure to the fingerprint sensor with your finger to detach it from the back panel.
-
-
-
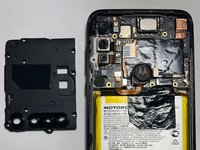
Fully remove the back panel from the device.
-
-
-
Using a Torx T3 screwdriver, remove nine 2.2 mm screws.
When I re-installed the back cover, I found that the left side around the camera lenses was the hardest part to get back into place, so I put the 4 left screws in first (lower left corner, then upper left corner, then left of the 3 lenses, then lower right of the top lens). I don't know what torque spec they use in the factory, but only 2 of the 9 screws came out easily so I put them back in with the "stop when you feel resistance" standard.
-
-
-
-
Use the spudger to gently lift the cover.
-
Set the back cover aside.
As shown, the bottom left corner is a good place for the first lift of the cover, then the bottom right side which should release the bottom edge, then pivot the cover up toward the top, and it should lift off easily.
-
-
-
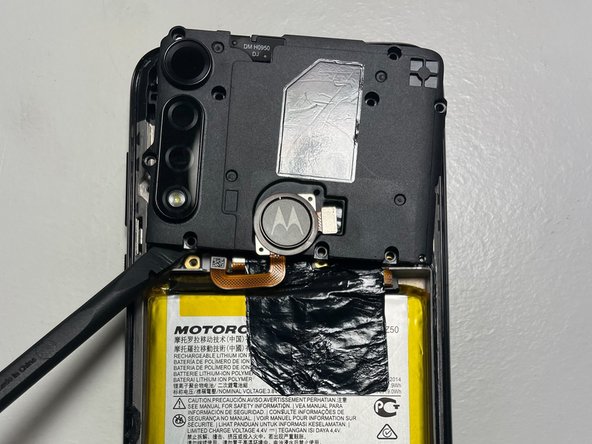
Carefully use the spudger to lift the sensor cable, disconnecting the fingerprint sensor from the motherboard.
-
-
-
Carefully remove the fingerprint sensor from the device and set it aside.
-
-
-
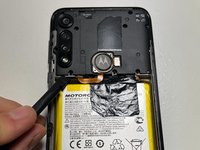
If present, carefully remove the protective tape using a plastic spudger as shown, ensuring the delicate flex cable is not torn in the process.
-
-
crwdns2935267:0crwdne2935267:0Tweezers$4.99
-
Use a plastic spudger or non-conductive tweezers to disconnect the battery cable from the motherboard.
-
-
-
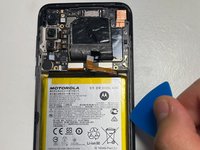
Slide an opening pick under the battery and gently work it back and forth to separate the adhesive from the battery.
It was at this point that I completely destroyed my plastic pick, so I used the blade of a utility knife (removed from the knife, just using the bare blade) to pry each side of the battery in turn. After 4 or 5 pry times on each side, I used a blade on each side to lift the battery out, that worked quite well.
-
-
-
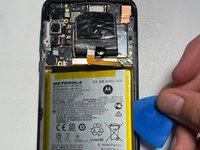
Remove the old battery and insert the replacement battery, connecting it to the motherboard.
You complete the reassembly by doing everything I Reverse I understand that ... but you don't say anything about securing the back cover in place do you use 1/8" double sided Tape or an Adhesive / Glue Thanks for these instructions VERY well Done except for attaching the back cover LOL. HAPPY NEW YEAR
What about attaching the back cover onto the phone ? Do you use 1/8" double sided tape or an adhesive glue ? Please reply and Thank You so much for this information here. its Greatly appreciated
-


To reassemble your device, follow these instructions in reverse order, excluding the battery removal, of course.
To reassemble your device, follow these instructions in reverse order, excluding the battery removal, of course.
crwdns2935221:0crwdne2935221:0
crwdns2935229:06crwdne2935229:0

crwdns2915084:0crwdne2915084:0

UC Santa Barbara, Team 1-1, Bator Summer 2022 crwdns2935289:0UC Santa Barbara, Team 1-1, Bator Summer 2022crwdne2935289:0
UCSB-BATOR-SU22S1G1
crwdns2934841:01crwdne2934841:0
crwdns2935297:05crwdne2935297:0
crwdns2947412:07crwdne2947412:0
THIS OS THE WRONG BATTERY!!!!! IT's ABOUT 1/4" TOO LONG!!! WTF?!?!?!
THIS OS THE WRONG BATTERY!!!!! IT's ABOUT 1/4" TOO LONG!!! WTF?!?!?!
You link to the 'replacement" battery all say it's for the G Power (2022) but the GUIDE AND MY PHONE ARE THE 2020!!!!!
Your link goes to the JK50 battery.... but my Motorola g Power (2020) uses a KZ50 !!!! - OM<G I NEED MY PHONE!!!! AND NOW I HAVE TO WAIT TO SEND IT BACK, GET THE REFUND, AND THEN WAIT FOR THEM TO SEND BACK THE RIGHT ONE?!?!?!? - As you can tell because I OWN A CHEAP P.O.S. phone I CANNOT AFFORD TO 'just buy another one" ARRGGHHH!!!!!
Oh and my finger print sensor even broke off too... I tried SOOOO HARD not to break the wire... but it moved less than a 1/2" away and had already split.....
DO NOT BUY THIS PHONE!!! - Now I have no fingerprint sensor, the phone is NO LONGER WATER PROOF, AND IT DOESN'T EVEN WORK RIGHT NOW!!!!! AAARRGGGGHHHHH!!!!!!!!!!!! :'(
How hard would it be for phone manufacturers to create a back cover to access battery for replacement...but NO, they make it as difficult as possible so they can make money selling new phones and/or sell repair services.
I was an LG phone customer for many years because they were the last ones selling smart phones with user replaceable batteries. When they quit making their phones like that I switched to Motorola because i do like them better overall
Cee64E -
I purchased my "not Motorola" KZ50 battery from an eBay seller, it was a drop-in replacement for the original battery. I did have to do my own "fold" for the flex cable, not a big deal. I used my own T3 screwdriver, the "free" tools included with the battery are worth what I paid for them.
This guide worked great for me! Thank you. However, a couple of suggestions to make it a bit better. On the first step, I had a little trouble separating the back. The back is attached with glue (the guide doesn't say this) and I wasn't exactly sure which grove on the edge was the back. And edge picture would be helpful. Also, while removing the back, most of the glue came off the back and was unusable for re-assembly. Some suggestion on how to deal with that would be helpful. I used a bit of double stick tape, which seems to work ok, but I'm mostly relying my protective phone case to hold it together.
Ok, I looked at some other guides on this site and found a great deal more detail and help. So while this guide worked, but it's pretty lacking in detail. Take a look at this one for example, and how much information it has about how to soften the adhesives, notes on re-assembling the connectors, and links to re-assembling adhesive-attached parts. Motorola Moto G Play (2021) Screen Replacement
Matt J -
I am finding it extremely difficult to find an insertion point between the casing and the screen. I've even brought a Stanley No. 199 Utility knife into play. Still, no separation. These instructions should include the use of a heat gun to soften the adhesive that holds the case and screen together. I may have to bring this to a cell phone repair shop.
Jerry Weinhausen - crwdns2934203:0crwdne2934203:0
Light heat with a blowdryer/heatgun will help it flex more, but you can do it this way. It's definitely challenging as you have to pull on the suction cup close to the edge and you might only get like .5mm of gap.
If you don't have a good spudger or thin piicks like in the picture, heat gun is absolutely necessary.
Zach M -
One thing to note: be careful with a spudger or prying near the right side of the phone. A small wire runs from top to bottom of the phone about 5mm past the phone edge. You can see it in the pictures, it's a black wire that's very tiny. It's easy to see in Step 7 where it connects to the board above the right corner of the battery.
Zach M - crwdns2934203:0crwdne2934203:0
I had a terrible time with the adhesive on the back cover, I lost most of the black film around the camera lens and some around the middle of the bottom edge. I put modest effort towards reinstalling the touch sensor into the back cover, but since I use an external case I did not go overboard. I did test the touch sensor before firmly seating the back cover into the remaining adhesive.
Richard Ekblaw - crwdns2934203:0crwdne2934203:0