MacBook Pro 13" Retina Display Early 2015 Trackpad Replacement
crwdns2944107:0crwdnd2944107:0Andrew Optimus Goldheartcrwdnd2944107:0crwdnd2944107:0crwdnd2944107:08crwdnd2944107:0crwdne2944107:0
crwdns2944111:0Maw 10, 2024crwdne2944111:0
crwdns2915892:0crwdne2915892:0
crwdns2942287:0crwdne2942287:0Does your Force Touch trackpad require a bit more force than it used to? Taptic engine acting up? Use this guide to replace the trackpad in your Early 2015 13" MacBook Pro.
This procedure involves using adhesive remover to remove the battery. Do not reuse the battery after it has been removed, as doing so is a potential safety hazard. Replace it with a new battery.
iFixit adhesive remover is highly flammable. Perform this procedure in a well-ventilated area. Do not smoke or work near an open flame during this procedure.
To minimize risk of damage, turn on your MacBook and allow the battery to fully discharge before starting this procedure. A charged lithium-ion battery can create a dangerous and uncontrollable fire if accidentally punctured. If your battery is swollen, take extra precautions.
crwdns2942213:0crwdne2942213:0
crwdns2943213:0crwdne2943213:0


crwdns2943215:0crwdne2943215:0


crwdns2944105:0crwdne2944105:0

-
crwdns2935267:0crwdne2935267:0Magnetic Project Mat$19.95
-
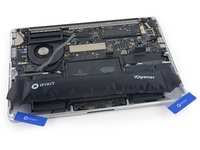
Remove the following ten screws securing the lower case to the upper case:
-
Two 2.3 mm P5 Pentalobe screws
-
Eight 3.0 mm P5 Pentalobe screws
-
-
-
Wedge your fingers between the upper case and the lower case.
-
Gently pull the lower case away from the upper case to remove it.
-
-
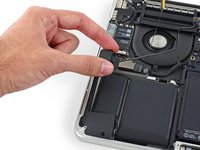
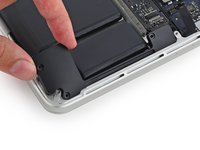
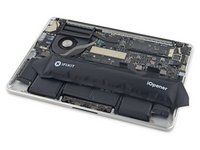
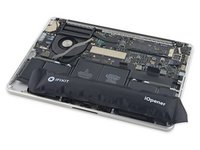
A plastic foam cover also covers plug and socket and the whole battery. It is easy to remove it from the right side to the trackpad wire that the battery plug is free like shown in the picture. I kept it to use it again later.
I have done tons of these battery replacements.
You don’t need to do anything on the list after you disconnect the battery, apart from carefully moving the speakers out of the way, and then prise up the battery modules. I just very carefully, and with little even motions, use a large slot screwdriver. Being careful to keep it flat, to not puncture the battery.
Easy peasy. I have never had an issue after dozens of the tasks…
Dear Sir,
as you seem to be very much experienced with battery replacements you might perhaps give me a hint why after having removed the battery pack successfilly, the keyboard doesn't work anymore after booting the system. The Touchpad works, the keyboard backlight works but typing does not function at all.
I only disconnected the battery connector and touched nothing else. I am quite desperate …
I agree with Dave la Rose, provided you use heat rather than solvent to remove the old battery (or possibly floss, haven’t done that). Please see my comment further down this thread on how to use an iOpener for correctly heating the glue joint
After removing battery contact board plastic. My screwdriver accidentally fell and touched the battery board. And it short circuited. Now my battery doesn't charge. My laptop doesn't work without charger now. shuts after a few minutes of use. Can i fix it without sending it for repairs?
Is replacing the battery necessary?
For speaker replacement of course not, but you still need to disconnect the battery cable to disconnect the current from the speaker circuit.
O Bana -
How do we know if it's necessary to replace the plastic cover adhered to the battery contact board?
What are the factors that would require that?
I think this step is only necessary for battery replacements; i.e. not necessary for speaker replacements (these instructions are used for both).
Bonjour,
Je vais changer ma batterie car mon ordinateur portable ne s'allume plus et ne se charge plus. Le clavier ne fonctionne plus non plus. Est-ce que changer la batterie suffit ?
De plus, l'intérieur de mon ordinateur est légèrement encrassé. Comment puis-je le nettoyer ?
Merci pour votre aide,
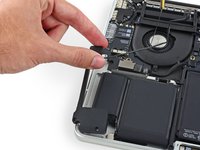
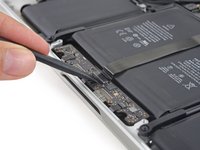
use the flat part, not the pointy part of the prying tool. I found it easy to wedge between the chipset and the lip of the plug, but from the other side than whats indicated in the picture. Then wobble it a little, just enough to loose the plug. Then do the same from the side indicated in the pic. No worries whatsoever. (And yes, this step is necessary, in order to disconnect the current from the speaker assembly)
-
-
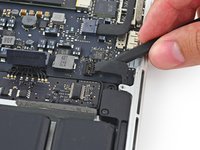
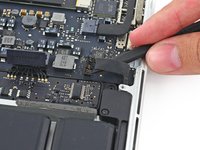
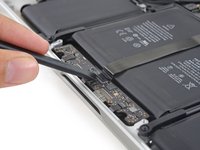
Use the flat end of a spudger to lift the battery connector straight up out of its socket on the logic board.
-
-
-
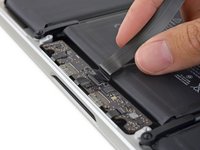
Remove the two 2.1 mm T5 Torx screws securing the logic board end of the I/O board cable bracket.
-
Remove the I/O board cable bracket.
-
-
-
Use the flat end of a spudger to pop the I/O board connector straight up off its socket on the logic board.
-
-
-
Lift the logic board end of the I/O board cable straight up to bend it out of the way.
-
-
-
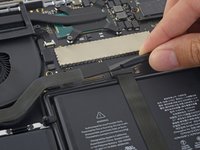
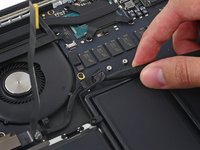
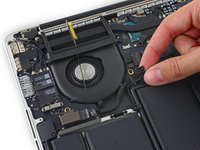
Carefully tuck the tip of a spudger under the right speaker cable near the connector and lift it up out of its socket on the logic board.
-
-
-
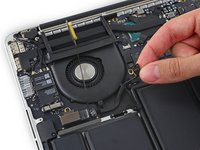
Carefully peel the right speaker cable off the upper case.
-
-
-
Remove the following screws securing the right speaker to the upper case:
-
One 5.7 mm T5 Torx screw
-
One 6.5 mm T5 Torx screw
-
One 3.8 mm T5 Torx screw
-
-
-
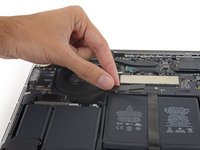
Lift the right speaker from the cable end and pull it free from the case.
-
-
-
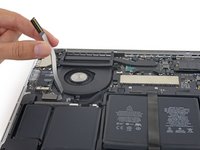
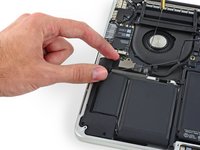
Insert the tip of a spudger under the left speaker cable near the connector and lift it up out of its socket on the logic board.
-
-
-
Remove the following screws securing the left speaker to the upper case:
-
One 5.7 mm T5 Torx screw
-
One 6.5 mm T5 Torx screw
-
One 3.8 mm T5 Torx screw
-
-
-
Lift the corner of the left speaker up and slide it out around the battery to remove it from the upper case.
-
-
-
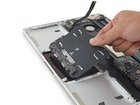
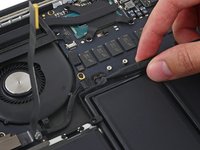
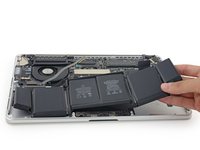
Use the flat end of a spudger to pop the trackpad connector straight up off its socket on the logic board.
-
-
-
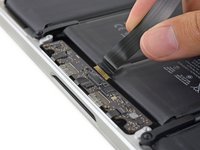
Lift the trackpad cable up off the battery to separate it from the adhesive securing it.
-
-
-
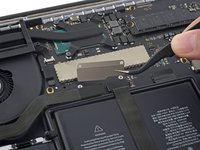
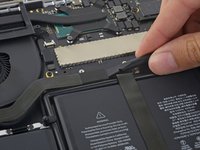
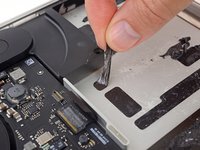
Use the end of a spudger to flip the retaining tab on the ZIF connector.
-
-
-
Pull the trackpad cable straight out of its ZIF socket on the trackpad control board.
-
-
-
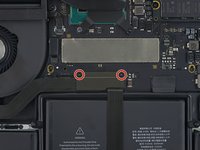
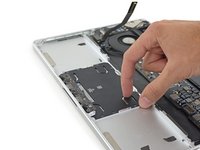
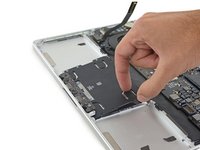
Remove the single 3.7 mm T5 Torx screw securing the battery board to the upper case.
-
-
-
To protect your display, place a sheet of aluminum foil between the display and keyboard and leave it there while you work.
-
-
-
Alternatively, if you are using the hot iOpener method, skip the following three steps.
-
Wear eye protection when handling and applying the adhesive remover. (Eye protection is included in your kit.)
-
Protective gloves are also included in your kit. If you are concerned about skin irritation, put your gloves on now.
-
-
-
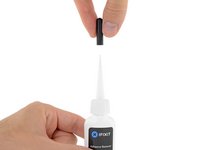
Pull off the black rubber stopper from your bottle of adhesive remover.
-
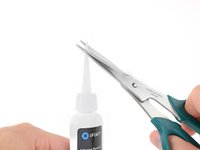
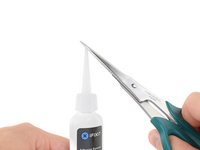
Use scissors to cut off the sealed tip of the applicator.
-
-
-
Apply a few drops of adhesive remover evenly under the edge of the rightmost battery cell.
-
Wait 2-3 minutes for the liquid adhesive remover to penetrate underneath the battery cell before you proceed to the next step.
-
-
-
Use the hot iOpener to cover half of the right-most battery cells.
-
After about a minute, reheat the iOpener and move it to cover the other half of the right-most battery cells.
-
-
crwdns2935267:0crwdne2935267:0Plastic Cards$2.99
-
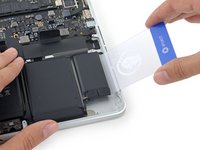
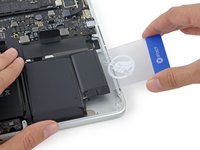
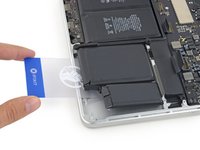
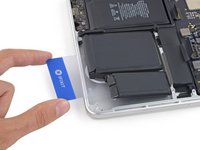
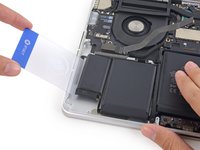
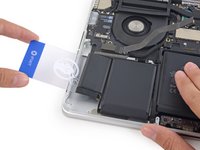
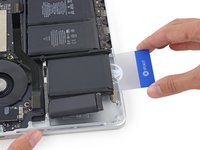
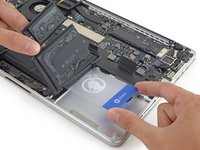
Push a plastic card between the right-most battery cell and the upper case, cutting the adhesive between the two.
-
When using the hot iOpener method, if you encounter significant resistance to prying, stop and use the iOpener to reheat the section you're working on.
-
-
-
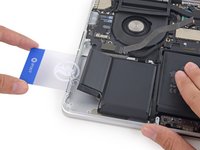
Repeat this procedure with the adjacent battery cell:
-
Apply a small amount of liquid adhesive remover under the battery cell, and wait 2-3 minutes for it to penetrate and soften the adhesive.
-
Alternatively, re-heat this section with your iOpener if needed.
-
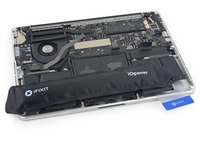
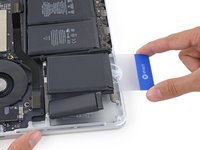
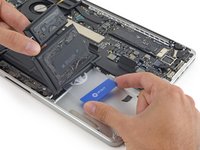
Push a plastic card about an inch between the battery cell and the upper case, and slowly pry the cell up to separate all of the adhesive.
-
-
-
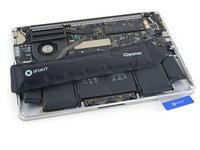
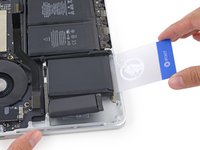
Temporarily leave your plastic card underneath the two rightmost battery cells to prevent them from re-adhering to the upper case.
-
If using an iOpener, reheat it and reapply it, this time to the left-most battery cells.
-
-
-
Repeat the above procedure to separate the two leftmost battery cells from the upper case.
-
Remember to apply a small amount of adhesive remover to each battery cell, and wait 2-3 minutes for it to penetrate and soften the adhesive.
-
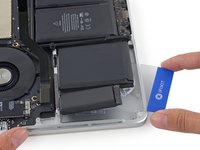
Use a second plastic card to separate the two leftmost battery cells from the upper case.
-
-
-
Insert the plastic card between the second left-most battery cell and the upper case to cut the adhesive joining the two, and pry the cell up from the case.
-
-
-
Leave the second card in the corner between the two left cells.
-
If using an iOpener, reheat it and apply it to the central battery cells.
-
As before, leave the iOpener in each position for about a minute, reheating in between, to heat each half of the center cells.
-
In the following steps, you can either use a third card, or the card from the right corner. The right corner adhesive should be dry/cool enough that the cells can easily be pulled up again when needed.
-
-
-
If using liquid adhesive remover, apply a few more drops under each of the final two, middle cells.
-
Allow 2-3 minutes for the adhesive remover to penetrate before you continue.
-
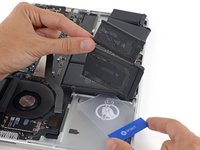
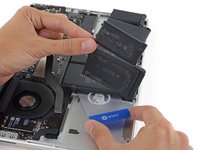
Gently folding the right-most battery cells out of the way, insert a plastic card under the right center cell.
-
Push the card in about half of its length to cut the adhesive holding the battery cell to the case.
-
Leave the card in place to keep the adhesive from re-sealing.
-
-
-
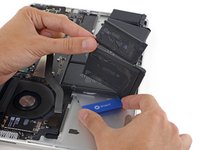
Repeat the same procedure for the last remaining battery cell.
-
Holding the outer cells out of the way, insert the plastic card about halfway under the left center battery cell, avoiding the trackpad board.
-
-
-
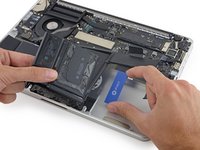
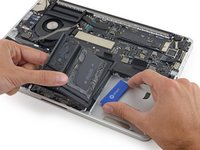
Return to the card beneath the right-center cell, and twist it to separate the entire battery from the upper case.
-
If it does not come out easily, you may need to reheat the iOpener and apply it to the stuck areas, and then continue gently cutting the adhesive with the plastic cards.
-
-
-
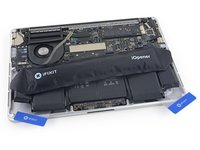
Remove the battery.
-
With a little luck, you can slowly pull out each strip of adhesive with your fingers.
-
Otherwise, soak each section of adhesive with a bit of adhesive remover for 2-3 minutes, and then scrape it out with an opening pick or one of the other tools in your kit. This can take quite a bit of work, so be patient.
-
Mop up any remaining adhesive remover and give your MacBook Pro a few minutes to air dry.
-
Calibrate your newly installed battery: charge it to 100%, and keep charging it for at least 2 more hours. Unplug and use it normally to drain the battery. When you see the low battery warning, save your work, and keep your laptop on until it goes to sleep due to low battery. Wait at least 5 hours, then charge your laptop uninterrupted to 100%.
-
If you notice any unusual behavior or problems after installing your new battery, you may need to reset your MacBook Pro's SMC.
-
-
-
Remove the ten 2.8 mm T3 screws securing the trackpad cover plate to the upper case.
-
-
-
Remove the twelve 2.4 mm T5 screws securing the trackpad to the upper case.
-
-
-
Lift up and remove the trackpad from the upper case.
-


To reassemble your device, follow the above steps in reverse order.
Take your e-waste to an R2 or e-Stewards certified recycler.
Repair didn’t go as planned? Check out our Answers community for troubleshooting help.
To reassemble your device, follow the above steps in reverse order.
Take your e-waste to an R2 or e-Stewards certified recycler.
Repair didn’t go as planned? Check out our Answers community for troubleshooting help.
crwdns2935221:0crwdne2935221:0
crwdns2935229:075crwdne2935229:0
crwdns2947821:0crwdne2947821:0
crwdns2947823:0crwdne2947823:0


crwdns2947412:033crwdne2947412:0
Is there a way to get a calibration software somehow ? Is Apple offering paid calibration service and what is the cost?
I just followed this repair guide. NO calibration whatsoever needed. It worked like a charm (like new) once I assembled everything back together.
No software needed
If you do this yourself, Apple will not touch your laptop with a 10-foot pole, you will have voided any existing warranty. They would require you to purchase a new trackpad from them and they will install/calibrate it themselves
Can you only replace the control board of the trackpad ?
I don’t think they sell the control board separate from the trackpad panel - comes soldered together
“To reassemble your device, follow these instructions in reverse order. “ Ah, yes, because now that the adhesive on the battery has been removed it should apparently still work! What a dumb reassembly instruction. You don’t sell the adhesive strips on their own either.
This is a valid point, sir. I recently had to replace the battery and in going through that process realized once the battery was finally freed from the bondage of adhesive that was remarkably overboard for securing a battery in a laptop, there it was… access to the trackpad. All that was stopping me were those 10, I repeat 10! Torx! Screws! that were yet a different size than the majorrity of the torx screws securing other components. I never did venture further as I was ready to be finished, the task at hand had proved to be arduous enough. It does give one a good perspective however this mother &&^&@* is NOT an easy to repair laptop. While the potential exists for many of the components to be replaced, it certainly isn’t a cake walk.
eeM Gee -
Worked like a charm! In my case I just needed to replace the Flex cable connecting main board with trackpad. I followed steps 1-7, 17-20.
My wifes MAC was already out of warranty, and the official authorized service in Slovakia asked 480 € for replacement of the whole trackpad, battery, keyboard and topcase. So I bought the flex from eBay, replaced it myself and fixed it for just 15 €. Really really HUGE THANKS for this repair guide
I just needed to replace the Flex cable connecting main board with trackpad. I followed steps 1-7, 17-20.
Thx for this comment! Laptop fully functional again.
Symptoms I noticed:
- first my touchpad didn’t work during login (1 or 2 times), but did after logging in (keyboard still worked)
- later my touchpad and keyboard didn’t work (“no keyboard connected“ warning), even after logging in with usb keyboard
I just finished! It had a million screws! Ok, so first of all there is NO adjustment needed for the haptic feedback. Works perfect. This is for the LATE 2015 13.3” MacBook Pro retina. I did not use the microwave heat thing nor did I use the adhesive remover liquid. I used a two inch paint spatula and slid it under the battery one at a time extremely slow and carefully lifted each battery from the edge and let the adhesive slowly separate as I i pried it up. The batteries did not tear but the adhesive was not reusable. I used double sided tape when I put them back in. Be prepared and make sure you have all three screw drivers before you begin. One last thing, I had to go back to the store three times because I kept ruining the screw driver heads. These screws are so tiny and in there really good in some places. The screws won’t strip but the screw driver sure will. Push down hard and don’t tighten to hard!
I had to only do apart of this tutorial, which was to replace the trackpad cable, because my keyboard and mouse stopped working the other night. Very simple and this was very helpful. Like many others have found that most replacement cables are a little longer than the originals but I just gently bent the cable along with the contours of the plastic and other pieces that it sat on top of.
Followed the tutorial, worked perfectly. However, now my keyboard stopped working (the trackpad is ok now). Any ideas where I may have gone wrong?
How are we supposed to glue the battery back together? Should we heat it up to activate the adhesive strip, I tried it and it worked only weakly….
Should we use super glue?
As a general rule, you shouldn’t re-use the battery once it has been removed—you want to replace it with a new one. The battery isn’t designed to be removed and can easily get damaged in the process. Reinstalling it afterward puts your MacBook at risk and may be a fire hazard. Remove the battery, remove the old adhesive as instructed, and replace it with a new one. The replacement battery should have new adhesive pre-installed, so there’s no need for any super glue. Good luck!
Does the trackpad replacement requires that the battery also should be replaced? I have a crackling sound under the trackpad. Genius mentioned that the circuitry attached to the trackpad is making sound because of the spill. I would like to know if i should by battery and the trackpad and replace both or just trackpad with all the tools.
Thank you
Are there other tutorials for replacing the force touch trackpad for this model?
The one here is a bit different to the one I have, though both are for the same force touch model macbook pro.
For example;
T5 screws in my trackpad cover plate are different from T3 screws for the cover plate in the above guide.
Here is the replacement part I bought.
Thanks,
Hello all, this is the first time I’m typing anything beyond the basic tests after replacing my trackpad cable. It wouldn’t have seemed obvious to me, but after going to the Apple store to investigate my ‘keyboard not working’ issues, they reported that I might, first, try replacing the trackpad cable. For $80 U.S. they’d order and install the cable for me, <fingers crossed>. I Decided I’d rather do that myself. I ordered the part from fixit for $10 plus $5 shipping (and some stickers too) and put my two specialty screwdrivers, spudger and finesse top the test. Other than skipping from Step 3 to 17, my keyboard worked right after I powered back up. Super happy with fixit. Thanks for making this site, thanks Andrew for making this page, thanks everyone else for commenting. Can we make sure there’s a way to let people who are trying to resolve the KEYBOARD NOT WORKING issue might actually be a try-replacing-the-trackpad-cable SOLUTION?
thanks again, Brandt
I would start off replacing the cable then you’ll likely need a new touchpad if that fails to fix things.
DanJ -
Hi, my trackpad isn’t vibrating, do i need to replace only the cable or replace the trackpad with new one?
You need a new touchpad unit
DanJ -
Do i need to buy a new battery for this repair?
It would make sense! Your current battery likely needs replacing soon anyways. It depends how difficult it was to take out and if it’s damaged in the process (which you often do).
DanJ -
Empecé a seguir este tutorial porque tanto el trackpad como el teclado dejaron de funcionar. Lo seguí paso a paso hasta el punto de quitar las baterías. Al no tener a mano esa herramienta, decidí esperar a que me llegase para continuar.
Antes de cerrarlo, limpié toda la placa y los conectores con una brocha y Alcohol isopropílico. Cuando acabé lo volví a conectar todo y lo cerré de nuevo. Al encender el portátil para ver si todo esta bien, me di cuenta de que tanto el teclado como el Trackpad funcionaban perfectamente. SOLO NECESITABAN UNA BUENA LIMPIEZA.
Gracias por la guía de desmontaje.
I just did this today, my liquid damaged laptop is now working perfectly! I was a bit intimidated by the battery replacement but it really wasn’t so bad. I used 99% alcohol and an old credit card and with a bit of cautious perseverance it all came up. The hardest part was replacing the trackpad cable, it’s too long and has to be bent to fit into the case, I was scared to pinch it into a proper “fold”. My case is a tiny bit poofed out now and I can’t get the remaining 2 screws in. Not sure whether to try again with it or just leave it now. In any case I’m happy that the keyboard and trackpad is functional again!
Can I purchase the trackpad cable by itself?
If you find it, why not?
thanks for the great guide. I was trying to decide between just buying a top case on ebay that had the trackpad still mounted, or following this guide. but as I wanted to put in a new battery also this worked out perfectly….
FIXED my issue with the keyboard and trackpad not working. Started with the computer shutting down and not being responsive for a day. Then it turned into a couple of days in between uses. Both the keyboard and the trackpad were completely unresponsive EXCEPT for the power key. I tried resetting the SMC and PRAM which did nothing. Followed these steps after purchasing the full kit from iFixIt and BOOM!!! All systems go!!! Plus, now my battery is fresh! These instructions were great - made the process very manageable for someone with a very limited tech knowledgeable. The side-by-side pictures were a huge help - you NEVER see that kind of detail and clarity from pictures in instructions. THANK YOU for this!!!
My taptic engine is not working. Should I replace the touchpad or the cable?
Is it the same for 15" middle 2015?
No, review Steps 26 & 27 for the trackpad and Step 33 for the keyboard in this guide MacBook Pro 15" Retina Display Mid 2015 Logic Board Replacement.
How about posing your Q’s in the Answers forum
DanJ -
Where do I get the t5 screws? They are very tight. I am guessing from heating and cooling cycles. Is there a reason you don't just include them in the kit?
I rarely need to replace the screws. But they are a bit tricky! They have thread lock on the screws so you need to either get a solvent to seep into the threads or what I do is use a good heavy duty soldering iron heating up the screw and try to remove it
I'm assuming you need the screws, here's one possible source MacBook Pro 13" Retina (Early 2015) Screw Set
DanJ -