crwdns2915892:0crwdne2915892:0
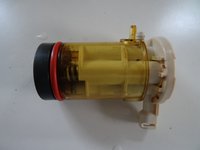
The descaling programs usually do not descale via the brewing unit but only via the tea water spout. This can be a problem with DeLonghi machines because they work with a fixed upper piston that contains valves. If these become calcified, the tea water will run through, but the path to the coffee is blocked. It is therefore recommended to descale the upper brewing piston from time to time.
If the coffee spout continues to drip a little, there is a chance that you can use a descaling agent to get the upper brewing piston back to a lime-free state. To do this, the machine must be set to test mode. You can find many instructions for the respective models at iFixit. You can find basic cleaning instructions here.
-
-
Leave the plug in the socket and turn off the machine. The main switch – if available – must be turned on.
-
Empty the water tank and add about half a liter of descaling solution. Use only a good descaling agent based on sulfamic acid, as prescribed by the manufacturer. You can find more information about this here.
-
-
-
Put your DeLonghi in test mode. We have lots of instructions for this. If your model is not included, then search for it in the internet.
-
-
-
-
Your machine must be in test mode. Select the appropriate option to move the brewing unit to the upper end position.
-
See here for ESAM models
-
See here for ECAM models with touch controls
-
See here for ECAM models with real buttons
-
Run the pump until the descaling agent comes out of the coffee spout.
-
Now the descaling agent can take effect in the upper flask. Wait for about two minutes.
-
Repeat this process several times.
-
-
-
Remain in test mode; the brewing unit is still in the upper end position.
-
Empty the water tank and refill with fresh water.
-
Run the pump again to flush out the remains of the descaling agent.
-
Move the brewing unit down a little again.
-
Unplug the machine to exit test mode.
-
Reconnect the plug and turn on the machine. It should automatically find the start position and be ready for use.
-
-
-
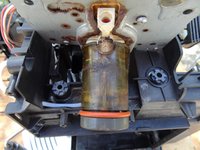
Try to see if the machine works normally. If no coffee comes out, the seals in the upper piston may be damaged:
-
Remove the brew unit.
-
Put the machine to one side and use a flashlight to examine the upper brewing piston. A small mirror may also be helpful.
-
The upper piston is transparent. There must be no dirt or liquid inside it. If there is (as shown in the photo), you will need to have it serviced or replaced. You can find our instructions for ECAM, ETAM and ESAM here.
-


Follow the steps in reverse order to reassemble your device.
Follow the steps in reverse order to reassemble your device.
crwdns2935221:0crwdne2935221:0
crwdns2935227:0crwdne2935227:0
crwdns2934873:0crwdne2934873:0
100%

crwdns2934885:0crwdne2934885:0 crwdns2934875:0crwdne2934875:0
crwdns2934877:0crwdne2934877:0 ›
crwdns2915084:0crwdne2915084:0

Repair is War on Entropy crwdns2935289:0Repair is War on Entropycrwdne2935289:0
Community
crwdns2931471:031crwdne2931471:0
crwdns2935297:01.552crwdne2935297:0
crwdns2947412:06crwdne2947412:0
Frage: Es kommt die Meldung
Wasserkreislauf leer
Wasserkreislauf füllen
Wasser ist im Behälter
Pumpe will aber geht nicht
Was nu?
Also: die Pumpe geht, stark und kräftig? Dann würde ich eine Verstopfung vermuten, oft ist es das Flowmeter. Dazu haben wir Anleitungen.
VauWeh -
Hallo,
ich habe eine De'Longhi Eletta
Explore ECAM 450.55.S weißt du ob hier der Obere Brühkolben beim Entkalkungsprogramm mit entkalk wird?
Und wie ist es mit einem Reinger für Kaffee Rückstände/Öle? macht es Sinn damit zu Spülen?
LG
Markus
Bei den DeLonghis erwischt das Entkalkungsprogramm den oberen Brühkolben nicht. Eine gelegentliche Entkalkung (wie oben beschrieben) - je nach Wasserhärte - ist empfehlenswert. Den oberen Brühkolben kann man ja mit einer Taschenlampe anleuchten und kontrollieren. Überaus kritisch (oder teuer) ist das nicht und im Falle des Falles haben wir ja die Anleitung.
Kaffeefettreiniger ist durchaus nützlich, auch die gelegentliche Revision des unteren Kolbens. Geräte von DeLonghi sind schon standfest, eine gute Wahl!
Also: hoch die Tassen!
VauWeh -
PS: Der Testmodus wird wahrscheinlich so aktiviert. Genau weiß ich es leider nicht.
VauWeh -