crwdns2933423:0crwdne2933423:0

Técnica de diagnóstico del sistema de bloqueo por vacío del Mercedes W123

crwdns2936315:0crwdne2936315:0
crwdns2936331:0crwdne2936331:0
crwdns2931653:010crwdne2931653:0
Mercedes W123 Vacuum Lock System Diagnosis Technique: crwdns2935265:00crwdnd2935265:01crwdnd2935265:02crwdne2935265:0 Mercedes W123 Vacuum Lock System Diagnosis Technique: crwdns2935265:00crwdnd2935265:02crwdnd2935265:02crwdne2935265:0
  • Once inside the car, the lock and unlock vacuum lines travel beneath the carpets and in some places underneath flexible black plastic covers. Begin by removing the floor mat, if equipped, and carpet in the driver's foot well.

  • With the carpets removed, look along the end of the foot well nearest the driver's door and find the black plastic cover that protects the vacuum lines beneath. Lift this cover up as shown to expose the vacuum lines.

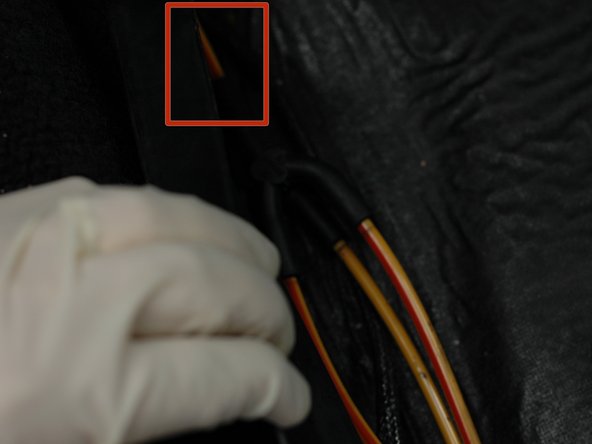
  • As mentioned, the red lines are the lines for the lock side of the circuit. The highlighted line is the one that enters the car from inside the door. Note - the top of the picture is facing the front of the car. This line connects to the switch and is the one that you plugged in the previous step.

  • Disconnect this line from the rubber "Y" 3-way connector.

Una vez dentro del coche, las líneas de vacío de bloqueo y desbloqueo pasan por debajo de las alfombras y, en algunos lugares, por debajo de las cubiertas de plástico negro flexibles. Comienza quitando la alfombra del piso, si está equipada, y la alfombra del espacio para los pies del conductor.

Con las alfombras quitadas, mira a lo largo del extremo del espacio para los pies más cercano a la puerta del conductor y busca la cubierta de plástico negra que protege las líneas de vacío que se encuentran debajo. Levanta esta cubierta como se muestra para exponer las líneas de vacío.

Como se mencionó, las líneas rojas son las líneas del lado de la cerradura del circuito. La línea resaltada es la que ingresa al coche desde el interior de la puerta. Nota: la parte superior de la imagen está orientada hacia el frente del coche. Esta línea se conecta al interruptor y es la que enchufaste en el paso anterior.

Desconecta esta línea del conector de goma de 3 vías en "Y".

crwdns2944171:0crwdnd2944171:0crwdnd2944171:0crwdnd2944171:0crwdne2944171:0