crwdns2933423:0crwdne2933423:0

iPad 7 defekten Touchscreen tauschen

crwdns2936315:0crwdne2936315:0
crwdns2936319:0crwdne2936319:0
crwdns2931653:024crwdne2931653:0
iPad 7 Cracked Digitizer Replacement: crwdns2935265:00crwdnd2935265:01crwdnd2935265:03crwdne2935265:0 iPad 7 Cracked Digitizer Replacement: crwdns2935265:00crwdnd2935265:02crwdnd2935265:03crwdne2935265:0 iPad 7 Cracked Digitizer Replacement: crwdns2935265:00crwdnd2935265:03crwdnd2935265:03crwdne2935265:0
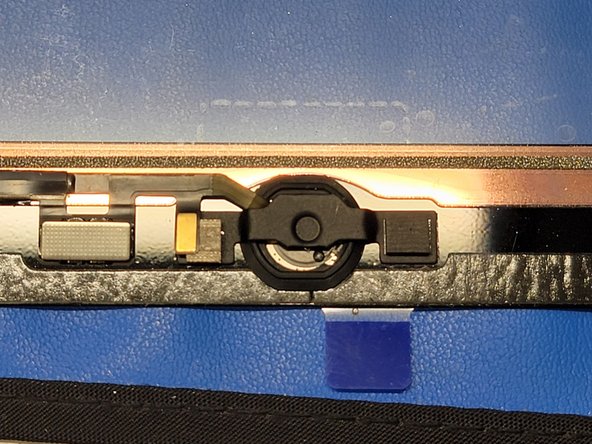
  • Take the metal bracket and remove the white paper covering the adhesive on the cushion

  • Take the blue plastic off the metal bracket

  • If reusing old bracket, take tesa tape or glue and apply a little amount to both ends where the bracket will adhere to the digitizer

  • Align the bracket with the cushion to the left and the indent on the bracket in the center of the home button.

  • Make sure to lift the flex cable gently over the metal bracket before pressing down

  • Once aligned, and flex cable is placed in the correct position over the bracket, firmly but gently press the 2 sides of the bracket onto the digitizer.

Das Klebepad auf der Metallhalterung ist mit einem weißen Papier geschützt. Ziehe es ab.

Entferne das blaue Plastikteil von der Metallhalterung.

Wenn du die alte Halterung weiterverwenden willst, dann bringe etwas Tesaband oder Klebstoff an den beiden Enden an, wo sie am Touchscreen befestigt wird.

Richte die Halterung so aus, dass das Klebepad links und die Vertiefung in der Mitte des Home Buttons ist.

Bevor du die Metallhalterung festdrückst, musst du das Flachbandkabel vorsichtig über sie hinweg führen.

Wenn die Halterung gut ausgerichtet und das Flachbandkabel richtig platziert ist, dann drücke die beiden Seiten der Halterung vorsichtig auf dem Touchscreen fest.

crwdns2944171:0crwdnd2944171:0crwdnd2944171:0crwdnd2944171:0crwdne2944171:0