crwdns2933423:0crwdne2933423:0

iPad 7 defekten Touchscreen tauschen

crwdns2936315:0crwdne2936315:0
crwdns2936319:0crwdne2936319:0
crwdns2931653:023crwdne2931653:0
iPad 7 Cracked Digitizer Replacement: crwdns2935265:00crwdnd2935265:01crwdnd2935265:02crwdne2935265:0 iPad 7 Cracked Digitizer Replacement: crwdns2935265:00crwdnd2935265:02crwdnd2935265:02crwdne2935265:0
  • Take the new gasket and look at it closely. There should be 2 rings of adhesive on it being covered up by blue strips of plastic. You will also notice there are 2 notches on thw inner portion of the gasket. This will help guide you with installing the new gasket

  • Insert the home button perpendicular to the gasket making sure to have it go through the 2 inner notches of the gasket and having the blue adhesives strips towards the part of the button where your finger clicks.

  • Once the gasket is on the home button but not applied, we need to apply the gasket.

  • One notch of the inner part of the gasket will go where the flex cable meets the home button.

  • When you remove the inside ring blue plastic, that adhesive is suppose to adhere to the home button.

  • Remove the inner most blue plastic by using ESD safe tweezers and an xacto knife. You will use the xacto knife to CAREFULLY cut a notch on the blue plastic so that way you can remove it easily from the home button.

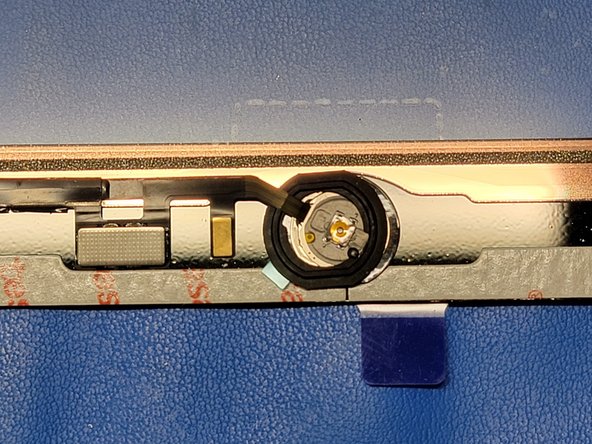
  • Lift the home button up and use ESD safe tweezers remove the outermost blue plastic. Since the gasket is applied to the home button now, the outer blue plastic should come right off without the need to cut. Place the home button inside the hole of the digitizer. Once you are confident it is in the right position, firmly press down on the gasket.

  • Place the home button in the hole of the digitizer, and angle the flex cable towards the left of the digitizer (the side where the digitizer flex cables are).

Schaue dir die neue Dichtung genau an. Es sollten sich zwei ringförmige Klebestreifen darauf befinden, die mit blauen Plastikstreifen bedeckt sind. An den Innenseiten der Klebestreifen sind zwei Einbuchtungen, die beim Einbau helfen, die richtige Position zu finden.

Setze den Home Button rechtwinklig zur Dichtung ein. Achte dabei darauf, dass er durch die beiden Einbuchtungen der Dichtung geht und die blauen Plastikstreifen zu dem Teil des Home Buttons zeigen, wo der Finger draufdrückt.

Jetzt muss die Dichtung festgeklebt werden.

Eine der Einbuchtungen auf der Innenseite der Dichtung muss an die Stelle, wo das Flachbandkabel auf den Home Button trifft.

Damit der Kleber für den Home Button freigelegt wird, muss der innere blaue Plastikstreifen abgezogen werden.

Entferne den inneren blauen Klebestreifen mit einer ESD-sicheren Pinzette und einem scharfen Werkzeug. Schneide damit behutsam eine Kerbe in den blauen Plastikstreifen, damit du ihn leicht von der Dichtung entfernen kannst.

Hebe den Home Button hoch und entferne den äußeren blauen Plastikstreifen mit der Pinzette. Da die Dichtung bereits am Home Button festgeklebt ist, sollte sich der äußere Plastikstreifen ohne Weiteres abziehen lassen. Platziere den Home Button innen in der Öffnung des Touchscreens. Wenn er gut ausgerichtet ist, dann drücke die Dichtung fest.

Platziere den Home Button in der Öffnung im Touchscreen und führe das Flachbandkabel zur linken Seite des Touchscreens hin (eben zu der Seite, wo die Touchscreenkabel sind).

crwdns2944171:0crwdnd2944171:0crwdnd2944171:0crwdnd2944171:0crwdne2944171:0