crwdns2915892:0crwdne2915892:0
Follow this guide to remove and replace the rear camera for your iPhone 8.
crwdns2942213:0crwdne2942213:0
-
-
Remove the two 3.5 mm pentalobe screws on the bottom edge of the iPhone.
-
-
-
Measure 3 mm from the tip and mark the opening pick with a permanent marker.
Got to step 2 and realized the fix kit doesn't include an opening pick! Looks like a guitar pick, and I have those lying around. Is that expected? Looks like the pick is used in many steps below. There's a little blue crowbar that isn't mentioned in the instructions. Perhaps that replaces the opening pick?
Hi! I can't see which guide you were using when writing this comment. Can you reply here with which guide and fix kit you used?
I see you posted this in Meta. I hope it's resolved soon! In the meantime, a guitar pick may work well enough for your repair.
what fix kit?
My fix kit didn't include an opening pick either
Make sure you check inside the black boxes after emptying them. My pick was stuck inside one of the boxes.
My AliExpress refurbished screen came with a pick that has a coin-like circle that pops out, so no modification was necessary
the picture shows 3 cm but the description says 3 mm's. Which one is it?
That is a misunderstanding. It is a ruler with a scale for cm, it shows 0.3 cm, i.e. 3 mm.
VauWeh -
Oh, come ON!
Big Ed -
It will ALWAYS be millimeters on a phone, but this step is ridiculous, skip it!
@leifdewolf I wouldn't skip it for a first repair.
It's not an Ifixit KIT if it doesn't include everything. You'll need to order the opening pic separately. Or head to Walmart like myself and look for guitar pics. Hopefully, this will work just as well.
No pick in mine as well. It’s really not clear that you have to order this separately when ordering an IPhone SE 202/2022 screen repair kit. Is this the case?
Frustrated, I ordered a compact package where everything was encapsulated. Useless suction tools could not separate the screen. If it is unable to decouple the screen, then why sucking suction tools you have provided.
For my kit the triangle pick was stuck inside the box with the screen not with the other tools maybe it's also there for you
Y’all are getting far, FAR too detailed with some of this stuff…. Measuring and marking the pick that you won’t actually use to open the device?!? lol that’s kinda funny. Just heat it up, grab a spudger, and the back just pops right off! The iFixit tech need to stick to the KISS method more often, you know KEEP IT SIMPLE STUPID!!! Like l, for reals, I’ve been doing this stuff for YEARS and using iFixit guides regularly and this is just ridiculous at this point!
Will the phone still work if the sensor assembly on the back of the screen is damaged?
I don't have a pick, but how much better are these picks than an old credit card for opening an iPhone 13 mini?
an old credit card will do that job, although you'll have to pull a little bit more if the credit card is thicker than the picks, just again, be careful and don't insert it that far
The pick in my iFixIt kit was packed with the battery, not with the rest of the toolkit.
Many of these comments are PURE GOLD. Seriously y’all, if you’re not sure if it should be 3mm or 3cm or whether you could find and use an alternative pick, mending an IPhone really isn’t for you. Find a responsible adult and get back to doing something simpler…
I bought the kit of five just in case. I used two and marking them at 3mm was definitely helpful.
-
-
crwdns2935267:0crwdne2935267:0Clampy - Anti-Clamp$24.95
-
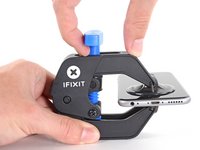
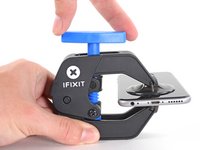
Pull the blue handle backwards to unlock the Anti-Clamp's arms.
-
Slide the arms over either the left or right edge of your iPhone.
-
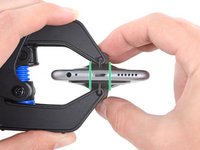
Position the suction cups near the bottom edge of the iPhone just above the home button—one on the front, and one on the back.
-
Squeeze the cups together to apply suction to the desired area.
-
-
-
Pull the blue handle forwards to lock the arms.
-
Turn the handle clockwise 360 degrees or until the cups start to stretch.
-
Make sure the suction cups remain aligned with each other. If they begin to slip out of alignment, loosen the suction cups slightly and realign the arms.
-
-
-
Heat an iOpener and thread it through the arms of the Anti-Clamp.
-
Fold the iOpener so it lays on the bottom edge of the iPhone.
-
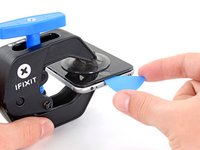
Wait one minute to give the adhesive a chance to release and present an opening gap.
-
Insert an opening pick into the gap.
-
Skip the next three steps.
-
-
-
Heating the lower edge of the iPhone will help soften the adhesive securing the display, making it easier to open.
-
Use a hairdryer or prepare an iOpener and apply it to the lower edge of the phone for about 90 seconds in order to soften up the adhesive underneath.
No hair dryer so GENTLY heated over stove burner
Hello,
What temperature is suitable for removing the front display ? I bought i-Fixit ProTech which is not include the heating "roller" . Thanks for help
I was about to ask the same Question...
Ich habe eine heiße Wärmflasche verwendet. Das hat gut funktioniert :-)
I laid my phone face-down on my 3D printer’s heated bed, and set the temperature to 60 C. After a few minutes, it was ready to loosen.
Hey, that's smart !
If you don’t have an “iOpener” or heat gun, try using an electric heating pad. I have a small $11 pad I got at CVS for my knee. On medium heat it worked fine for removal and with the “pennies” for setting the new seal.
I used a heated tea kettle and a tea towel, it worked!
I put on the furnace vent for 10 minutes to get it warm to the touch but not hot.
I attached it to the after burner of my rocket ship and that worked.
I'm holding mine just above an erupting volcano but I'm still waiting to see if it has worked. How long does it need?
It won't work if you don't throw it in the lava.
I used a water-filled ziploc bag, heated it in microwave. fast, cheap, worked.
Hairdryer works fine for this step. No issues.
Agree! Just did it for 2 times to make sure I didn't overheat the phone.
The most effective way to heat up the glue is to leave the phone in full sun - if it's available. In fact I would always wait for a sunny day to repair any glued together Apple device. The heat will be very even and the phone was probably designed to survive anything the sun can throw at it - although it can get very warm. (I'm in the UK) If you leave the phone turned on it will give a warning if it goes near the temperature limit.
I'm sorry but I tried both the hair dryer (for 3 minutes!) and the eye opener (also 3 minutes) and no luck. Not even a hint of loosening the adhesive holding down the display!! Do I send this kit back for a refund or what??!!
No luck, guys. 3 minutes of hair drying and 3 minutes heating up the iopener. What next?
Okay, a half hour later i finally got the screen loose, but not after super heating it for at leat 10 minutes with a hair drying and burning my hand trying to pry it open. Also, watch out for the power button because it inadvertently keeps switching the phone back on while you wrestle with it. More later . . .
. . . and now I need to buy a new phone!!! the cable broke as I was trying to unscrew one of the top screws, so thanks! I FIXed IT but Good!!!!
Nate B's advice was key. I couldn't get the temperature of the display hot enough to break the seal with a hair dryer. A heat gun set to low speed and 550F (287C) got the display up to just over 130F, close to the 60C Nate mentioned.
This part was actually much easier than I thought. I used a hair dryer on max for 2 minutes on each side of the phone, less than half an inch away from the phone, just on the bottom half. It was hot! Screen came right out!
I used a tube sock full of about 1 cup of white rice. Tied a knot in the top of the sock. Put the sock of rice in the microwave on 60% power for 1 minute. Kept doing this until the temp felt right. Put the sock of rice down, put bottom edge on sock, then covered w/ other half of the sock/rice. Put a piece of paper towel between phone and sock/rice to absorb any moisture. When lifting up on front panel, I rested the phone on the sock/rice. Worked nicely once I got the temp of the rice high enough.
(threw the rice away later :-) )“Threw the rice away later” has to be the best advice here. I wrapped my phone in a small heating pad and turned it up to 6 of 8. Worked great in 5 min or less! No need for water bottles, microwaves, heat guns, volcanoes, …. I kept the heating pad later ; )
I popped my iPhone under a desk lamp with a 60w filament light bulb in it, switched it on,
-






just how long are those screws- i turn and turn and turn and the lift off is soooo slight, seemingly insignificant…
An. Jahnke - crwdns2934203:0crwdne2934203:0
I would recommend, from the very beginning, dumping all tools out of the kit (if you got it) and using that white paper tool box as a tray to organize the screws and braces in. It’s nice to work over because it catches screws well and makes it easy to see them if you drop any.
Johnny Emrica - crwdns2934203:0crwdne2934203:0
That’s a great idea thank you
Mohamed Dekkiche -
Screw to the left of the charging port will not come out. Screw on the right came out no problem. Any ideas?
Bill Maher - crwdns2934203:0crwdne2934203:0
Maybe the screw is stripped…
Gabriel-Science -
I already replaced my iPhone 8 battery with one from iFixit and honestly I wasn't impressed. It worked well for a few months, but then I started noticing the peak performance capability dropping significantly thereafter. I followed the initial charging instructions to a tee and only let it drop below 20% once a month. Normal everyday use for me... no intense apps like games, etc. I considered having Apple do it this time around, but for these older models they don't keep the batteries in-stock and you have to give them your phone for up to a week. So in the end, I opted to try another battery from iFixit instead. Hopefully this one will last longer.
tripmusic - crwdns2934203:0crwdne2934203:0
Does it lasted longer ?
Gabriel-Science -
How with the gigantic kit do I not have a 3 1/2 pentalobe driver the very first screwdriver I reach for and that I need is not in any of these kits. What’s up with that?
Michael Stephens - crwdns2934203:0crwdne2934203:0
Same problem. The kit comes with a screw driver, but not for this pentalobe screw. This is a problem.
Yuji Ishitsuka - crwdns2934203:0crwdne2934203:0
I had to search what screwdriver bit I had to use from the ifixit toolkit; it's the P2 bit. (Maybe it's more obvious if you bought the battery kit, because it only has one type of pentalobe screwdriver.)
Nathaniel Zielstra - crwdns2934203:0crwdne2934203:0
Definitely P2 bit
Megolina - crwdns2934203:0crwdne2934203:0
I drained my battery completely before I did this thinking it might help prevent a fire if I accidentally puntured it. I don't know if that is the case... but figured it couldn't hurt.
Megolina - crwdns2934203:0crwdne2934203:0