crwdns2915892:0crwdne2915892:0
Use this guide to remove, clean, or replace a faulty rear-facing iSight camera in your iPhone 6s.
You can also use this guide to replace the rear camera bracket.
crwdns2942213:0crwdne2942213:0
-
-
Remove the two 3.4 mm P2 Pentalobe screws on the bottom edge of the iPhone, on either side of the Lightning connector.
-
-
crwdns2935267:0crwdne2935267:0Clampy - Anti-Clamp$24.95
-
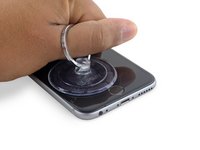
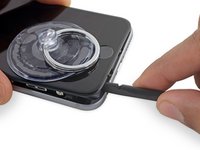
Pull the blue handle backwards to unlock the Anti-Clamp's arms.
-
Slide the arms over either the left or right edge of your iPhone.
-
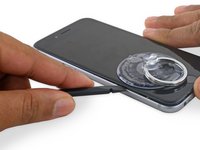
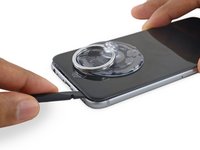
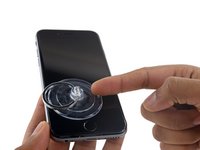
Position the suction cups near the bottom edge of the iPhone just above the home button—one on the front, and one on the back.
-
Squeeze the cups together to apply suction to the desired area.
-
-
-
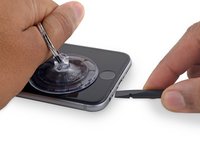
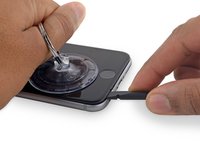
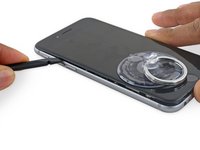
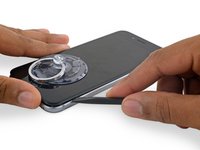
Pull the blue handle forwards to lock the arms.
-
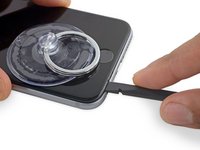
Turn the handle clockwise 360 degrees or until the cups start to stretch.
-
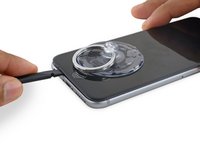
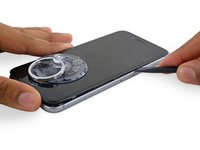
Insert an opening pick under the screen when the Anti-Clamp creates a large enough gap.
-
Skip the next three steps.
-
-
crwdns2935267:0crwdne2935267:0Clampy - Anti-Clamp$24.95
-
If you don't have an Anti-Clamp, follow the next three steps to use a suction handle.
-
Apply mild heat to the lower edge of the iPhone using an iOpener or hair dryer for about a minute.
-
-
-
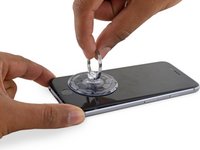
Apply a suction cup to the lower left corner of the display assembly.
-
Take care not to place the suction cup over the home button.
-
-
-
Pull up on the suction cup with firm, constant pressure to create a slight gap between the front panel and rear case.
-
-
-
Place the flat edge of a spudger into the gap between the screen and rear case, directly above the headphone jack.
-
-
-
Twist the spudger to widen the gap between the front panel assembly and the rest of the phone.
-
-
-
Insert the flat end of the spudger on the left side of the phone, between the display assembly and rear case.
-
Slide the spudger up the side of the phone to separate the adhesive and pop the clips free.
-
-
-
Remove the spudger and reinsert it on the bottom edge, where you pried the phone open.
-
Slide the spudger to the right, along the bottom edge of the phone.
-
-
-
-
Slide the spudger up the right side to continue separating the adhesive and popping the display clips free from the iPhone.
-
-
-
Use the suction cup to open the display, breaking the last of the adhesive.
-
-
-
Pull up on the nub on the top side of the suction cup to remove it from the front panel.
-
-
-
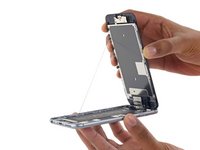
Gently grasp the display assembly and lift it up to open the phone, using the clips at the top of the front panel as a hinge.
-
Open the display to about a 90º angle, and lean it against something to keep it propped up while you're working on the phone.
-
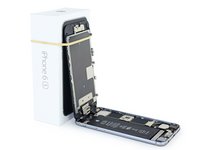
Add a rubber band to keep the display securely in place while you work. This prevents undue strain on the display cables.
-
-
crwdns2935267:0crwdne2935267:0Magnetic Project Mat$19.95
-
Remove two Phillips screws securing the battery connector bracket, of the following lengths:
-
One 2.9 mm screw
-
One 2.2 mm screw
-
-
-
Remove the battery connector bracket from the iPhone.
-
-
-
Use the point of a spudger to disconnect the battery connector by prying it straight up from the logic board.
-
-
-
Push the battery connector away from the logic board until it stays separated from its socket, so as to avoid any accidental connection to the battery while you work.
-
-
-
Remove the following four Phillips screws securing the display cable bracket:
-
Three 1.2 mm screws
-
One 2.8 mm screw
-
-
-
Use a spudger or a clean fingernail to disconnect the front camera flex cable by prying it straight up from its socket on the logic board.
-
-
-
Disconnect the digitizer cable by prying it straight up from its socket on the logic board.
-
-
-
Disconnect the display cable by prying it straight up from its socket on the logic board.
-
-
-
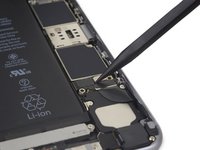
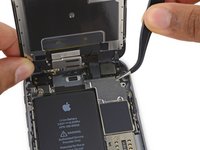
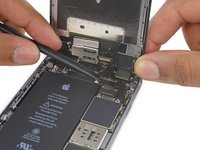
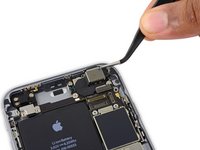
Use the flat end of a spudger to disconnect the rear camera from its socket on the logic board.
-
-
-
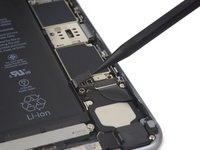
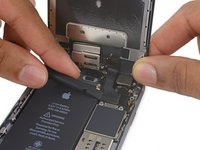
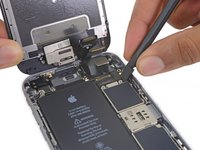
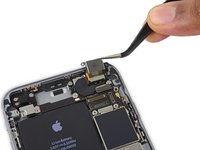
Remove the following two Phillips screws over the rear camera bracket:
-
One 1.6 mm screw
-
One 2.0 mm screw
-
-
-
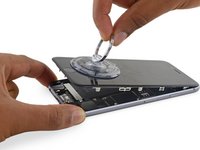
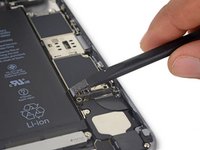
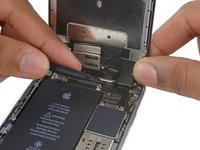
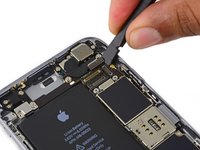
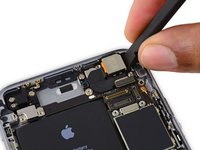
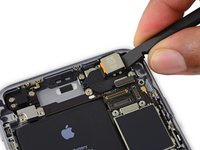
Insert a spudger to the side of the camera, between the rear case and the camera module.
-
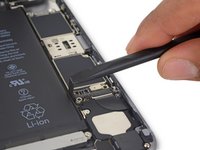
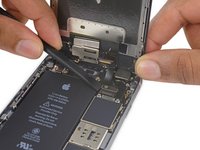
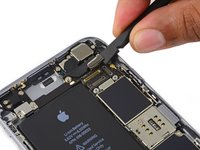
Gently pry up on the camera to nudge it out from its housing.
-


To reassemble your device, follow these instructions in reverse order.
To reassemble your device, follow these instructions in reverse order.
crwdns2935221:0crwdne2935221:0
crwdns2935229:086crwdne2935229:0

crwdns2947412:011crwdne2947412:0
After camera replacement my iSight camera does not focus close up its blurry but when I take it out of the housing it seems to work but when I pop it back in its housing it goes blurry? Any ideas
Clean the lens with a qtip.
Hello, I was wondering if the camera they sell in here is also the same quality as the original one, thank you
I replaced the rear facing camera. The sapphire filter is shattered and must be replaced. Did not come with new camera. No instructions on how to replace it. iphone is disassembled , so I am with out a phone I need a replacement filter and instructions of the steps ASAP Please help!!!!!!!!!!
Don Carroll
dc@conceptimages.com
It's true, the lens cover is a separate part and is fixed to the rear case. Another user posted a guide for replacing the cover on the iPhone 6—you might be able to reference that to figure out how to replace the lens cover on your 6s. Good luck!