
iPhone 6 Volume Control Cable Replacement

crwdns2944107:0crwdnd2944107:0Sam Goldheartcrwdnd2944107:0crwdnd2944107:0crwdnd2944107:06crwdnd2944107:0crwdne2944107:0
crwdns2944111:0Maw 10, 2024crwdne2944111:0
crwdns2915892:0crwdne2915892:0
crwdns2942287:0crwdne2942287:0Use this guide to replace a malfunctioning volume control cable—this includes the electronic switches responsible for volume up and down, and the ring/silent control.
If you're looking to replace the physical button covers, we have a guide for that too: iPhone 6 Volume Control Buttons Replacement
crwdns2942213:0crwdne2942213:0
crwdns2943213:0crwdne2943213:0


crwdns2943215:0crwdne2943215:0


crwdns2944105:0crwdne2944105:0

-
-
Power off your iPhone before beginning disassembly.
-
Remove the two 3.6 mm-long P2 Pentalobe screws next to the Lightning connector.
-
-
crwdns2935267:0crwdne2935267:0Clampy - Anti-Clamp$24.95
-
Pull the blue handle backwards to unlock the Anti-Clamp's arms.
-
Slide the arms over either the left or right edge of your iPhone.
-
Position the suction cups near the bottom edge of the iPhone just above the home button—one on the front, and one on the back.
-
Squeeze the cups together to apply suction to the desired area.
-
-
-
Pull the blue handle forwards to lock the arms.
-
Turn the handle clockwise 360 degrees or until the cups start to stretch.
-
Insert an opening pick under the screen when the Anti-Clamp creates a large enough gap.
-
Skip the next three steps.
-
-
crwdns2935267:0crwdne2935267:0Clampy - Anti-Clamp$24.95
-
If you don't have an Anti-Clamp, use a single suction cup to lift the front panel:
-
Press a suction cup onto the screen, just above the home button.
-
-
-
While holding the iPhone down with one hand, pull up on the suction cup to slightly separate the front panel assembly from the rear case.
-
Using a plastic opening tool, begin to gently pry the rear case down, away from the display assembly, while continuing to pull up with the suction cup.
-
-
-
Pull the plastic nub to release the vacuum seal on the suction cup.
-
Remove the suction cup from the display assembly.
-
-
-
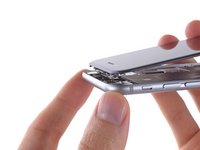
Open the iPhone by swinging the home button end of the front panel assembly away from the rear case, using the top of the phone as a hinge.
-
-
-
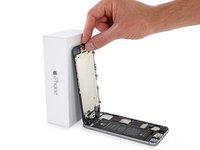
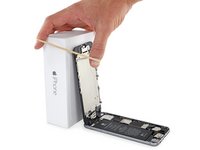
Open the display to about a 90º angle, and lean it against something to keep it propped up while you're working on the phone.
-
Add a rubber band to keep the display securely in place while you work. This prevents undue strain on the display cables.
-
-
crwdns2935267:0crwdne2935267:0Magnetic Project Mat$19.95
-
Remove the following Phillips screws from the battery connector bracket:
-
One 2.2 mm screw
-
One 3.2 mm screw
-
-
-
Remove the metal battery connector bracket from the iPhone.
-
-
-
Use a plastic opening tool to gently pry the battery connector up from its socket on the logic board.
-
-
-
Remove the following five Phillips screws securing the front panel assembly cable bracket:
-
Three 1.2 mm screws
-
One 1.7 mm screw
-
One 3.1 mm screw
-
-
-
Remove the front panel assembly cable bracket from the logic board.
-
-
-
Use a spudger or a fingernail to disconnect the front-facing camera and sensor cable connector.
-
-
-
Use a spudger or a fingernail to disconnect the home button cable connector.
-
-
-
Use a spudger or a fingernail to disconnect the display data cable connector.
-
-
-
Use the flat end of a spudger to disconnect the digitizer cable connector.
-
-
-
Remove the front panel assembly from the rear case.
-
-
crwdns2935267:0crwdne2935267:0Tweezers$4.99
-
Peel back the first battery adhesive tab from the bottom right edge of the battery.
-
-
-
Slowly pull the adhesive tab away from the battery, toward the bottom of the iPhone.
-
Pull steadily, maintaining constant tension on the strip until it slips out from between the battery and the rear case. For best results, pull the strip at a 60º angle or less.
-
If the strip breaks, carefully try to retrieve it with your tweezers (without damaging the battery) and continue pulling. If the strip breaks off underneath the battery and can't be retrieved, continue with the steps below.
-
-
-
Repeat for the second strip.
-
Wait about one minute for the alcohol solution to weaken the adhesive. Use the flat end of a spudger to gently lift the battery.
-
-
-
If the battery remains stuck to the rear case, prepare an iOpener or use a hair dryer to heat the rear case directly behind the battery. It should be slightly too hot to touch comfortably.
-
Then, use a plastic opening tool to gently lift the battery.
-
A stronger alternative to floss is an unwound guitar string, such as a 0.009 E string from a 12-string set.
-
-
-
Remove the battery from the iPhone.
-
Before you adhere the replacement battery, temporarily reconnect the battery connector to the logic board socket. This ensures that the battery is properly aligned in its recess.
-
Adhere the battery, disconnect it, and continue reassembling your device.
This was very helpful
I got the battery out but what if it the battery bends a bit????
A bit of bending is probably fine as long as you are planning to replace the battery. Don't try to reuse a bent battery. In any case, try not to bend it any more than necessary, as bending increases the risk of fire.
I need a little help... I've been through your tutorial and success... all gone smoothly.
But.... I've had it on charge for 25 minutes... no charging symbol, no life at all... how long does a new battery take to charge before you notice any life?????
It can take a little while. If it doesn't power on after a little more time has gone by, open your phone back up and double-check your cable connectors. If that doesn't work, try plugging in your old battery to see if it behaves the same way. If you continue to have problems, drop a post in our Answers forum for more detailed troubleshooting. Good luck!
Well, the screen removal step is completely unnecessary and cost me the functionality of my front facing camera. I would remove it from the guide altogether.
There's no way I could have replaced the battery without removing the screen. It took a fair amount of wrangling to remove the battery.
It depends on your experience level. If you don't successfully remove both pull tabs, it's much easier to pry the battery out if the screen isn't connected. Most professionals probably leave the screen connected to save some time but we recommend beginners remove the screen to minimize the risk of damaging the display's ribbon cables.
Got it working turned it off now it doesn't want to turn on!!
You should add a comment about the best way (environmentally) to dispose of this battery.
You should add the final step of connecting the battery cable and finishing the install. I followed these steps and my phone is dead and no longer works, so not sure if I connected the battery cable incorrectly. It doesn't secure as tight as the original was, but there is no guidance in this guide on how to reinstall it. The youtube videos skip past the final steps too.
@jaybytez Sorry you're having trouble! Installation for the most part is just the reverse of removal. There's a link in the final step and the conclusion for how to install new adhesive strips and stick the battery down. To reconnect the battery to the logic board, just position the connector over its socket and press gently until it clicks into place. Same goes for all the other connectors. I'd suggest going through the guide a second time and checking your work carefully. If you're not sure whether the battery is connecting correctly, try the old battery again for comparison. If you continue to have trouble, reach out to our customer support team or try posting your issue in the Answers forum. Good luck!
("Never" part 1 of 4)
If you are only directly interested in the current instructional steps for iPhone 6 battery replacement, please know that this 4-part comment simply upvotes/supports Jay's post above. (4-parts needed as ran up against the character limit for this box.)
This is a commentary on this specific guide, yes, but it really applies to all guides I've read so far on iFixit, so I am not critiquing the author per se. This turned into a global recommendation for possible improvement in the fundamental approach that iFixit takes in writing ALL of the guides.
I agree with Jay 100% and I think the iFixit community would benefit tremendously if this suggestion were taken more seriously, namely that reassembly should be addressed as a separate instruction. Here is my further claim:
Reassembly is NEVER simply following disassembly instructions in reverse order.
It is never “just the reverse of removal.”
(Cont'd)
Paul -
("Never" part 2 of 4)
If you tend to disagree with my statement, simply try dragging the included YouTube video in reverse. Then try to follow that along while reassembling your phone. As just one example, see if you have great success reconnecting the battery connector to the logic board using the opening tool in the same manner as you used it during disassembly. Heck, try using the opening tool in a different manner if you like, but go ahead and reattach the connector using the opening tool. It is even called an “opening” tool - the very name of the tool shows you that it would NOT be included in a reversal of the instructions. That would require a “closing” tool. In this case, the “closing” tool is actually wisely recommended to be our fingers, applying gentle pressure, and in one case (I believe it was for the display connector) even pressing on the connector in a very particular manner (not much in the middle).
(Cont'd)
Paul -
("Never" part 3 of 4)
If you still question my claim that reassembly is never simply following disassembly instructions in reverse, it might be a very interesting exercise to record yourself actually reassembling the item (you already have the cameras present and rolling anyway, why not for a little while longer?). If you did that, and watched the assembly video side by side with the disassembly, you will quickly see all the many differences there are. I imagine that would be all it would take to convince "the powers that be" at iFixit that it would be a very good recommendation to authors that they complete the full round trip. Alternately, as I said, you could simply watch any of the current videos in reverse while actually performing reassembly, and could then at least add notes to existing content regarding the differences (as was done with the display connector NOTE found in this article above - I thought that was a really nice touch, BTW).
(Cont'd)
Paul -
("Never" part 4 of 4)
In closing, I really, really like iFixit, so I hope this recommendation is helpful and I hope it is received as such, as constructive criticism. Just trying to make iFixit even better, on its way to becoming an indispensable resource to all. :-)
(End of "Never" comment)
Paul -
@spacemanspiff2 As you seem to have noticed, there are reassembly bullets sprinkled throughout each guide specifically to mark the areas where additional instructions are provided for reassembly. Hence the qualifier, “Installation for the most part is just the reverse of removal.” When it’s not, reassembly tips are added to the appropriate step. In those cases where more is needed, you’ll find reassembly steps or even a full-blown reassembly guide.
Pre-bend the new battery connector cable! If doing this again I would make sure I had pre-bent the connector cable the same way as the original battery is bent. I did not and then once the new battery was glued down I could not get at it well to bend it properly. I had to wedge the extra cable in a bit and then the very small extra thickness left a small color distortion on the screen due to the additional pressure on the back of the display.
Es posible que al instalar una batería no original falle a continuación él detector de huella en un iPhone 6 ?
Well, I disassembled my work phone after buying just the battery. Now I find out the battery doesn’t come with these adhesive strips. Too late, I need this phone. Nice.
Hi Wesley!
I’m sorry to hear about the trouble. If you ordered just the battery and not the Fix Kit option, then the adhesive strips are not included and are sold separately. This is mentioned on the product page. If you’re still in need, you can find them right here: iPhone 6/6s/7 Battery Adhesive Strips
However, the battery should still technically perform just fine for you without the adhesive strips, as these are primarily used to keep the battery structurally adhered to the inside of the phone. If you are mindful of how well you handle your device (ie: Don’t throw it across the room, or go running with it in your hand), you shouldn’t have too much to worry about. Otherwise, it would be best to replicate the way the batteries come in all iPhones and get yourself a set of adhesive strips.
Yeah, the glue tab part is where this is not realistic to do yourself… mine tore off and now the battery is stuck in there, with no way to get it out and now voided. Your special tools are a joke.
Assuming I get through this procedure, are we supposed to cycle the battery a certain way?
Assemble in reverse needs update because I fix it now includes a screen gasket with no instruction. I’ve got a feeling I need to disconnect screen again in order to install it???
@docwild There is no screen gasket on the iPhone 6. If you’re working on an iPhone 6s, the instructions are here, and there’s a link in Step 21 with instructions for replacing the gasket.
I agree with the comment about pre-bending the cable first. I didn’t look close enough at the original battery and it looked like the replacement battery had a completely different cable. Then I realized that the cable turned up 180 degrees and then bent over 90 degrees.
I’m amazed my phone works after all this. I must have done just about everything wrong. Good luck to everyone attempting this. My next phone will be an Android, just not yet now that I’ve successfully replaced the battery.
ifixit needs to change their product configuration to include the adhesive strips with the battery only option and not just with the kit. Stupid to make people buy all the tools again just to get the adhesive strips…
@mts04a60 You can buy the strips separately. They’re linked in the parts list at the top of the guide.
Warming the back of the phone was the only way I could remove the adhesive strips. If cold, the adhesive strips do not release and break easily. Once warmed up, the improvement in ease of removal was amazing. I think this should be the starting point unless you live in a really hot place
The battery replacement went off without a hitch, but now I have no speaker sound. I still have earpiece and headphones sound, but no speaker. I’m trouble shooting now, but does anyone have any ideas? I’ve cleaned my headphones jack, checked my ringer is on etc. etc. Doing the most recent software update now ( hadn’t done it yet), but could just replacing the battery cause my speaker to be damaged? I didn’t even touch anything near where the speaker is housed. ???
Replacing iphone6 battery with out using heat gun, will it spoil the battery? Thank’s
Great kit! Simple to follow instructions made an intimidating task a breeze to accomplish. I highly recommend this kit to any owner of an iPhone to replace their own battery. An added bonus is the tools you have after the job for future use. They’re handy for glasses and other items with miniature screws besides phones. Overall an easy task with everything needed to complete the job in a professional manner. AAA+++
A few weeks I brought my 6S to Best Buy and let them replace it for $49. They are a certified Apple repair agent. Not worth my time or risk of breaking the phone. Just my preference and opinion.
my phone doesnt turn on and without a charging cable is the only time i can see the apple logo and then it retries and reshows the logo every 10 seconds. not sure what i did wrong
Have you already replaced your battery?
I found it beyond helpful to have the old battery and its connector to compare it to the way the replacement arrived. This told me approximately what the exact shape the replacement cable ought be configured/pre-bent into to successfully reconnect it to where it must go in the iPhone.
Just be warned that the Battery I received was absolutely dead flat- no residual charge at all.
Just to check that I hadn’t messed up any connections I dismantled it again.
In desperation I put it on charge and it worked!!!!
The iPhone 6 that I replaced the battery in did not have the dual adhesive strips at the end of the battery but rather a single narrow adhesive strip under the center of the battery. I had to heat up the back case and then pry the battery out by wedging a spudger tool under to work it lose.
It all seemed to go smoothly but when reassembled and switched on the white apple logo appeared for a moment but disappeared leaving thin red and green lines up the right-hand side of the screen and otherwise not functioning. Any ideas which bit of the process I've got wrong?
-
-
-
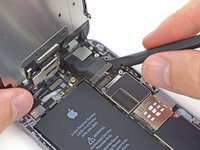
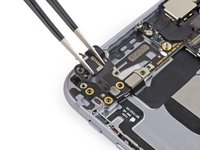
Remove the following Phillips #00 screws from the upper cable bracket:
-
One 2.9 mm screw
-
One 2.2 mm screw
-
-
-
Remove the upper cable bracket from the iPhone.
-
-
-
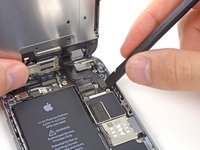
Remove the following four Phillips #00 screws from the contact bracket:
-
One 1.5 mm screw
-
One 1.4 mm screw
-
Two 2.1 mm screws
-
-
-
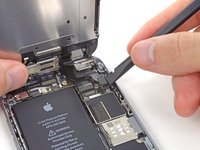
Remove the contact bracket from the iPhone.
-
-
-
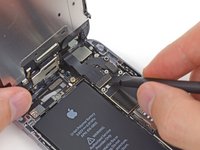
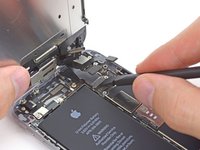
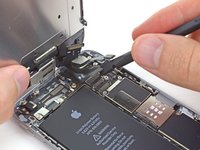
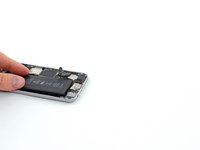
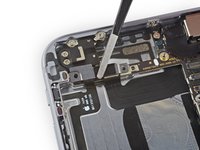
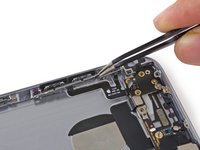
Use the flat end of a spudger to lift the volume control cable connector up off of its socket.
-
-
-
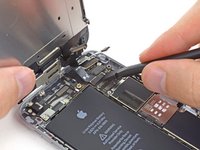
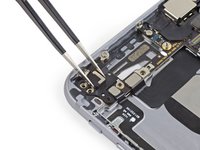
Remove the following Phillips #00 screws from the volume control cable brackets:
-
Two 2.3 mm screws
-
One 1.8 mm scew
-
-
-
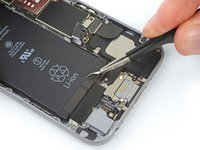
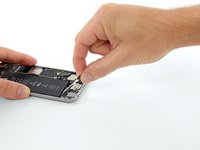
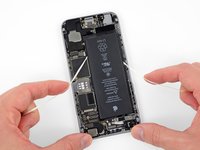
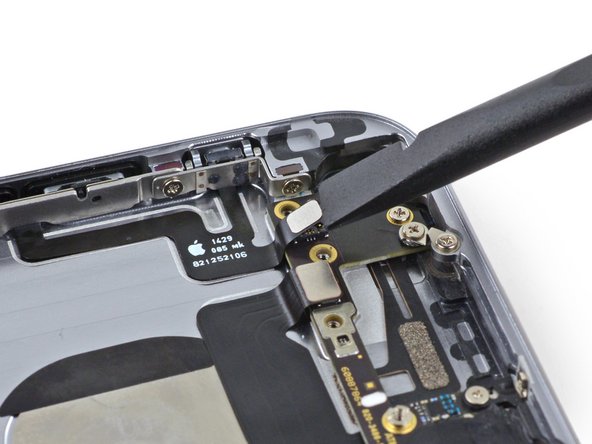
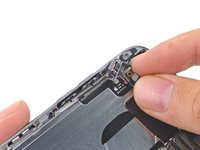
Pull the hold switch and volume control button brackets away from the rear case to allow access to the button covers.
-
-
-
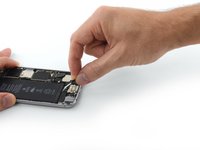
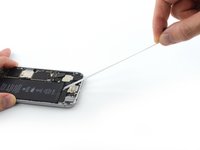
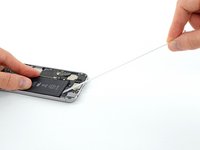
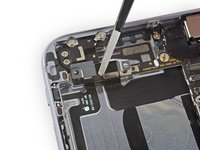
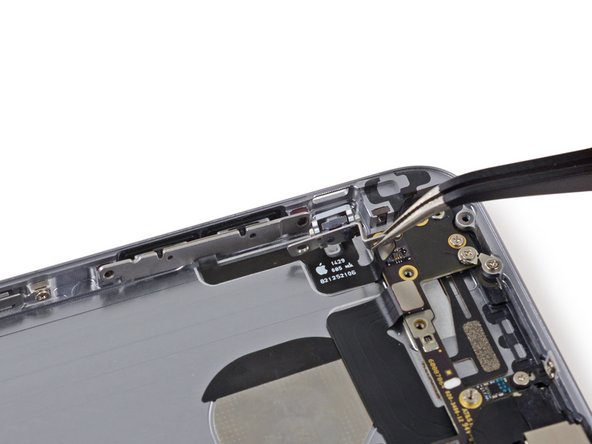
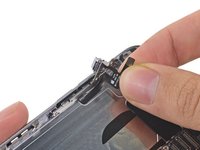
Begin to peel the volume control button cable up from the rear case starting from the connector end.
-
Be gentle when peeling the thin portions of the cable up from the case.
-
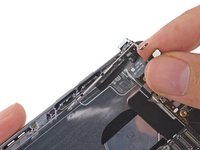
Remove the volume control button cable from the rear case.
-


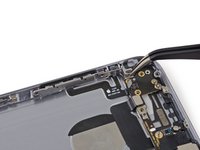


To reassemble your device, follow these instructions in reverse order.
crwdns2935221:0crwdne2935221:0
crwdns2935229:059crwdne2935229:0
crwdns2947821:0crwdne2947821:0
crwdns2947823:0crwdne2947823:0


crwdns2947412:02crwdne2947412:0
These instructions are so AWESOME to be able to reference! That last 1.8mm screw was a pain to get out of my phone. Step-by-Step, worked EXCELLENT. Thanks for posting these!
TRICKY BITS: replacing the mute switch lever onto the cable assembly is a bit…interesting. It was only when I used the Head Magnifier that I was able to see the mechanics of the switch and fit it on. There needs to be a seriously microscopic shot of that mechanical fit!
But, get the magnifier, it’s great for digging out splinters from your fingers.
SUGGESTION: Once you get the switch and the bracket situated, but before you stick the control cable to the case, make sure the switch functions. I had to loosen the three screws and place pressure on the assembly, holding the switch firmly in place, before it made a solid fit-then I tightened the three screws. Voila, the switch works!
Only then should did I bond the cable to the case
And now my phone rings again! Yay, no more missed calls!