crwdns2915892:0crwdne2915892:0
Use this guide to replace the Lightning connector and headphone jack cable. If you've tried cleaning the lightning port to no avail, replacing the Lightning connector can solve charging and connectivity issues.
crwdns2942213:0crwdne2942213:0
crwdns2936621:0crwdne2936621:0
-
-
Power off your iPhone before beginning disassembly.
-
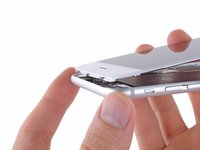
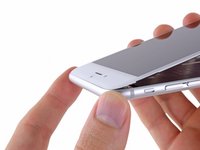
Remove the two 3.6 mm P2 Pentalobe screws next to the Lightning connector.
-
-
crwdns2935267:0crwdne2935267:0Clampy - Anti-Clamp$24.95
-
Pull the blue handle backwards to unlock the Anti-Clamp's arms.
-
Slide the arms over either the left or right edge of your iPhone.
-
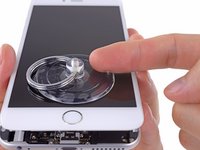
Position the suction cups near the bottom edge of the iPhone just above the home button—one on the front, and one on the back.
-
Squeeze the cups together to apply suction to the desired area.
-
-
-
Pull the blue handle forwards to lock the arms.
-
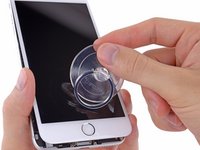
Turn the handle clockwise 360 degrees or until the cups start to stretch.
-
Insert an opening pick or tool under the screen when the Anti-Clamp creates a large enough gap.
-
Skip the next three steps.
-
-
-
Use a single suction cup to lift the front panel:
-
Press a suction cup onto the screen, just above the home button.
-
-
-
While holding the iPhone down with one hand, pull up on the suction cup to slightly separate the front panel assembly from the rear case.
-
Using a plastic opening tool, begin to gently pry the rear case down, away from the display assembly, while continuing to pull up with the suction cup.
-
-
-
Pull the plastic nub to release the vacuum seal on the suction cup.
-
Remove the suction cup from the display assembly.
-
-
-
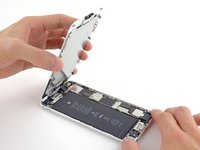
Pull the home button end of the front panel assembly away from the rear case, using the top of the phone as a hinge.
-
Open the display to about a 90º angle, and lean it against something to keep it propped up while you're working on the phone.
-
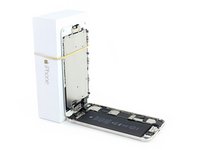
Add a rubber band to keep the display securely in place while you work. This prevents undue strain on the display cables.
-
-
-
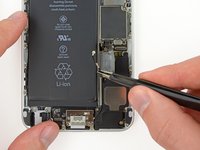
Remove the following Phillips screws from the battery connector bracket:
-
One 2.3 mm screw
-
One 3.1 mm screw
-
-
-
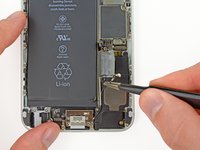
Remove the metal battery connector bracket from the iPhone.
-
-
-
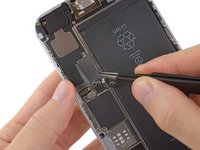
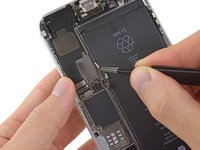
Use a clean fingernail or the edge of an opening tool to gently pry the battery connector up from its socket on the logic board.
-
-
-
Remove the following Phillips screws securing the front panel assembly cable bracket:
-
Three 1.2 mm screws
-
One 1.5 mm screw
-
One 2.9 mm screw
-
-
-
Remove the front panel assembly cable bracket from the logic board.
-
-
-
-
While still supporting the front panel, use a fingernail or the edge of an opening tool to disconnect the front-facing camera and earpiece speaker connector.
-
-
-
Disconnect the home button cable connector.
-
-
-
Use a plastic opening tool to disconnect the display data cable connector.
-
-
-
Finally, disconnect the digitizer cable connector.
-
-
-
Remove the front panel assembly from the rear case.
-
-
-
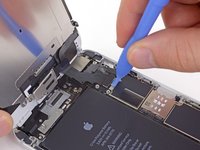
Pry the charge port connector cable up from its socket on the logic board with the flat end of a spudger.
-
-
-
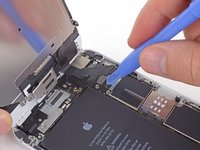
Use the tip of a spudger to disconnect the interconnect antenna cable from its socket on the logic board.
-
-
crwdns2935267:0crwdne2935267:0Tweezers$4.99
-
Grasp the interconnect antenna cable with a pair of tweezers and carefully de-route it from its channel on the vibrator assembly.
-
-
-
Remove the two 2.5 mm Phillips #00 screws securing the vibrator to the rear case.
-
-
-
Remove the vibrator from the iPhone.
-
-
crwdns2935267:0crwdne2935267:0Tweezers$4.99
-
Grasp the antenna connector with a pair of tweezers and carefully begin de-routing it from its channel on the speaker.
-
-
-
Remove the following screws securing the speaker to the rear case:
-
One 2.3 mm Phillips #00 screw
-
One 2.8 mm Phillips #00 screw
-
-
-
Lift and remove the speaker out of the iPhone.
-
-
-
Remove the two 3.3 mm Phillips #00 screws securing the metal bracket to the Lightning connector assembly.
-
-
crwdns2935267:0crwdne2935267:0Tweezers$4.99
-
Use a pair of tweezers to lift and remove the metal bracket out of the iPhone.
-
-
-
Use the flat edge of a spudger to pry the antenna connector cable up off its socket on the Lightning connector assembly.
-
-
-
Lift and remove the antenna connector out of the iPhone.
-
-
-
Remove the following Phillips #00 screws securing the Lightning connector assembly to the rear case:
-
Two 3.2 mm screws
-
One 3.8 mm screw
-
Two 1.7 mm screws
-
Two 1.5 mm screws
-
Two 1.4 mm screws
-
-
-
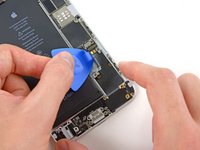
Use a pair of tweezers to grasp the plastic clip that is situated to the right of the headphone jack and remove it from the iPhone.
-
-
-
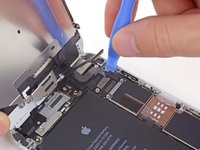
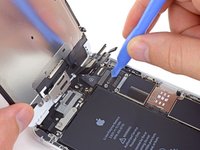
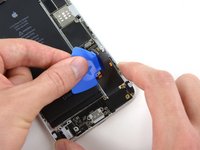
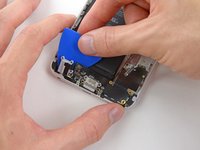
Use an opening pick to slowly separate the Lightning connector and headphone jack cable from the rear case.
-
-
-
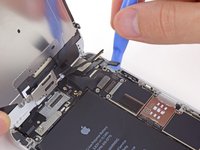
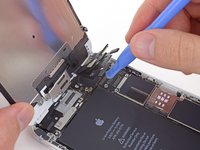
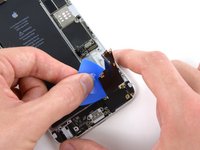
Insert the pick underneath the right bottom corner of the Lightning connector and headphone jack cable.
-
-
-
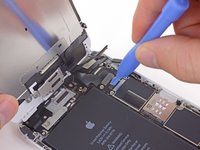
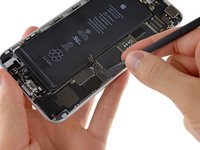
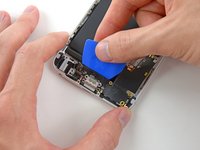
Run the opening pick across the top of Lightning connector and headphone jack cable to loosen the adhesive securing it to the rear case.
-
-
-
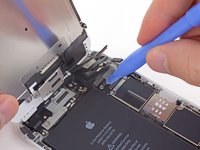
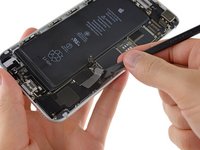
Lift and remove the Lightning connector and headphone jack cable out of the iPhone.
-
Use a plastic tool to scour any bits of adhesive residue from the rear case behind the cable.
-
Compare your replacement part to the original and note any differences. You may find a rubber gasket adhered to the old headphone jack, which should be transferred to the new part if needed.
-
Test fit your replacement part, and then peel off any protective plastic films or liners before installing.
-


To reassemble your device, follow these instructions in reverse order.
crwdns2935221:0crwdne2935221:0
crwdns2935229:0149crwdne2935229:0

crwdns2947412:025crwdne2947412:0
I did this tonight, took about 45 min. I used my iFixit tool kit to all the work.
When putting it back together I had an issue with my screen going all "white lines", turns out it was just a loose connection on the digitizer cable, I lifted it and placed it again and all is good with the world.
I had to replace the assembly because I was getting feedback when making calls with headphones and no voice at all with headphones if the phone was plugged into power. Now I can do both.
Thanks so much iFixit for making this possible.
After fixing my headset jack successfully, people could not hear me clearly on the mic. I took it apart again today. The clip that holds the mic in place, next to the jack, had been put down too tight to the mic, which kept it from moving enough to pick sound up clearly -- everything was muddied. I only had to pull the case open a little, unscrew the mic assembly to loosen it, wiggle it back a bit, move the mic a little to align it better with the hole, and then tighten it back down. It works beautifully now and everyone says I sound better than ever. A really easy fix, but it could have been avoided if there were instructions on putting everything back together or at least tips for little things like this.
My iphone stuck into headphone,what can i do to fix it?please help me as soon as possible
Hi @Tannaz pourian
If you are stuck on headphone mode first thing you can do is a quick fix if it works for you. You first turn off your iphone and with a gentle hand you can pull out any dirt or particals inside your headphone jack with a pin then clean it with a cotton bud with a little acitone or alcohol ( Don’t use too much of alcohol only little would be fine otherwise it could damage you display if it gets into your phone). Then after completing this process let it dry for a while and turn on your phone. I hope it works for you:) orthewise you have to replace your whole cc flex pannel. Good luck
I recently replaced the headphone jack but when I tried it out after successfully replacing it, the headphones still gave a crackling sound. Less than before but still very noticeable. Anyone have any suggestions to fix this issue?