
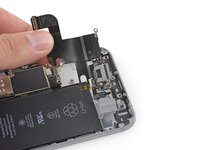
iPhone 6 Lightning Connector Assembly Replacement

crwdns2944107:0crwdnd2944107:0Sam Goldheartcrwdnd2944107:0crwdnd2944107:0crwdnd2944107:012crwdnd2944107:0crwdne2944107:0
crwdns2944111:0Kho 18, 2024crwdne2944111:0
crwdns2915892:0crwdne2915892:0
crwdns2942287:0crwdne2942287:0Use this guide to replace the Lightning connector assembly, which also includes the headphone jack and microphone. If you've tried cleaning the lightning port to no avail, replacing the Lightning connector can solve charging and connectivity issues.
You can also use this guide for reference when replacing the following parts:
- Battery Connector Bracket
- Front Panel Assembly Cable Bracket
- Lightning Connector Bracket
- Microphone Brace
crwdns2942213:0crwdne2942213:0
crwdns2942269:0crwdne2942269:0
crwdns2942337:0crwdne2942337:0

crwdns2943213:0crwdne2943213:0


crwdns2943215:0crwdne2943215:0


crwdns2944105:0crwdne2944105:0

-
-
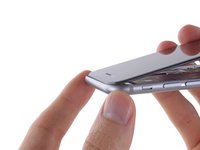
Power off your iPhone before beginning disassembly.
-
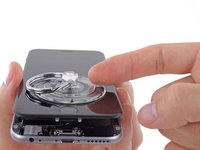
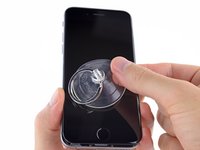
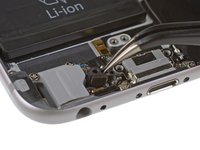
Remove the two 3.6 mm-long P2 Pentalobe screws next to the Lightning connector.
-
-
crwdns2935267:0crwdne2935267:0Clampy - Anti-Clamp$24.95
-
Pull the blue handle backwards to unlock the Anti-Clamp's arms.
-
Slide the arms over either the left or right edge of your iPhone.
-
Position the suction cups near the bottom edge of the iPhone just above the home button—one on the front, and one on the back.
-
Squeeze the cups together to apply suction to the desired area.
-
-
-
Pull the blue handle forwards to lock the arms.
-
Turn the handle clockwise 360 degrees or until the cups start to stretch.
-
Insert an opening pick under the screen when the Anti-Clamp creates a large enough gap.
-
Skip the next three steps.
-
-
crwdns2935267:0crwdne2935267:0Clampy - Anti-Clamp$24.95
-
If you don't have an Anti-Clamp, use a single suction cup to lift the front panel:
-
Press a suction cup onto the screen, just above the home button.
-
-
-
While holding the iPhone down with one hand, pull up on the suction cup to slightly separate the front panel assembly from the rear case.
-
Using a plastic opening tool, begin to gently pry the rear case down, away from the display assembly, while continuing to pull up with the suction cup.
-
-
-
Pull the plastic nub to release the vacuum seal on the suction cup.
-
Remove the suction cup from the display assembly.
-
-
-
Open the iPhone by swinging the home button end of the front panel assembly away from the rear case, using the top of the phone as a hinge.
It's not clear from the instructions but it is shown correctly in the pictures: when the front panel assembly is just open (at a small angle with the rear case) pull the top edge clips out of the rear case to slightly separate the two components, then swing the front panel assembly away from the rear case. I assume not doing so would potentially damage the connecting ribbon and/or the alignment clips. Just a guess...
Yes! I wish I had read this before working on my phone. I read the instructions as they are and slowly started to open the case. This is when I heard my screen crack. So in the future, slowly open and when you are about 40% of the way, pull the screen forward so that the top clips pull away (we are talking a cm at most). Sigh just ordered a new screen
Albert -
Ein Tipp zum Zusammenbau: Das Display ca. in 45 Grad halten und vorsichtig an die obere Kante des Gehäuses drücken, bis es bündig und glatt anliegt.
Dann das Display langsam und vorsichtig anklappen und die Clips von oben nach unten festdrücken.
This entire process went smooth. Final step of re-assembly , the assembly does not seat into the framing. The white gasket seats on one side not the the volume button side. Alignment looks good. How much pressure does one apply on the reassembly?
My problem is the front panel does not want to joint together with the rear panel… it feel like the front is too big but it look perfect but does not clip in place… Help…
same problem, in the final step, the screen does not fit entirely. it looks like the size is not 100% correct, but 99%… one side of the case stays open…
Same thing here, with a new screen it doesn’t fit quite right during re-assembly. It sits just a little bit higher and doesn’t look seated.
Some people have noted that the screen doesn’t seat properly on the case. Here’s how I solved it:
The issue is that rectangular brackets on the back of the display aren’t latching with the corresponding clips in the base. I think the brackets are missing the gap between the spring plate and bracket with the latching bumps on it on the base. Here’s my solution:
Position the top of the display slightly below the top of the case so the clips on the back top of the display start to engage with the phone case. Important: don’t push it all the way up!
Now press both sides of the top part of the display until the display seats on the back. Make sure both sides are flush with the case.
Repeat for the middle of the display. The bottom of the display will remain bent up because it will interfere with the bottom edge of the case.
Now push/slide the display up so the top of the display lines up with the top of the case. The bottom should then snap into the base, and the display should be flush with the case all round.
Yes - important to get those two rectangular brackets in place first but not all the way as you say.
Hola soy de Guatemala Me pueden ayudar a saber si puedo cambiar las partes de un A1589 a un A1549 iPhone 6
Good thing am reading this prior to beginning any disassembly or re assembly. Thanks guys for the great tips
-
-
-
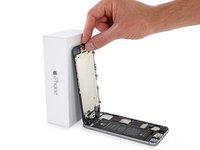
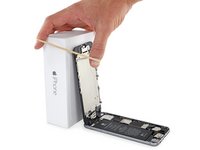
Open the display to about a 90º angle, and lean it against something to keep it propped up while you're working on the phone.
-
Add a rubber band to keep the display securely in place while you work. This prevents undue strain on the display cables.
-
-
crwdns2935267:0crwdne2935267:0Magnetic Project Mat$19.95
-
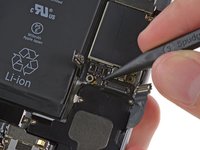
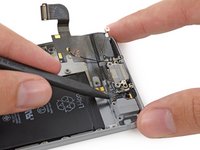
Remove the following Phillips screws from the battery connector bracket:
-
One 2.2 mm screw
-
One 3.2 mm screw
-
-
-
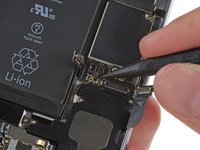
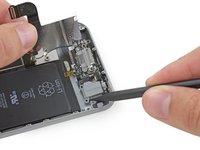
Remove the metal battery connector bracket from the iPhone.
-
-
-
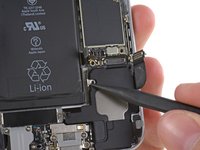
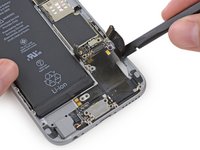
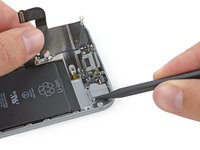
Use a plastic opening tool to gently pry the battery connector up from its socket on the logic board.
-
-
-
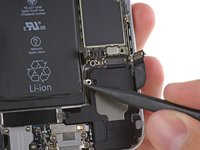
Remove the following five Phillips screws securing the front panel assembly cable bracket:
-
Three 1.2 mm screws
-
One 1.7 mm screw
-
One 3.1 mm screw
-
-
-
Remove the front panel assembly cable bracket from the logic board.
-
-
-
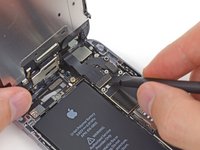
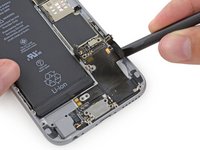
Use a spudger or a fingernail to disconnect the front-facing camera and sensor cable connector.
-
-
-
Use a spudger or a fingernail to disconnect the home button cable connector.
-
-
-
Use a spudger or a fingernail to disconnect the display data cable connector.
-
-
-
Use the flat end of a spudger to disconnect the digitizer cable connector.
-
-
-
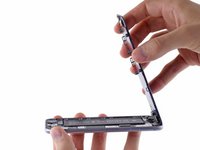
Remove the front panel assembly from the rear case.
-
-
-
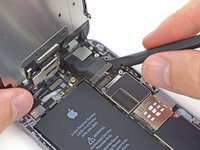
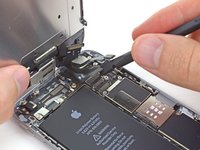
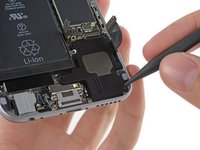
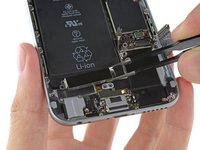
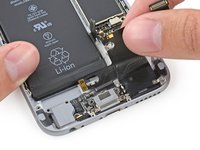
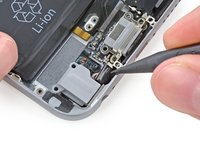
Use the flat end of a spudger to disconnect the Lightning connector assembly cable and fold it out of the way of the speaker.
-
-
-
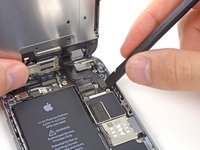
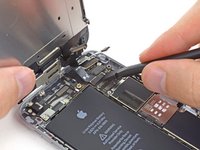
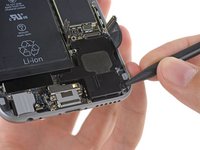
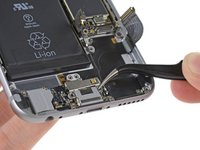
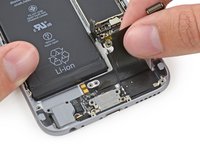
Use the point of a spudger to lift the antenna cable connector up off of its socket on the logic board.
-
-
-
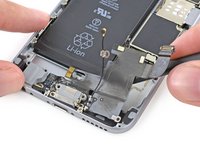
Remove the following four Phillips screws securing the speaker:
-
Two 2.9 mm screws
-
Two 2.3 mm screws
-
-
-
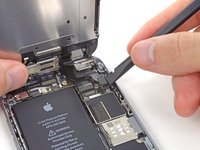
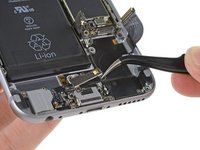
Use the point of a spudger to push the antenna interconnect cable clip off of the speaker housing.
-
-
-
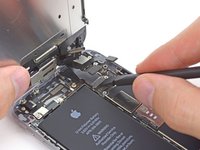
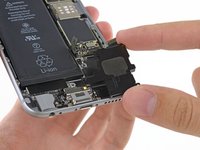
Use the tip of a spudger to pry the speaker up and out of the rear case.
-
Remove the speaker from the iPhone.
-
-
-
Remove the two 1.6 mm Phillips #00 screws securing the vibrator to the rear case.
-
-
-
Remove the vibrator from the iPhone.
-
-
-
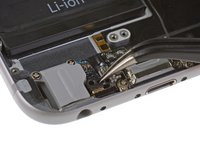
Remove the two 3.1 mm Phillips #00 screws securing the Lightning port retaining bracket.
-
-
-
Remove the Lightning port retaining bracket.
-
-
-
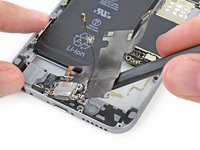
Remove the single 3.6 mm Phillips #00 shoulder screw from the microphone brace.
-
-
-
Remove the microphone brace from the iPhone.
-
-
-
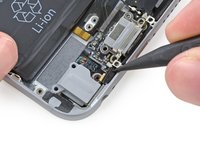
Remove the six remaining Phillips #00 screws from the Lightning connector assembly:
-
Two 3.1 mm shoulder screws
-
Two 1.7 mm screws
-
Two 1.5 mm screws
-
-
-
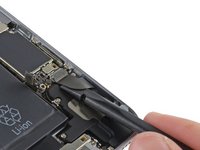
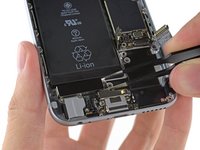
Use the flat end of a spudger to begin peeling the Lightning connector assembly up from the rear case.
-
-
-
Carefully pull the Lightning connector assembly up slightly to free it from the vibrator and speaker screw posts.
-
-
-
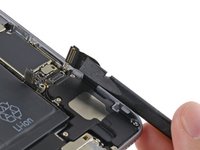
Use the flat end of a spudger to lift under the Lightning connector portion of the assembly to free more adhesive.
-
-
-
Use the point of a spudger to push the microphone portion of the Lightning connector assembly out of its recess in the rear case.
-
-
-
Gently run the point of a spudger under the assembly between the Lightning connector and the headphone jack to free it from the last of the adhesive.
-
-
-
Use the tip of a spudger to help guide the headphone jack out of its recess in the rear case.
-
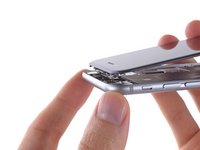
Remove the Lightning connector assembly from the iPhone.
-
Use a plastic tool to scour any bits of adhesive residue from the rear case behind the cable.
-
Carefully compare your replacement part to your original cable and make sure they match. Your replacement Lightning connector assembly may be missing certain components that need to be transferred from the original.
-
Components that commonly need to be transferred include the headphone jack gasket, microphone bracket, and antenna interconnect clip.
-


To reassemble your device, follow these instructions in reverse order.
To reassemble your device, follow these instructions in reverse order.
crwdns2935221:0crwdne2935221:0
crwdns2935229:0757crwdne2935229:0
crwdns2935103:0crwdne2935103:0
crwdns2947821:0crwdne2947821:0
crwdns2947823:0crwdne2947823:0


crwdns2947412:0135crwdne2947412:0
It isn't necessary to remove the screen as long as you can support it properly while doing the rest of the work. In my experience, unnecessarily removing screens can do more harm than good and causes extra work for yourself
I was trying to find exactly this message. Thanks!
I agree with this comment. If you can support it, don’t disconnect the screen connectors. I took the screen off and had two vertical white lines on my display when I was finished. I had to re-seat the connector multiple times to get the problem to go away. It’s working great now.
deshave -
Just completed this in about an hour. Follow the steps slowly and closely, then power cycle your device at the end. BAM you're done before you know!
I changed the charge port on an iphone 6. Apple diagnose the charge port not working to the owner of this iPhone. Now that its changed the phone still wont turn on. It doesnt even show the battery icon that it needs to be charged. What is a most likely scenario for this? Is it a bad LCD? A bad Battery? Someone help me.
im having the same problem also replaced battery and charging port, phone does nothing
ocvilla -
Same issue some one knows what to do, just double checked everything and it’s not working
rrhhmmtt -
It could be the Tristar chip. Search YouTube for iPadRehab channel and watch a few of the Tristar or not charging videos to see why it may be the case.
This part can die when using non-genuine mains charger and/or non-genuine cable due to not filtering spikes on the charging lines if I remember right.
If your microphone isn't working , check to see that the double stick tape is not blocking its input. Obviously the microphone needs airflow to get it to respond to anything, and as it came from ifixit, the adhesive tape was not perforated, so no "signal" was reaching the microphone. Consequently nobody could hear me on the phone. Since the iPhone already has the microphone brace, I just removed the double stick tape that was included on the back of the new microphone, made sure the microphone was centered on its rubber housing and post, then pressed the brace tightly against the microphone with tweezers while I screwed it down. I had called myself using google voice to aid in troubleshooting the microphone, and that horrible echo feedback (aka alien-whale-sex noise) you get when you put the phone up the computer's speakers signalled that the microphone was now picking up its surroundings. Hooray! Despite my minor difficulties, I'm still blown away with the stuff you can get from Ifixit. Thanks! DW
After connecting all worked except microphone during normal phone mode. Turns out both Siri and speaker phone mode use different microphone. Suspect it may have been the adhesive on the small piece connected tot he mic. Will tear down again and take a closer look at the microphone setup.
Any luck there Adam?
Ortenga -
Finished the repair but now my speaker isn't working properly. The volume works up to about 50% (but sounds dimmer than usual). By about 60% the speaker cuts out and stops working. Any thoughts what this could be? I took it apart again and reseated the speaker but no luck.
Did you re-use the little connector bracket which connects the antenna cable to the speaker casting? I did not do that in the fist place and had to re-install it afterwards. After that the speaker was working fine. Maybe your antenna cable is touching the speaker part just a little bit?
Alex G -
So question...my phone recently acquired some water damage. It won't hold a charge, the charge icon is missing on the main screen and there is a little bit of damage on the screen in that it appears like slightly smudged lines under the screen. What is the best recommendation for fixing all of these issues. I had thought at first just replace the battery but now it appears as though the best option is to replace the lightening port. I guess I'm just looking for some advice/confirmation before I begin!
Just finished and glad to see my Phone working flawlessly again. Thanks for the awesome guide.
One thing not in the instructions - Be sure to check the old assembly for the small black rectangular bracket/setting for the mic and the super thin black gasket looking piece that goes around the headphone jack before discarding the old assembly. If you don't, your mic will likely be loose and not sit in the recess properly when you re-assemble.
After having done this guide I now got a problem: When I plug in my phone it shows me the charging battery symbol but isn't really charging because no matter how long I wait the phone can't be turned on. Also it's even too empty now to show the battery loading animation anymore.
What do the upper gold pins from the lightning connector unit do?
PLEASE tell me this problem got solved. I just ran into it myself.
Microphone was distant sounding and muddy. Upon disassembly it appears the adhesive that holds the screen in place between the microphone and housing had liquefied a bit and spread out to the point that it was covering the entire screen (may have liquefied from cleaning it externally with alcohol over a couple of years). I peeled the adhesive off from the half of the screen that goes over the hole in the housing and left a bit on the end to hold it in place. The microphone is loud and clear now with no money spent on parts.
Had an issue with the charging port not working, used the walkthrough, within an hour the issue was fixed and I had power again!
2 hours later my phone started to drop out to 'no service'. Would then come on to my home network with 1-2 bars of service, but all calls and texts fail???
I assumed that it was the bottom antenna next to the battery that was the issue, as when I was reassembling the phone, I found that extremely difficult to click in place, I shook my phone and could here something rattling inside so I guessed it was the antenna.
Took the phone apart a few times to fix it, after my third attempt im positive the antenna has clicked in place. But still I have the issue of calls failing and texts not sending. I thought if the antenna was not connected properly then I wouldn't connect to O2 at all?
Maybe worth mentioning, theres a screw missing from the cover for the screen connectors? surely that wouldn't be an issue?
My SIM works in an Android phone, so I'm ruling out a network failure.
I'm having this same issue Jonathan. Were you able to find a fix?
Same thing is happening to me. Says 1x a lot. I have Verizon but I feel like I now have metro pcs
Hi Jacob, Jonathan and Max,
I am facing the same issue: did you find any solution ?
Thanks in advance for your help :)
Margaux
margox -
So if replacing this the unit still does not power on. What is the next logical part to troubleshoot?
Can I replace the lightening port itself on an iphone6 not the whole unit inc the flex and jack etc with IPhone 6plus lightening port?
How to fix back
That was one of the easiest fixes I have ever had and its marked Difficult. Ironically, the hardest fix to date was the lightning port on the 5s and that is marked moderate. That was far and above anything I have had to fix before and many missing steps. Even easier than the ipad mini! Just dont forget to compare parts or tape/foam covering old parts and replace on new parts.
Jonathan Lewis,
I've had the same problem as you; however, I'm not missing a screw. After replacing this item -- which is relatively easy -- I can no longer get a good cellular signal. Cellular connection frequently goes to 3g or 1x, and with only 2 bars, and calls/texts are dropped frequently. Calls/texts do work when connected via wifi, though.
-I properly used a grounding strap prior to working on the phone
-I'm certain the antenna was clicked into place completely
-I re-opened the phone to re-check connections, and they're good
My concern is that since the new part didn't come with new foam, I re-used the old foam for the connectors/antenna. The antenna foam piece was good, but the battery and lightning ribbon connectors have only partial foam on them now due to breakage during transfer. Perhaps this partial foam transfer is causing a grounding issue. I do wish that ifixit would offer replacement foam pieces for sale if they didn't come with the part.
Paul, more likely some of the screws have not been done up too loosely or they are not grounding properly. There is quite a few screws in the iPhone design that are used as connectors for the ariels. Have another crack at it. That antenna connector is a really difficult piece to get connected, so although you are certain, double check it. Also make sure it is guided through the right channels, and not being crimped anywhere as that may be causing premature grounding. Best.
Ben -
I had my phone repaired at a local shop for a dodgy aux port. They replaced this part but I now have no signal whatsoever and the battery died extremely fast. The back gets really hot and to top it off the aux port is fuzzy and crap.
I went back and they replaced the part again turns out to be exactly the same. I got a refund but after looking into it it's far cheaper and easier to fix myself.
Before I start any tips or explainations to what my phone is doing?
Much appreciated.
iPhone 6s
Is the iPhone 6 connector assembly the same than for the iPhone 6S?
I can´t find one for my 6S...
Thank you for any advise
No, the iPhone 6s is a slightly different assembly. I made the mistake of buying a 6s assembly for a 6 phone. Had to wait on repair while exchange part shipped! Got mine from Amazon.
I changed the charging port reassembling it all again I do not work as the speaker!
help me!!!
Make sure you've used the right screws in the right holes for this. The speaker uses the screws for connectivity and may not be getting a signal if the screws are incorrect..
Ben -
hello, did you solve this problem? I am having exactly the same problem. should I change the screws?
anlergl -
My phone took a dunk in some water and now won't turn on. I changed the battery as well as the charging port. Still nothing. Any suggestions?
You may have fried the logic board. You'll probably need a new one. :(
Ben -
After replacing the lightning assembly, my phone is still having issues charging. It will charge when the power is turned off, but once the phone is turned on, it stops charging and is not recognized when plugged into the computer, either. Any suggestions?
I got exactly the same issue. During the "operation", i spent a lot of time trying to plug properly the antenna plug to the motherboard. They were not fitting perfectly and i had to "force" the pluging. Now my phone is not charging correctly anymore (24h for a 100% charge). And I can't synchronise with my MBP neither, the data are not going throw my lighting (test with a brand new original iPhone cable...). What a mess...
Took me about 1,5h to complete this and it seems to have solved my charging issues.
I completed this repair in about 20 minutes, little bit of difficulty getting the digitiser connector to go in, but thats just the design of the phone and connector. Great job on the guide!
After replacing the lightning connector assembly I do not get very good signal strength. Everything else works fine and fixed my charge/earphone jack problems. My signal strength is very intermittent switching between 3G and 4G and seldom make calls. I'm guessing this would relate to the antenna connector which I have disconnected and reconnected several times, checked all the screws to make sure they are tight and in correctly around the case. It seems to be a common problem when replacing this part, any suggestions on how to fix the antenna problem?
a) try another part?
b) reinstall the old part?
c) could it be from opening the case?
d) I have no idea...
By the way the guide was really good! Thank you.
Update - reinstalled old part and it worked fine. Faulty part and getting refund. Will buy from a different seller with guaranteed genuine OEM part.
taylzee -
Same problem as Jonathan Lewis, Paul Briggs, Kieren and Taylzee here.
I installed the lightning connector assembly 3 days ago, everything went pretty smooth.
Like so many others it took me a while to get the antenna connector back in but that worked eventually with a bit of patience.
Now I notice the same symptoms as the people above wrote, weak signal strength and failed calls, over and over again.
I checked and re-checked everything by the way, all screws are properly in place and the antenna is clicked on.
Taylzee, did you get your lightning connector assembly from iFixit? I'll see if I can get a refund or a replacement part.
I contacted iFixit and explained the situation. They replied quickly and sent me a new part with a quick delivery method. Thumbs up for their customer service.
I have yet to replace the faulty with the new part but will post an update once done.
Ortenga -
I bought the first one off eBay from Sydney and got a refund no questions asked. I bought a second one from the USA which their photos of the part were exactly like the original part, Apple symbol and part number, yet receiving the part it is the same as the first one I bought (JBL meks 121437). I am in the process of another refund.
After hours of trying to diagnose the where the signal transmission drop is coming from I gave up, it seems to be around the lower part of the case for me. When the screen is partially opened and still connected at the top (case to case) it seems to work better but not 100%. Could be just coincidence as reinstalling the old part with the phone in two halves worked fine.
Batch of $@$* parts? Could be, I am open to suggestions.
taylzee -
I'm experiencing the same problem here. After replacing the lightning assembly connector, I'm experiencing signal drop, call and message failure. Did you replace the part ? Did it fix the problem ?
Thanks for your feedback
I tried two replacement parts from iFixit: both defective (low signal or no signal, dropped calls, the works).
Never had problems with their stuff before (I am an ACMT, use iFixit parts A LOT for OOW repairs).
I am very disappointed.
Enrico -
I am having the same issue replaced the lightning connector twice, and calls are dropping (call failed) and people cant always call me , i put the original lightning cable back and the signal is fine? has anyone found a fix?
Dan -
Hey guys!
Same problem here. I haven't tried putting the original part back again, but double checked the connection and everything looks fine. However, I do have low signal in part of the house where I used to have better. And another iPhone 6 has better signal than mine. Any suggestions? Thanks!
I’ve had the same issue as above… opened it back up twice to play around with any parts that are related to the antenna.
My latest theory though, is related to the sticky contact area beneath the whole assembly that is inserted…
When I removed the old assembly, I noticed there was some residue sticky gunk still left on the inside of the phone.
My first thought was to clean it, but I didn’t read anything about the adhesive in the guide, so I decided to be lazy leave it.
I got out the old part and a multimeter, and the back of the assembly does indeed connect to the antenna cable.
So I think I need to get myself another assembly, take out the current one and give the bottom of the case a good clean.
That way the assembly will have a better connection with the outer metal case of the phone.
Fantastic guide. Finished in about 1.5 hours. My charging port was faulty. Used this to replace it. One thing I recommend to not lose screws is take a white sheet of paper and draw a rough diagram with the step number and positions of each individual screw. After removing the screw, tape it down so it will not get lost. Saves a lot of trouble trying to figure out which screw is which. See link for my diagram http://imgur.com/u32hUmA
Another example https://www.technibble.com/the-cheapest-...
Oh my god, I totally did just this and it worked a charm. Fortunately for me, I had an old dodgy iphone 6 to do a test run on. During that test run I lost two screws and from that point on I was paranoid! Haha… Great minds think alike!! :-)
Excellent guide! My iPhone 6 had issues with both Lightning and headphone connectivity and I'm happy to say that both are fully functional and connect flawlessy now. Patience is key- if you try to rush through these repairs it's almost certainly going to lead to disappointment, but if you take your time, work in a well-lit area, and have the right organization and tools anyone can complete this repair.
This guide is comprehensive and very easy to follow. This isn't a job for the technically-inept, but it's simple enough for someone with reasonably good intuition and skills.
About as good instructions as you can find; together with a few helpful comments I aced it in 45 min.
Many thanks to all involved.
Loved using the magnetic mat from ifixit, really helped with this tear down. Some of the steps in reverse were more challenging, the comments really helped. some photos or videos might be nice for some of the more challenging steps like connected the antenna again? Thanks for the guide and the parts!
Did you have to buy all those parts or did just having the Lightning Connector and Headphone jack part suffice? Thanks in advance
I was wondering if all these parts are needed to complete this repair, or can I just use the ones already in the device. The only part I bought was the iPhone 6 Lightning Connector and Headphone Jack. The ones below I have not bought, can i just use the originals?
iPhone 6 Lightning Connector Bracket
iPhone 6 Front Panel Assembly Cable Bracket
iPhone 6 Battery Connector Bracket
iPhone 6 Microphone Brace
Hi Juan, the parts listed are not a requirement for this guide. You could replace any of those parts by following this guide, but you only need to replace whichever one is broken in your unit. As long as you follow the guide carefully (and the phone doesn't have other secret issues) no other component should need replacing because of following the guide!
I'd like to add that the part you buy from IFixIT has some blue tape like stuff which has to be removed when you install the parts. This is not noted in the guide.
The additional PDF file with the screw and part pieces was BEAUTIFUL - every guide should include it! So helpful!
Hey, are all Iphone 6 components like this? I'm used to a different port/component in the southern areas of the US. Great tutorial, I'm just wondering.
Great guide! The one item I had an issue with was the piece referenced in step 35 (as of this writing, the step where the small plastic microphone piece gets removed from the phone housing).. This microphone assembly is glued to your old lightning connector cable and must be removed and transferred to the new one. There is only a pinhole (literally) that allows sound to pass from the plastic piece into the microphone cable, and those two parts need to be very precisely aligned before you press it onto the adhesive to reattach it... It took me several attempts to ensure the plastic microphone piece was properly aligned with the cable (pinhole-to-pinhole). Other than that, flawless.
Hello there i Got thar problem With my iPhone 6 its dead it Won't turn on it won't charge ive tryed with med batteri and Mew lightning Dock but its dead Can somebody help me what Can be wrong with it :/
I've got a very strange problem and I was wondering if anyone could help me. I've replaced the unit as above and now my microphone is acting strange. If I make a call the person on the other end can't hear me and I can only hear my own voice through my earpiece! (Feedback?) even if I mute the microphone I can still hear my own voice.
Any advice?
Great! I solved the charging problem.. before it was only able to charge with some cables, or switched off.. after buying a new charging dock by 10 euros and following this material, its solved!!!! (In an apple store they wanted me to pay 400 CHF)
Thanks a lot!!!!!!
Hi there
just wondering if the foam used on the mic brackets is different from the foam used elsewhere. Is it designed to be acoustically transparent. I have an ebay phone and it had lots of bits missing as well as dodgy mic. I replaced the lightning connector assemble and while doing so realised the upper mic bracket was missing. I bought a new one but it came without foam. I can buy foam, pads but don't want to be insulating the mic.
Did no solve my charging issues. Phone wouldn't charge at all and still will not charge after replacing the part.
I purchased the part to replace a non working microphone.
A few notes to buyers:
1. some smaller parts (brackets, etc) must be switched over from the non-working part (i.e. antenna cable bracket)
2. no EMI foam on the top of the replacement part's antenna. That may or may not cause problems.
3. the replacement antenna connector is a VERY tight fit. Take maximum care when connecting it to avoid damage to the board.
4. last, but not least: The first part I received was defective. The microphone worked perfectly, but the antenna had SEVERE connection problems (no connection, dropped call, impossible to make or receive calls). I contacted iFixit and got a replacement. Unfortunately the replacement had the SAME EXACT problem. At that point, to exclude a mistake on my part (I am a trained Apple Technician, but you never know), I reinstalled the original part. Connection is again flawless. Returned the part and got a refund, had to contact a lawyer because iFixit is refusing compensation. Not good.
Followed this guide and everything worked as illustrated! Great step by step manual. Laid out my screws by each step and then simply reversed the steps putting it what together. Replaced the battery while I was in the phone.
Hi, I replaced the lightning port assembly and now my iPhone 6 says I touch is not activated and headphone jack is not working. What could be the problem?
Just did this, I did not remove the screen as that seemed more difficult than it needed to be. Only took me an hour and I've never opened up a phone before. Somehow everything works perfectly. I bought the part from the ifixit store and I bought a tool kit on amazon for 7 bucks. Greats purchase.
I'm buying a second spare part because the first one (from amazon) had signal problems with the antenna. The second one says "Apple Original spare" and doubles the price of the first. I will tell you later the result...
Hey! Any news? Did the new replacement work as expected? If so, could you share the link with me? I bought it on Amazon (less than US $8), but having the low signal issue now. Thanks!
I've repaired iPhones several times for broken switches, home button, shattered screens, faulty batteries, etc. in the past and this was the hardest one I think I've ever done due to that antenna cable. Took me over half an hour but it magically fell into place unexpectedly and everything seems to be working great. I bought the replacement part from iFixit after seeing reviews from others who had problems with parts from eBay (my usual source). Works great. Thanks for a good guide.
I did the above process and I am having the same issues with weak service. I tossed my old original part not knowing I needed to interconnect bracket off of it for the antenna. Could this be part of my problem? Does that bracket serve as a ground? And if so, can the bracket be purchased anywhere?
Anyone having issues with the antenna, you can also try plugging the antenna before putting the speaker back. It was easier for me to do it like that. It took me 1hr 30min first time but everything works perfectly. There are two pieces (one of them is the antenna bracket) that the item doesn't bring so make sure to remove it from the original.
After replacing the charging port, I immediately realized the speaker no longer functions. Soon thereafter, I came to find out calls are very frequently dropped, while talking my voice goes in and out as well as the battery takes much longer to help. Advice much appreciated?
I just replaced one I had bought on Amazon with the Ifixit replacement. I can pretty much hold 3G now, but get no LTE. Before with the Amazon part I could get LTE but would bounce back to 1X a lot. I have the antenna clip arriving today and will install, hoping this helps but not sure if that clip acts as some sort of ground or not.
I have a problem with my mic being quiet and cutting out on calls. I have replaced the assembly and it seems fine when using voice memos although not as loud as when I try my old iPhone 5 . Any thoughts on what could be causing this low mic volume could it it be software related?
Have tried repositioning the mic several times m making sure it's seated properly etc. Driving me a bit nuts.
great tools, great instructions, great price, everything took an hour and works flawlessly!
This is the most frustrating thing ever. Where can we get this part that preserves original signal connectivity?? I had the dock connector replaced by a shop, everything works OK except frequent drops to 1x or no service. I can still get LTE but it will switch to 1x without me moving. Airplane mode on and off will temporarily go to LTE. The shop says he has no advice. And of course every time I'm in there it says LTE. About to buy a new phone :-(
I had the poor signal issue after using a part bought from Amazon. After a lot of fiddling around, I decided to replace original part and signal was fine again. I then bought a part online from 'replacebase' in the UK, fitted that and all works fine. So my experience was that it was a faulty part rather than anything subtle about how it was fitted.
OK, I spoke too soon, all works fine EXCEPT the battery percentage jumping around (e.g. suddenly going down from 54% to 1% - then on rebooting the phone it came back up as 33%). I have seen this problem before with a bad battery guage, and also with a bad charging IC, but I'm not sure whether a bad lightning port assembly could also cause this? I will have to start replacing things again to track down the problem...
any luck?
good luck! (i hope)
DVS -
Ok so I wanted to post about how I resolved this issue. I took out the "new" part from the shop and replaced it with a "working pull" from e-bay. The part I put in is an authentic Apple part. Unfortunately you can't buy these parts new anywhere because Apple doesn't sell them. My issue is now resolved! This also fixed the fast draining battery because it isn't constantly searching for signal.
Worked perfectly! I didn't remove the screen for this repair and it doesn't seem to have been an issue. One point: reconnecting the antenna I found really difficult; spent the most time trying to get it reattached. Thanks!
So Basically This is identical to an iphone 6 plus, infact identical, except a few steps are in a different order, although those steps that are different can be performed in any order...
After replacing this part I had trouble with the phone being stuck in headphone mode even when no headphone was plugged in. The symptom of this is that it won't play music through the speaker, and that phone calls only work in speakerphone mode. Also, when I used a headphone, the balance was off.
The solution was to clean out the headphone port with rubbing alcohol. I used 91% on a Q tip with almost all the cotton pulled off to make it small enough to fit. Once you dip it in alcohol, twirl the remaining cotton between your fingers to tame the strands and take off excess alcohol, then clean the headphone port. It may take a few times. My theory is there may be some film or dust from the factory coating the contacts in there that the alcohol removes?
I replaced my headphone and lightning ports for just that reason. No amount of alcohol would clean it. Now I know why. Same problem after replacing the part.
Hey, just replaced my lightning connector assembly, and I now notice that the phone indicates it is charging without ever turning on. A couple of other people seem to have run into this problem, but nobody in this thread seems to have a solution. Please help, I cannot afford a new phone.
@zifker hard to say without more details. You might want to try searching through existing iPhone 6 questions for something that matches your problem. If you're really stuck, post your question in more detail in our Answers forum—you'll have a better chance of getting help. Good luck!
Just finished this and now my ear speaker doesn't work, I have to put it on speaker phone to answer and make calls. How can I fix this?
@ washburnbros Most likely answer is a loose connector or a damaged flex cable. Does your front camera work or is that out, too? The front camera and earpiece speaker are both fed by the same cable. Try reseating the connector in this step (making sure to disconnect the battery first). Check to make sure there's no dust/debris or bent pins in the connector socket. Check the attached flex cable to make sure it wasn't damaged. If you still have trouble, drop your post into Answers.
Every step was perfect, thank you very much for this manual. Saved my phone.
Great guide - two things I noticed though. The microphone is adhered to a black piece which was not present on the replacement component. You’ll have to remove this piece to reuse it. Secondly - the replacement antenna did not have the metal clip that screws into the speaker but it is easy to pull off of the old antenna. Other than that the repair went super smooth!
In my case after the repair the vibrator vibrate with very very low intensity… someone kwon why?
Went through the process. All seemed fine after installing. Then after my battery charged back to 100% the phone went black and died. I have no power. Connecting to computer shows the phone isn’t recognized so it isn’t a screen issue. Took the phone back apart and reconnected all of the connections listed in this guide…still no power at all
After completing the part replacement, I’m getting rubbish signal strength to the point where it wears down the battery trying to search for my mobile provider. Don’t bother with this replacement unless you absolutely have to. The part is sub-standard and actually makes your phone worse as a result. My time and my money wasted!!!
Your indepth investigation into the cause of the degradation of your signal strength came to this conclusion did it? Or did you just ‘give the instructions a go’ and it didn’t work so it must be someone elses fault? So you did everything absolutely perfectly? You didn’t accidentally touch some metal to metal contact point thus contaminating the surface with oil/grease from your skin?
this is an absolute argument from ignorance if I have ever seen one!
Same problem here. Others had a similar result.
I just replaced as per the steps and now Phone is dead. I tried a new screen and new battery and still nothing.
My charging port started acting up in me so I decided to replace myself. Was pretty simple repair. I did no take display screen off as I didn’t feel I needed to and I was able to prop up next to something solid on my workstation that kept it up. Followed instructions and worked good I took a small paper plate n a pen and “carved” squares in it. Every step I did I put those parts in the square. Once I was done I just reversed everything square by square. Took about 30-40 min to begin and finish. I’m very happy with the results. The only two issues I had was the antenna wire took a little time to snap back in. One of the screwdriver heads wasn’t unscrewing some of the screws so I took my other parts kit I bought a while back with few more bits and found one to work. Other than that it was simple. I love doing this stuff. Thanks for reading.
This guide is comprehensive and very easy to follow. The part was replace and the phone is funtioning normal except it is only the one of the two earphone pieces when plugged into the phone. Any idea why anyone?
Awesome instructions!
I do this kind of stuff very often and it can be tricky. You even have a printable storage guide for the screws and removed components. Great job.
Probably the two trickiest parts was removing the connector cable without tearing it and swapping the little rubber piece for the microphone. I had to use a hairdryer to heat the back of the phone to get the connector cable removed. Swapping the rubber piece required a magnifier and with something to carefully wedge between the cable and the rubber piece.
It maybe obvious but it would be good to remind those on the reverse instructions to remove the covers over the sticky tape at the appropriate times.
Ross
Milpitas, CA
Awesome, you are the man.
My iPhone 6 was slightly different, the vibrator was longer and one of the screws which holds the speaker was hidden, but the steps worked for me just fine.
Before opening your phone when something seems wrong with the lightning connection, try to ‘undust’ it, by blowing it clean with air pressure, or, what I did, carefully insert a wooden toothpick to remove dust.
Brutal, I did the full replacement like in 1h. Thank you very much!!!
I tried and it didn’t work. ) =
The part on the connection on Logic board is Brocken what is it called and can you replace it
Excellent guide followed it by the book,took roughly 45 minutes to complete this everything going well.
Well done to the author of the guide,only thing that is a little bit tricky is the glue that apple use it is nothing short of a nuisance apart from that good.
I just recently replaced this assembly and it went really well. As long as you go through it carefully. This is the second replacement I have done: the first was a screen and digitizer assembly.
This was my first iPhone repair, and it worked. The parts and lightning port assembly all worked well. A couple points I would add for my experience.
1: Getting the antenna back on was challenging, but patience pays off.
2: The adhesive from the original assembly was very hard to remove even with the smudger.
3: Do not drink coffee prior to doing this if it makes you shaky. These screws are tiny!
The guide was super helpful, the print out for screw placement was also helpful (though my fiance made a good suggestion which was to place the sheet of where to put the screws in the top of a box lid so that they dont accidentally fall out onto the carpet like mine did.)
All things considered, this was definitely hard but not impossible. If you take your time, you can do this.
Comparing original Apple and aftermarket iPhone 6 charge port flex assembly.
Like many others have commented on IFIXIT’s forum and on IFIXIT’s iPhone 6 charge port repair guide, I had intermittent cell service and signal strength after replacing the charge port flex assembly. I purchased the part from an eBay supplier. The cell service would fluctuate between no service, searching, 1x, and LTE, but could rarely make calls. I concluded the part was defective, and had the same supplier provide another part. This one I installed with exactly the same result.
I decided to measure continuity between several of the case grounding areas of the flex assembly and the flex assembly’s outer conductor of the antenna connector wire. I did this on both the eBay part and the original Apple part, and found an interesting difference.
Refer to the link below for more extensive write-up and the findings.
I did this complete repair and test in under 30 minutes. I bypassed the screen removal and just supported it properly. No issues afterwards. A few notes:
1. The adhesive on the original part is a pain to get off
2. The antenna is a pain to get back on
3. Take care not to press on the battery or you will be back looking for another guide
4. Line your parts and screws in the same position and order that you took them out. Speeds up reassembly exponentially.
5. Check the original part before you throw it away. There are at least 2 pieces that you may need from it.
6. Test the part before you put your pentalobes back in
I’m not a professional and I have shaky hands but this was quite easy. Thank you ifixit!!
Excellent instructions, I replaced the battery as well. I concur with the comment about not taking off the screen if you can carefully avoid that. I did take the screen off and ended up not reconnecting it properly… had to redo to get snug fit. :-)
Done this successfully. However, I had to go back and re-install the little connector on the antenna cable. It was missing on the replacement assembly. The speaker was not working without the connector bracket.
Others reported that problem as well, but I did not read all those comments.
It would be great for others to include that in the instructions. Right now it only mentions that you should should compare the replacement assembly with the old one and re-use any missing parts. Rather vague…
In this guide, the part you’re referring to is called an antenna interconnect clip. There’s a specific reminder in the last step to make sure you include it. Congrats on a successful repair!
Agree with Phonesurgon, no need to disconnect the screen if properly supported. The guide was great and the repair turned out perfect. Took about 45 minutes. Thanks for the great guide.
So the good news is I got the charge port working! The bad news is in the process I accidentally screwed up the front camera, phone speaker (like at the top for phone calls) and bluetooth. The phone was going to need to be replaced anyway so I’d say it was a success. I must’ve messed up a connector when putting everything back together that screwed up the front camera. Be really careful with the little long skinny antennae.
After the replacement, the lightning connector cannot be inserted in either direction. It works only when inserted in a certain direction. I tried it with different cables to make sure it’s not the cable at fault. Any else had this problem?
I presume using a white lightning port replacement on a phone with an existing black lightning port is fine?
The parts don’t identify themselves to the mainboard and be detected as a mismatch will they?
Very good tuturial, 1 hour and half past
to test if battery is charging i use :
- usb meter
- lighting to usb cable
If usb meter show voltage u can say the battery is charging, battery is ok
But, price of usb meter is same than battery or complete lcd,
I completed this repairs along with a display assembly and battery replacement. Doing all 3 together took about 1.75 hours. The key is to use a mat with labeled squares (Step# and screw size) for all of the removed parts and screws and keeping the screw of different sizes clearly separated. The major challenge I found was seating the new LC connected assembly into place while exposing the sections new adhesive. I ended up removing the backing and seating it in three sections. Thankfully all of the assembly is bolted down as well. My iPhone 6 now has a new display, new battery and charges properly due to the new LC connector. It is like having a new iPhone again! Thanks, IFixit.
This guide was exactly what I needed! In an hour I had the entire repair done. I didn’t disconnect the screen, just kept it supported the whole time. Apple sure does make some tiny screws … I had to search a couple times for screws that went bouncing off the table when I tried to reinstall them. Maybe a slightly magnetic screwdriver would help, but then again maybe that isn’t a good idea for electronics.
Thanks for the guide and the comments I went with not removing the screen but making sure it was well supported.
Had no trouble at all following this guide, and the issues I had were fixed. Removing the film from the double sided tape on the replacement part was the only step not mentioned here, and the only step of the process I had any trouble with! For some reason the the double sided tape would cling to the film and tear no matter how careful I tried to be.
I’m a beginner and this really wasn’t too bad! I followed this video as well https://www.youtube.com/watch?v=qnX_KKJn...
The trickiest part was reconnecting the antenna cable cuz it’s so small and the microphone part since it has to bend at a 90 degree angle to be along the bottom of the frame of the phone. I don’t think I was able to get it quite right and my microphone seems a bit worse quality now because of it. That specific part was why I wish this guide had some tips for the reassembly instead of just saying “reverse the steps”. The video above shows the reassembly which is very helpful.
Just make sure you connect all the cables correctly! Gotta hear the two clicks! And keep track of all the screws! Good luck :))
Work all very well, only tricky part was to fit in the new lighnign connector (cut out for screws seems to be smaller than original). Other than that very good and detailed descritpion and photos here ! Thanks a very lot !
Amazon has this part for a lot cheaper, but I don’t trust the quality of their iphone parts anymore . i bought a charging port for my iphone 4 some years back from Amazon because it was cheap and it gave me nothing but trouble. That’s why I went with ifixit this time when my iphone 6 wouldn’t charge. Cost a little more but everything works great now.
I failed. Believe the other commenters that reattaching the antenna is hard. I was working The at it, and bent the connector one too many times and it broke. Bummer! I still don’t understand how that antenna connects. I would want a high power magnifying glass if I was going to try this again. I also found that removing the screen wasn’t really necessary. I taped it to the side of the box the part shipped in and it was secure. The other thing I did was tape all my screws to a paper with the drawings and steps labeled on it so I knew where all the screws went and I didn’t lose them.
Thank you very much for this tutorial! Thanks to it, I renewed my battery *and* my Lightning connector… and my iPhone 6 is working as if it was new. The operation wasn’t expensive at all and I can wait a little bit longer to buy a new phone. :)
I didn’t noticed the PDF guide for the screws but I made one myself and used some blu-tack to keep the screws in place. It worked fine for me and I did not have any issue while following this guide. (I started with the one for the battery replacement then switched to this one and it was perfect).
At last but not least, thank you (a lot) to iFixit for the parts and the (awesomely) fast delivery (in France)! The service is perfect from A to Z.
PS: for the antenna, I read the comments, took a deep breath and did as follow => with one hand, I placed the antenna connector in place (it looks like a target so it’s “easy” to center) then, once aligned, I pressed softly on it until I heard a “click”… and it was made in a minute or two. As for the rest of the process, it’s important to be patient, organized and keep its calm. (Of course, you should read and watch everything before your to proceed, at least the first time.)
Excellent tutorial. I completed this in about an hour, along with a battery replacement, and it was seamless. A helpful tip would be to LOOK at the creases in the OEM part installed and match those creases in the replacement part, or else it won’t fit quite right.
if you are having issues with your relationship or marriages I advice you to contact Dr Charles he can help you as well. WhatSApp: +2348146708557
Everything went well after installing a new lighting port, plugged charger in, made a call, talked for about 5 mins. then call dropped. Called back, had a brief conversation then call dropped. I can text but have no voice cell. Any ideas?
Antenna solidly on the the screw connection mid wire, rubber boot on top of antenna plug.