
iPhone 5s Home Button Replacement

crwdns2944107:0crwdnd2944107:0Sam Goldheartcrwdnd2944107:0crwdnd2944107:0crwdnd2944107:011crwdnd2944107:0crwdne2944107:0
crwdns2944111:0Maw 16, 2024crwdne2944111:0
crwdns2915892:0crwdne2915892:0
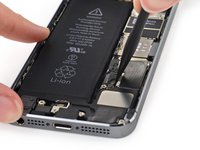
crwdns2942287:0crwdne2942287:0Use this guide to replace the home button assembly in your iPhone 5s.
Please note that only the phone's original home button assembly will be capable of using the Touch ID functionality. Installing a new home button will only restore ordinary home button functions, not the Touch ID features.
You can also use this guide to replace the following parts:
crwdns2942213:0crwdne2942213:0
crwdns2942269:0crwdne2942269:0
crwdns2942337:0crwdne2942337:0

crwdns2943213:0crwdne2943213:0


crwdns2943215:0crwdne2943215:0


crwdns2944105:0crwdne2944105:0

crwdns2936621:0crwdne2936621:0
-
-
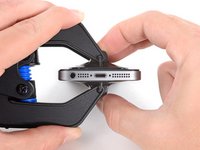
Power off your iPhone before beginning disassembly.
-
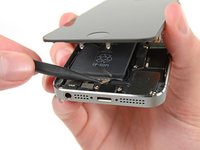
Remove the two 3.9 mm Pentalobe screws from either side of Lightning connector.
-
-
-
If your display glass is cracked, keep further breakage contained and prevent bodily harm during your repair by taping the glass.
-
Lay overlapping strips of clear packing tape over the iPhone's display until the whole face is covered.
-
-
-
Regardless of the tool you use, you need to be sure you pull up the entire display.
-
If the glass begins to separate from the plastic, as shown in the first image, slide a plastic opening tool between the plastic frame and the metal phone body to pry the metal clips out of the case.
-
-
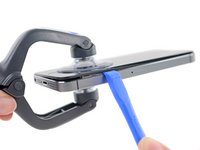
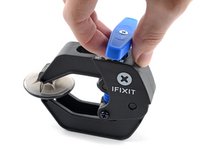
crwdns2935267:0crwdne2935267:0Clampy - Anti-Clamp$24.95
-
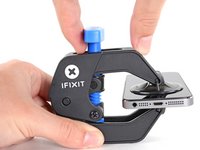
Pull the blue handle backwards to unlock the Anti-Clamp's arms.
-
Slide the arms over either the left or right edge of your iPhone.
-
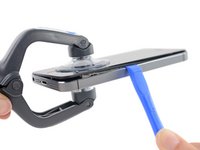
Position the suction cups near the bottom edge of the iPhone just above the home button—one on the front, and one on the back.
-
Squeeze the cups together to apply suction to the desired area.
-
-
-
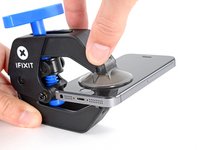
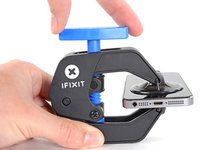
Pull the blue handle forwards to lock the arms.
-
Turn the handle clockwise 360 degrees or until the cups start to stretch.
-
Insert an opening pick under the screen when the Anti-Clamp creates a large enough gap.
-
Skip the next two steps.
-
-
-
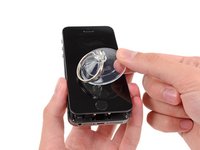
If you don't have an Anti-Clamp, use a single suction cup to lift the front panel:
-
Press a suction cup onto the screen, just above the home button.
-
-
-
While holding the iPhone down with one hand, pull up on the suction cup to slightly separate the home button end of the front panel from the rear case.
-
With a plastic opening tool, gently pry the edges of the rear case down, away from the front panel assembly, while you pull up with the suction cup.
-
-
-
Pull the plastic nub to release the vacuum seal on the suction cup.
-
Remove the suction cup from the screen.
-
-
crwdns2935267:0crwdne2935267:0Tweezers$4.99
-
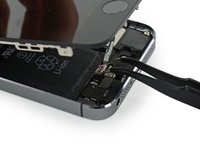
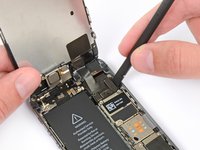
Open the phone just enough to reveal the metal bracket covering the home button cable.
-
Only the phone's original home button assembly will be capable of using the Touch ID functionality. If you rip the cable, installing a new home button will only restore ordinary home button functions, not the Touch ID features.
-
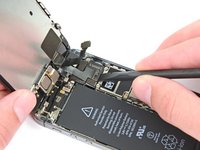
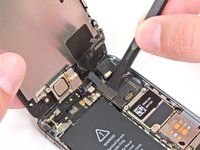
Use the tip of a spudger to push the bracket free and remove it with tweezers.
-
-
-
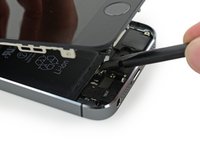
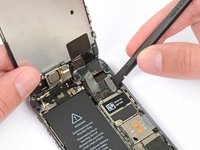
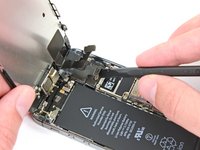
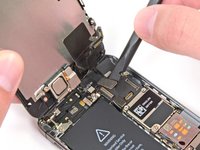
Use the tip of a spudger to pry the home button cable connector up out of its socket.
-
-
-
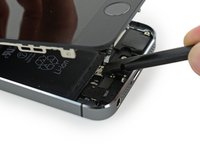
Once the connector has been released, pull the home button end of the assembly away from the rear case, using the top of the phone as a hinge.
-
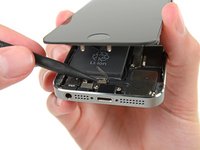
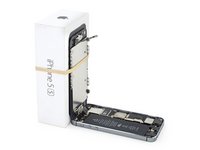
Open the display to about a 90º angle, and lean it against something to keep it propped up while you're working on the phone.
-
Add a rubber band to keep the display securely in place while you work. This prevents undue strain on the display cables.
-
-
-
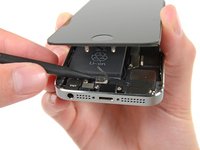
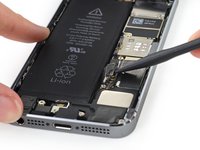
Remove the two 1.6 mm Phillips #000 screws securing the metal battery connector bracket to the logic board.
-
-
-
Remove the metal battery connector bracket from the iPhone.
-
-
-
Use the flat end of a spudger to gently pry the battery connector up from its socket on the logic board.
-
-
-
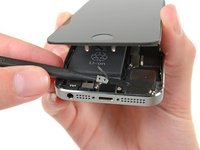
Remove the following screws securing the front panel assembly cable bracket to the logic board:
-
One 1.7 mm Phillips #000 screw
-
One 1.2 mm Phillips #000 screw
-
One 1.3 mm Phillips #000 screw
-
One more 1.7 mm Phillips #000 screw
Two screws at the bottom should be the most short, two screws on top are the longest, you got it wrong.Please official verification again, and reply to me. Thank you!
Hi Claude,
Unfortunately I forgot to check at dis-assembly which screw goes back where at step 11 so I ended up following the instructions although, I would find it logical that the longer screws are for the top and the shorter ones for the bottom holes, which is what you mentioned also . I anyway ended up following the instructions and all went well except that I am now unable to hear anything while in a phone call connected to the Bluetooth in my car. The phone connects, I have the battery and network status on the screen of my car, I can receive SMS on the car's screen, I can stream music to the speakers but I cannot hear anything while in a call. I can hear the call ringing in the car speakers, I can answer it but after that it's silent.
So, I was wondering:
1. Did you hear back on your comment from iFixit?
2. Did you install the screws back the way you mentioned in your comment? Did it work?
3. Did you check / note down the position of the screws at dis-assembly?
Thanks in advance.
Regards,
Cornel.
Can anyone answer if the blue strips on the crews indicate which screws they are? They are all so small it's hard to find the right lengths for each hole
Does anyone know if the blue strips on the screws indicate their length? I'm finding it very hard to distinguish the lengths
@Ariel - The blue that you are seeing on the screws is simply leftover loctite compound that is used to prevent the screws from working their way loose during every day use and does not give any indication as to the length of the screw. You should notice that, generally, you have two lengths of screws out of the 4 that came out...2 with longer threads and two with shorter threads. The two with shorter threads need to go in the bottom two holes...these two screws are not exactly the same length (difference of 0.1 mm), but mixing them up should not cause any harm to the phone due to such a small difference. With the two longer ones that are leftover, only one of them will be magnetically attracted to your screwdriver...this is the one that goes in the top left hole. The one that does not easily attract to your screwdriver goes in the top right.
iGuys -
Hi Everyone,
Claude is right, after re-arranging the screws so that the top two are the longest, bottom-right shortest and bottom left is the second-shortest the in-call audio came back with Bluetooth calls.
The same was found and posted by Pete on the Apple Support Communities forums and, as mentioned, I can also confirm that this fix works.
Hope this helps.
Regards,
Cornel.
The magnetic mat its priceless I found. As I removed screws, I placed on magnetic mat and labeled right away. Reassembly time was a breeze.
Upside-down masking tape also works well, especially when labelled with corresponding step for each bit of parts!
i did the battery replacement and now my gyro isnt working. I did not know the screws had different lengths. Think it will be ok if i take apart and put correctly or do i need a new logic board??
The two 1.7 mm Phillips #000 screws should be placed on top and the 1.2 & 1.3 mm Phillips #000 screw at the bottom.
If you do not respect that order, the Bluetooth calls feature will not work anymore.
Please change all the versions including this step.
I skipped steps 11-16 and that worked pretty well from me. On another commenter's advice, I simply used some packaging tape to tape onto the top of the screen, over the top of the phone, and onto the back of the phone to hold the display at a right angle to the rest of the device. Saved me all the trouble/risk of disconnecting the display, but if you use this method you should be VERY careful not to hit the display while removing the battery.
I completely agree with lambdahindiii, skip steps 11 - 16 completely. You do have to be careful not to flip open the display, but it's manageable with some care.
I will give disclaimer that I used 3.0x magnification with surgical loupes. Any kind of magnification will help. Also recommend using an LED head lamp for optimal illumination.
wmlee1 -
I'm going to upvote the suggestion to skip steps 11- 16 too.
Some things to look out for:
- Both the battery adhesive strips broke off for me so I had to pry the battery out. You do have to be careful as a good amount of pressure is needed to remove the battery that you don't twist the top display and break the connectors. It's just a trade-off of risks though - you won't have to worry about losing or inserting the wrong screws for the front panel connectors either.
- The metal connector over the touch ID button is hard to put back in. It looks like one piece on the video but it's a separate metal piece that goes over the connector.
- To open the case with the suction cup, I found it useful to place the cup more to one side, and lift that side up first and then work on the other side.
Take your time and good luck all
wilten -
I agree. The steps to remove the display are unnecessary. I skipped these and had no issues.
On my phone it actually seems like one of the 1.7mm screws is non-magnetic (the other 3 screws are magnetic). Although this could be a botched repair job from a previous owner...
I guess if it's intentional, it should be the top-right one, as that is closest to the compass IC.
You're right. The top right screw must be non-ferrous stainless. I've repaired tons of the5-5s and that screw is never magnetic.
BJS -
You are absolutely correct — the upper right one is the non-ferrous / non-magnetic one. I’ve made corrections to this guide and the guide for the iPhone 5 but each time the edits have been denied, once by @Reed Danis and the previous by @Walter Galan. Not sure why they’re denied — it’s obvious which one doesn’t stick to a magnetic screwdriver. This mistake makes these guides quite unreliable and will screw (ha) with the compass.
Drtofu -
Apparently it is non magnetic so as not to interfere with the compass. The iPhone 6 has moved tis down to the bottom near the battery connector.
Jack -
I was fixing a broken screen, when I noticed that the guy that had started the job before leaving it to me, had mixed up the screws for the battery that he changed by himself and step 11. So i started searching around for an answer when the startup just looped with the Apple logo. and I of course started here, and found out that he had mixed up the screws, but step 11 here, and the same step at this link: http://www.irepairnational.com/iphone-5s...
shows two different ways to where the 1,2mm and the 1,7mm screws are being placed.
what is the correct way?
i had the 'blue screen of death' and here was my workaround:
kgale4 -
I was wondering exactly the same thing why we need to un-screw the screen? Anyway place the screws in the order they come and you should find no problems putting them back in right order.
Also I found the screw driver comes with ifixit battery kit does not fit in the screws perfectly. Feeling a little large for these screws. Anyone else had the same experience?
Because this guide is for more than one repair option instead of them having to type out several this fits in for replacment of screen. I didn't hav the kit but my #000 wasn’t the best for all I used a #00 just depends on if the tip isn't real pointy
Heather -
The screw 1.7mm screw (highlighted green) was magnetic on the phone I repaired, while the standoff near it in step #27 was not (*see my note in #27). Either I have different parts or the magnetism note was swapped. If anyone else can confirm or deny this it’d help the guide. Thanks.
Invest in several colored Sharpie pens. When you see a red circle on the guide, tap that screw head with a red sharpie, orange, green, blue and so forth. This makes it almost fool-proof to not mix up your screws when re-assembling the phone or any other piece of equipment.
I cannot unscrew the Philips #000 screws in this step using iFixit's Philips #000 screwdriver. The screw does not even turn at all. I wonder about the screwdriver iFixit is using in the video - https://youtu.be/k_OpjhKAUCM?t=180 . Can we buy it ?
Putting the upper screws back in the bracket is a bit tricky--if you hold the screen at 90 degrees, the connector cables lift up the loose bracket, but if you lower the screen to allow the bracket to lay flat, you can't reach with a screw driver. Be very slow and patient and replace the upper left screw last (after the first three are tight)--these will hold down the bracket fairly well so you can aim the last (upper left) screw into the hole and push down as you tighten.
That is exactly how I did it; good hint. Thanks.
So I managed to loose the top right (non magnetic) screw. I saw it fall to the table, but it's gone. Wonder if it fell back into the phone, as there is a slight rattle sound when I shake it. Will there be any big surprises if I just reassemble without that screw?
How did it turn out? I lost the same screw.
If you keep the top steady these steps (17-22) could be skipped. That's how I did. Everything is ok.except screwdriver didn't undo upper one of the battery bracket I had to bend the bracket.
I noticed that reassembling my device, if the metal bracket touch the hole of the 1.3mm screw the touch stopped working. I had to put a little piece of plastic between the hole and the bracket unable to put the screw in (or it would make contact between the hole and the bracket).
Any suggestion?
Hi Denis, could you be a bit more specific as to which metal bracket you are referring to please? also, where did you put the piece of plastic? Thank you.
Denis, could you be more specific please? Which metal bracket causes the problem and where did you put the piece of plastic?
I have the same problem, (lost touch screen function).
Trying to get the screws into the holes and driving them in was extraordinarily challenging due in large part to their magnetic bond. Screws didn't want to leave the driver, once they were in they flew right back out as soon as the driver came within distance. To combat this, I suggest using a thin, clear tape (I used packing tape) cut into 4 strips and place each screw flat side down on one end of each strip of tape. Now you can easily maneuver and securely hold the screws into their holes as the driver pierces the tape easily screwing them in without losing them or your mind. Also, fridge magnets are good to retrieve screws that have fallen into iPhone's nooks and crannies, likewise from carpeting.
After aligning the bracket over the screw holes, I used the tweezers to pick the screw on its head and position it in the hole. Then, it was not difficult to use the screwdriver to fasten it.
If I messed up the screw placement, can it be redone and fixed by putting the screws back in prober order?
Like James Lee (above), I found reinserting the tiny screws quite difficult because the magnetic screwdriver would pull them out, with the screw adhering to the screwdriver at odd angles. What worked was to insert a screw with tweezers, then START the screw using the non-magnetic plastic pointy tool while holding down the plate so the screw could turn easily. Once the screw was started, I tightened it with the screwdriver.
Firstly do not just watch the video if you are going to do the battery replacement. I was too busy and stupid and only watched the video and boogered my Girlfiends 5S with the screw replacement boon doggle... You must read the iFix full instructions (forget the video) or you will screw it up!..
The iFixit Kit I bought does NOT have the right screw driver to remove these screws. Neither phillips screwdrivers work - the point is much too sharp and does not grip the screw at all. Not happy with this purchase right now.
Color coding the screw heads is an excellent idea. I used red for red - green for green - and black for orange - left the yellow one uncolored. Did a screen capture and labeled it to avoid confusion.
Also color a small area around the screws on the cable bracket. Makes it real easy to see which screw goes where.
Leonard -
I found out that you don’t need the 1.7mm screw. The shorter one will do and I don’t lose bluetooth.
I used colored sharpies to keep track of the screws. I color coded the screw heads and around their holes. Worked like a charm.
I managed to loose the socket of the green screw. Apparently, during my second disassembly of my iPhone the socket (which appears to be screwed in as well) came loose without me noticiing it and promptly vanished later on in the process, never to be seen again. The iPhone does seem to work without it, but still, I’d advise checking that they are still in place when you unmount the metal shield.
Erroneamente ho sbagliato la combinazione delle viti e mi si è danneggiata l’iPhone.. che parte devo cambiare ?
You do not actually have to remove the screen to replace the battery. Just tilt up the screen at a 60 degree angle from the phone and tape it open or have someone hold it up. That way you don’t have to flex the screen wires or inadvertently damage anything.
I also completed this repair successfully without removing the screen. I kept the screen at a 90 degree angle using the iPhone’s box and a rubber band as pictured in Step 13. I was nervous about bumping it while doing the rest of the steps and stretching the display cables too much, but it worked.
If anyone is still using the dino-aged iphone 5s like me ;) , please follow the steps rather than the video patiently before putting it into action. The screw placement is extremely crucial during reassemble. I messed the screws up the first time and had problems with touch screen, it wasn’t working. Then I disassembled again. I was lucky to have sufficient eyesight to figure out the 1.7 mm screws - both magnetic and non-magnetic ones. In case of of lower left screw, I put the one I felt (!) the bigger one, and at the end, left the lower right hole unscrewed. It’s working fine now.
I removed the screws and placed them on a white piece of paper in the orientation they belonged in and then removed the bracket covering the cables (step 18). At this point, looking at the 3 cables I needed to remove I thought one of these likely won’t go back on correctly and will be disabled. I had the screen securely at 90 degrees to the base using a juice glass and rubber band so I decided to put the bracket back on and skip to step 23. I wish I had thought of that before removing the screws as these are some tiny screws. It was difficult to see which end was the screw head and get it placed on the screwdriver for inserting into the hole. For the green (nonmagnetized) screw I used the tweezers to get it in the hole and then screwed it in.
Alas my screws got muddled without me realising and a long one went on the bottom right (as per the warning in the article). When you say “will result in damage”, would either of these count? 1) trapped in a cycle of booting with the white apple logo or 2) trapped in a loop of white apple logo followed by red screen
Thanks, James
I would think so. Even just lines could be damage to logic board. I got the screws figured out using the link I posted above as a guide to measure but my new screen won’t do anything. I bought it from eBay and I replaced battery first. I could see back light on broken screen prior to replacement and I get the chime when plugged in but absolutely nothing on the screen. I was very careful with the ribbon cables as it comes with them completely flat so I just seated the cables and slowly moved the screen to a 90 degree angle. Could I have broken something's in the ribbon cable?? Or maybe just pos screen? Read comments on seller after this noted is not oem and others had problems. s it possible to conn to iTunes and maybe fix problem if it’s a software issue? I don’t know what else to do at this point. Any help I should appreciated
Heather -
One doesn’t actually HAVE to remove the display. But it does make the removal of the battery easier, at it is very well glued to the back case.
I didn’t set the screws aside so I had to measure which is super hard but here’s a link to an online free ruler and it has a command icon for you to input show me 1.7mm and then you can match up screw lengths. The website is https://www.ginifab.com/feeds/cm_to_inch...
i hope this helps for anyone who removed the panel without reading the important steps first and i’m female lol.
Heather
As mentioned, the screws are difficult to re-install. I found that sitting the screw on its head on the table and pressing down with my finger the screw will be set on your finger, head up. Then carefully put Philips driver into screw slot. It should come away and easily inserted into bracket.
WRONG !!!
The ONLY 1,7mm it's at the top left corner. All OTHERS are 1.3 mm. The 1.7mm it tue other screw under this part.
I broke my phone because of this.
is it necessary to put back this plate after reattached screen , cuz i didn’t , for futures swaps
With my phone I needed to use a PH0000 screwdriver. The provided PH000 (and my own from another screwdriver set) was too large. Indeed, every Phillips head screw in my phone needed the PH0000 and not the PH000 driver.
Don’t do it. Don’t do this step. With some gentle care you can get the battery replaced without ever removing the four tiny screws from !&&*.
This step and all the steps through 22 are not needed for replacing lighting connector- don’t know why they’re on this guide.
I totally agree with Elijah, I had to do this repair 3 times today and after the first time I realised that steps 17 to 22 are not necessary if you can find some way of keeping the screen upright. I propped my screen up using a flat headed toothpick and it worked fine providing you are careful.
Auf die Schritte 17 - 22 habe ich ebenfalls verzichtet.
Den Akku konnte ich mit hochgeklappten Display entfernen.
Die Klebestreifen sind zwar gerissen, aber mit Fön und sanfter Gewalt hat es funktioniert.
Der neue Akku hat laut iMazing sogar 1736 mAh :-)
I would agree with Bryce Nesbitt. DO NOT do these steps if all you’re going to do is replace the battery. Having disconnected and reconnected all this stuff, which absolutely was not needed to get the battery out, my touchscreen is no longer working and there’s a weird grid pattern all over the screen, which suggests to me that at least one of the connectors isn’t seated properly, so I’m going to have to do this all over again.
Let me reiterate: DO NOT DO THIS IF ALL YOU WANT IS TO REPLACE THE BATTERY. Skip straight to step 23 where you start work to remove the battery adhesive tab and strips.
I’m sure someone can correct me, but this is my experience. The 1.7 mm Phillips #000 screw in the top right might be demagnetised for a reason. When I tried a magnetised screw in that position I found that I got a distinct yellowish tinge on my screen in the same place. So I removed the screw (couldn’t find the original as it disappeared off the face of the earth!), and re-assembled the phone without it.
Don’t have any problems as far as I see having only 3 screws holding the bracket down…
I had the 4 screws all neat and separated, then accidentally got a super-strong rare earth magnet too close to them, and they were all mixed up. To determine the difference between the 1.3 and 1.2, I pulled out calipers. I found both of mine to be 1.1 mm, so they weren’t different lengths. Also, all 4 of mine were attracted to the magnet.
Eek. I didn’t have access to this guide when taking my phone apart. I mostly access the internet on my phone as my laptop is super slow. I watched the YouTube video on my smart TV while doing the repair. So I didn’t know the screws were different sizes, they all looked pretty teeny tiny to me. Makes sense now that the top left one is longer, I got a bit frustrated trying to get that one in, and ended up putting it in last so the others would hold the plate in position. I do remember one didn’t stick to the screwdriver, and I actually dropped this one into the iPhone and then on the mottled carpet when I shook it out, but found it after a long search. Then I just put the screws in however they came to me. I hope they ended up okay. I already did it twice because the screen had lines on when I finished, and I also managed to inadvertently disconnect the on/off button and not reconnect properly. Need to make them click.
PS I’m not sure you sufficiently stressed the importance of the screw order in the video.
Good to know about the screw lengths. This section could have a larger font warning to carefully store the the screws in the right orientation, in separate compartments. I didn’t notice the notes on screw size until after I put all 4 screws in one compartment. I had to line up the screws (upside down) and eyeball which appeared to be which lengths using a magnifying lens. It took a few minutes but I figured it out due to their relative sizes.
Suggest using a Sharpie to color-code screws before removal. Color screw heads (matching Step 17 if you like) and add a color circle around each screw head.
-
-
-
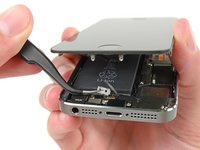
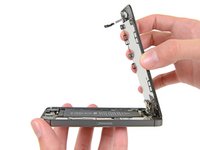
Remove the front panel assembly cable bracket from the logic board.
-
-
-
Use a spudger or a fingernail to disconnect the front-facing camera and sensor cable.
-
-
-
Finally, disconnect the digitizer cable connector.
-
-
-
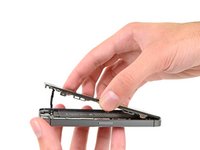
Remove the front panel assembly from the rear case.
-
-
-
Unscrew the single captive Phillips #000 screw securing the home button cable.
-
-
-
Fold the home button cable down, out of the way of the home button bracket.
-
-
-
Remove the two 1.4 mm Phillips #000 screws from the home button bracket.
-
-
-
Remove the home button bracket from the display assembly.
-
-
-
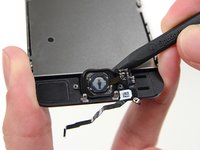
Wedge the the tip of a spudger underneath the home button cable assembly.
-
Gently work the spudger underneath the cable to separate the home button cable from the front panel assembly.
-
-
-
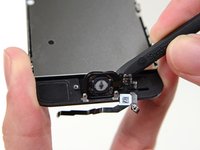
Gently push the top left corner of the home button up away from the front panel.
-
-
-
Peel the home button the rest of the way off of the display by prying gently with a spudger.
-
-
-
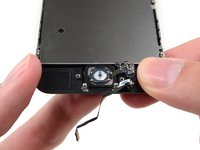
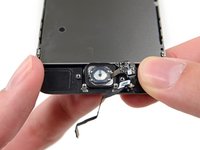
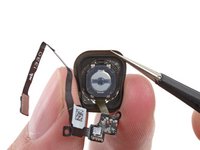
Remove the home button assembly from the front panel.
-
-
crwdns2935267:0crwdne2935267:0Tweezers$4.99
-
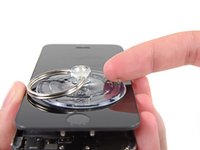
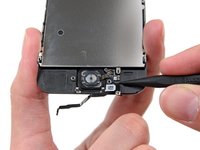
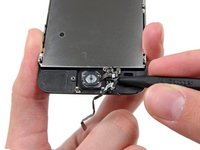
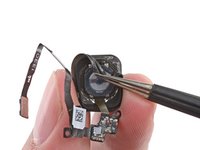
Using a set of tweezers, gently peel the gasket off of the home button.
-
-
-
Thread the gasket off of the ribbon cable.
-


To reassemble your device, follow these instructions in reverse order.
crwdns2935221:0crwdne2935221:0
crwdns2935229:0330crwdne2935229:0
crwdns2947821:0crwdne2947821:0
crwdns2947823:0crwdne2947823:0


crwdns2947412:039crwdne2947412:0
Has anyone attempted to replace the metal ring around the finger scanner?
I was unable to find any info on this, I'd like to offer this as a custom service, I'd be great to get some guidance without wrecking a few of em first.
If you’ve got a iPhone 5S with a broken touch ID button or flex cable, you’re pretty much stuck! The iPhone 5S touch ID and motherboard are linked specifically to each other and there is no way to swap out the touch ID and still have the fingerprint sensors work.
Don’t ever attempt to change the iPhone 5S home button from the flex cable. The sensor is glued to the sapphire with very strong adhesive. Disassembling the button from the chip will cause irreversible damage. The electronic components will be different if you attempt to connect another button to the touch ID flex and will not function. You can’t recalibrate the sensor and it will never read fingerprints again. It will however function as a home button.
ben -
Steps 11-16 are not really needed. Just replaced the home button on an iPhone 5s and there is no need to fully detach the front from the back of the phone. After step 10 just prop the phone open so that the button can be removed. Replace button. Reconnect cable and then then close the phone up. Otherwise a really a good guide.
So you don't need to remove the home button ribbon cable?
brian -
if the fingerprint touch id cable is damaged..the cable only can be repaired?
Hello if I need to replace my touch screen + home button (broken) will I get Error 53 once I replace them?
I skipped steps 14-22, instead just leaving it rubber-banded to box. Everything went well from there. The replacement home button and ribbon were perfect fit, though a small screw holder tab is missing from OEM design. You can see what it should look like in step 25. (The screw not circled in red) I just reconnected cable and taped folded cable in place with electrical tape. I've always heard that you end up with one leftover screw in any project. I guess it's true lol.
I purchased a replacement button which included a new gasket. The hardest part of the entire operation was applying the new gasket to the new button, as it kept sticking everywhere I didn't want it to.
Excellent instructions! I'm happy to have my home button back.
Update: my new home button is still working as a button, but my phone battery is draining at an excessive rate. I have checked my steps, and the hardware connections all seem good. Internet searches seem to indicate that the touch ID software in the phone may be running continuously, I suspect that the home button I bought might not be a good one (not from iFixit). I am going to try again with a hopefully better button.
Riyadth -
Any ideas on how to disable touch id functionality now that I replaced my home button? Iphone keeps saying touch id error after reboot. Great guide, but I had to come up with a simple way to measure screws, not a big difference between 1.2 and 1.3 mm screws there. Also, I had to use my old gasket because the new one wont fit with the new button =(
I opened my phone and there is no metal bracket covering the home button. My screen repair is finished...how important is that bracket. The home button had stopped working and probably had just come in plugged. Can I buy one somewhere?
In the iFixit shop: iPhone 5s/SE Home Button Bracket - Item code: IF124-042-1
Josh -
After replacing the home button, I get the grey apple for several minutes, then the screen flashes blue, then goes back to the grey apple. Boots fine when the new home button isn't attached.
I replaced my home button assembly, and afterwards the display, sound, or vibration wouldn't come back on. The power and home buttons work, just not everything else. I see that it still powers on, as it's detected by iTunes when connected to my laptop. Any idea what the issue may be? I've made sure the connections from the screen are properly connected, kept track of the screws, and I also tried re-connecting the old home button ribbon.
Hello all I recently bought the button in ifixit I read the instructions and put it correctly, the button works perfect but when the iphone is turned on I can not activate the fingerprint sensor, therefore this is the button that sold me failed Or is it something else ??
Hi Laura—As stated in the introduction at the top of this guide, any time you remove the original home button, you will lose fingerprint sensor function. The embedded fingerprint sensor is paired to your phone's logic board at the factory, and to my knowledge cannot be replaced by anyone other than Apple.
Hey Guys, THIS IS MY FIRST POST!! I've been on ifixit for awhile now and never joined until now! I'm a seasoned tech and I myself still have trouble returning the bracket that covers the touch id ribbon back in its place.
Eventually after fiddling with it, I get it back in place.
My question is: Is there a specific technique to doing it the right way the first time?
Very Respectfully,
Claude Katto
It's definitely a bit fiddly! See steps 10 and 11 above for the best technique.
I replaced the screen unit but the home button wouldn't work. I replaced the home button and it still won't work.
Anybody have any suggestions?
Ok so I followed all the steps BUT it seems I just got the button not the entire assembly. How do I get the old button out?
I just replaced the home button but it's not responding any ideas? Is the ribbon very fragile or did I get a defective button?
Tried it, now screen remains black. Attached the connectors a couple of times, screen stays black. Bye Iphone.
Io ho cambiato lo schermo ma ho messo lo stesso touch ID di prima. Purtroppo però mi da l'errore quando voglio impostare un'impronta digitale. Non vorrei che ci sia qualche vite da montare in un particolare modo. Qualche consiglio?
I changed the screen but I put the orginal touch ID. Unfortunately when I want to set up a fingerprint the phone shows me an error. It may be that I didn't fit some srew in the right way. Some advice?
sei riuscito a risolvere? anche io ho rimesso il vecchio pulsante ma l'impronta sembra non voler funzionare
Sebio -
It is possible to reattach the button connector in reverse. I worked on mine for 2 hours only to realize I had it on backwards. Fortunately, no damage was done and when connected it correctly, the Touch ID and button worked properly.
my original home button doesn't work neither does the Touch ID. what went wrong?
Regarding the locations of the four screws in step 17, most other sites on the web show the 1.3mm screw on the UPPER RIGHT, not the LOWER LEFT! Is it possible that this instructional has a 1.7mm screw going into a 1.3mm hole, over the logic board?
I followed these instructions and my now phone is dead, but that could also be due to another mistake on my part.
Fantastic step by step guide, the instructions were easy to follow and the photos helped a lot. I also used your guide to replacing the Rear Facing Camera and did both repairs at the same time. The phone is now working perfectly, first time. Thanks so much!
[|These instructions are incomplete. There is a metal bracket that holds the assembly to the glass button on the screen that is not part of this assembly. I cannot find any instructions on how to transfer that metal ring to the new assembly. Unfortunately I cannot add an image to this post to illustrate.]
I’m very frustrated to say the least and am waiting on a call back from iFixit for a while now.
Hi Mel,
I hit the same issue as you! I would suggest 2 options:
1. Buy the entire assembly with the appropriate color here: iPhone 5s Home Button Assembly
2. Try to remove the ribbon assembly from the metal ring. See my post below to see how I removed it.
I wish i have some pictures to help, but I did not have my camera while I encountered this.
Hi, can I install iphone 5 homebutton part to iphone 5s? (i understand the use id will be gone)
It looks like I am hitting the same issue like many other people.
Do not buy this part if you want to repair your home button. There is a metal bracket you need to remove and it is not an easy task.
Instead, buy the assembly part. It looks like it has the bracket installed with it.
EDIT- We have destructively salvaged the home button assembly from the ribbon. We used a sharp finishing nail to pry the first layer (of two)- we applied leverage at where the ribbon was connecting to the first layer. The second layer is attached to the button with weak adhesive- warming up the button allowed us to peel the layer off.
transferred old home button, works fine but no touch ID or touch ID error. Ver small (3x2x0.5 mm approx) black gasket with a small hole (size of screw) in it fell out from somewhere. I reassembled without it to see if everything works, and it does apart from touch id. Any ideas? Not mentioned the this can happen on any posts. Thanks very much, great website, great support.
Ciao a tutti…Vorrei sostituire il tasto home con uno nuovo,mantenendo l'ID…veramente devo cambiare colore al tasto e mantenere il circuito di quello vecchio…è possibile?
The new home button assembly does not come with the home button face or the metal button face bezel. How do you remove these from the old home button assembly so as to attach to the new home assembly?
One of the screws for the home button bracket wont come out, the top of the screw looks like it’s damaged, not sure what to do can someone help?
salve
ho sostituito il tasto home, rimontato tutto correttamente. non capisco la funzione della vite “captivity” quella che non si puo staccare dal cavo flet del home button originale. a che serve? io l ho staccata dal vecchio home button, riavvitata montando il nuovo home button, il quale non ha il foro. quindi non ne capisco il senso.
il mio nuovo home button ha funzionato solo due giorni. adesso non va piu!!
cosa puo essere?
grazie saluti
Just finished the repair, but the home button is now completely unresponsive. The screen and other buttons work just fine, only the home button is not working. I noticed during the repair that the new part did not have the screw hole for the captive screw mentioned in step 23. Perhaps they sent me the wrong part? The static bag that the part was shipped in said “iPhone 5s HB Assembly”, which is the correct phone, but perhaps the wrong part was put in the bag? Any ideas?