crwdns2915892:0crwdne2915892:0
Bring back the beats by replacing a blown out speaker on your iPhone 5.
crwdns2942213:0crwdne2942213:0
-
-
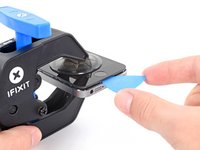
Lay overlapping strips of clear packing tape over the iPhone's display until the whole face is covered.
-
-
-
Power off your iPhone before beginning disassembly.
-
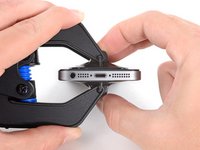
Remove the two 3.6 mm Pentalobe screws next to the Lightning connector.
-
-
-
Regardless of the tool you use, you need to be sure you pull up the entire display.
-
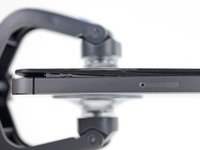
If the glass begins to separate from the plastic, as shown in the first image, slide a plastic opening tool between the plastic frame and the metal phone body to pry the metal clips out of the case.
-
-
crwdns2935267:0crwdne2935267:0Clampy - Anti-Clamp$24.95
-
Pull the blue handle backwards to unlock the Anti-Clamp's arms.
-
Slide the arms over either the left or right edge of your iPhone.
-
Position the suction cups near the bottom edge of the iPhone just above the home button—one on the front, and one on the back.
-
Squeeze the cups together to apply suction to the desired area.
-
-
-
Pull the blue handle forwards to lock the arms.
-
Turn the handle clockwise 360 degrees or until the cups start to stretch.
-
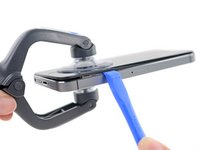
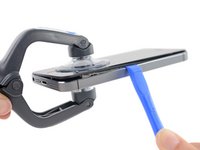
Insert an opening pick under the screen when the Anti-Clamp creates a large enough gap.
-
Skip the next two steps.
-
-
-
Press a suction cup onto the screen, just above the home button.
-
-
-
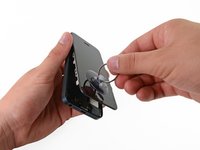
While holding the iPhone down with one hand, pull up on the suction cup to slightly separate the front panel assembly from the rear case.
-
With a plastic opening tool, begin to gently pry the rear case down, away from the screen, while you pull up with the suction cup.
-
-
-
-
Continue to pry up around the sides of the front panel assembly, detaching the clips along the left and right side.
-
-
-
Once the clips have been released on the bottom and sides of the front panel assembly, pull the bottom of the assembly away from the rear case.
-
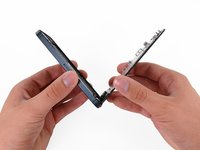
Open the display to about a 90º angle, and lean it against something to keep it propped up while you're working on the phone.
-
Add a rubber band to keep the display securely in place while you work. This prevents undue strain on the display cables.
-
-
-
Remove the following two screws securing the metal battery connector bracket to the logic board:
-
One 1.8 mm Phillips screw
-
One 1.6 mm Phillips screw
-
-
-
Remove the metal battery connector bracket from the iPhone.
-
-
-
Use a plastic opening tool to gently pry the battery connector up from its socket on the logic board.
-
-
-
Remove the following screws securing the front panel assembly cable bracket to the logic board:
-
Two 1.2 mm Phillips screws
-
One 1.6 mm Phillips screw
-
-
-
Lift the display cable bracket toward the battery to unhook it, and remove it from the iPhone.
-
-
-
Use a plastic opening tool or a fingernail to disconnect the three front panel assembly cables:
-
Front-facing camera and sensor cable
-
LCD cable
-
Digitizer cable
-
-
-
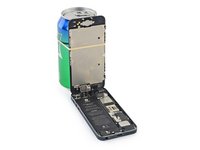
Remove the front panel assembly from the rear case.
-
-
-
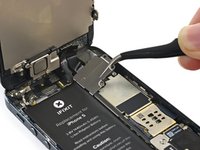
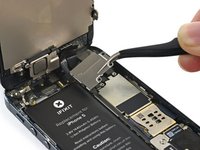
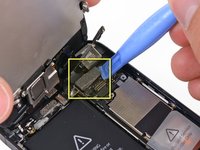
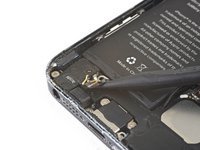
Use the point of a spudger to pry up and disconnect the antenna cable from the logic board.
-
-
crwdns2935267:0crwdne2935267:0Standoff Screwdriver for iPhones$5.49
-
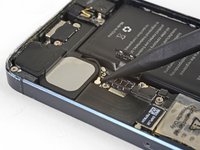
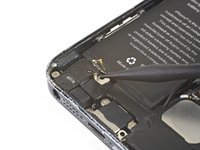
Remove the following screws securing the speaker enclosure to the rear case:
-
One 2.5 mm Phillips screw
-
One 1.5 mm Phillips screw
-
One 2.5 mm Phillips screw
-
One 2.7 mm standoff screw
-
-
-
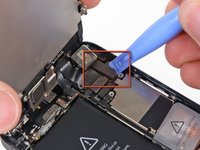
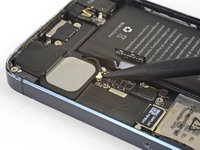
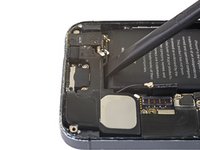
Slide the point of a spudger underneath the spring contact flex cable below the battery and gently loosen it from the speaker enclosure.
-
-
-
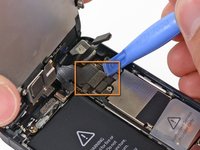
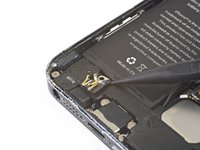
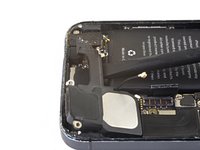
Use the flat end of a spudger to pry up and loosen the speaker enclosure from the rear case.
-
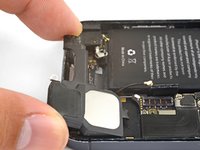
Pull the speaker enclosure out of its recess.
-
-
-
Remove the small double-sided metal washer on the speaker enclosure and transfer it to the replacement part.
-


Compare your new replacement part to the original part. You may need to transfer remaining components or remove adhesive backings from the new part before installing.
To reassemble your device, follow these instructions in reverse order.
Take your e-waste to an R2 or e-Stewards certified recycler.
Repair didn’t go as planned? Check out our iPhone 5 Answers community for troubleshooting help.
crwdns2935221:0crwdne2935221:0
crwdns2935229:0101crwdne2935229:0


crwdns2947412:07crwdne2947412:0
Ok guys I replaced a iPhone 5C loud speaker. Turned the phone on. Now its a black screen with numbers on it. It wont boot up or show the apple.
Any ideas why it does this?
Step 2 Can I suggest that prior to any dismantling of the main component section that,when the front display has been set aside you take a photo of section containing battery etc.Print the photo you have just taken,then when you remove a screw place it on the corresponding position of the pictured screw.
Have run into a 5 that had it's power/volume flex replaced but now the phone is stuck in headphone mode. Tried a new speaker and a new dock/headphone jack assembly with no luck. Anyone have any ideas?
do not follow this guide! you will destroy your phone: no need to remove logic board for speaker replacement!!! skip to step 28!!!
beware ifixit can not fixit!
No need to remove battery or logic board. After disconnecting battery and removing screen, Do steps 26 and 27. Then remove the two stand-offs on the lower part of the logic board (shown in orange in step 30) and the screw on the far right of the logic board (bottom screw shown in red in step 30). Using a spudger, pop off the cellular data antenna (shown in step 21). Remove the screw on the bottom right securing the speaker in the frame and grounding the home button (this is the blue screw in step 34). You can carefully peel the lightning connector ground off the speaker (large flat ribbon on the bottom right. Then carefully peel the home button ground contact ribbon off the speaker on the left side. You can then gently slide the speaker out from under the logic board and replace it. Put tings back in reverse order. You can use a little piece of battery sticker to re-glue the home button ground contacts back to the left side of the speaker. No need to remove the data port or any other component.