
iPhone 5 Interconnect Cables Replacement
crwdns2944107:0crwdnd2944107:0Andrew Optimus Goldheartcrwdnd2944107:0crwdnd2944107:0crwdnd2944107:09crwdnd2944107:0crwdne2944107:0
crwdns2944111:0Mud 9, 2024crwdne2944111:0
crwdns2915892:0crwdne2915892:0
crwdns2942287:0crwdne2942287:0Use this guide to remove the two interconnect cables from the logic board of your iPhone 5. Be very careful, as the connector cables are delicate.
crwdns2942213:0crwdne2942213:0
crwdns2943213:0crwdne2943213:0

crwdns2943215:0crwdne2943215:0


crwdns2944105:0crwdne2944105:0

-
-
Lay overlapping strips of clear packing tape over the iPhone's display until the whole face is covered.
-
-
-
Power off your iPhone before beginning disassembly.
-
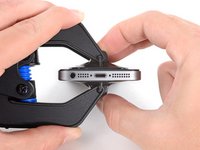
Remove the two 3.6 mm Pentalobe screws next to the Lightning connector.
-
-
-
Regardless of the tool you use, you need to be sure you pull up the entire display.
-
If the glass begins to separate from the plastic, as shown in the first image, slide a plastic opening tool between the plastic frame and the metal phone body to pry the metal clips out of the case.
-
-
crwdns2935267:0crwdne2935267:0Clampy - Anti-Clamp$24.95
-
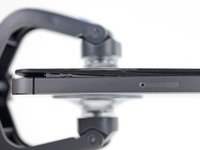
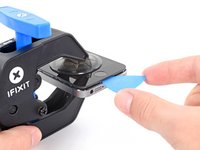
Pull the blue handle backwards to unlock the Anti-Clamp's arms.
-
Slide the arms over either the left or right edge of your iPhone.
-
Position the suction cups near the bottom edge of the iPhone just above the home button—one on the front, and one on the back.
-
Squeeze the cups together to apply suction to the desired area.
-
-
-
Pull the blue handle forwards to lock the arms.
-
Turn the handle clockwise 360 degrees or until the cups start to stretch.
-
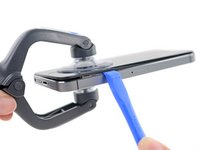
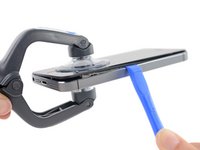
Insert an opening pick under the screen when the Anti-Clamp creates a large enough gap.
-
Skip the next two steps.
-
-
-
Press a suction cup onto the screen, just above the home button.
-
-
-
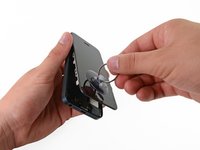
While holding the iPhone down with one hand, pull up on the suction cup to slightly separate the front panel assembly from the rear case.
-
With a plastic opening tool, begin to gently pry the rear case down, away from the screen, while you pull up with the suction cup.
The suction cup didn't work, because of my destroyed front glass.
So i take "tesa powers trips".
With that help, i had enough force to pull up the front display from the rear case.
Suction cup didn't work for me. I tried for half hour with my nerd biceps. In the end, I inserted an xacto blade below the home button to create a gap big enough for me to put in a guitar pick and finally able to pry it open. In the process I scratched the frame so you have to be very careful if you decide to take this approach.
Where can you buy "Tesa Powerstrips?
The glass on my phone was completely destroyed, making the suction cup entirely useless. I was pretty close to giving up when i tried putting a strip of clear packing tape on the screen and squishing out all the bubbles. Put the suction cup on this and it worked perfectly.
Thank you. I broke the front glass with this technique..
Used a suction cup from my Garmin Navi. The one you use to stick it to your windshield. It has a nice plastic "handle" and made things a lot easier... almost too easy that I nearly pulled the screen off the cables. Go easy on this step.
I'd Advise Against The Suction Cup Here As It Will Separate The Glass From The Black/White Framing That You're Actually Supposed To Pry Under. I Found When Using The Suction Cup, The Glass Came Up, But The Framing Stayed Stuck. If You're Replacing The Entire Display It's Not As Much Of A Problem, But If You're Installing Any Other Part Or A Custom Housing, You'll Notice Your Screen Has A Bit Of "Play" When Pressing Down.
While holding down on the lower sides of the iPhone, I found inserting the plastic separator just to the right of the audio jack while gently applying pressure down and back from the edge popped the bottom of the display assembly up. Keep in mind to do this while pulling back on the suction cup ring, like the guide says constant, but gentle force at the same time. Another note is to have the suction cup ring vertical to align with the length of the display, that made the process much easier.
You rock! I was having trouble getting the thing to budge, but the moment I put the plastic tool near the audio jack, the screen immediately popped up.
Justin -
This should be in the guide. The front panel is actually recessed a bit here making it much easier to get a tool in at this point. No way I would have opened it without this tip. Thanks!
dave -
Thank you so much! This should DEFINITELY be added to the main guide.
After struggling for half an hour and nearly giving up, I was able to easily lift up the screen once I tried to wedge it near the headphone jack!
Thanks so much!
This was the key for me. Thank you so much for this tip :)
I was having a lot of trouble. Should be in the guide.!!
Coact -
Thank you very much, this worked for me!
I've been using a metal flat opening tool along with the suction cup to pop these bad boys open - remember the tape on the screen trick if you have a smashed screen - so the suction cup can grip and stops the glass going everywhere!
Definitely a difficult step. Make sure not to pry the screen from framing. Also, I kept pushing the power button on while attempting separate the frame. Keep your fingers clear from the top of the phone because having it turn on while the casing is popped is a little nerve racking!
I had trouble with this step too, since I had to apply quite a lot of force on the suction cup when pulling up on the screen while holding down on the frame with my fingernails. Eventually it popped free, but came almost to 90 degrees before I was able to stop it. No damage, but nerve-wracking, and if there was a better technique, it would be good to figure it out and share the information here.
Be very gentle! I overdid it and, though the repair was successful, there's now a bit of play when pressing on the top right quadrant of the screen.
When i was reassembling, the screen broke form the pressure. I recommend putting the screen towards your working surface and press your phone downwards. That way your screen is always straight.
My front panel flew right off after some puling on the suction cup - no prying was necessary.
Fortunately, no cables got damaged. Take care.
I can confirm, the Garmin sucker cup worked like a charm. Within 5 seconds it popped open.
everything worked but i got a problem i hope anybody can help me very fast !
when i lift the screen up it just lift the glass up not the whole display ....
what should i do ??
thanks in advance
Need extra careful while pulling the screen.
Once there is a gap between the screen and the frame, insert the plastic opening tools and move it around the screen. But don't use it for top area (near to power button) as there is a location for flexible ribbon cable.
Once the bottom part is free, the screen will pop out easily.
Suction cup is very difficult with a cracked screen. Stick something in the ear jack and carefully push it and the edge of the screen will pop up. Use the plastic stick to open it.
I had trouble opening the screen due to a warped suction cup that was bent up at one spot and also due to my cracked screen. My solution: used double sided tape between the suction cup and the glass. I had some command strips, but I think any double-sided tape could work.
Use needle its a best way
I could never even get the case open. Waste of $30.
The suction cup will hold if you put a piece of tape over the cracked screen.
BE VERY, VERY CAREFUL, HERE!!
-The repair went horribly wrong during this step, for me. I pulled-up on the suction cup, gradually increasing force. Instead of just opening a gap to get the plastic prying tool into, the whole thing gave way at once. This damaged the connection between the display assembly and the rest of the iPhone.
-During this step, I would recommend placing a rubber band around the phone, over the home button and one near the top of the iPhone for good measure. Even better, invest in the "iSclack". In my case, it would have saved me about fifty bucks and three days without a functional iPhone.
-When I reassembled, The screen was blank, but I could still sync with iTunes. I may have been able to replace only the cables, but I wasn't sure how extensive the damage was and I was done messing around with it. I replaced the whole display assembly, and now it works just fine.
-This was STILL cheaper than buying a new phone, and I learned a lot. Overall, it was a good experience.
my phones screen displays the dead battery sign and the plug below it sign too, when your phones battery is dead. Bought a new battery and charged overnight...... any ideas?
Was someone able to answer this question? I have the same issue
1. This is very difficult, you have to use much more strength than it appears and it's very easy to rip out the connector cords. Mine did not rip, thankfully.
2. Upon replacing the screen, I had to do this 3 times, I would not recommend putting the screws back in but turning on the phone and testing all screens before putting the panel back.
3. When I finally managed to ensure all displays were working, I was pushing the screen back in and cracked the glass just below the home button. This part is very sensitive as it is the thinnest portion of the glass so be careful and ensure you push from the top and go all the way around. I also had to do this twice because after cracking the glass on the first try, I also realised the top was not fully pushed back.
We highly recommend using the iSclack tool for opening the phone up. It simply pops it up with very little effort, and you won't risk damaging your screen or device.
My older phone had a swollen battery, it turns out it had distorted the display assembly enough that the suction cup only separated the screen from the display assembly. Not good.
I was in no mood to pay for the special tool and wait for it. Took the "right of headphone jack" suggestion and pushed down vertically at the edge of the frame with a "ice pick" sharp tool, " I had two of them. Who cares if you scratch the frame a little, I usually have my phone in a protective case anyhow. I kept working with this until the corner was up, and then the rest of the display was loose without any further work.
My phone is in pristine condition for a 5 year old phone, I have no cracks to speak of on the glass and the suction cup that ifixit sent me doesn't stick to the glass.
Holding the other side (top of the phone) down with another hand is extremely important. Plenty of people have damaged their screens by pulling the panel right off, ripping all the cables.
I made a series of gentle pulls and the front panel came up without problems. The opening started to appear next to the audio jack, as other people indicated. Then, I used the pry that came with the kit and the panel opened easily.
Upon reassembly, I cracked the glass at this step. The top of the screen seemed to have too play in it and on my phone—I suspect from right side brackets that may have been damaged already. Was nearly finished and applied too much pressure? to the top of the screen area to get it back into position. Snap!
I pulled and pulled on the suction cup with no results then read the comments! Ugh! Found a kiosk at the mall that will replace battery for $15. Should have saved the cost of tools. They were very pretty and well packaged though! Good fortune to all that succeeded.
Suction cup does not work. I also had to use the Garmin suction cup
This went easy. Place the opening tool in the seam near the earphone jack to pry as others have stated. Also, as insurance I wrapped a rubber band around the top end of the phone (covering the listening speaker and camera lens) so if the cover suddenly popped open when pulling the suction ring, (which it did!) the cover would not pop entirely off and damage the connector ribbon inside.
I used the suction cup that came with the replacement battery kit. It took me quite a while to get the screen loose, but ultimately it came open. They are not kidding when they said this device is tighter that most. I also use the iOpener to get the battery to let go. The iOpener worked like a charm.
-
-
-
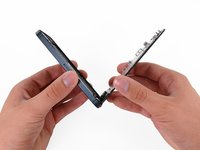
Continue to pry up around the sides of the front panel assembly, detaching the clips along the left and right side.
-
-
-
Once the clips have been released on the bottom and sides of the front panel assembly, pull the bottom of the assembly away from the rear case.
-
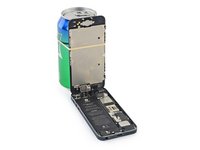
Open the display to about a 90º angle, and lean it against something to keep it propped up while you're working on the phone.
-
Add a rubber band to keep the display securely in place while you work. This prevents undue strain on the display cables.
-
-
-
Remove the following two screws securing the metal battery connector bracket to the logic board:
-
One 1.8 mm Phillips screw
-
One 1.6 mm Phillips screw
-
-
-
Remove the metal battery connector bracket from the iPhone.
-
-
-
Use a plastic opening tool to gently pry the battery connector up from its socket on the logic board.
-
-
-
Remove the following screws securing the front panel assembly cable bracket to the logic board:
-
Two 1.2 mm Phillips screws
-
One 1.6 mm Phillips screw
-
-
-
Lift the display cable bracket toward the battery to unhook it, and remove it from the iPhone.
-
-
-
Use a plastic opening tool or a fingernail to disconnect the three front panel assembly cables:
-
Front-facing camera and sensor cable
-
LCD cable
-
Digitizer cable
-
-
-
Remove the front panel assembly from the rear case.
-
-
-
Remove the following two screws securing the metal battery connector bracket to the logic board:
-
One 1.8 mm Phillips screw
-
One 1.6 mm Phillips screw
-
-
-
Remove the metal bracket securing the battery connector from the iPhone.
-
-
-
Use a plastic opening tool to gently pry the battery connector up from its socket on the logic board.
-
-
-
Remove the single 1.2 mm Phillips screw remaining in the mid logic board bracket.
-
Remove the mid logic board bracket.
-
-
-
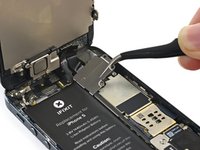
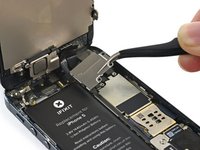
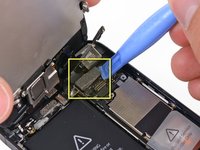
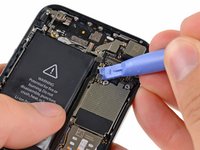
Use a plastic opening tool to pry the two interconnect cables up from their sockets at the top of the logic board.
-
-
-
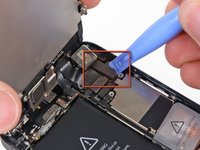
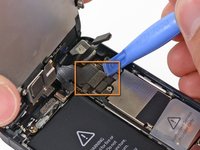
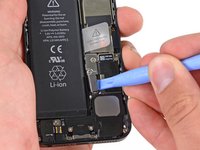
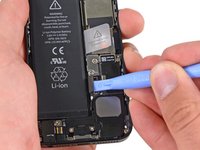
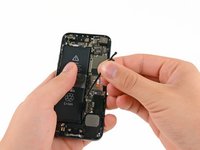
Disconnect the two interconnect cables from the bottom of the logic board in the same manner described above.
-
-
-
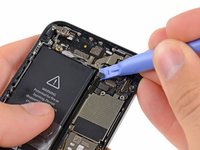
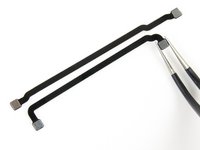
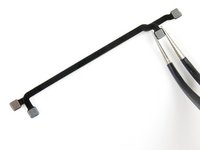
Remove the interconnect cables from the iPhone.
-


To reassemble your device, follow these instructions in reverse order.
To reassemble your device, follow these instructions in reverse order.
crwdns2935221:0crwdne2935221:0
crwdns2935229:038crwdne2935229:0
crwdns2947821:0crwdne2947821:0
crwdns2947823:0crwdne2947823:0


crwdns2947412:02crwdne2947412:0
Please someone help me. Im having cellular signal issues. What's the purpose of two strips in iphone board. Msg me at whatsapp 03454494079
io ho cambiato la batteria , la batteria funziona e funziona tutto ma non prende più la rete , i cavi sono tutti attaccati bene , cosa posso aver toccato ? grazie