crwdns2933423:0crwdne2933423:0

crwdns2942213:0crwdne2942213:0

  1. crwdns2935201:0crwdne2935201:0 crwdns2935203:0crwdne2935203:0

    : crwdns2935265:01crwdnd2935265:01crwdnd2935265:02crwdne2935265:0 : crwdns2935265:01crwdnd2935265:02crwdnd2935265:02crwdne2935265:0
    • Before you begin, discharge your iPhone battery below 25%. A charged lithium-ion battery can catch fire and/or explode if accidentally punctured.

    • Power off your iPhone before beginning disassembly.

    • Remove the two 6.7 mm-long pentalobe screws at the bottom edge of the iPhone.

    • Opening the iPhone's display will compromise its waterproof seals. Have replacement seals ready before you proceed past this step, or take care to avoid liquid exposure if you reassemble your iPhone without replacing the seals.

  2. crwdns2935201:0crwdne2935201:0 crwdns2935203:0crwdne2935203:0

    : crwdns2935265:02crwdnd2935265:01crwdnd2935265:03crwdne2935265:0 : crwdns2935265:02crwdnd2935265:02crwdnd2935265:03crwdne2935265:0 : crwdns2935265:02crwdnd2935265:03crwdnd2935265:03crwdne2935265:0
    • If inserted too far, an opening pick can damage your device. Follow this step to mark your pick and prevent damage.

    • Measure 3 mm from the tip and mark the opening pick with a permanent marker.

    • You can also mark the other corners of the pick with different measurements.

    • Alternatively, tape a coin to a pick 3 mm from the tip.

  3. crwdns2935201:0crwdne2935201:0 crwdns2935203:0crwdne2935203:0

    : crwdns2935265:03crwdnd2935265:01crwdnd2935265:03crwdne2935265:0 : crwdns2935265:03crwdnd2935265:02crwdnd2935265:03crwdne2935265:0 : crwdns2935265:03crwdnd2935265:03crwdnd2935265:03crwdne2935265:0
    • If your iPhone has a cracked screen, keep further breakage contained and prevent bodily harm during your repair by taping over the glass.

    • Lay overlapping strips of clear packing tape over the iPhone's screen until the whole face is covered.

    • Wear safety glasses to protect your eyes from any glass shaken free during the repair.

    • If you can't get the suction cup to stick in the next few steps, fold a strong piece of tape (such as duct tape) into a handle and lift the screen with that instead.

    • If all else fails, you can superglue the suction cup to the screen.

  4. crwdns2935201:0crwdne2935201:0 crwdns2935203:0crwdne2935203:0

    : crwdns2935265:04crwdnd2935265:01crwdnd2935265:03crwdne2935265:0 : crwdns2935265:04crwdnd2935265:02crwdnd2935265:03crwdne2935265:0 : crwdns2935265:04crwdnd2935265:03crwdnd2935265:03crwdne2935265:0
    crwdns2935267:0crwdne2935267:0
    Clampy - Anti-Clamp
    $24.95
    • The next three steps demonstrate the Anti-Clamp, a tool we designed to make the opening procedure easier. If you aren't using the Anti-Clamp, skip down three steps for an alternate method.

    • For complete instructions on how to use the Anti-Clamp, check out this guide.

    • Pull the blue handle backwards to unlock the Anti-Clamp's arms.

    • Slide the arms over either the left or right edge of your iPhone.

    • Position the suction cups near the bottom edge of the iPhone—one on the top, and one on the bottom.

    • Squeeze the cups together to apply suction to the desired area.

    • If you find that the surface of your iPhone is too slippery for the Anti-Clamp to hold onto, you can use tape to create a grippier surface.

  5. crwdns2935201:0crwdne2935201:0 crwdns2935203:0crwdne2935203:0

    : crwdns2935265:05crwdnd2935265:01crwdnd2935265:03crwdne2935265:0 : crwdns2935265:05crwdnd2935265:02crwdnd2935265:03crwdne2935265:0 : crwdns2935265:05crwdnd2935265:03crwdnd2935265:03crwdne2935265:0
    • Pull the blue handle forward to lock the arms.

    • Turn the handle clockwise 360 degrees or until the cups start to stretch.

    • Make sure the suction cups remain aligned with each other. If they begin to slip out of alignment, loosen the suction cups slightly and realign the arms.

  6. crwdns2935201:0crwdne2935201:0 crwdns2935203:0crwdne2935203:0

    : crwdns2935265:06crwdnd2935265:01crwdnd2935265:03crwdne2935265:0 : crwdns2935265:06crwdnd2935265:02crwdnd2935265:03crwdne2935265:0 : crwdns2935265:06crwdnd2935265:03crwdnd2935265:03crwdne2935265:0
    • Heat an iOpener and thread it through the arms of the Anti-Clamp.

    • You can also use a hair dryer, heat gun, or hot plate—but extreme heat can damage the display and/or internal battery, so proceed with care.

    • Fold the iOpener so it lays on the bottom edge of the iPhone.

    • Wait one minute to give the adhesive a chance to release and present an opening gap.

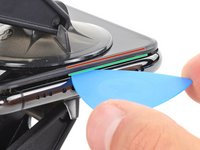
    • Insert an opening pick into the gap under the screen and the plastic bezel, not the screen itself.

    • If the Anti-Clamp doesn't create a sufficient gap, apply more heat to the area and rotate the handle a quarter turn.

    • Don't crank more than a quarter turn at a time, and wait one minute between turns. Let the Anti-Clamp and time do the work for you.

    • Skip the next three steps.

  7. crwdns2935201:0crwdne2935201:0 crwdns2935203:0crwdne2935203:0

    : crwdns2935265:07crwdnd2935265:01crwdnd2935265:01crwdne2935265:0
    • Heating the lower edge of the iPhone helps soften the adhesive securing the display, making it easier to open.

    • Use a hairdryer or heat gun or prepare an iOpener and apply it to the lower edge of the iPhone for about a minute.

  8. crwdns2935201:0crwdne2935201:0 crwdns2935203:0crwdne2935203:0

    : crwdns2935265:08crwdnd2935265:01crwdnd2935265:02crwdne2935265:0 : crwdns2935265:08crwdnd2935265:02crwdnd2935265:02crwdne2935265:0
    • If you're using a single suction handle, apply it to the bottom edge of the phone, while avoiding the curved portion of the glass.

  9. crwdns2935201:0crwdne2935201:0 crwdns2935203:0crwdne2935203:0

    : crwdns2935265:09crwdnd2935265:01crwdnd2935265:03crwdne2935265:0 : crwdns2935265:09crwdnd2935265:02crwdnd2935265:03crwdne2935265:0 : crwdns2935265:09crwdnd2935265:03crwdnd2935265:03crwdne2935265:0
    • Pull up on the suction cup with firm, constant pressure to create a slight gap between the front panel and rear case.

    • Insert an opening pick into the gap under the screen and the plastic bezelnot the screen itself.

    • The watertight adhesive holding the display in place is very strong; creating this initial gap takes a significant amount of force. If you're having a hard time opening a gap, apply more heat, and gently rock the screen up and down to weaken the adhesive until you create enough of a gap to insert your tool.

  10. crwdns2935201:0crwdne2935201:0 crwdns2935203:0crwdne2935203:0

    : crwdns2935265:010crwdnd2935265:01crwdnd2935265:03crwdne2935265:0 : crwdns2935265:010crwdnd2935265:02crwdnd2935265:03crwdne2935265:0 : crwdns2935265:010crwdnd2935265:03crwdnd2935265:03crwdne2935265:0
    • Slide the opening pick around the lower left corner and up the left edge of the iPhone, slicing through the adhesive holding the display in place.

    • Don't insert your pick more than 3 mm, as you may damage internal components.

  11. crwdns2935201:0crwdne2935201:0 crwdns2935203:0crwdne2935203:0

    : crwdns2935265:011crwdnd2935265:01crwdnd2935265:01crwdne2935265:0
    • There are delicate cables along the right edge of your iPhone. Don't insert your pick here, as you may damage the cables.

  12. crwdns2935201:0crwdne2935201:0 crwdns2935203:0crwdne2935203:0

    : crwdns2935265:012crwdnd2935265:01crwdnd2935265:03crwdne2935265:0 : crwdns2935265:012crwdnd2935265:02crwdnd2935265:03crwdne2935265:0 : crwdns2935265:012crwdnd2935265:03crwdnd2935265:03crwdne2935265:0
    • Re-insert your pick at the bottom edge of the iPhone, and slide it up the right side to continue separating the adhesive.

    • Don't insert your pick more than 3 mm, as you may damage the display cables.

  13. crwdns2935201:0crwdne2935201:0 crwdns2935203:0crwdne2935203:0

    : crwdns2935265:013crwdnd2935265:01crwdnd2935265:03crwdne2935265:0 : crwdns2935265:013crwdnd2935265:02crwdnd2935265:03crwdne2935265:0 : crwdns2935265:013crwdnd2935265:03crwdnd2935265:03crwdne2935265:0
    • The top edge of the display is secured with both glue and clips.

    • Gently pull the right edge of the display down slightly (in the direction of the Lightning port).

    • Insert your pick into the top-right corner of the phone.

  14. crwdns2935201:0crwdne2935201:0 crwdns2935203:0crwdne2935203:0

    : crwdns2935265:014crwdnd2935265:01crwdnd2935265:02crwdne2935265:0 : crwdns2935265:014crwdnd2935265:02crwdnd2935265:02crwdne2935265:0
    • Continue pulling the display down (toward the Lightning port) as needed in order to make a gap large enough for the pick.

    • Slide the pick to the top left corner and cut any remaining adhesive securing the display.

    • Don't insert your pick more than 3 mm, as you may damage the Face ID sensor array.

  15. crwdns2935201:0crwdne2935201:0 crwdns2935203:0crwdne2935203:0

    : crwdns2935265:015crwdnd2935265:01crwdnd2935265:01crwdne2935265:0
    • Pull the small nub on the suction cup to detach it from the front panel.

  16. crwdns2935201:0crwdne2935201:0 crwdns2935203:0crwdne2935203:0

    : crwdns2935265:016crwdnd2935265:01crwdnd2935265:03crwdne2935265:0 : crwdns2935265:016crwdnd2935265:02crwdnd2935265:03crwdne2935265:0 : crwdns2935265:016crwdnd2935265:03crwdnd2935265:03crwdne2935265:0
    • Open the iPhone by swinging the display up from the left side, like the back cover of a book.

    • Don't try to fully separate the display yet, as several fragile ribbon cables still connect it to the iPhone's logic board.

    • Prop the display up against something sturdy.

    • During reassembly, lay the display in position, align the clips along the top edge, and carefully press the top edge into place before snapping the rest of the display down. If it doesn't click easily into place, check the condition of the clips around the perimeter of the display and make sure they aren't bent.

  17. crwdns2935201:0crwdne2935201:0 crwdns2935203:0crwdne2935203:0

    : crwdns2935265:017crwdnd2935265:01crwdnd2935265:02crwdne2935265:0 : crwdns2935265:017crwdnd2935265:02crwdnd2935265:02crwdne2935265:0
    • To access the screws in the following step, tilt the display by slightly lifting its lower edge.

    • Be careful not to strain or tear the display cables.

  18. crwdns2935201:0crwdne2935201:0 crwdns2935203:0crwdne2935203:0

    : crwdns2935265:018crwdnd2935265:01crwdnd2935265:02crwdne2935265:0 : crwdns2935265:018crwdnd2935265:02crwdnd2935265:02crwdne2935265:0
    crwdns2935267:0crwdne2935267:0
    Magnetic Project Mat
    $19.95
    • Use a Y000 driver to remove the three 1.1 mm-long screws securing the battery connector bracket.

    • Throughout this repair, keep track of each screw and make sure it goes back exactly where it came from.

    • During reassembly, this is a good point to power on your iPhone and test all functions before you seal the display in place. Be sure to power your iPhone back down completely before you continue working.

  19. crwdns2935201:0crwdne2935201:0 crwdns2935203:0crwdne2935203:0

    : crwdns2935265:019crwdnd2935265:01crwdnd2935265:01crwdne2935265:0
    • Remove the bracket.

  20. crwdns2935201:0crwdne2935201:0 crwdns2935203:0crwdne2935203:0

    : crwdns2935265:020crwdnd2935265:01crwdnd2935265:02crwdne2935265:0 : crwdns2935265:020crwdnd2935265:02crwdnd2935265:02crwdne2935265:0
    • Use a spudger or a clean fingernail to pry the battery connector up from its socket on the logic board.

    • Try not to damage the black silicone seal surrounding this and other board connections. These seals provide extra protection against water and dust intrusion.

    • Bend the connector slightly away from the logic board to prevent it from accidentally contacting the socket.

  21. crwdns2935201:0crwdne2935201:0 crwdns2935203:0crwdne2935203:0

    : crwdns2935265:021crwdnd2935265:01crwdnd2935265:02crwdne2935265:0 : crwdns2935265:021crwdnd2935265:02crwdnd2935265:02crwdne2935265:0
    • Use a Y000 driver to remove the five 1.1 mm screws securing the logic board cover bracket.

  22. crwdns2935201:0crwdne2935201:0 crwdns2935203:0crwdne2935203:0

    : crwdns2935265:022crwdnd2935265:01crwdnd2935265:01crwdne2935265:0
    • Remove the bracket.

  23. crwdns2935201:0crwdne2935201:0 crwdns2935203:0crwdne2935203:0

    : crwdns2935265:023crwdnd2935265:01crwdnd2935265:03crwdne2935265:0 : crwdns2935265:023crwdnd2935265:02crwdnd2935265:03crwdne2935265:0 : crwdns2935265:023crwdnd2935265:03crwdnd2935265:03crwdne2935265:0
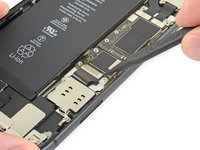
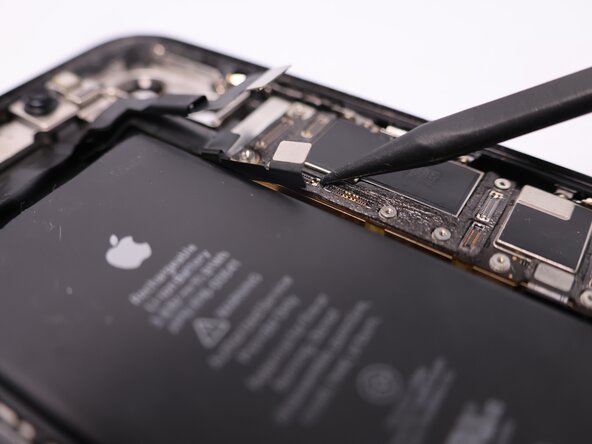
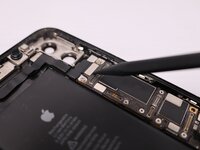
    • Use a spudger or a fingernail to disconnect the LCD panel cable connector.

    • Disconnect the digitizer connector next to it.

  24. crwdns2935201:0crwdne2935201:0 crwdns2935203:0crwdne2935203:0

    : crwdns2935265:024crwdnd2935265:01crwdnd2935265:02crwdne2935265:0 : crwdns2935265:024crwdnd2935265:02crwdnd2935265:02crwdne2935265:0
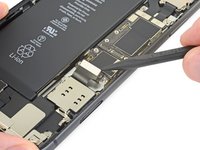
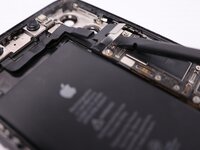
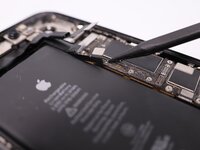
    • Use the point of a spudger or a fingernail to disconnect the front panel sensor assembly connector.

  25. crwdns2935201:0crwdne2935201:0 crwdns2935203:0crwdne2935203:0

    : crwdns2935265:025crwdnd2935265:01crwdnd2935265:01crwdne2935265:0
  26. crwdns2935201:0crwdne2935201:0 crwdns2935203:0crwdne2935203:0

    : crwdns2935265:026crwdnd2935265:01crwdnd2935265:02crwdne2935265:0 : crwdns2935265:026crwdnd2935265:02crwdnd2935265:02crwdne2935265:0
    • Remove the two Phillips screws securing the rear camera cover:

    • One 1.4 mm screw

    • One 1.3 mm screw

  27. crwdns2935201:0crwdne2935201:0 crwdns2935203:0crwdne2935203:0

    : crwdns2935265:027crwdnd2935265:01crwdnd2935265:03crwdne2935265:0 : crwdns2935265:027crwdnd2935265:02crwdnd2935265:03crwdne2935265:0 : crwdns2935265:027crwdnd2935265:03crwdnd2935265:03crwdne2935265:0
    • Lift the camera cover from the edge closest to the battery, and remove it.

    • To reinstall the camera cover, follow the images exactly in reverse: first, lower the outside edge until the two protruding tabs on the cover are slotted securely into the bracket on the outer edge of the camera module. Then, hinge the cover closed.

    • The cover only lays flat after the two tabs are seated correctly.

  28. crwdns2935201:0crwdne2935201:0 crwdns2935203:0crwdne2935203:0

    : crwdns2935265:028crwdnd2935265:01crwdnd2935265:03crwdne2935265:0 : crwdns2935265:028crwdnd2935265:02crwdnd2935265:03crwdne2935265:0 : crwdns2935265:028crwdnd2935265:03crwdnd2935265:03crwdne2935265:0
    • Use a spudger or a fingernail to disconnect the two camera cable connectors by prying them straight up from their sockets.

  29. crwdns2935201:0crwdne2935201:0 crwdns2935203:0crwdne2935203:0

    : crwdns2935265:029crwdnd2935265:01crwdnd2935265:02crwdne2935265:0 : crwdns2935265:029crwdnd2935265:02crwdnd2935265:02crwdne2935265:0
    • Insert the point of a spudger at the bottom right corner of the camera, between the camera assembly and the iPhone's frame.

    • Gently pry up to lever the camera out of the iPhone.

  30. crwdns2935201:0crwdne2935201:0 crwdns2935203:0crwdne2935203:0

    : crwdns2935265:030crwdnd2935265:01crwdnd2935265:01crwdne2935265:0
    • Remove the rear-facing camera assembly.

  31. crwdns2935201:0crwdne2935201:0 crwdns2935203:0crwdne2935203:0

    : crwdns2935265:031crwdnd2935265:01crwdnd2935265:02crwdne2935265:0 : crwdns2935265:031crwdnd2935265:02crwdnd2935265:02crwdne2935265:0
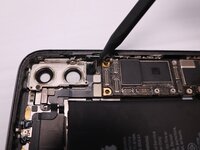
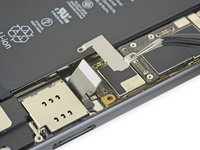
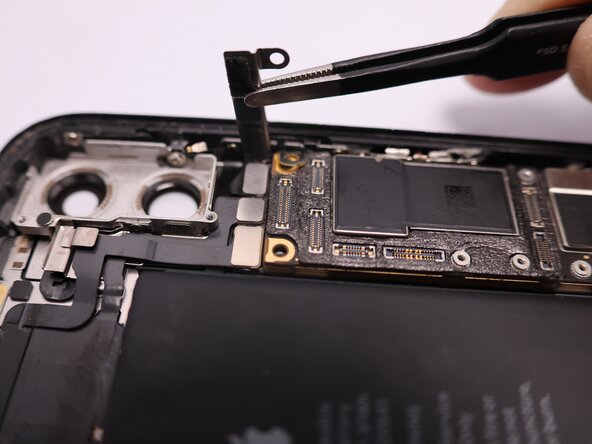
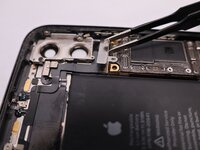
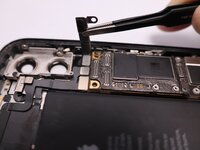
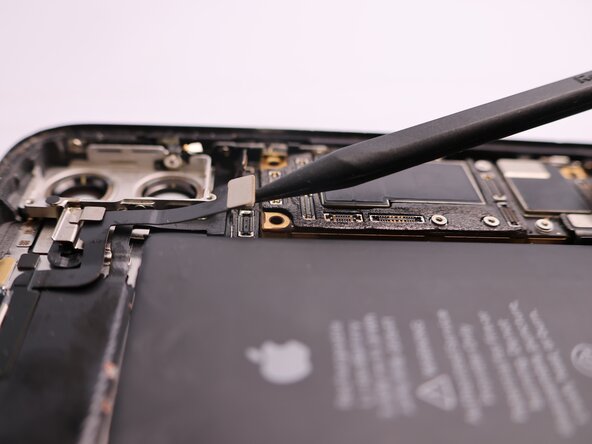
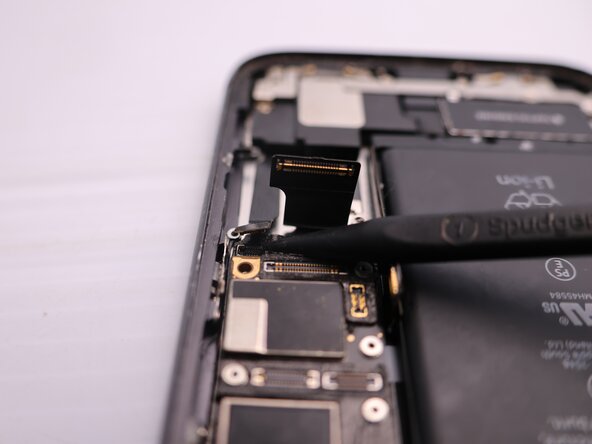
    • Use a spudger or a fingernail to pry up and disconnect the flex cable for the Lightning connector assembly.

  32. crwdns2935201:0crwdne2935201:0 crwdns2935203:0crwdne2935203:0

    : crwdns2935265:032crwdnd2935265:01crwdnd2935265:03crwdne2935265:0 : crwdns2935265:032crwdnd2935265:02crwdnd2935265:03crwdne2935265:0 : crwdns2935265:032crwdnd2935265:03crwdnd2935265:03crwdne2935265:0
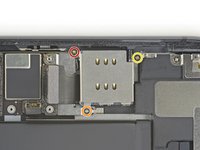
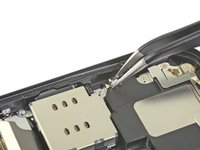
    • Remove the three Phillips screws surrounding the SIM card reader:

    • One 1.5 mm screw

    • One 1.9 mm screw

    • One 1.6 mm screw securing a grounding bracket

    • Removing the grounding bracket secured by the final screw.

  33. crwdns2935201:0crwdne2935201:0 crwdns2935203:0crwdne2935203:0

    : crwdns2935265:033crwdnd2935265:01crwdnd2935265:02crwdne2935265:0 : crwdns2935265:033crwdnd2935265:02crwdnd2935265:02crwdne2935265:0
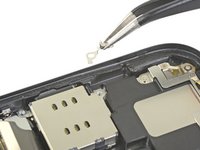
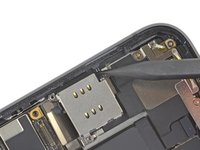
    • Use a standoff driver to remove the 3.1 mm screw securing the SIM card reader connector bracket.

    • In a pinch, a small flathead screwdriver will do the job—but use extra caution to ensure it doesn't slip and damage nearby components.

  34. crwdns2935201:0crwdne2935201:0 crwdns2935203:0crwdne2935203:0

    : crwdns2935265:034crwdnd2935265:01crwdnd2935265:02crwdne2935265:0 : crwdns2935265:034crwdnd2935265:02crwdnd2935265:02crwdne2935265:0
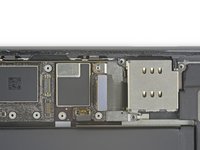
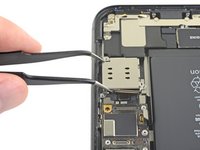
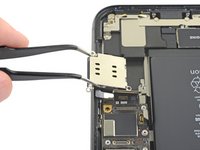
    • Remove the SIM reader's connector bracket.

  35. crwdns2935201:0crwdne2935201:0 crwdns2935203:0crwdne2935203:0

    : crwdns2935265:035crwdnd2935265:01crwdnd2935265:02crwdne2935265:0 : crwdns2935265:035crwdnd2935265:02crwdnd2935265:02crwdne2935265:0
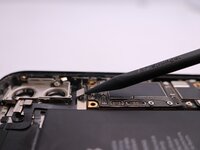
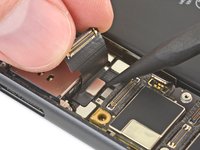
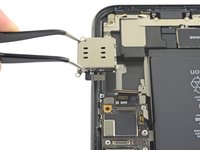
    • While gently lifting the Lightning connector flex cable out of the way, use the point of a spudger to pry up and disconnect the SIM card reader flex cable.

  36. crwdns2935201:0crwdne2935201:0 crwdns2935203:0crwdne2935203:0

    : crwdns2935265:036crwdnd2935265:01crwdnd2935265:02crwdne2935265:0 : crwdns2935265:036crwdnd2935265:02crwdnd2935265:02crwdne2935265:0
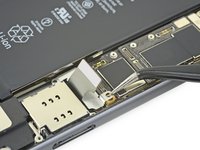
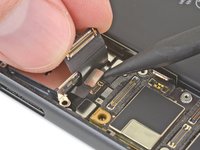
    • Use the point of a spudger to push the SIM eject plunger out towards the edge of the phone.

  37. crwdns2935201:0crwdne2935201:0 crwdns2935203:0crwdne2935203:0

    : crwdns2935265:037crwdnd2935265:01crwdnd2935265:03crwdne2935265:0 : crwdns2935265:037crwdnd2935265:02crwdnd2935265:03crwdne2935265:0 : crwdns2935265:037crwdnd2935265:03crwdnd2935265:03crwdne2935265:0
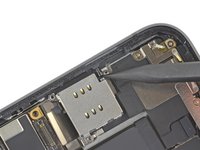
    • Lift the SIM card reader and slide it toward the outside edge of the iPhone.

    • Remove the SIM card reader.

  38. crwdns2935201:0crwdne2935201:0 crwdns2935203:0crwdne2935203:0

    : crwdns2935265:038crwdnd2935265:01crwdnd2935265:03crwdne2935265:0 : crwdns2935265:038crwdnd2935265:02crwdnd2935265:03crwdne2935265:0 : crwdns2935265:038crwdnd2935265:03crwdnd2935265:03crwdne2935265:0
    • Use a spudger or fingernail to disconnect the two front camera cable connectors by prying them from straight up from their sockets.

  39. crwdns2935201:0crwdne2935201:0 crwdns2935203:0crwdne2935203:0

    : crwdns2935265:039crwdnd2935265:01crwdnd2935265:01crwdne2935265:0
    • The front camera array houses the FaceID sensor, which is paired to the motherboard. If you use the front camera array that does not belong to its respective board, FaceID will not function. Make sure your logic board comes with its original front camera array if you want to retain FaceID functionality.

    • Remove the front camera assembly.

  40. crwdns2935201:0crwdne2935201:0 crwdns2935203:0crwdne2935203:0

    : crwdns2935265:040crwdnd2935265:01crwdnd2935265:01crwdne2935265:0
    • Remove the two 3.2 mm standoff screws.

  41. crwdns2935201:0crwdne2935201:0 crwdns2935203:0crwdne2935203:0

    : crwdns2935265:041crwdnd2935265:01crwdnd2935265:02crwdne2935265:0 : crwdns2935265:041crwdnd2935265:02crwdnd2935265:02crwdne2935265:0
    • Remove the upper cable bracket.

  42. crwdns2935201:0crwdne2935201:0 crwdns2935203:0crwdne2935203:0

    : crwdns2935265:042crwdnd2935265:01crwdnd2935265:03crwdne2935265:0 : crwdns2935265:042crwdnd2935265:02crwdnd2935265:03crwdne2935265:0 : crwdns2935265:042crwdnd2935265:03crwdnd2935265:03crwdne2935265:0
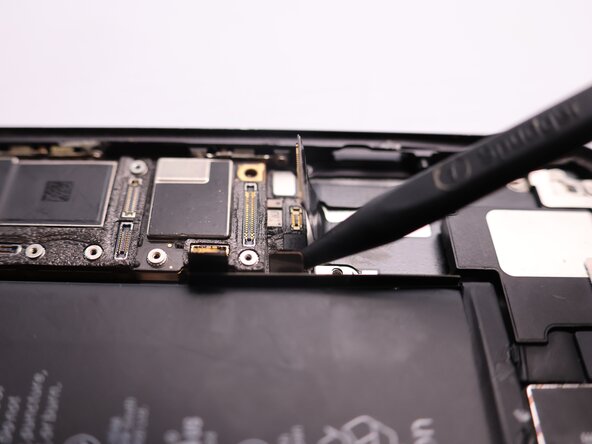
    • Use a spudger to disconnect the cable connectors for the volume, power, and silent switch.

  43. crwdns2935201:0crwdne2935201:0 crwdns2935203:0crwdne2935203:0

    : crwdns2935265:043crwdnd2935265:01crwdnd2935265:03crwdne2935265:0 : crwdns2935265:043crwdnd2935265:02crwdnd2935265:03crwdne2935265:0 : crwdns2935265:043crwdnd2935265:03crwdnd2935265:03crwdne2935265:0
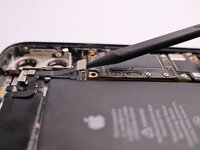
    • Use a spudger to disconnect the cable connectors for the lighting port and wireless charging coil.

  44. crwdns2935201:0crwdne2935201:0 crwdns2935203:0crwdne2935203:0

    : crwdns2935265:044crwdnd2935265:01crwdnd2935265:01crwdne2935265:0
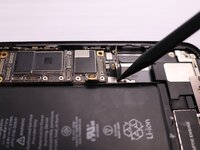
    • Carefully remove the logic board from the phone chassis.

    • Be careful not to snag the logic board on any cables.

crwdns2935217:0crwdne2935217:0

crwdns2935229:051crwdne2935229:0

Arty

crwdns2935283:010/27/19crwdne2935283:0

28,452 crwdns2915208:0crwdne2915208:0

crwdns2935297:095crwdne2935297:0

crwdns2947412:015crwdne2947412:0

Nice beakdown! Might also use post-processing on stopping point above video view over main pcb to highlight screw location with color coding

nand26 - crwdns2934203:0crwdne2934203:0

Thanks for the recommendation, I’ll take this into account in the following videos.

Arty -

where can I buy a logic board for an Iphone 11

Cassie Srubar - crwdns2934203:0crwdne2934203:0

Try AliExpress or eBay

Lawson Glomski -

Top, explications claires. Merci pour votre vidéo.

Manar Maiti - crwdns2934203:0crwdne2934203:0

So, I got some Non iCloud locked phones (an 11 and an XR) that are super super terribly busted and broken, but the logic boards are good. If I buy iCloud locked phones with good-condition bodies, can i swap the logic boards into the good bodies? Do I have to swap the sim slot too? What risks do I run?

Jacob Abdo - crwdns2934203:0crwdne2934203:0

Hey Jacob! If you put the unlocked motherboard into the locked body, make sure you also transfer the following parts from the unlocked phone:

-Front-facing camera assembly

-Screen-mounted earpiece assembly

-Battery

The new phone combo will work without swapping in the FF camera and earpiece, but Face ID will not be functional. The battery is optional but it will give an annoying "Cannot verify official iPhone battery" message for a few weeks.

TehachaScreens -

So I've had an issue with a few iPhone 11 re-body jobs I've done, where I've swapped all of the components out of a broken iPhone body into a fresh one. Out of about 30 that I've performed, two of them end up with an issue where the phone reboots randomly ever 2-5 minutes. (I've had to replace the phones outright for the customer.) It's not common but it is VERY frustrating.

Any idea what could be causing this? I've disconnected every component except for the battery and screen and it still does the reboot, so I'm certain it's a motherboard issue.

TehachaScreens - crwdns2934203:0crwdne2934203:0

I'm facing the same issue with my phone. It keeps on restarting every 2 minutes or so. I wonder if I can just swap the logic board and fix it. Please let me know if you find a solution. My email is pranav.lamba1@gmail.com.

Pranav Lamba -

what does the logic board do?

dj blaster - crwdns2934203:0crwdne2934203:0

Why did ifixit switch to video? It's not as helpful as actual steps.

Sarah Wreisner - crwdns2934203:0crwdne2934203:0

Please let us know it is repairable

Harsh - crwdns2934203:0crwdne2934203:0

does replacing the logic board delete all data on my iphone? i believe my logic board is messed up because i recently bought a screen off you guys and replaced it and it was still black but the iphone was on because it vibrated once i connected it to a charger and i put the new screen on a different iphone and it works. i dont want to swap out my logic board if it erases the data because my iphone isnt backed up

blaze fate - crwdns2934203:0crwdne2934203:0

I just manage to change the motherboard on iPhone 11. Im learning iPhone repair, so it was quite a nice feeling.

Is it much harder to change the motherboard on 12 and 13 series compared to iPhone 11?

iMados - crwdns2934203:0crwdne2934203:0

crwdns2917038:0crwdne2917038:0

crwdns2936625:0crwdne2936625:0:

crwdns2936751:024crwdne2936751:0 24

crwdns2936753:07crwdne2936753:0 306

crwdns2936753:030crwdne2936753:0 1,167

crwdns2942667:0crwdne2942667:0 74,776