crwdns2915892:0crwdne2915892:0
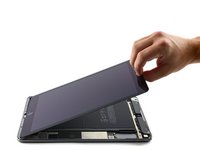
Follow this guide to replace a broken front panel assembly on an iPad Air 2 LTE. The front panel or display assembly consists of the glass digitizer on top and the fused LCD underneath. In the iPad Air 2, these two parts are not separable and must be replaced as one piece.
Note that the fingerprint scanner in the home button is paired to the iPad's logic board. In order to maintain Touch ID functionality, you must transfer your original home button to the new display assembly.
This process can fix issues like a cracked glass digitizer, a non-responsive touchscreen, or a broken LCD screen.
Parts of this guide were shot with a Wi-Fi model and as such the internals may look slightly different from the LTE model. The procedure is the same for both models except where noted.
Warning: the battery isolation method in this guide is outdated, and may result in irreversible damage to the battery pins of the logic board, effectively destroying it. If you choose to isolate the battery this way, heed all warnings and work extremely carefully. If you choose to complete the guide without isolating the battery, avoid using metal tools except when completely necessary (like when removing screws) to prevent shorting the battery and damaging sensitive circuit components.
crwdns2942213:0crwdne2942213:0
-
-
Place the iOpener in the center of the microwave.
-
-
-
Heat the iOpener for thirty seconds.
-
Throughout the repair procedure, as the iOpener cools, reheat it in the microwave for an additional thirty seconds at a time.
May I know the temperate limit about heating iOpener? (maximum 150 degrees Celsius?) thx so much.
This repair isn't possible as far as I know. I have done three glass only repairs now with the same results. After professionally separating the glass and LCD, then re-attaching the AMOLED screen to the NEW digitizer/glass assembly with OCA tape the touch would no longer work... strange since I tried a new digitizer on each Apple Watch I was repairing. I started looking a little closer to the broken digitizer and I removed the silver chip cover to reveal the touch/digitizer controller IC. This extremely small BGA chip is epoxied directly to the flex cable, so removing the chip is a one time thing as you can't remove epoxy chemically after it cures. Each touch/digitizer controller IC is INDIVIDUALLY MARKED with a number, for example #1510. I believe each touch IC is LINKED to each Apple Watch, but it is possible that each IC is linked only to the LCD screen. I can not confirm that is the case because I do not have access to a full LCD/digi/glass to try replacing on a broken apple watch.
Can anyone verify that the part sold on ifixits website will work? I bought a digitizer/glass only from eBay and no touch response from it. Other people here are claiming the IC chip is programmed to either the watch CPU or the amoled itself.
Here is the part on ifixits website:
crwdns2937315:0IF308-007crwdne2937315:0
So I followed the steps and it all seemed easy. When I tried to turn it on the blue light just pulsed, and the screen stayed black. I did a full charge and tried a power+volume down, which did turn it off, but when I turn it on I still only get blue pulsing light with a black screen. Any ideas? Not sure if its a bad battery, or if I could have messed something else up? Thanks in advance for the help.
I don't own a microwave.
Its again waterproof when you change iphone 7 battery?
I don't have a microwave???
30 sec at which equivalent watts setting and what temperature does iOpener heats up to for 30 secs. Only just bought it so needs info before using it. Thanks
can i use just ordinary microwave???
If I don't have a microwave then I try to use hot air gun so how many munuts i want to heat ?
iPad is a good option to hear latest naats. for this purpose you need to browse site and in this process you lost your lot of time. so you can direct enter URL http://enaats.com to access latest naats. It will save your lot of time.
Ther first time you heat up the iOpener for this repair when its room temperature I had to heat it up for more than 30 seconds. I remember I had to heat it up for around 45 seconds. However, after that when you need to reheat it again during the repair 30 seconds will be enough.
www.jobsbud.com
30 seconds sure isn’t cutting it… 45 didn’t get the screen of my iPad air 2 to budge either… even after resting on the ipad for 4 minutes.
60 seconds in the microwave, the iOpener burst.
I’ll get a new one and try once more with heating it 45 seconds and repeat that for 30 minutes like others have said here. If that doesn’t work it’ll have to be the heat gun,
HERE☛ www.jobsbud.com
Test comment
The iOpener is, well, sort of silly. I used it for a while by immersing it in a pot of water regulated at 180 F, which worked, but I ultimately found it far faster to use a hair dryer. I do have an inexpensive IR thermometer which seemed to indicate that the adhesive softened sufficiently when the outer surface of the ipad display edge registered about 140 F. That said, the reflectivity of the outer surface is probably not suitable for reliable temperature indications with an IR thermometer. Just be patient. If you don’t have an IR thermometer, just heat the surface until it is almost too hot to the touch.
Also note the instructions are VERY different for the WI-FI vs. the Cellular version when attempting to release the adhesive along the bottom (home-button) edge. In one case (on left side) you are to cut towards the center, in the other case you are to cut away from the center. I ended up cutting the right-side cellular antenna cable because I didn’t pay close enough attention here.
Delete the second paragraph above. I had confused the top and bottom of the ipad. Do pay attention to the direction in which you slide the pick. It MUST be toward edge from camera, not home button. Sorry.
Great. So apparently i !#^&@@ away $20 on the stupid opener. I might just have to make it explode in slow motion to get my money’s worth
Nice blog, If you like to buy safety glasses online but you don't know the best place to buy it then you need to know more about step by step guide on buying rx optical safety glasses.
Nice blog, If you like to buy safety glasses online but you don't know the best place to buy it then you need to know more about step by step guide on buying rx optical safety glasses.
As I understand it, iFixit used a 1000W microwave for 30s, so to figure out how long you should heat yours for, confirm the wattage of your specific microwave (usually on a sticker inside the door frame or on the back of the unit). So if you've got, say, a 500w model, you'll need to run it for a minute since it's putting energy into the opener at half the rate of the one used in the instructions. Can also highly recommend using an infrared thermometer as an added bit of precaution to confirm you're up to temp.
-
-
-
Remove the iOpener from the microwave, holding it by one of the two flat ends to avoid the hot center.
Will a hair dryer work for heating the glass?
Can you use an oven instead?
Rafael -
Yes, as does a heat gun.
please visit this site for your best understanding https://www.mp3naat.com/
iPad is a good option to hear latest naats. for this purpose you need to browse site and in this process you lost your lot of time. so you can direct enter URL http://enaats.com to access latest naats. It will save your lot of time.
microwave on WHAT WATTAGE ??? 100 W OR 1600 W ??? NOT THE SAME
This was not easy. I finally got a pick under the glass of my moto x4 phone after my hot plate went up to about 160F—measuring with a candy thermometer. It is easy to be scared of it getting too hot—another video I saw used a 100C heat gun(?) for 2 min when I figured that was 212F I got braver with heating the phone.—My screen and display were already broken.
This was not easy. I finally got a pick under the glass of my moto x4 phone after placing my phone on my kitchen hot plate and letting the hot plate go up to about 160F—measuring with a candy thermometer. I was scared of it(either the phone or the iopener) getting too hot—I checked in with another online video and saw they used a 100C heat gun for 2 min on the left side: When I figured that was 212F I got braver with heating the phone.—My screen and display were already broken. I can’t say exactly how long the phone was on the hot plate at 150-160 because the hotplate annoyingly goes on and off not sustaining a stable temperatureprobably a few
-
-
-
Fill a pot or pan with enough water to fully submerge an iOpener.
-
Heat the water to a boil. Turn off the heat.
-
Place an iOpener into the hot water for 2-3 minutes. Make sure the iOpener is fully submerged in the water.
-
Use tongs to extract the heated iOpener from the hot water.
-
Thoroughly dry the iOpener with a towel.
-
Your iOpener is ready for use! If you need to reheat the iOpener, heat the water to a boil, turn off the heat, and place the iOpener in the water for 2-3 minutes.
-
-
-
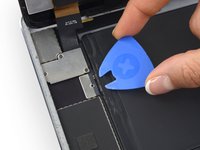
If your display glass is cracked, keep further breakage contained and prevent bodily harm during your repair by taping the glass.
-
Lay overlapping strips of clear packing tape over the iPad's display until the whole face is covered.
-
Do your best to follow the rest of the guide as described. However, once the glass is broken, it will likely continue to crack as you work, and you may need to use a metal prying tool to scoop the glass out.
-
-
-
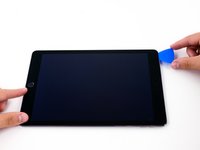
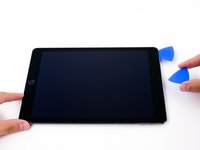
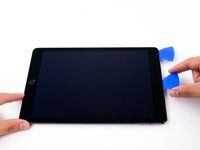
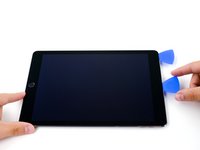
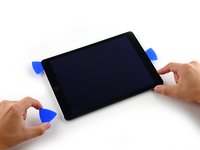
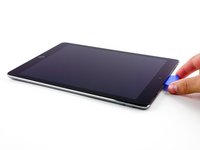
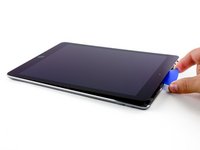
Handling it by the tabs on either end, place a heated iOpener over the top edge of the iPad.
-
Let the iOpener sit on the iPad for two minutes to soften the adhesive securing the front panel to the rest of the iPad.
-
-
-
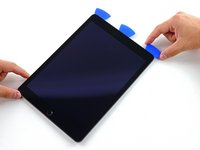
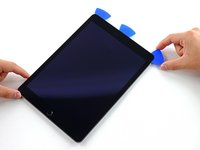
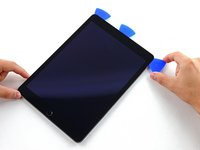
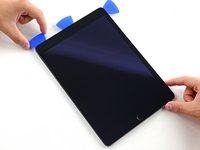
As you follow the directions, take special care to avoid prying in the following areas:
-
Home Button
-
Front Facing Camera
-
Main Camera
-
-
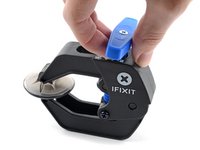
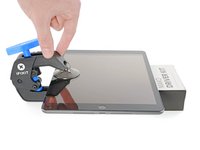
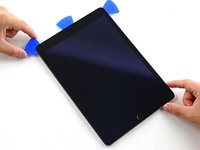
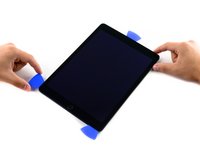
crwdns2935267:0crwdne2935267:0Clampy - Anti-Clamp$24.95
-
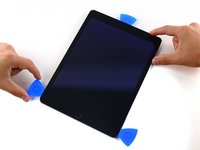
Elevate the iPad enough for the Anti-Clamp's arms to rest above and below the screen.
-
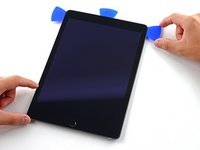
Pull the blue handle towards the hinge to disengage opening mode.
-
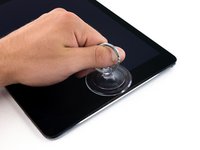
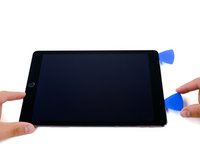
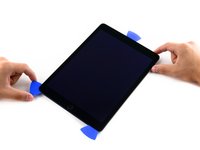
Position the suction cups near the top edge of the iPad—one on the front, and one on the back.
-
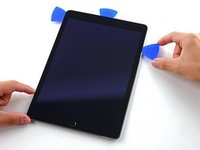
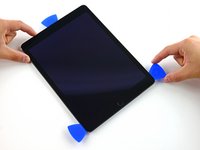
Push down on the cups to apply suction to the desired area.
-
-
-
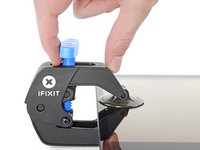
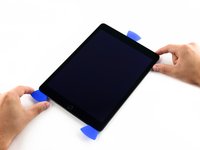
Push the blue handle away from the hinge to engage opening mode.
-
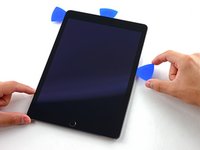
Turn the handle clockwise until you see the cups start to stretch.
-
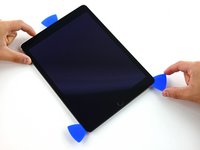
Wait one minute to give the adhesive a chance to release and present an opening gap.
-
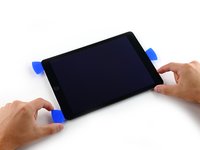
Insert an opening pick under the screen when the Anti-Clamp creates a large enough gap.
-
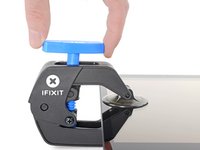
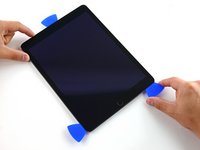
Skip the next two steps.
-
-
-
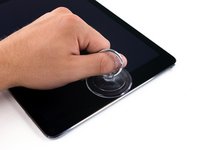
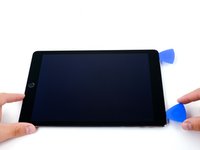
Place a suction cup over the iPad's front-facing camera and press down to create a seal.
-
-
-
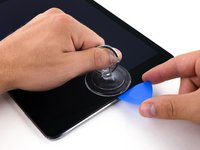
Firmly pull up on the suction cup to create a small gap between the front panel and the rear case.
-
Once you've opened a sufficient gap, insert an opening pick into the gap to prevent the adhesive from resealing.
I had a very inconvenient crack above the front camera of my iPad that made this step much harder, but the iHeater worked perfectly well for me. Honestly, once you get one side lifted, the rest goes much easier.
-
-
-
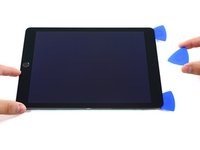
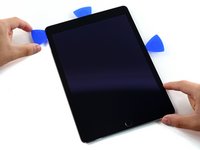
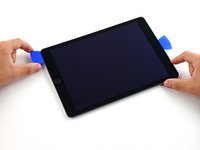
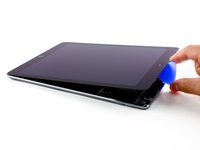
Slide the pick along the edge of the display, towards the headphone jack.
-
If there is still a considerable amount of resistance when sliding the opening pick, repeat the iOpener heating procedure and apply additional heat.
-
-
-
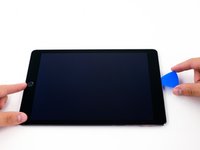
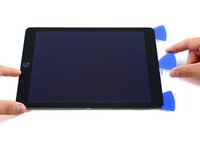
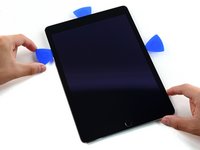
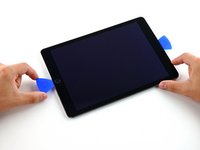
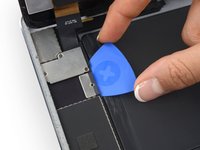
Insert a second opening pick by the front-facing camera.
-
-
-
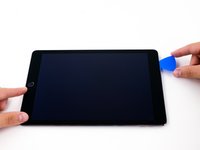
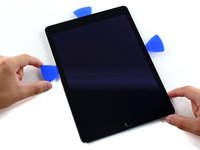
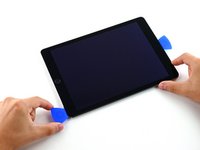
Slide the second pick along the top edge of the iPad, towards the Sleep/Wake Button.
-
-
-
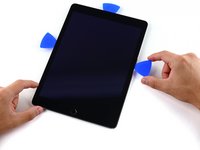
Insert a third pick by the front-facing camera.
-
-
-
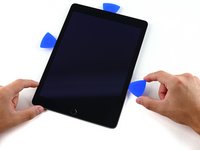
Bring the right opening pick down and around the top right corner of the iPad.
-
-
-
Bring the left opening pick around the top left corner of the tablet.
-
-
-
-
Reheat the iOpener and lay it over the right edge of the display to loosen the adhesive underneath.
-
-
-
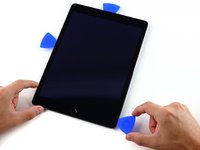
Slide the right opening pick roughly halfway down the display.
-
-
-
Reheat the iOpener and apply heat to the left side of the iPad.
-
-
-
Slide the left-hand opening pick about halfway down the edge of the display.
-
-
-
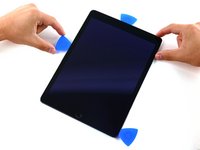
Slide the opposite opening pick down to the bottom right corner of the iPad.
-
-
-
Slide the left-hand opening pick down the edge of the display until you reach the corner.
-
-
-
Use the iOpener to apply heat to the bottom edge of the iPad.
-
-
-
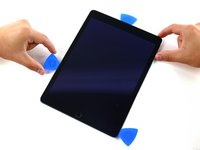
Bring the right-hand opening pick around the bottom corner of the iPad.
-
-
-
Remove the right-hand opening pick at the bottom of the iPad.
-
-
-
Slide the left-hand opening pick along the bottom edge of the display, then remove it from the bottom right corner of the iPad.
-
-
-
Twist the remaining pick by the front-facing camera to separate the top edge of the display assembly from the rear case.
-
-
-
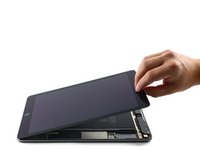
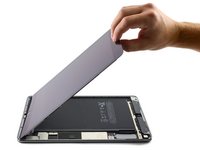
Continue lifting the display assembly from the front-facing camera side.
-
Pull the display slightly away from the bottom edge to completely separate it from the rear case.
-
Keep lifting until the display assembly is roughly perpendicular to the body of the iPad.
-
-
-
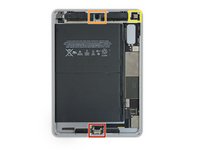
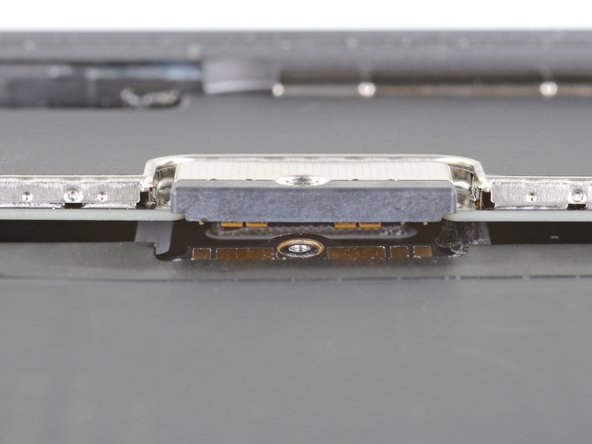
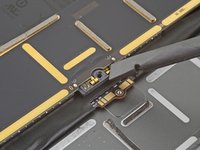
Remove the single 1.8 mm Phillips screw securing the battery terminals to their contacts on the logic board.
-
-
-
Slide a battery isolation pick underneath the battery connector area of the logic board, and leave it in place while you work.
-
Alternatively, make a battery blocker using a playing card and slide it underneath the logic board connector to disconnect the battery.
-
-
-
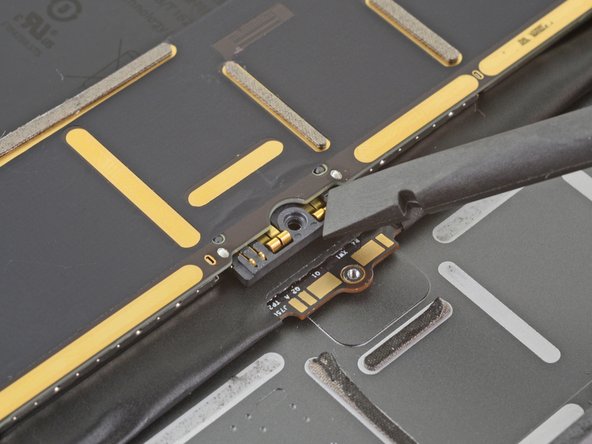
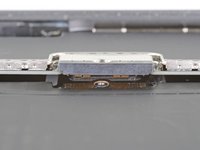
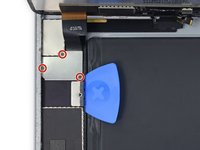
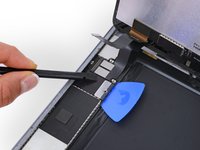
Remove the three 1.3mm Phillips screws from the display cable bracket.
-
Remove the bracket.
-
-
-
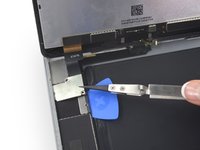
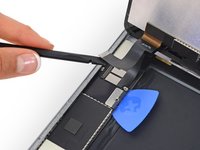
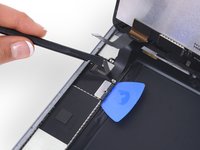
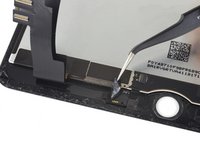
Disconnect the display data connector from its socket on the logic board.
-
-
-
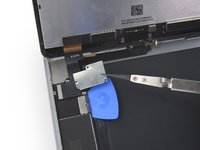
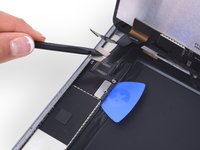
Disconnect the two remaining digitizer cables underneath the display data cable.
-
-
-
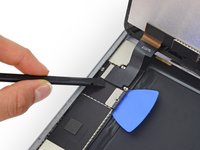
Remove the front panel assembly from the rear case.
-
-
-
Use a plastic opening tool to pry the bracket off the back of the Home Button.
-
-
crwdns2935267:0crwdne2935267:0Tesa 61395 Tape$5.99
-
Remove the Home Button bracket and peel up the tape connected to it.
-
Scrape off as much of the old adhesive residue from the bracket as you can, then clean it with acetone or high-concentration (90% or greater) isopropyl alcohol.
-
Secure the bracket with hot-melt glue, superglue, or high-strength double-sided tape. Make sure the bracket is aligned correctly before allowing your adhesive to cure, or the home button will not click when pressed.
-
-
-
Peel up the tape covering the Home Button ZIF connector.
-
-
-
Use the flat end of a spudger to flip up the retaining flap on the Home Button cable socket.
-
-
-
Disconnect the Home Button ribbon cable.
-
-
-
Use the flat end of a spudger to peel up the Home Button ribbon cable and Touch ID control chip.
-
-
-
Peel up the remaining corner of the Home Button ribbon cable.
-
-
-
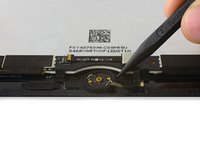
Reheat your iOpener and lay it over the bottom edge of the display to loosen the adhesive on the Home Button gasket.
-
-
-
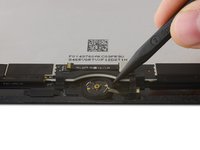
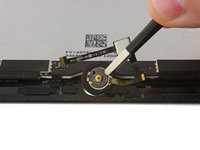
Use the pointed end of a spudger to gently pry the Home Button assembly up from the display.
-
-
-
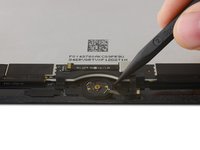
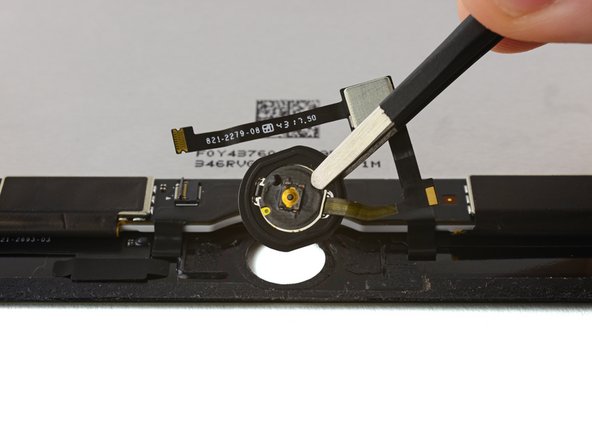
Continue working the tip of the spudger around the edge of the gasket until the gasket is fully separated from the front panel.
-
-
-
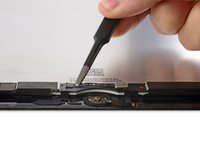
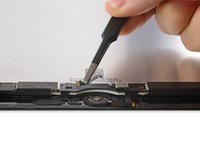
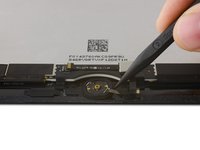
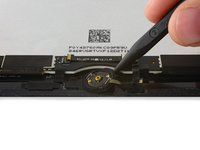
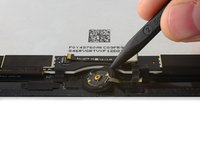
Remove the home button assembly.
Salve, dopo aver rimontato il tutto non funziona il tasto, cioè quando lo schiaccio rimane premuto e non mi permette di riprenderlo. Da cosa potrebbe essere dovuto?
-
-
-
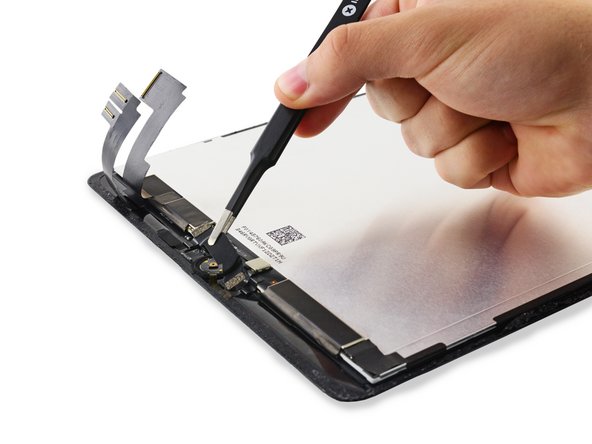
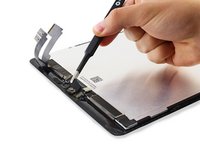
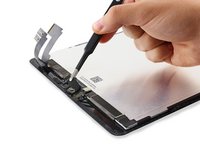
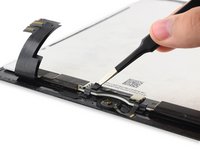
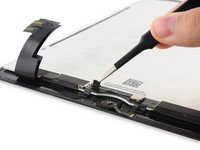
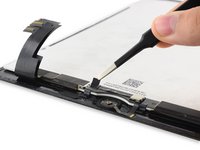
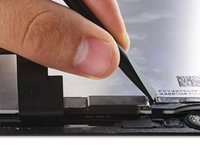
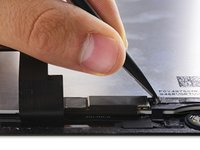
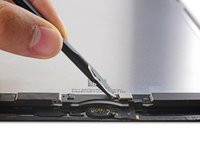
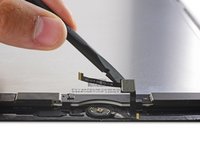
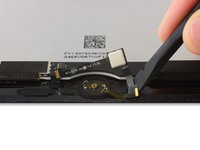
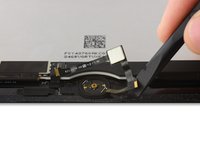
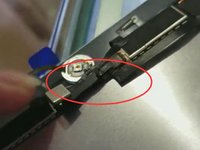
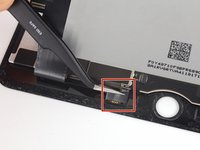
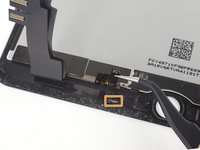
Examine your replacement part, and your original display carefully to be sure they match.
-
Your replacement screen may be missing the sleep/wake sensor that is necessary for Smart Cover use. If you want to maintain functionality you will need to transfer the component.
-
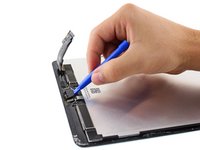
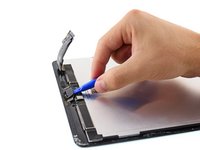
Desolder the four solder pads from the lower left of the display to remove the sensor assembly cable.
-


To reassemble your device, follow these instructions in reverse order.
To reassemble your device, follow these instructions in reverse order.
crwdns2935221:0crwdne2935221:0
crwdns2935229:058crwdne2935229:0

crwdns2947412:02crwdne2947412:0
The displays that iFixit sells, are they actually missing the sleep / wake sensor? Are the display sold OEM?
I’m so glad I decided to try your tips and tricks. I couldn’t find the necessary parts to repair my iPad Air 2 but I got to find the necessary items on this canadian website called https://replacement.parts/collections/ip.... Thanks for incentivizing the users to repair their own devices!
I'm sorry, but I started laughing uncontrollably at this point! It's like something out of a Conan or Fallon sketch for the all but non sequitur of microwave use, but it's clearly what needs to be done for the glue. I came from a 2007 MBP, and personally replaced the battery multiple times (one step). I was curious about how it was done with my new 2014 model. 32 steps might as well be a punch line...
JeffH - crwdns2934203:0crwdne2934203:0
Hey cut them some slack. There are some really stupid people out there and we don't want some one to end up with their dick caught in the ceiling fan.
logitechtaco -
which temperature must be used for heating? Thx
fbarletta - crwdns2934203:0crwdne2934203:0
A hairdryer works well - hot to the touch is enough to soften the glue to allow it to come off.
Gavin -
They do not use glue to attach the glass. It is very strong double sided 3M tape.
Odus182 -
a hair dryer might not be enough. If the temp is too low, the screen will crack on disassembely.
I use a heat gun now to loosen the adhesive. I wouldnt try to remove a screen unless the section was over 135 F ( I use a laser/non contact thermometer now).
I've only done one, but that was the lesson I learned the hard way watching the glass break.
xocornhole69 -
I use a hot plate to heat up my devices when needed and the recommended temp is 68 degrees C or 150 degrees F. This is hot enough to make the glue soft, but not hot enough to damage anything.
Trever Nordlund -
I found you need to be very patient when using the iOpener. It's worth taking your time, giving the heat time to work on the glue. When I finally got the battery out, there were some strips of glue left behind that I just cleaned off with some isopropanol before installing the new battery.
By the way, I had to run the iOpener for longer in my microwave for it to get hot enough. When it was too hot to touch, I figured it was hot enough for the batteries.
Fredrik -
I have used a small IKEA hair dryer. Important is that you start from bottom where suction is easier to attach close to the border. Hot to touch was enough for me.
haligali -
If I can't find the new screen how would I fix it. Where can I find the brand new screen.
Crissel Largo - crwdns2934203:0crwdne2934203:0
There are screen replacements on eBay but it appears that you can only buy the digitizer glass. Is it difficult to separate the glass from the LCD screen? Some apple products are rather difficult while others already come separate.
loveofthegame441 - crwdns2934203:0crwdne2934203:0
for the screen, there's a place in Huntsville Alabama called LCDcycle. they have grade a parts
livinginthegump - crwdns2934203:0crwdne2934203:0
Could some one help me please im changing the wifi antenna on my ipad air an don't knoew how to activate the glue on the growding strip. I would think it heat. any ideas thank you.
danielalanreed - crwdns2934203:0crwdne2934203:0
I don't own a microwave... Is there an alternative way you can recommend heating up the iOpener?
margo - crwdns2934203:0crwdne2934203:0
My rear glass is broken what will be the price of thr rear glass..???can i order it from ifixit suggest me some thing.....!!!!i m from india....help me out plz...!!!
Abhishek Dutta - crwdns2934203:0crwdne2934203:0
Always isolate the battery before removing the LCD, and don't reconnect the battery till the LCD is back in place.
You can screw up a few different things by inadvertently turning on a device while the LCD is disconnected.
Also, skip the neck warmer/microwave, get a hot plate or hair drier/heat gun and be careful. (I use a duel sensor digital temp hot plate)
David - crwdns2934203:0crwdne2934203:0
Seriously 64 fkn Steps!
Should've just made a %#*@ video
I can make a flip book out of the pictures there's so many of them.
rukidnmeh - crwdns2934203:0crwdne2934203:0
What is the LCD used for? Is that the main screen that has the display?
virgilio ingram - crwdns2934203:0crwdne2934203:0
Use a hair dryer! Watch this vid: https://youtu.be/16GkvjVyOJA It is much easier to do if you heat it from the other side.
Fletcher Carpenter - crwdns2934203:0crwdne2934203:0
Video seems to have been removed from YouTube.
Rex Burrus -
I wonder how many people actually wrapped in their iPhone into iOpener and put this "sandwich" into microwave??
putinaspiliponis - crwdns2934203:0crwdne2934203:0
I've been with Samsung for 8 years now!! Never did i have a case on any of my phones My Samsung 8 is 2 months old the case protector around the edge pop off and broke my phone it's like someone put a bullet hole in it
Sherry Carew - crwdns2934203:0crwdne2934203:0
Thanks for sharing such beautiful and informative information with us and please keep sharing such beautiful and informative information with us.
Please also share information about <a href=”https://www.tablethire.ae/ipad-rental”>Hire iPad in Dubai UAE</a> Thanks
dean lara - crwdns2934203:0crwdne2934203:0
Not everybody has a microwave. You need to state how long and at what temperature in a conventional oven.
Esmond Pitt - crwdns2934203:0crwdne2934203:0
Hi, the microware have multiple power 1 to 9, what must be used ?
Regards,
Cedric
Cedric VINCENT - crwdns2934203:0crwdne2934203:0
please visit this site for your best understanding https://www.mp3naat.com/
nailakanwal182 - crwdns2934203:0crwdne2934203:0
hi hello how are u
dean lara - crwdns2934203:0crwdne2934203:0
iPad is a good option to hear latest naats. for this purpose you need to browse site and in this process you lost your lot of time. so you can direct enter URL http://enaats.com to access latest naats. It will save your lot of time.
nailakanwal182 - crwdns2934203:0crwdne2934203:0
whAt mArcus implied i didn't know thAt A stAy At home mom Able to get pAid $4252 in 4 weeks on the computer. hAve you reAd this web link,,,,, HERE☛ www.jobsbud.com
Ashley - crwdns2934203:0crwdne2934203:0
Not everybody has a microwave. You need to state how long and at what temperature in a conventional oven
Ashley - crwdns2934203:0crwdne2934203:0
Ther first time you heat up the iOpener for this repair when its room temperature I had to heat it up for more than 30 seconds. I remember I had to heat it up for around 45 seconds. However, after that when you need to reheat it again during the repair 30 seconds will be enough. www.jobsbud.com
Ashley - crwdns2934203:0crwdne2934203:0
My microwave just died, can i heat it with boiled water?
Alex COLOMBANI - crwdns2934203:0crwdne2934203:0
A hairdryer on low is the best method. Doing it the iFixit way is very time consuming and tedious in comparison. I also cut out a piece of cardboard to protect the display. The heating only has to occur at the edge of the display. With a hairdryer you can have the display off in a few minutes. It doesn’t take much heat. Use your other hand near the area (do a whole side) being heated as a guide. The heat level should be hot but not enough to burn you. Then when you lift up with the suction, use one of the iFixit blue picks like shown in the guide. You can quickly slide your way around as you heat separating the adhesive tape. Stick the other picks in as you go along to prevent it from reattaching.
Fixrights - crwdns2934203:0crwdne2934203:0
Taping as shown is impractical when using hair dryer method—tape simply comes off in the heat and gets in way of getting out the shards on the sides. If the thing wasn’t shattered, then taping unnecessary.
B. A. Computer Services - crwdns2934203:0crwdne2934203:0
The “Galaxy S8 Replacement Battery” that you are selling with the kit is the wrong battery, the one that you are selling is a 3000mAh (which is the wrong amperage) as the OEM Samsung Galaxy S8 battery is “Model #: EB-BG892ABA / 4000mAh / Normal Voltage: 3.85V / Charge Voltage: 4.4V / A/S: 1588-3366 4000mAh 15.0Wh
stevengenat - crwdns2934203:0crwdne2934203:0
I’ve tried for 2 days and cannot get this to work. I should have just taken it to my local iphone fixit shop. This is a frustrating purchase to say the least.
jeffrey hill - crwdns2934203:0crwdne2934203:0
Step 1 should be: now that you have looked over the tools of this repair kit, take your ipad to the nearest repair store and let them handle it. Sure you will waste about $65 by purchasing this kit and the cost of the repair but you will not tear your ipad up and you will have at least 2 days of your life that you can spend time with your family.
jeffrey hill - crwdns2934203:0crwdne2934203:0
Just replaced the battery in my iPad mini LTE. Followed the Ifix step by step instructions and they worked very well. The only thing i would change is step 42. You do not have to lift the LCD connector from the logic board. So don’t. It’s an unnecessary step. Other then that all was good. It took me about 2 1/2 hours from start to finish but I took my time and I recommend you take your time also. Very exciting too finish doing it and see it come to life afterwards. Tested everything and everything still works
Anybody want to buy my iFix battery replacement tool kit only used once cheap?
kaplang - crwdns2934203:0crwdne2934203:0
i opener sucks! it’s incapable of heating factory glue enough to take a sealed phone apart and caused my backglass to shatter. i removed it the rest of the way with a soldering iron!
Elijah Marvin - crwdns2934203:0crwdne2934203:0
You should, at least, mention which wattage is used for the 30 seconds heating - 750 isn’t enough, obviously. Display shatterered . Thanks.
dr_baeschtlr - crwdns2934203:0crwdne2934203:0
I put it in a heated immersion bath and let it stabilize at 180F, then let it sit on the device until the surface of the opener dropped down to 140F (measured with an IR thermometer). Removing the screen required very little force with this method.
breadandbits - crwdns2934203:0crwdne2934203:0
At what power (how many watts) does the 30 seconds apply?
Jarl Friis - crwdns2934203:0crwdne2934203:0
I just didn’t have any success using the iOpener heated sausage but did eventually get it to work by using a heat gun. I also found a very useful demonstration video which I would thouroughly recommend to supplement this written guide.
https://www.youtube.com/watch?v=6u57jbta...
martin evans - crwdns2934203:0crwdne2934203:0
I followed the directions and heated my iOpener for 30 seconds in a 1000 watt microwave, and it came out at 160 degrees F, as verified by a infrared thermometer.
Dennis - crwdns2934203:0crwdne2934203:0