crwdns2933423:0crwdne2933423:0

iMac 27" 2017 Hard Drive Replacement

crwdns2942213:0crwdne2942213:0

  1. iMac 27" 2017 Hard Drive Replacement, Install the service wedge: crwdns2935265:01crwdnd2935265:01crwdnd2935265:01crwdne2935265:0
    crwdns2935267:0crwdne2935267:0
    iMac Intel 27" Cardboard Service Wedge
    $4.99
    crwdns2942207:0crwdne2942207:0
  2. iMac 27" 2017 Hard Drive Replacement, Insert an opening tool: crwdns2935265:02crwdnd2935265:01crwdnd2935265:03crwdne2935265:0 iMac 27" 2017 Hard Drive Replacement, Insert an opening tool: crwdns2935265:02crwdnd2935265:02crwdnd2935265:03crwdne2935265:0 iMac 27" 2017 Hard Drive Replacement, Insert an opening tool: crwdns2935265:02crwdnd2935265:03crwdnd2935265:03crwdne2935265:0
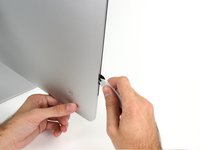
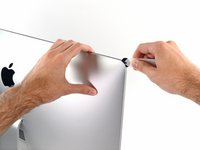
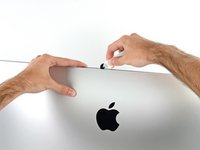
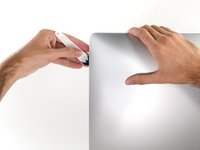
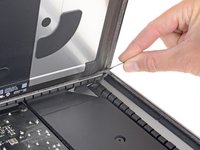
    • Starting on the left of the display, near the power button, insert the iMac Opening Tool into the gap between the glass panel and the rear case.

    • The hub on the iMac Opening Tool will keep you from pushing the wheel in too far. If using a different tool, insert it no more than 3/8" (9.5 mm) into the display. You risk severing antenna cables and causing serious damage if you insert the tool too far.

  3. iMac 27" 2017 Hard Drive Replacement, Slice through the display adhesive: crwdns2935265:03crwdnd2935265:01crwdnd2935265:03crwdne2935265:0 iMac 27" 2017 Hard Drive Replacement, Slice through the display adhesive: crwdns2935265:03crwdnd2935265:02crwdnd2935265:03crwdne2935265:0 iMac 27" 2017 Hard Drive Replacement, Slice through the display adhesive: crwdns2935265:03crwdnd2935265:03crwdnd2935265:03crwdne2935265:0
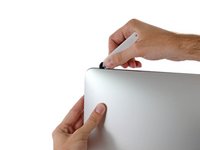
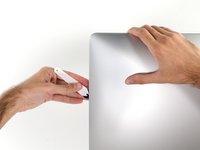
    • Use the tool like a pizza cutter—roll it along through the gap, and it will cut the foam adhesive through the center.

    • Be sure to always push with the handle behind the cutting wheel. If you pull, the wheel might get pulled out of the handle.

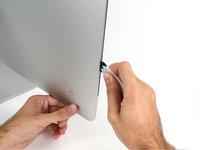
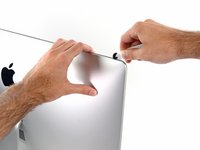
    • Run the tool up along the left side of the display.

  4. iMac 27" 2017 Hard Drive Replacement, Cut through the remaining adhesive: crwdns2935265:04crwdnd2935265:01crwdnd2935265:03crwdne2935265:0 iMac 27" 2017 Hard Drive Replacement, Cut through the remaining adhesive: crwdns2935265:04crwdnd2935265:02crwdnd2935265:03crwdne2935265:0 iMac 27" 2017 Hard Drive Replacement, Cut through the remaining adhesive: crwdns2935265:04crwdnd2935265:03crwdnd2935265:03crwdne2935265:0
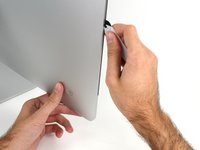
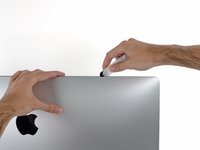
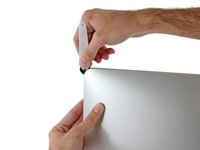
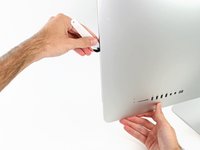
    • Continue wheeling the tool up around the top left corner.

  5. iMac 27" 2017 Hard Drive Replacement: crwdns2935265:05crwdnd2935265:01crwdnd2935265:02crwdne2935265:0 iMac 27" 2017 Hard Drive Replacement: crwdns2935265:05crwdnd2935265:02crwdnd2935265:02crwdne2935265:0
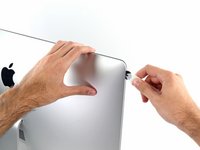
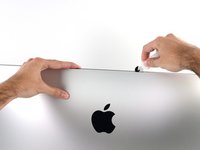
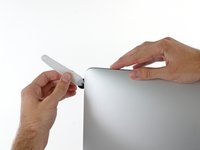
    • Cut the adhesive along the top left of the display.

  6. iMac 27" 2017 Hard Drive Replacement: crwdns2935265:06crwdnd2935265:01crwdnd2935265:02crwdne2935265:0 iMac 27" 2017 Hard Drive Replacement: crwdns2935265:06crwdnd2935265:02crwdnd2935265:02crwdne2935265:0
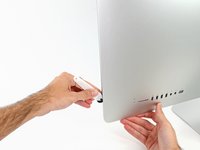
    • Continue along the top of the display.

    • You may want to run the tool back and forth through what you've already cut a few times, to ensure you get as much of the adhesive separated as possible.

  7. iMac 27" 2017 Hard Drive Replacement: crwdns2935265:07crwdnd2935265:01crwdnd2935265:03crwdne2935265:0 iMac 27" 2017 Hard Drive Replacement: crwdns2935265:07crwdnd2935265:02crwdnd2935265:03crwdne2935265:0 iMac 27" 2017 Hard Drive Replacement: crwdns2935265:07crwdnd2935265:03crwdnd2935265:03crwdne2935265:0
    • Push the tool around the top right corner of the display.

  8. iMac 27" 2017 Hard Drive Replacement: crwdns2935265:08crwdnd2935265:01crwdnd2935265:02crwdne2935265:0 iMac 27" 2017 Hard Drive Replacement: crwdns2935265:08crwdnd2935265:02crwdnd2935265:02crwdne2935265:0
    • Wheel the tool down along the right side of the display.

  9. iMac 27" 2017 Hard Drive Replacement: crwdns2935265:09crwdnd2935265:01crwdnd2935265:02crwdne2935265:0 iMac 27" 2017 Hard Drive Replacement: crwdns2935265:09crwdnd2935265:02crwdnd2935265:02crwdne2935265:0
    • Finish pushing the opening tool to the bottom of the right side of the display.

    • At this point, you'll want to run the tool back around the entire display, to ensure you cut as much adhesive as possible.

  10. iMac 27" 2017 Hard Drive Replacement, Separate the display: crwdns2935265:010crwdnd2935265:01crwdnd2935265:03crwdne2935265:0 iMac 27" 2017 Hard Drive Replacement, Separate the display: crwdns2935265:010crwdnd2935265:02crwdnd2935265:03crwdne2935265:0 iMac 27" 2017 Hard Drive Replacement, Separate the display: crwdns2935265:010crwdnd2935265:03crwdnd2935265:03crwdne2935265:0
    crwdns2935267:0crwdne2935267:0
    Plastic Cards
    $2.99
    crwdns2942207:0crwdne2942207:0
    • While the opening tool did the lion's share of the work, the display will still be slightly adhered to the case. A plastic card will be necessary to free up the last of this adhesive.

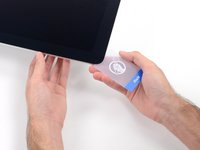
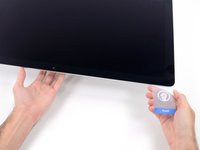
    • Set the iMac face-up on a table.

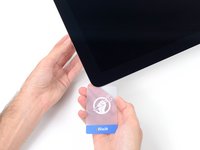
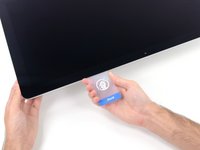
    • Starting from the top right corner of the iMac, insert a plastic card between the display and frame.

    • Be careful not to insert it more than 3/8" (9.5 mm), or you may damage internal components.

  11. iMac 27" 2017 Hard Drive Replacement: crwdns2935265:011crwdnd2935265:01crwdnd2935265:02crwdne2935265:0 iMac 27" 2017 Hard Drive Replacement: crwdns2935265:011crwdnd2935265:02crwdnd2935265:02crwdne2935265:0
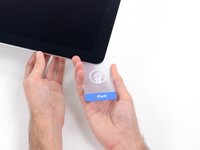
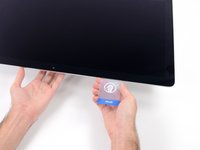
    • Gently twist the plastic card to open the space between the display and frame, and cut any remaining adhesive near the corner.

    • Using too much force will crack the glass. Work carefully, and don't try to create a gap any larger than about 1/4" (6 mm).

  12. iMac 27" 2017 Hard Drive Replacement: crwdns2935265:012crwdnd2935265:01crwdnd2935265:03crwdne2935265:0 iMac 27" 2017 Hard Drive Replacement: crwdns2935265:012crwdnd2935265:02crwdnd2935265:03crwdne2935265:0 iMac 27" 2017 Hard Drive Replacement: crwdns2935265:012crwdnd2935265:03crwdnd2935265:03crwdne2935265:0
    • Be sure to stop cutting before the iSight camera in this step, or you may damage it.

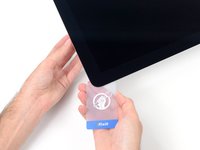
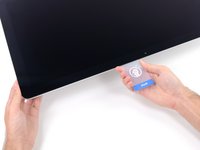
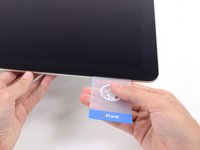
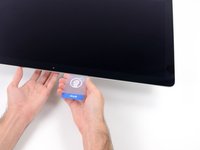
    • Slide the card toward the center of the display, to cut any remaining adhesive.

  13. iMac 27" 2017 Hard Drive Replacement: crwdns2935265:013crwdnd2935265:01crwdnd2935265:02crwdne2935265:0 iMac 27" 2017 Hard Drive Replacement: crwdns2935265:013crwdnd2935265:02crwdnd2935265:02crwdne2935265:0
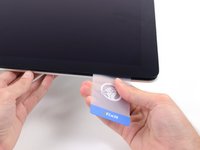
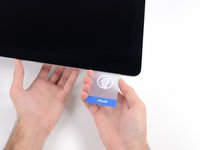
    • Put the card into the corner again and let it stay there to keep the adhesive from resettling.

  14. iMac 27" 2017 Hard Drive Replacement: crwdns2935265:014crwdnd2935265:01crwdnd2935265:03crwdne2935265:0 iMac 27" 2017 Hard Drive Replacement: crwdns2935265:014crwdnd2935265:02crwdnd2935265:03crwdne2935265:0 iMac 27" 2017 Hard Drive Replacement: crwdns2935265:014crwdnd2935265:03crwdnd2935265:03crwdne2935265:0
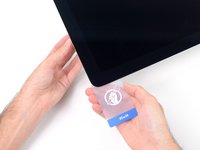
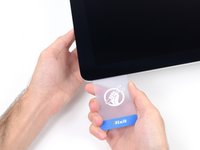
    • Insert a second card into the gap between the display and frame in the top left corner.

  15. iMac 27" 2017 Hard Drive Replacement: crwdns2935265:015crwdnd2935265:01crwdnd2935265:02crwdne2935265:0 iMac 27" 2017 Hard Drive Replacement: crwdns2935265:015crwdnd2935265:02crwdnd2935265:02crwdne2935265:0
    • Gently twist the card, slightly increasing the space between the display and frame.

    • As with the other side, move slowly to allow the adhesive to break, and be careful not to over-stress the display glass.

  16. iMac 27" 2017 Hard Drive Replacement: crwdns2935265:016crwdnd2935265:01crwdnd2935265:03crwdne2935265:0 iMac 27" 2017 Hard Drive Replacement: crwdns2935265:016crwdnd2935265:02crwdnd2935265:03crwdne2935265:0 iMac 27" 2017 Hard Drive Replacement: crwdns2935265:016crwdnd2935265:03crwdnd2935265:03crwdne2935265:0
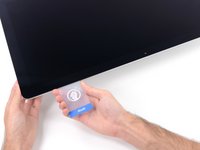
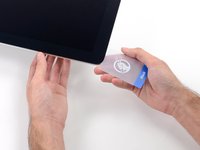
    • Slide the plastic card toward the center, again stopping just before the iSight camera.

  17. iMac 27" 2017 Hard Drive Replacement: crwdns2935265:017crwdnd2935265:01crwdnd2935265:02crwdne2935265:0 iMac 27" 2017 Hard Drive Replacement: crwdns2935265:017crwdnd2935265:02crwdnd2935265:02crwdne2935265:0
    • Insert the card back into the top left corner.

  18. iMac 27" 2017 Hard Drive Replacement: crwdns2935265:018crwdnd2935265:01crwdnd2935265:03crwdne2935265:0 iMac 27" 2017 Hard Drive Replacement: crwdns2935265:018crwdnd2935265:02crwdnd2935265:03crwdne2935265:0 iMac 27" 2017 Hard Drive Replacement: crwdns2935265:018crwdnd2935265:03crwdnd2935265:03crwdne2935265:0
    • With the cards inserted as shown near the corners, gently twist the cards to increase the gap between display and case.

    • If there are any sections that seem to stick and won't separate, stop twisting and use one of the cards to cut the adhesive in the problem area.

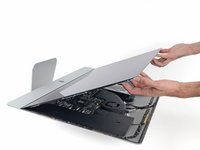
    • Begin to lift the top of the display up from the frame.

    • Only lift the display a few inches—it is still attached to the iMac by data and power cables.

  19. iMac 27" 2017 Hard Drive Replacement, Disconnect the display cables: crwdns2935265:019crwdnd2935265:01crwdnd2935265:02crwdne2935265:0 iMac 27" 2017 Hard Drive Replacement, Disconnect the display cables: crwdns2935265:019crwdnd2935265:02crwdnd2935265:02crwdne2935265:0
    • While holding the display up with one hand, use the other to unplug the display power cable.

    • Lift the display up enough to have easy access to the connections, but not so much that you stretch the cables and stress their connections (about 8").

  20. iMac 27" 2017 Hard Drive Replacement: crwdns2935265:020crwdnd2935265:01crwdnd2935265:03crwdne2935265:0 iMac 27" 2017 Hard Drive Replacement: crwdns2935265:020crwdnd2935265:02crwdnd2935265:03crwdne2935265:0 iMac 27" 2017 Hard Drive Replacement: crwdns2935265:020crwdnd2935265:03crwdnd2935265:03crwdne2935265:0
    • Flip up the metal retaining bracket on the display data cable.

    • Disconnect the display data cable.

    • This is a delicate connection that can easily be broken. Be sure to pull the display data cable connector straight out of its socket, toward the top of the iMac.

  21. iMac 27" 2017 Hard Drive Replacement, Lift the display: crwdns2935265:021crwdnd2935265:01crwdnd2935265:02crwdne2935265:0 iMac 27" 2017 Hard Drive Replacement, Lift the display: crwdns2935265:021crwdnd2935265:02crwdnd2935265:02crwdne2935265:0
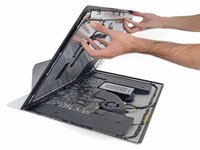
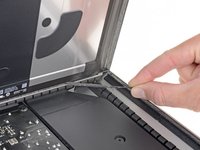
    • Lift the display up to a near-vertical position.

    • At this point there is still a strip of adhesive along the bottom of the display that will hold the display to the frame like a hinge. You can loosen this adhesive by working the display up and down a few times.

  22. iMac 27" 2017 Hard Drive Replacement, Remove the remaining adhesive: crwdns2935265:022crwdnd2935265:01crwdnd2935265:03crwdne2935265:0 iMac 27" 2017 Hard Drive Replacement, Remove the remaining adhesive: crwdns2935265:022crwdnd2935265:02crwdnd2935265:03crwdne2935265:0 iMac 27" 2017 Hard Drive Replacement, Remove the remaining adhesive: crwdns2935265:022crwdnd2935265:03crwdnd2935265:03crwdne2935265:0
    • Be very careful not to touch the capacitor leads or any exposed solder joints on the back of the power supply (boxed in red).

    • Grasp the small tab at the end of one of the bottom edge display adhesive strips and pull the adhesive toward the top of the iMac to remove it.

    • Repeat this step with the other adhesive strip and remove it.

    • If either adhesive strip breaks before it's removed, use a plastic card to slice through the remaining adhesive.

  23. iMac 27" 2017 Hard Drive Replacement, Remove the display: crwdns2935265:023crwdnd2935265:01crwdnd2935265:03crwdne2935265:0 iMac 27" 2017 Hard Drive Replacement, Remove the display: crwdns2935265:023crwdnd2935265:02crwdnd2935265:03crwdne2935265:0 iMac 27" 2017 Hard Drive Replacement, Remove the display: crwdns2935265:023crwdnd2935265:03crwdnd2935265:03crwdne2935265:0
    • Be very careful handling the display—it's big, heavy, and made of glass. The display has fragile edges. Avoid lifting the display by the corners.

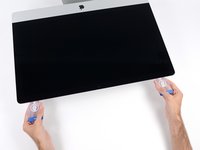
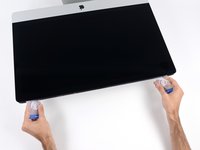
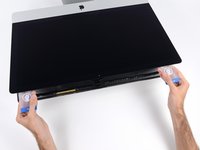
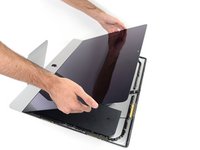
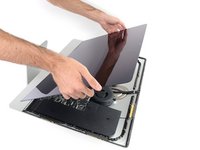
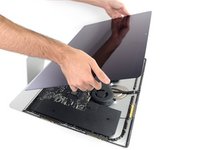
    • Lift the display up from the frame and remove it from the iMac. Lay the display face down on a flat, soft surface.

    • It may be necessary to slowly lift from one side, to peel against the remaining adhesive.

    • After the adhesive is cut, it cannot be used to re-seal the display in place. Follow this guide when your repair is complete to replace the adhesive strips that secure the display to the rear enclosure.

  24. iMac 27" 2017 Hard Drive Replacement, iMac Intel Speaker Displacement for HDD Guides: crwdns2935265:024crwdnd2935265:01crwdnd2935265:01crwdne2935265:0
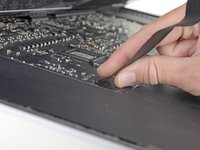
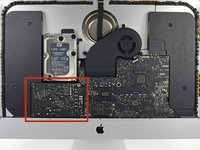
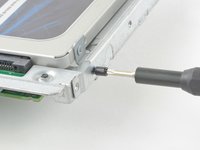
    • Use a T10 driver to remove the two 10 mm screws securing the left speaker.

  25. iMac 27" 2017 Hard Drive Replacement: crwdns2935265:025crwdnd2935265:01crwdnd2935265:02crwdne2935265:0 iMac 27" 2017 Hard Drive Replacement: crwdns2935265:025crwdnd2935265:02crwdnd2935265:02crwdne2935265:0
    • Shift the loosened left speaker to the left—enough to uncover the hard drive bracket screws.

  26. iMac 27" 2017 Hard Drive Replacement: crwdns2935265:026crwdnd2935265:01crwdnd2935265:02crwdne2935265:0 iMac 27" 2017 Hard Drive Replacement: crwdns2935265:026crwdnd2935265:02crwdnd2935265:02crwdne2935265:0
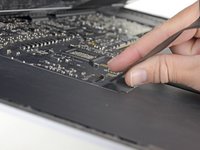
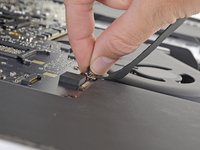
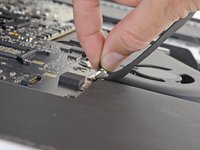
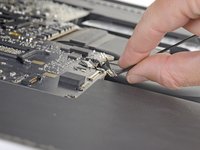
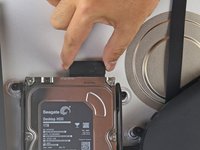
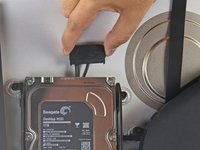
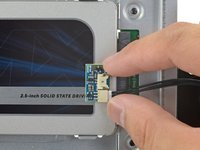
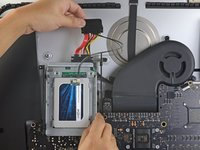
    • Pull straight up on the SATA combo cable to disconnect it from the drive.

  27. iMac 27" 2017 Hard Drive Replacement: crwdns2935265:027crwdnd2935265:01crwdnd2935265:01crwdne2935265:0
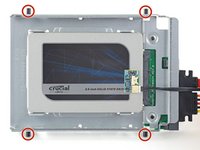
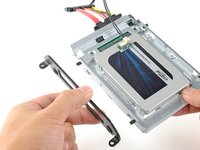
    • Use a T8 driver to remove the two 7.3 mm screws securing the left hard drive bracket to the rear case.

  28. iMac 27" 2017 Hard Drive Replacement: crwdns2935265:028crwdnd2935265:01crwdnd2935265:03crwdne2935265:0 iMac 27" 2017 Hard Drive Replacement: crwdns2935265:028crwdnd2935265:02crwdnd2935265:03crwdne2935265:0 iMac 27" 2017 Hard Drive Replacement: crwdns2935265:028crwdnd2935265:03crwdnd2935265:03crwdne2935265:0
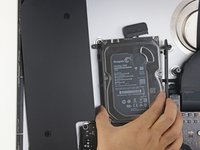
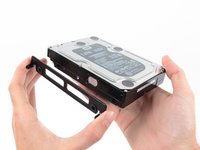
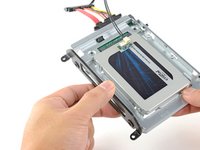
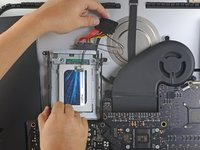
    • Grab the hard drive and left hard drive bracket together.

    • Tilt the left side away from the rear case, and slide the assembly to the left.

    • Remove the hard drive and left hard drive bracket from the iMac.

  29. iMac 27" 2017 Hard Drive Replacement: crwdns2935265:029crwdnd2935265:01crwdnd2935265:02crwdne2935265:0 iMac 27" 2017 Hard Drive Replacement: crwdns2935265:029crwdnd2935265:02crwdnd2935265:02crwdne2935265:0
    • Remove the left hard drive bracket.

  30. iMac 27" 2017 Hard Drive Replacement, Hard Drive: crwdns2935265:030crwdnd2935265:01crwdnd2935265:01crwdne2935265:0
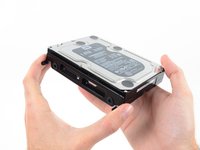
    • Remove the four 8.1 mm T8 screw posts from the hard drive, and transfer them to the replacement drive enclosure.

  31. iMac 27" 2017 Hard Drive Replacement, Replace the hard drive with an SSD: crwdns2935265:031crwdnd2935265:01crwdnd2935265:03crwdne2935265:0 iMac 27" 2017 Hard Drive Replacement, Replace the hard drive with an SSD: crwdns2935265:031crwdnd2935265:02crwdnd2935265:03crwdne2935265:0 iMac 27" 2017 Hard Drive Replacement, Replace the hard drive with an SSD: crwdns2935265:031crwdnd2935265:03crwdnd2935265:03crwdne2935265:0
    • Follow the remaining steps if you are replacing your hard drive with an SSD kit.

    • If your SSD enclosure looks like the first image, follow this guide instead.

    • Line up the SSD connectors with the metal enclosure's sockets.

    • Press the drive against the enclosure sockets until the SSD is firmly seated.

    • The SSD connects with the enclosure in only one direction. If the connectors don't line up, rotate the SSD and try again.

  32. iMac 27" 2017 Hard Drive Replacement: crwdns2935265:032crwdnd2935265:01crwdnd2935265:03crwdne2935265:0 iMac 27" 2017 Hard Drive Replacement: crwdns2935265:032crwdnd2935265:02crwdnd2935265:03crwdne2935265:0 iMac 27" 2017 Hard Drive Replacement: crwdns2935265:032crwdnd2935265:03crwdnd2935265:03crwdne2935265:0
    • Use a Phillips screwdriver to install the four silver screws (two on each side) along the edges of the SSD to secure it to the enclosure.

  33. iMac 27" 2017 Hard Drive Replacement: crwdns2935265:033crwdnd2935265:01crwdnd2935265:02crwdne2935265:0 iMac 27" 2017 Hard Drive Replacement: crwdns2935265:033crwdnd2935265:02crwdnd2935265:02crwdne2935265:0
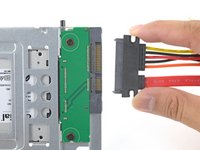
    • Plug the included sensor-enabled combo cable into the enclosure's port.

    • The cable is keyed to connect in only one orientation. If you can't connect the cable, rotate it 180° and try again.

  34. iMac 27" 2017 Hard Drive Replacement: crwdns2935265:034crwdnd2935265:01crwdnd2935265:03crwdne2935265:0 iMac 27" 2017 Hard Drive Replacement: crwdns2935265:034crwdnd2935265:02crwdnd2935265:03crwdne2935265:0 iMac 27" 2017 Hard Drive Replacement: crwdns2935265:034crwdnd2935265:03crwdnd2935265:03crwdne2935265:0
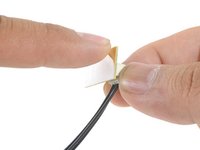
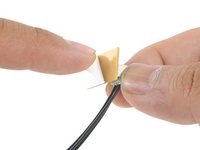
    • Peel the white liner off the back of the small temperature sensor board in order to expose the adhesive.

    • Adhere the temperature sensor board to an exposed, metal surface of the SSD, close to the SATA connector.

    • Fold the excess temperature sensor wires so that they are out of the way while you install the enclosure.

  35. iMac 27" 2017 Hard Drive Replacement: crwdns2935265:035crwdnd2935265:01crwdnd2935265:02crwdne2935265:0 iMac 27" 2017 Hard Drive Replacement: crwdns2935265:035crwdnd2935265:02crwdnd2935265:02crwdne2935265:0
    • Use a T8 driver to install the mounting pins from the old hard drive onto the sides of the enclosure.

  36. iMac 27" 2017 Hard Drive Replacement: crwdns2935265:036crwdnd2935265:01crwdnd2935265:02crwdne2935265:0 iMac 27" 2017 Hard Drive Replacement: crwdns2935265:036crwdnd2935265:02crwdnd2935265:02crwdne2935265:0
    • Attach any mounting brackets removed from the old hard drive onto the enclosure.

  37. iMac 27" 2017 Hard Drive Replacement: crwdns2935265:037crwdnd2935265:01crwdnd2935265:02crwdne2935265:0 iMac 27" 2017 Hard Drive Replacement: crwdns2935265:037crwdnd2935265:02crwdnd2935265:02crwdne2935265:0
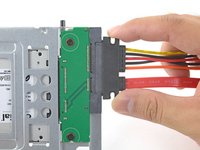
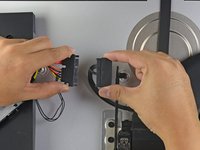
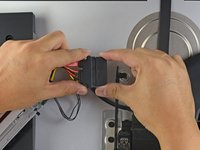
    • Connect the iMac's combo cable to the new temperature-enabled combo cable.

  38. iMac 27" 2017 Hard Drive Replacement: crwdns2935265:038crwdnd2935265:01crwdnd2935265:03crwdne2935265:0 iMac 27" 2017 Hard Drive Replacement: crwdns2935265:038crwdnd2935265:02crwdnd2935265:03crwdne2935265:0 iMac 27" 2017 Hard Drive Replacement: crwdns2935265:038crwdnd2935265:03crwdnd2935265:03crwdne2935265:0
    • The images used in this step come from a 2017 iMac. Your cables may look slightly different, but the procedure remains the same.

    • Slide the SSD enclosure into the space previously occupied by the hard drive.

    • Route the cables so that they will not interfere with any other components.

    • Try to keep the cables free from any sharp bends, and route them such that they are not pinched.

crwdns2915888:0crwdne2915888:0

Compare your new replacement part to the original part—you may need to transfer remaining components or remove adhesive backings from the new part before installing.

To reassemble your device, follow the above steps in reverse order.

Take your e-waste to an R2 or e-Stewards certified recycler.

Repair didn’t go as planned? Check out our Answers community for troubleshooting help.

crwdns2935229:046crwdne2935229:0

Adam O'Camb

crwdns2935283:004/11/15crwdne2935283:0

195.318 crwdns2915208:0crwdne2915208:0

crwdns2935297:0416crwdne2935297:0

crwdns2944067:09crwdne2944067:0

Hello, I have an iMac (Retina 5K, 27-inch, 2017) and I would like to change my hard disk, which is a 3.5GHz 1TB Fusion Unit, for an SSD disk, would you recommend doing it? And if so, what reference or brand do you recommend to do it?

Julio Cesar Ortiz Soto - crwdns2934203:0crwdne2934203:0

I can confirm the OWC thermal sensor cable is not needed for HDD to SSD upgrade. I successfully upgraded my 2017 5k iMac fusion drive’s HDD to WD blue 2TB SATA3 ssd without it and the fans speeds don’t ramp up at all. Anyhow thanks for your guides Ifixit on how to DIY. I successfully upgraded my 128gb NVME to a 1TB NVME and to a SATA3 ssd for storage. Transfer speeds are insane and my boot up time now only takes 12 seconds compared to 32 seconds previously. I also upgraded my cpu from the i5-7600k to the i7-7700k. My 2017 5k iMac is blazing fast now. Thanks again ifixit.

Andy C - crwdns2934203:0crwdne2934203:0

Successfully upgraded to a 2TB SSD from the 2TB Fusion drive. As soon as I turned on Bootcamp, the Fusion drive went nuts for a few weeks I think because it prioritized the Windows side onto the SSD and the Mac side onto the spinning drive. It eventually corrected itself but it was a helluva time. And it was time for a fresh hard drive anyway. $500 is much cheaper than a new iMac. Highly recommend this one. This was way easier than my upgrades to the 2009 and to a Mac Mini.

Michael Higdon - crwdns2934203:0crwdne2934203:0

Excellent instructions. The process is straightforward - the only tricky bit is reinstalling the screen accurately. There seems to be some conflicting views on the internet about the best way to do it and which adhesive strips to use - the 2012-2015 strips now seem to be supplied for later models, and they worked fine on my 2017 iMac.

My advice is just to take take it all very steadily and always read one stage ahead before you start on your next stage just to know where you are going next. I installed a 2TB Crucial SSD and the results are very good.

Roland Denning - crwdns2934203:0crwdne2934203:0

crwdns2917038:0crwdne2917038:0

crwdns2936625:0crwdne2936625:0:

crwdns2936751:024crwdne2936751:0 71

crwdns2936753:07crwdne2936753:0 509

crwdns2936753:030crwdne2936753:0 2,224

crwdns2942667:0crwdne2942667:0 72,827