crwdns2915892:0crwdne2915892:0
Follow this guide to replace the hand strap or adjustment strap for the right-hand controller of a Valve Index VR headset.
Power off your headset and controllers before you begin your repair.
crwdns2942213:0crwdne2942213:0
-
-
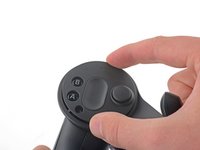
Press and hold the elastic band adjustment button.
-
Slide the elastic band out of the controller.
-
-
-
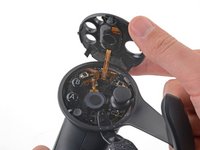
Insert an opening pick under the round plastic cover next to the A and B buttons.
-
Slide the opening pick around the top of the controller until all three plastic clips are disengaged.
-
-
-
-
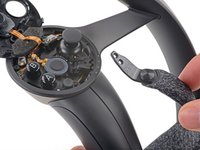
Carefully open the top of the controller to access the screws inside.
-
-
-
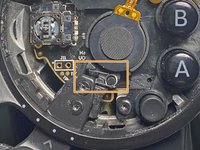
Use a T5 Torx screwdriver to remove the two 6.1 mm screws securing the adjustment strap to the controller.
-
Once the adjustment strap is unscrewed, the spring underneath may fall out.
-
-
-
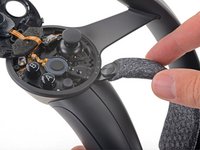
Slide the adjustment strap out from the controller to remove it.
-
-
-
First, loosely screw the strap back in. Don't screw it in too tight, or you'll have trouble getting the spring in. Once it's screwed in, adjust the mechanism so that it's lined up with one of the pegs.
-
Place the spring so that the coil is around the nearby spoke, and the lower arm is seated in its little notch behind the strap screws.
-
Put pressure on the coil of the spring so that it doesn't fly out, and move the arm of the spring over the top of the fastener, and push it in so that it stays underneath the lip.
-
While keeping pressure on the coil, quickly tighten the screws. Tighten the screw closest to the spring first. This will prevent the spring from unseating itself and springing back out.
-


Compare your new replacement part to the original part—you may need to transfer remaining components or remove adhesive backings from the new part before installing.
To reassemble your device, follow the above steps in reverse order.
Take your e-waste to an R2 or e-Stewards certified recycler.
Repair didn’t go as planned? Try some basic troubleshooting, or ask our Valve Index Answers community for help.
crwdns2935221:0crwdne2935221:0
crwdns2935229:03crwdne2935229:0

crwdns2947412:03crwdne2947412:0
This guide doesn't go any detail on replacing the spring that is prone to flying out during the strap replacement. I offer anyone who attempts this repair luck and a cautionary tale: even with the photos and a working controller to compare it to, I was unable to tension the spring correctly or find the correct procedure for replacing it. The spring was too small for me to properly manipulate, and I ended up losing it in the controller casing.
I appreciate Sam putting this guide together, but not having instructions on replacing the spring on reinstall was a mistake that might cost me a couple hundred dollars. Please consider updating this guide.
I'm a few months late, but just in case I figured I'd toss a reply just in case you were interested in the imgur guide I made to help out anyone else struggling with this. It's posted as a separate comment on this post. Hope your repair went well otherwise!
I appreciate the guide, but as someone noted above, you are seriously lacking in the spring instructions, which might be the most important part of this assembly. However, I managed to find a way to get the spring seated back in on my own, and so for any other unfortunates stumbling onto this guide, I made my own crappy Imgur gallery guide for re-seating the spring. Each image has a small paragraph beneath it explaining the steps to take. I hope it manages to help anyone else struggling to swap out a strap.
https://imgur.com/gallery/RQYtS5e