crwdns2915892:0crwdne2915892:0
Use this guide to remove or replace the battery on your Sony WH-1000XM3 headphones.
If your battery is swollen, take appropriate precautions.
For your safety, discharge your battery below 25% before disassembling your headphones. This reduces the risk of a dangerous thermal event if the battery is accidentally damaged during the repair.
You’ll need replacement adhesive to reattach components when reassembling the device.
crwdns2942213:0crwdne2942213:0
-
-
Before beginning any repairs, turn off your headphones.
-
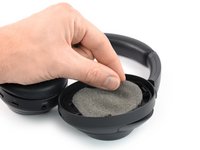
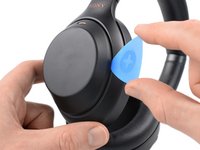
Insert a spudger into the gap between the earcup cushion and the earcup frame.
-
Pry up the earcup cushion by tilting the spudger downwards to release the plastic clips.
-
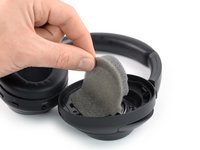
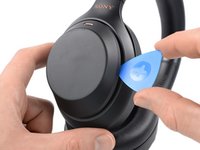
Repeat the previous step around the perimeter of the earcup cushion to release the remaining clips.
-
-
-
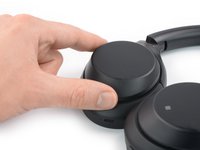
Remove the earcup cushion.
-
-
-
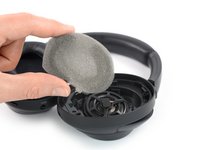
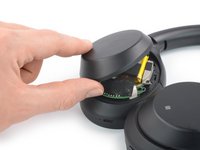
Carefully peel the foam liner off the earcup frame.
-
Remove the foam liner.
-
-
-
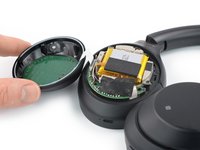
Use a Phillips screwdriver to remove the four 10.4 mm-long screws securing the plastic cover of the earcup frame.
Be careful, the speaker diaphragm is VERY fragile. Don't go anywhere near it.
-
-
-
Turn the headphones over.
-
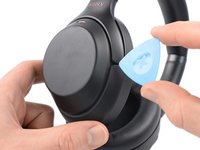
Insert an opening pick into the gap between the plastic cover and the earcup frame.
-
Use the opening pick to pry up the plastic cover until you can get a good grip to it.
any old plastic card works fine for this, no need to buy "opening picks"
-
-
-
Carefully fold the right earcup cover to the left like you would open the front page of a book and place it next to the earcup frame.
My headphones have an elastic band on the right side that prevents me from folding over the earcup cover to the left.
In case anyone is reading this, the elastic band mentioned is a seal that goes in between the earcup cover and the earcup. The seal might get stuck on a small ribbon cable right above and just to the right of the charging port, just gentle wiggle it free from the ribbon cable and it should come away free
Avoid straining the gesture control cable during the following procedure
The gesture control in my headphones is malfunctioning (performs some actions "on its own") for over a year already. The frequency gets more and more annoying so I thought about just disconnecting it (I'm not using it at all tbh.). The quoted comment sort of implies that the headphones may stop working properly without the gesture control panel.
Anybody any experiences?
I know my question is kinda "niche", just taking my chances before disassembling the headphones 🙃
-
-
-
crwdns2935267:0crwdne2935267:0Tweezers$4.99
-
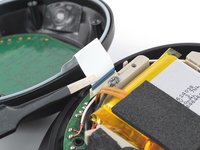
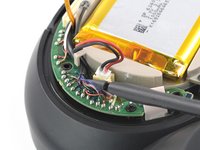
Use a pair of blunt nose tweezers or your fingers to disconnect the gesture control ribbon cable by pulling it straight out of its socket.
-
-
-
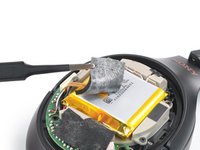
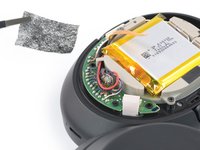
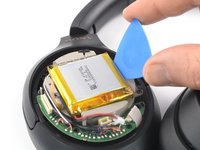
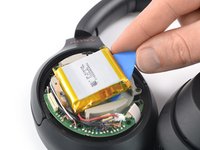
Use a pair of tweezers to carefully peel the protective foam sticker off the battery and the thermal sensor.
The foam became detached from the adhesive on the battery, a small amount of rubbing alcohol helped soften the adhesive and a small spudger helped pull the temperature sensor free
-
-
-
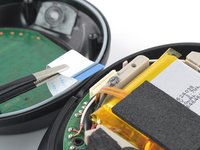
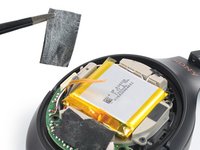
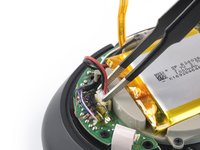
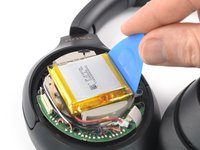
Use a pair of tweezers or your fingers to carefully remove the protective cloth sticker.
Be very careful here, the sticker covers some very thin wires and some of the wires may become stuck to the sticker. It helped to use the tweezers to hold the wire steady while I pulled the sticker free with my fingers
-
-
-
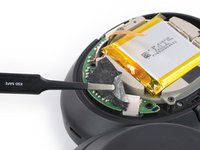
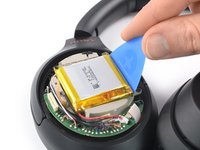
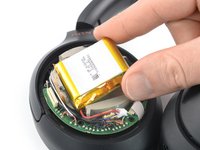
Use a pair of tweezers to carefully bend the thermal sensor to the side to get free access to the battery.
-
-
-
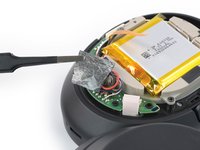
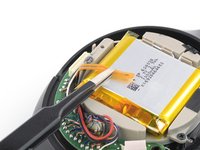
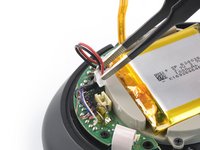
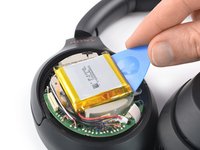
Use a pair of tweezers to carefully free the battery cables.
while these two photos make it seem like you can magically pull the battery cables through the tan piece of plastic, it's actually a bit tricky getting them out while keeping the other black cable in place
-
-
-
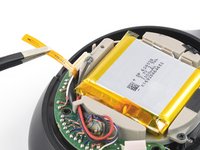
Use the flat end of a spudger or an opening pick to carefully fold the cables blocking the battery connector to the side until you get free access to the connector.
-
-
-
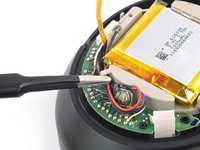
Use a pair of blunt nose tweezers to grasp the sides of the battery connector.
-
Pull the connector up and out of its socket, gently rocking it back and forth to loosen the clips securing it.
It was helpful to use a credit card to gain some leverage to pry out the connector
When connecting the new battery, I've made sure to place the connector (black wire to the left and red wire to the right) in the same position as I've disconnected it.
Joooooh THANKS a bunch!!! There was something that kept wiggling with the base. It was really annoying. I was rather scared to open up such a sensitive thing. But it worked and now it works perfect again.
-
-
-
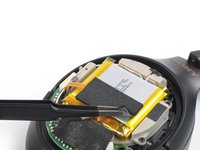
Insert the tip of an opening pick into the gap between the right edge of the battery and the battery housing.
-
Rotate the opening pick to insert one of its long edges into the gap.
A credit card works fine
Thanks! I was struggling to get the battery up, as the pick I had was too thick
A old credit/debit card worked a treat, jumped when the battery came out though, as it sounded like something snapped/popped.Can you provide the make and model for the battery replacement?
1-853-710-12 is the part # for mine purchased in the US mo # wh-1000xm3
-
-
-
Slide the opening pick underneath the battery.
-
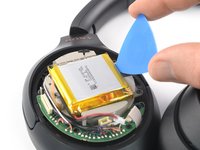
Pry up the battery intermittently to work it away from its adhesive.
-
-
crwdns2935267:0crwdne2935267:0Tesa 61395 Tape$5.99
-
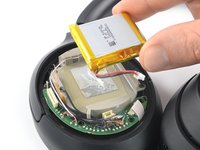
Remove the battery.
-


If possible, turn on your device and test your repair before installing new adhesive and resealing.
For optimal performance, calibrate your newly installed battery: Charge it to 100% and keep charging it for at least 2 more hours. Then use your device until it shuts off due to low battery. Finally, charge it uninterrupted to 100%.
To reassemble your device, follow the above steps in reverse order.
Take your e-waste to an R2 or e-Stewards certified recycler.
Repair didn’t go as planned? Try some basic troubleshooting, or ask our Answers community for help.
crwdns2935221:0crwdne2935221:0
crwdns2935229:064crwdne2935229:0


crwdns2947412:025crwdne2947412:0
Thank you! This is a very detailed and helpful guide. I especially appreciated the battery calibration tip at the end of it! The battery removal was probably the most difficult part, as the adhesive was strong. Slowly working the opening pick under the battery as directed did the trick, though.
Thank you! This is a very detailed and helpful guide. I especially appreciated the battery calibration tip at the end of it! The battery removal was probably the most difficult part, as the adhesive was strong. Slowly working the opening pick under the battery as directed did the trick, though.
Thank you very much. This gonna help me out. Draining the battery now and gonna give it a shot later today. I love this headphones and I didn't want to get rid of them.
Hola. Aparte de cambiar la bateria de estos auriculares, no sabria usted donde puedo comprar para cambiarla la toma del puerto de carga de estos auriculares. Porque parece que se dañó de alguna forma. No me entra el cable , me lo hecha para atras. Tengo que apretarlo con mucha fuerza para que cargue, aun así me lo despide para atras y no carga. Gracias si pudiera ayudarme.
francisco-tiscar@hotmail.com
The batterie replacement was very easy. The guide described everything perfectly. Well done and thanks! I already tried to do the calibration once, but it seems it has not worked yet as the software gave me, for instance, 80% first and 5 minutes later it has dropped down to 30% and then very quickly to 10%. I have these 10% now for more than 8 hours. So it seems it is not calibrated. Any ideas? I also tried to reset the headphones. It not really worked.
What third party battery have people used here? I see a lot of batteries on the typical Chinese shop, but I doubt those will be as good as the original one. Unfortunately Sony nor iFixit sell the original themselves.
THX you are a life saver! C
If anyone is looking for the replacement battery and other similar parts, check out this page. It appears to have contracts with the OEMs that let the company sell the original parts.
Thanks alot for this tutorial, helped me to change out the battery in my headphones after not using them for 18 or so months. Used a cheap eBay battery suitable for application.
Thanks again.
Thank you Dominik! That was an excellent guide.
If anyone else had trouble with the battery cable connector - my tweezers were a little weak - I used a pair of quality thin-nosed pliers. Did the job very easily.
I greatly appreciate these instructions! There is a couple of times along the way where you go "should I really be hearing a snap?" or "should I really be applying that much force?" This great guide gave me the confidence to forge on - was quick and mostly painless.
Good instructions! I didn't see any reason to pull out the ribbon cable though and managed to do it all with it attached.
Thank you. Perfect guide, replacement worked fine. Instead of tweezers I used my fingers and finger nails :) Now I'm curious how the battery calibration will work out.
I folowed your directions to the letter and had success in repairing my headphone, much to my surprise! What more could I ask for? Thank you for your help.
Looking like a greatly detailed guide, I’ve had my pair of headphones for years and that’s the only thing that’s wrong with them in gonna use this guide to extend the life of them 👌🫡
ok ordered from the website linked on this guide. hoping to get better results.
previously ordered something that looked legit on amazon. I'm prety frustrated so I think it's worth warning folks that the random china ones on amazon probably are not so good. after replacing the battery the headphones worked well for maybe 6 months, then started to lose charge. Now 9 months later, it won't charge over 80% and discharges to 0% in 5 hours.
Strongly suggest no one use the amazon/ebay batteries.
Does anyone know if painting the touch panel plastic will prevent the touch controls from functioning? I'd like to disassemble my headphones and paint all the plastics for a custom look.
To answer my own question;
I tested putting 8 layers of painters tape over the touch panel, and it continued to respond to touch input perfectly. I imagine the same will be the case for paint+primer. I'll test 3 coats of primer, 3 coats of spray paint, and 2 coats of clearcoat on a painters tape swatch, and use that to test functionality on the headphones. If all is well, then it's on to painting!
Painting went well, and no touch performance decrease was noticed.
Thanks the guide was excellent
This guide was very helpful for my battery and ear pad replacement of my 5 years old XM3. The pictures and steps where really clear and easy to execute. with the tools from my IFIXIT toolkit. This saved me a couple of hundred euro's to buy a newer version of this headset. in the end I did not replace the battery adhesive as it was still really sticky and seems to hold the battery more the fine.
Superb guide for replacing the battery of the WH-1000XM3. So very detailed and nicely photographed. Every step is as accurate as it can get. One of the best guides I've followed in my life. Very dramatic, I know, but so true. Thanks Dominic! :-)
Great guide, thanks!
Unfortunately Encompass does not ship the battery to The Netherlands. I've managed to get a orginal battery via remote-control-world.eu (CZ). Looks a little different to the one originally in my XM3 but has the original part nr. "Sony 1-853-710-12" and comes branded/labeled.
Hopefully the XM3 will last for many years to come.
My headphones would not charge. The LED was flashing red.
I replaced the battery with an OEM cell per these helpful instructions here and saw the same behavior.
I then unsoldered the temp sensor and measured it's resistance at ~1.5Mohm. Resistance did drop a bit when I warmed the sensor with my fingers.
I ordered a new sensor. It measured ~130-150kohm, lowering when warmed. After installing the new sensor the headphones charge as they should.
Thank you! Instructions were great, and replacement was easy and successful.