crwdns2915892:0crwdne2915892:0
Use this guide to replace the display assembly including the frame of your Galaxy Note8.
Before disassembling your phone, discharge the battery below 25%. The battery can catch fire and/or explode if accidentally punctured, but the chances of that happening are much lower if discharged.
This guide involves removing the rear glass cover; you will need replacement adhesive to reattach the back cover to the phone.
Opening the Samsung Galaxy Note8 will damage the waterproof seals on the device. If you do not replace the adhesive seals, your phone will function normally, but will lose its water resistance.
crwdns2942213:0crwdne2942213:0
-
-
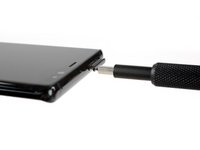
Switch off your phone.
-
Prepare an iOpener for softening the adhesive on the back of the Note8.
-
Apply the iOpener on the back of the Note8 along the side with the power button.
-
-
-
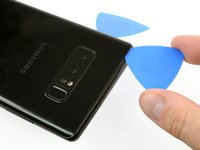
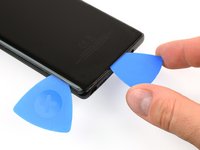
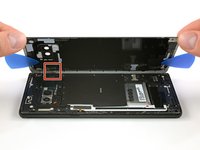
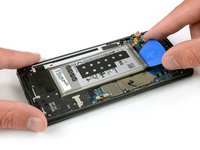
Use a suction handle to lift the back cover and create an opening pick to get in the gap.
-
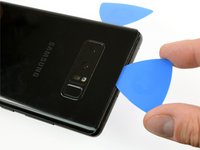
Start at the middle of the side and cut the adhesive while pulling up with the suction handle.
-
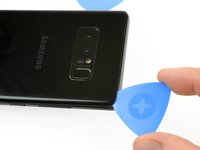
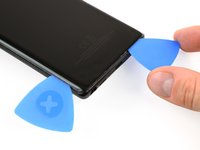
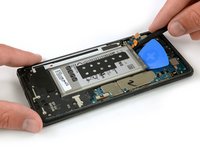
Move the pick towards the bottom corner and leave it there to keep the adhesive from resealing to the case.
-
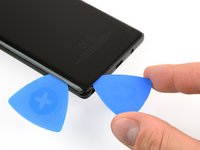
Use another pick and move it to the top corner.
I used an X-acto knife with the flat blade to get it started. I tried using the suction cup - but it’s difficult to get good leverage. Once I got the cover started - I used the metal pry tool (sharpened with a dremel file) and a business card to work it open.
This is definitely the hardest part.
Once off I see all the glue on the curved part of the chassis NOTON THE BACK. Apply heat to curved edges.
-
-
-
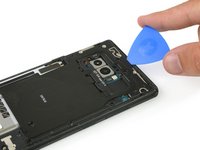
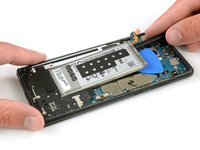
Again take another opening pick and carefully move it around the corner and along the top edge.
-
Reheat with an iOpener if necessary.
-
Leave the pick at the top right corner to keep the adhesive from resealing.
-
-
-
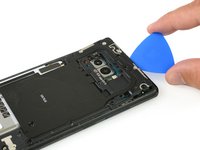
Rotate the device and start to separate the adhesive at the bottom with another opening pick.
-
Leave the pick at the bottom right corner to keep the adhesive from resealing.
-
-
-
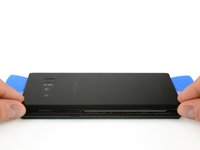
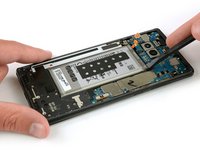
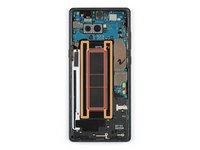
When the adhesive has been separated on all three sides properly you will be able to slowly lift the back cover.
-
Pay attention to the fingerprint sensor connector when flipping the back cover open. You might need to disconnect it as described in the next step.
I broke the back camera cover for the NUT 8 and then I bought a commercial cover and installed it but the quality of the picture became very bad and my question is, do you know where to get the original cover at a reasonable price?
-
-
crwdns2935267:0crwdne2935267:0Tweezers$4.99
-
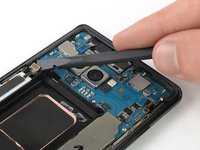
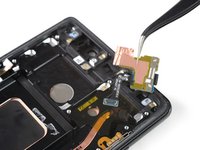
Use a pair of tweezers to disconnect the fingerprint sensor.
don't skip disconnecting the sensor, even if isn't still glued to the case. it has to move away from the NFC/charging coil assembly in order to free the latter so it can be lifted away from the battery.
-
-
-
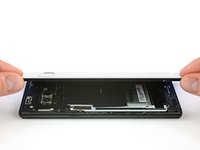
Remove the back cover.
How do you swap the fingerprint sensor
You can use a tweezer to swap the fingerprint sensor, you might be careful when doing the step 6, additionally, a tweezer will be helpful when reassemble the fingerprint sensor. please note that your new back cover needs to have the fingerprint adhesive on. most of the product did not have. i have get a LUVSS brand from amazon which came with all OEM adhesive and full set tools, even a B6000 glue, best option to go for replacing the note 8 back glass
-
-
-
Remove the ten Phillips #00 screws.
-
-
-
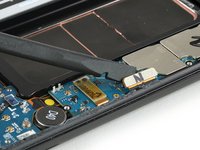
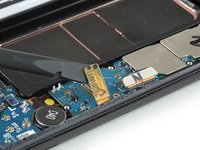
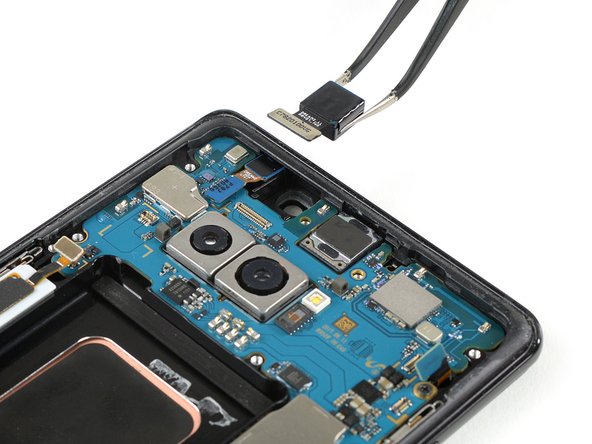
Use an opening pick at the top edge to get between the NFC antenna and charging coil assembly and the case.
-
Lever the top of the assembly out of the case.
-
-
-
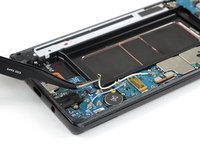
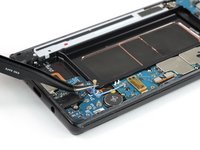
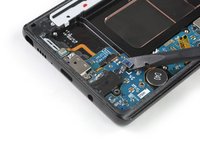
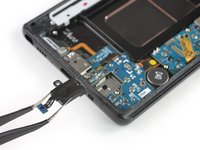
Carefully pull up the complete charging coil and NFC antenna assembly.
-
-
-
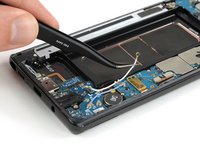
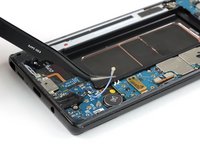
Use the flat end of a spudger to disconnect the battery connector.
-
-
-
-
Prepare an iOpener and apply it to the display for at least two minutes to loosen the adhesive beneath the battery. Reheat and reapply the iOpener as needed.
-
Alternatively or when the battery is blown up, you can apply some isopropyl alcohol under each corner of the battery and allow it to penetrate for several minutes to help weaken the adhesive.
Isopropyl alcohol worked great but flooded the main board and took all night to dry out
-
-
-
Use the flat end of a spudger to pry up the battery from the top right corner.
-
Use the spudger to pry up the battery until you can insert an opening pick to prevent the adhesive from resealing.
I really think this is much less risky if you just take out the motherboard. There is much less risk to heat the other components when you are loosening the battery adhesive and you can be more rough when getting the battery out. Especially (but not exclusively) if you are changing the screen anyway. Should be after step 29.
Additionally, I went at the battery from the side with a credit card and prying out the battery evenly across the length of the battery. I was even able to make a ‘ridge-peek’ from the card and screen and heat it from above while pushing down on the card and prying at eh same time. I got it out without any battery deformation. I would get one of those flat credit card shaped tools if I did it again because the credit card deformed and I had to keep flipping it.
Didn’t need to heat or use alcohol to get the battery out - just gently kept prying. I used the metal pry tool that came with the battery replacement tool kit. But very careful not to puncture the old battery.
-
-
-
Use the flat end of the spudger to pry up the top left corner of the battery where the flex cable is located.
-
Slide the spudger along the side of the battery to break apart remaining adhesive.
-
-
-
Lift the battery out of the case.
-
Remove any remaining adhesive from the phone, and clean the glued areas with isopropyl alcohol and a lint-free cloth.
do you mean when replacing display the battery should also be replaced?
Hi John,
Since you can replace the display without removing the battery, you do not need to replace the battery.
Great guide!
Quick note. If you are changing out the back cover or cant get touch ID reconnected Warm it up some on the back cover. It should pop right off with a spudger. Then reattach it inside the phone. Make sure the adhesive on back cover is sticky enough to hold it in place. Then set back cover on top!
-
-
-
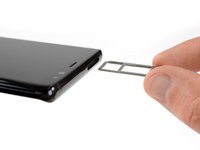
Insert a SIM card opening tool into the small hole on the left side of the top edge of the phone.
-
Press to eject the tray.
-
Remove the SIM card tray from the phone.
-
-
-
Remove the six Phillips #00 screws on the loudspeaker assembly at the bottom of the phone.
-
-
-
Use the flat end of a spudger to pry up the loudspeaker assembly.
-
Remove the loudspeaker assembly.
-
-
crwdns2935267:0crwdne2935267:0Tweezers$4.99
-
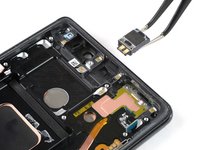
Remove the two coax cables running from the daughterboard to the motherboard.
-
Use a pair of tweezers to carefully disconnect both ends of the white coax cable and remove it.
-
-
-
Use a pair of tweezers to carefully disconnect both ends of the blue coax cable and remove it.
-
-
-
Use the flat end of a spudger to disconnect both the display and the touchscreen cables.
-
-
-
Use the flat end of a spudger to disconnect the power button flex cable.
-
Disconnect the flash and proximity sensor cable.
-
-
-
Use the flat end of a spudger to disconnect the flex connector of the front facing camera.
-
Carefully remove the front facing camera with a pair of tweezers.
-
-
-
Use the flat end of a spudger to disconnect the flex connector of the iris scanner.
-
Carefully remove the iris scanner with a pair of tweezers.
-
-
-
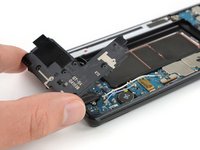
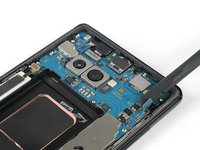
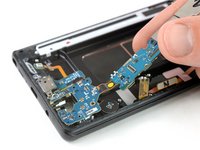
Remove the five Phillips #00 screws that hold down the motherboard, daughterboard, headphone jack and the charging port.
-
-
-
Use the flat end of a spudger to disconnect the headphone jack flex connector.
-
Carefully remove the headphone jack with a pair of tweezers.
-
-
-
Prepare an iOpener and apply it to the bottom part of the phone to loosen the adhesive beneath the microphone flex cable.
-
Use a pair of tweezers to carefully lift the microphone out of its recess and loosen it from the mid frame.
-
-
-
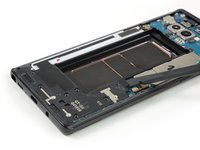
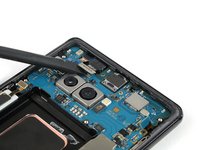
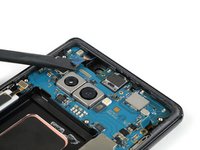
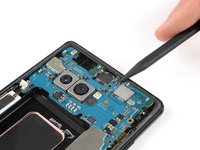
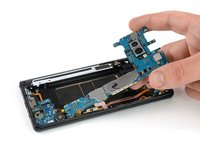
Use the pointed end of a spudger to pry up the motherboard until you can get a good grip.
-
-
-
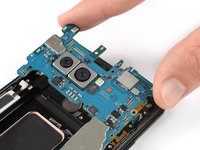
Carefully lift up the motherboard.
-
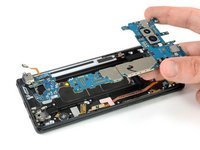
To lift the daughterboard out of its recess pull both components slowly towards the upper end of the phone whilst lifting upwards.
-
-
-
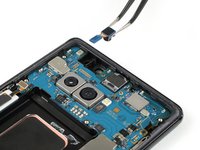
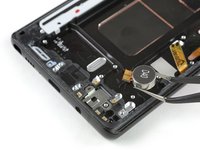
Prepare an iOpener and apply it across the phone to loosen the adhesive beneath the vibration motor at the bottom and the earpiece speaker at the top.
-
-
crwdns2935267:0crwdne2935267:0Tweezers$4.99
-
Carefully remove the vibration motor with a pair of tweezers. Keep an eye on its cable to not accidentally rip it.
-
Remove the earpiece speaker with a pair of tweezers.
-
-
-
Use a pair of tweezers to lift up the flash and proximity sensor cable and carefully loosen the tape holding it down to the mid frame.
-
Remove the flash and proximity sensor assembly.
-
-
-
To reassemble your phone transfer all components you removed to the new display assembly with frame. Reapply adhesive where it's necessary.
-


If possible, turn on your phone and test your repair before installing new adhesive and resealing the phone.
Follow these instructions in reverse order to reassemble your device. Apply new adhesive where necessary.
If possible, turn on your phone and test your repair before installing new adhesive and resealing the phone.
Follow these instructions in reverse order to reassemble your device. Apply new adhesive where necessary.
crwdns2935221:0crwdne2935221:0
crwdns2935229:043crwdne2935229:0


crwdns2947412:010crwdne2947412:0
i would like to suggest a time of (52) Minutes and (36) Seconds plus thanks for the guide
check, plus you’re welcome :)
great guide!
Very excellent guide. Great pictures. Pictures must have been done in some sorta studio setting or edited for only what is needed for the illustration of every step. This was my first attempt at self repair on a cellphone, but I’m no slouch. I repair and refurbish all sorts of electromechanical devices and was once employed to do brain surgery on massive water cooled mainframe computers. Some of the same rules apply; have proven procedures, follow instructions, control your work space, and invest in the best tools. Since this was my first, I was not in a hurry. It took me all of 6 hours, but I was meticulous, repeated many steps to increase my confidence, and had all the time needed to do what I needed to do. Grateful for no longer being a slave to phone repair/insurance scams!! DIY forever!
Thanks for the great guide. Unfortunately, ifixit does not stock Note 8 parts in Australia. When I went to purchase the display assembly with frame from a parts supplier, they refused to sell me the part as they said that a number of customers have experienced the LCD not working on the new assembly after repairing their phone. The wholesaler would not honour the warranty as all screens are tested before dispatch, therefore, the LCD must have been damaged in the repair process. I could understand if the repair included installing a new screen into an existing frame but because all parts are being transferred into the new assembly and the parts available for sale all come with adhesive, is there any step where it is likely that the LCD could be damaged even if extremely careful?
Hello Ifixit team, regardind note 8, I have the Corean model SM-N950N, can you tell if it has the same display assembly as SM-N950F?
What I mean is does all the connectors of a 950F display fit perfectly to a 950N board and frame and everything, reason is the 950N board I have is a 256gb storage and I don’t want to switch to 950F board with only 64gb storage, thanks in advance, Adrian
You may want to check the compatibility list of the spare part here: Galaxy Note8 Screen
Unfortunately, the Korean model (905n) is not listed separately but the part seems to fit every other model. So my guess is that the Korean version won’t be any different and the part will fit. Google searching for a spare motherboard might shed some light on different dimensions if they are some due to the difference in storage.
Thanks for the amazing guide! Really clear and worked well for my phone.
Here are a few notable things from my attempt:
- It would be very nice to know that a new battery might be required in the “necessary parts” in the very beginning. I only found out this on step 15 and I was already at removing the battery. At the end, i used my original one and don’t think there’s really an issue.
- Step 31 was by far the hardest - if you’re considering / attempting to perform the fix, pay extra attention to removing the vibration motor and earpiece speaker. They aren’t really easy to pull off with the tweezers as the pictures suggest, even after heating up the other side.
I ended up breaking the earpiece speaker in half and exposed the copper coil there..which i almost tore from some pulling. Luckily, it still works, but the quality is a little bit worse than it was.
Overall, though…very happy that this comprehensive guide exists! My phone looks brand new right now…save for the very slightly misplaced back panel.
Thanks!
Salve,il mio display ha già il frame però non ci sono i pulsanti in alluminio Come faccio a rimuovere i pulsanti cortesemente Grazie
@isakrittl of course I have checked the compatibility on the site before I asked, but still not confirmed, it’s not so easy and convenient to “try” and buy the part in hope it works, thats the reason I asked here where you guys dissasemble a lot of devices and my note 8 among them, this is the reason I asked thinking you guys know about all its variants, even technicians from repair shops I went to have different oppinions some say it’s a single display for all note 8 variants some say it’s different for 950N at least, so I want to know for sure before I order, thanks
I used a heat gun to soften the glue - worked it around the edges, moving the heat gun quickly. As this is my first attempt, I’m still calibrating on this - but other guides mention getting the back cover hot enough so as it’s just too hot to touch. I also have a temp probe on my multi-meter, and I measured appx. 75 deg. C.
One of the other guides showed using a electronics hot plate set to 105 deg C for 60 sec.
Phil Brooks - crwdns2934203:0crwdne2934203:0