
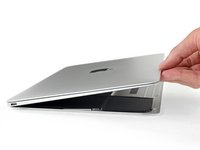
Retina MacBook 2017 Upper Case Assembly Replacement

crwdns2944107:0crwdnd2944107:0Tobias Isakeitcrwdnd2944107:0crwdnd2944107:0crwdnd2944107:04crwdnd2944107:0crwdne2944107:0
crwdns2944111:0Kul 20, 2023crwdne2944111:0
crwdns2915892:0crwdne2915892:0
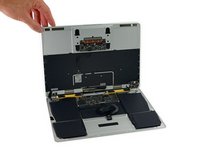
crwdns2942287:0crwdne2942287:0The upper case assembly includes the keyboard. Use this guide to replace the entire case/keyboard assembly as a single unit.
crwdns2942213:0crwdne2942213:0
crwdns2943213:0crwdne2943213:0


crwdns2943215:0crwdne2943215:0


crwdns2944105:0crwdne2944105:0

-
-
Power on your Mac and launch Terminal.
-
Copy and paste the following command (or type it exactly) into Terminal:
-
sudo nvram AutoBoot=%00
-
Press [return]. If prompted, enter your administrator password and press [return] again. Note: Your return key may also be labeled ⏎ or "enter."
-
sudo nvram AutoBoot=%03
-
-
crwdns2935267:0crwdne2935267:0Magnetic Project Mat$19.95
-
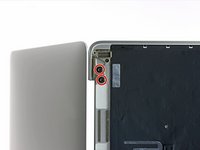
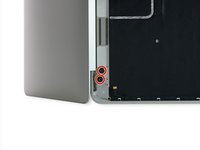
Remove the following eight screws securing the lower case:
-
Two 1.8 mm P5 Pentalobe screws
-
Four 2.9 mm P5 Pentalobe screws
-
Two 6.1 mm P5 Pentalobe screws
-
-
-
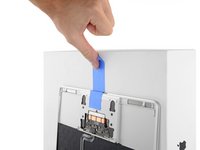
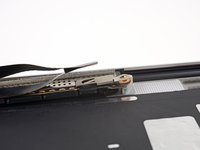
Wedge your fingers between the upper case and the lower case, starting from the rear of the MacBook between the hinges.
-
Keeping a firm grip, lift steadily until the lower case separates slightly from the upper case.
-
-
-
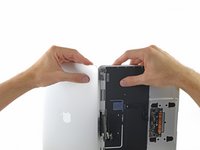
While holding the lower case in place, carefully flip the MacBook over so the Apple logo faces up.
-
-
-
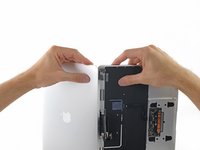
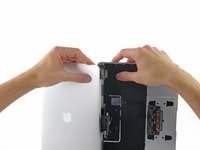
Lift the upper case and display together from the front edge and raise it to about a 45˚ angle.
-
-
-
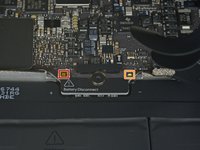
Use the flat end of a spudger to press and hold the small gold 'battery disconnect' button.
-
If the power LED is lit up, continue holding the button until the LED goes dark, and then release. This may take up to 10 seconds.
-
If the LED does not light, release the button after 5-10 seconds. Press and hold it again for 5-10 seconds, and release. Finally, press and hold it a third time for 5-10 seconds, and release.
-
-
-
Close the MacBook and carefully flip it upside-down.
-
-
-
Lifting from the front edge, open the lower case to an angle of about 45°.
-
-
crwdns2935267:0crwdne2935267:0Tweezers$4.99
-
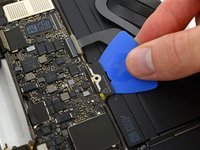
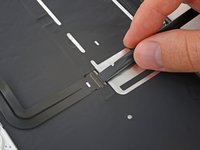
Use tweezers to peel back the tape covering the trackpad cable ZIF connector.
-
-
-
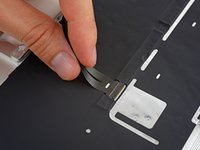
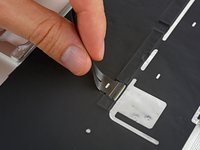
Use a spudger to carefully flip up the retaining flap on the trackpad cable ZIF connector.
-
-
-
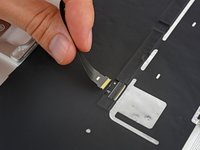
Disconnect the trackpad ribbon cable from the trackpad by pulling it gently through its slot in the frame.
-
-
-
Carefully close the MacBook and flip it over once again, so that the Apple logo faces up.
-
Lifting from the front edge, raise the upper case/display assembly to about a 90° angle, and prop it up against something sturdy so you don't have to hold it.
-
Add a piece of tape near the track pad to secure the upper case and prevent accidental movement.
-
-
-
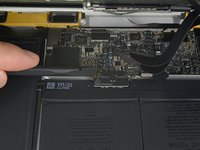
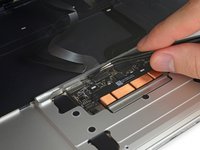
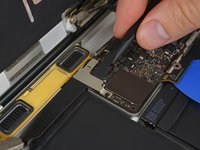
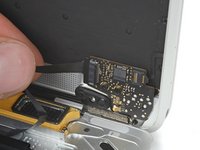
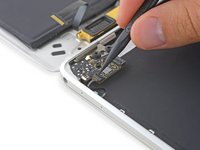
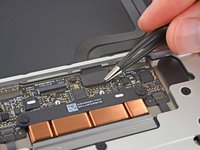
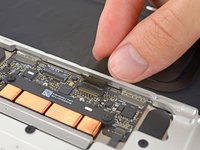
Remove the single 2.9 mm T5 Torx screw securing the battery connector to the logic board.
-
-
crwdns2935267:0crwdne2935267:0Battery Blocker$3.99
-
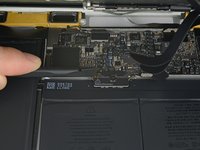
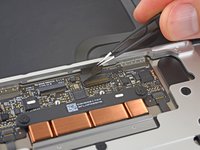
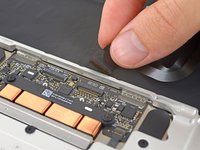
As an added precaution, you may physically disconnect the battery by inserting a battery isolation pick between the logic board and the battery connector.
-
-
-
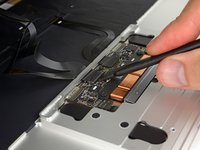
Remove the two screws securing the USB-C port cable bracket:
-
1.1 mm Phillips #00 screw
-
3.5 mm T5 Torx screw
-
-
-
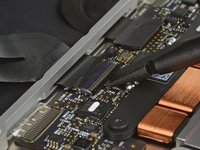
Use the flat end of a spudger to disconnect the USB-C port cable bracket by prying it straight up from the logic board.
-
-
-
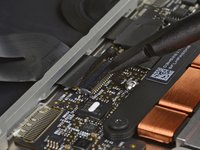
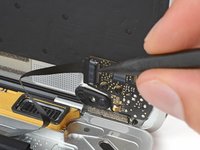
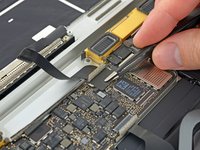
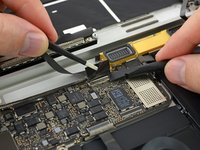
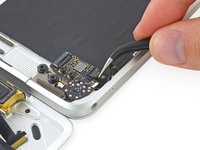
Use a spudger to flip open the retaining flap on the audio jack board cable ZIF connector.
-
-
-
Disconnect the audio jack board ribbon cable by pulling it straight back out of the ZIF connector.
-
-
crwdns2935267:0crwdne2935267:0Tweezers$4.99
-
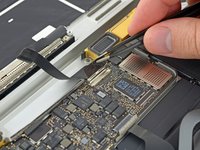
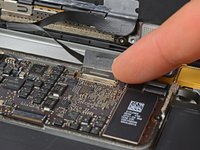
Use tweezers to peel back the tape covering the display cable connector.
-
-
-
If so, use the flat end of a spudger to hold down the retaining flap while peeling the tape away with the tweezers.
-
-
-
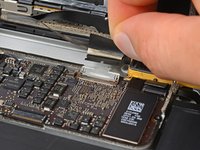
Use the flat end of a spudger to flip open the retaining flap on the display cable connector.
-
Try to keep it clear of the tape, or it may re-adhere and make cable removal difficult.
-
-
crwdns2935267:0crwdne2935267:0iOpener$14.99
-
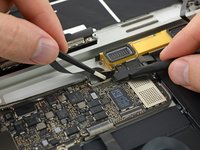
Carefully slide the flat end of a spudger underneath the display cable to separate the adhesive holding it to the lower case.
-
-
-
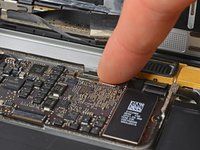
Hold the retaining flap open.
-
Disconnect the display cable by gently pulling it straight out of its connector.
-
-
-
Separate the upper case assembly from the lower case assembly.
-
-
-
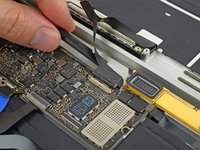
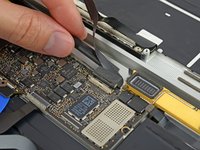
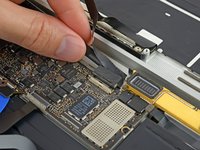
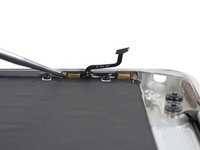
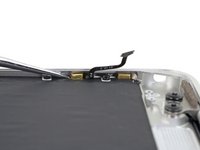
Use a spudger to flip open the ZIF connector retaining flap for the dual microphone assembly ribbon cable.
-
-
-
Disconnect the microphone assembly ribbon cable by pulling it straight out of its connector.
-
-
-
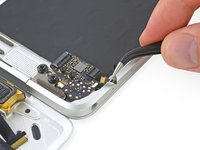
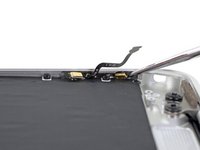
Remove the two 3.2 mm T5 Torx screws securing the audio jack board to the case.
-
-
-
Prepare an iOpener and apply heat to the upper case directly behind the microphone assembly.
-
-
-
Use a fine-tip probe or pick to gently peel the dual microphone assembly away from the case.
-
-
-
Remove the dual microphone assembly.
-
-
-
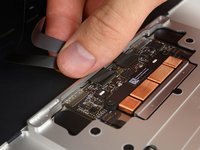
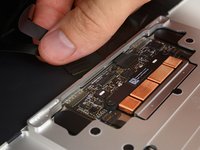
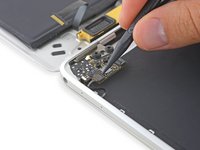
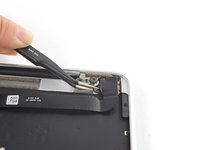
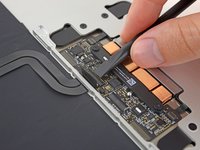
Remove two 2.5 mm Phillips #00 screws securing the USB-C port.
-
-
crwdns2935267:0crwdne2935267:0Tweezers$4.99
-
Use tweezers to lift the USB-C port just over the hinge screws.
-
Slide the port out and up over the display hinge to remove it.
Successful completion of USBC in 20 minutes with following notes
1 the replacement part has to have the ribbon folded to match the original or will it foul the display case large screw. You know this when you can’t put the two big Pentalobe screws in on the final case install
2 my USBC part looks identical to the original, but the port has some motion even with the screws tight. I’m wondering about this a bit. I’m confident I did not cross thread the screws.
i measure the thickness of the original USB C port board at the two Phillips screws as 325 microns +_25 umicrons
I found the same problem with the new part moving a lot after installation even with the screws tight, and realised the problem is the new part does not come with the black rubber seal that goes around the connector (you can see it in pic 3 step 25). I moved that across from the old part to the new one and now it seems very tight.
Step 25 only has one pic
John M -
He means 3rd pic of step 26.
dmjenks -
If you are removing the screen (to replace the top case, for example), do this step afterwards. It is much easier this way.
No luck, the port seems to be wedged in behind the computer’s hinge. But you need to remove USBC port BEFORE you remove the display. Soooooooo any other tips?
The screws on the hinge aren’t in the way, it’s hitting right up near the edge of the computer itself.
remove the two screws under the rubber piece to disconnect the display. I didn’t have to completely remove it, just enough to slide the pieces in and out
totally worked! saved me about $550 doing it myself so you have my eternal gratitude
I found it impossible to remove the USB type C port during this step and instead continued with the next 2 steps and after separating the display found that the USB type C port was effortlessly removed……hope that helps someone
I think it’s a pretty $@$*!& tutorial. Sorry to be blunt.
It is essentially missing about 3 final steps that show the replacement piece so one can appreciate it.
I read the tutorial, thought it’s all clear and then bought the piece except it was an incomplete piece. Since the tutorial is missing the last three steps, I could not judge the piece and essentially got lured buying an incomplete piece.
I don’t understand why here in this picture it looks like the black ribbon is turning away from the port but for the piece I bought, die black ribbon goes in the same direction as the port: Retina MacBook 2016 Teardown .
-
-
-
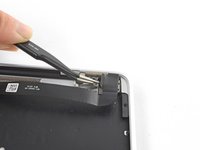
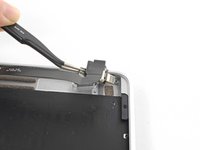
Remove the two 3.3 mm T5 Torx screws securing the display cable assembly.
-
-
-
Fully open the display.
-
Set the MacBook down on its right edge with the display facing away from you, as shown.
-
-
-
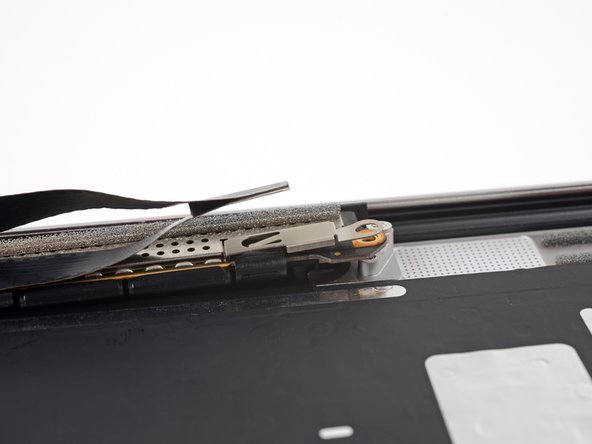
Remove the four 4.8 mm T8 Torx screws securing the display hinges.
-
-
-
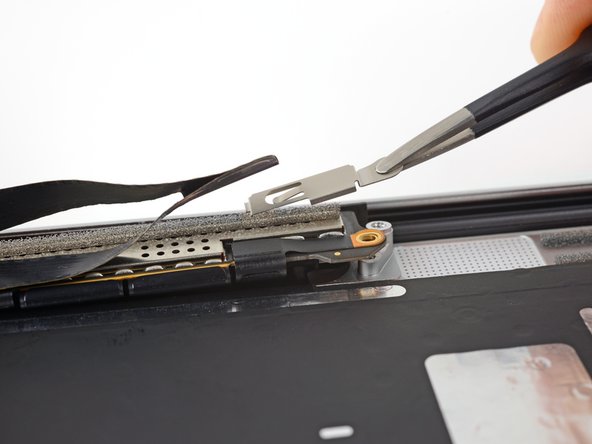
Holding the display assembly with one hand and the upper case with the other, push them together slightly to move the hinges out of their recesses in the the upper case.
-
Push the upper case forward while pulling back gently on the display.
-
Once the two display hinges have cleared the upper case, remove the display and set it aside.
-
-
crwdns2935267:0crwdne2935267:0Tweezers$4.99
-
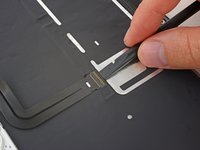
Use a pair of tweezers to remove the tape covering the keyboard ribbon cable connector on the trackpad.
-
-
-
Using a spudger, flip open the retaining flap on the keyboard ribbon cable ZIF connector.
-
-
-
Gently pull the keyboard ribbon cable out of its slot in the frame.
-
-
-
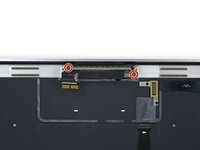
Remove the five 2.5 mm T3 Torx screws securing the trackpad to the case.
-
-
-
Use a spudger to flip up the retaining flap on the keyboard ribbon cable ZIF connector.
-
-
-
Gently peel the keyboard ribbon cable up from the case, and remove the cable.
-


To reassemble your device, follow these instructions in reverse order.
To reassemble your device, follow these instructions in reverse order.
crwdns2935221:0crwdne2935221:0
crwdns2935229:011crwdne2935229:0
crwdns2947821:0crwdne2947821:0
crwdns2947823:0crwdne2947823:0


crwdns2915084:0crwdne2915084:0

Tobias Isakeit - Repairability Engineer crwdns2935289:0Tobias Isakeit - Repairability Engineercrwdne2935289:0
Business
crwdns2934841:01crwdne2934841:0
crwdns2935297:01.144crwdne2935297:0
crwdns2947412:03crwdne2947412:0
kann ich mein deutsches Topcase mit einem z.B. UK Topcase austauschen
diese sind leichter zu kaufen und das andere Tastaturlayout wäre auch nicht das Problem
Hallo benny.joos98, es ist sehr wahrscheinlich möglich ein UK Topcase zu verwenden. Frage aber sicherheitshalber noch mal im Forum nach; eventuell hat bereits schon jemand diese Art von Tausch gemacht und kann mehr/genaueres darüber sagen: https://www.ifixit.com/Answers/Device/Re...
Thanks for the guide! Is there any reason I couldn’t change my EU keyboard top case with a US keyboard top case for this model?