
PDP Victrix Pro BFG Battery and Trigger Replacement

crwdns2944107:0crwdnd2944107:0ryanmorabitocrwdnd2944107:0crwdnd2944107:0crwdnd2944107:02crwdnd2944107:0crwdne2944107:0
crwdns2944111:0Mud 4, 2025crwdne2944111:0
crwdns2915892:0crwdne2915892:0
crwdns2942287:0crwdne2942287:0If you are having trouble with turning on your PDP Victrix Pro BFG Controller or having trigger problems, this guide will help you. This guide takes you through how to open up your controller, replace your batteries, and replace your triggers. If you have any problems or need to fix anything else related to this controller, please visit our troubleshooting page.
crwdns2942213:0crwdne2942213:0
crwdns2943215:0crwdne2943215:0


crwdns2944105:0crwdne2944105:0
-
-
Use the purple Module Swap Tool that comes with the device to remove the 4 hex screws.
-
Remove the joystick/button modules from the controller.
-
-
-
Remove the screws from each of the module compartments using a PH0 or J1 bit.
-
-
-
Using the iFixit opening tool, gently pry open the two side grips.
-
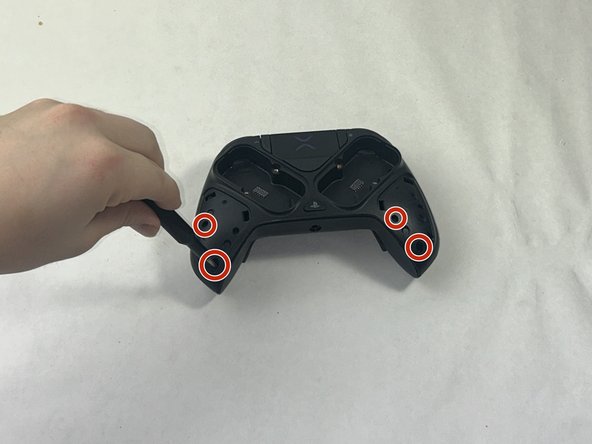
Using a PH0 or J1 screwdriver bit with a 4mm diameter or less, remove the screws located in the bottom outside corners.
This is almost impossible to do with the prybar tool. I had to use a size 1 Slot bit from the screwdriver kit instead.
-
-
-
Flip the controller to the other side so the label on the bottom is facing upwards.
-
Using the same PH0 or J1 screwdriver bit from the previous steps, remove the screw.
-
-
-
Flip the controller so the charging port of the controller is facing you.
-
Using a spudger, carefully pry open the front component.
This step is not necessary, and I can't seem to find a way to complete it without damaging the plate in question. Best to leave it alone unless you need to access the trackpad or Option/Share and Function buttons.
-
-
-
Flip the controller so it is upside-down, but the charging port is still facing you.
-
Use the flexible piece attached to the screwdriver to remove this screw.
-
Now that everything is loosened, gently pry open the controller along the grooves.
-
-
-
Using the screwdriver tool with a smaller head, remove the three screws from each trigger.
-
Remove the triggers.
-
-
-
Using the screwdriver, remove the two screws in the bottom two corners.
-
Using the halberd spudger, carefully pry the circuit board open.
-
-
-
To remove the batteries, use a pair of tweezers to carefully unplug the batteries from the circuit board.
-


To reassemble your device, follow these instructions in reverse order.
To reassemble your device, follow these instructions in reverse order.
crwdns2935221:0crwdne2935221:0
crwdns2935229:02crwdne2935229:0

crwdns2915084:0crwdne2915084:0

UMass Dartmouth, Team 1-1, Santin Spring 2024 crwdns2935289:0UMass Dartmouth, Team 1-1, Santin Spring 2024crwdne2935289:0
UMASSD-SANTIN-S24S1G1
crwdns2931471:03crwdne2931471:0
crwdns2935297:03crwdne2935297:0
crwdns2947412:02crwdne2947412:0
Only guide I could find to get this controller apart for my son. Now have to find someone to resolder the USB c port.
R2 and L2 no response, the board location for button?