
Nintendo Switch Battery Replacement

crwdns2944107:0crwdnd2944107:0Craig Lloydcrwdnd2944107:0crwdnd2944107:0crwdnd2944107:012crwdnd2944107:0crwdne2944107:0
crwdns2944111:0Ndz 29, 2025crwdne2944111:0
crwdns2915892:0crwdne2915892:0
crwdns2942287:0crwdne2942287:0Follow this guide to replace an old and degraded battery in the Nintendo Switch game console.
The Switch uses JIS screws, but you can use a Phillips screwdriver in a pinch. Be very careful not to strip the screws. iFixit's Phillips bits are designed to be cross-compatible with JIS-style screws.
When you remove the shield plate, you’ll need to replace the thermal compound between the plate and the heatsink. Since normal thermal paste isn’t designed to bridge large gaps, the closest replacement is K5 Pro viscous thermal paste.
This guide, and the part we sell, are compatible with the original Nintendo Switch model released in 2017, as well as the newer refreshed model released in 2019 (model numbers HAC-001 and HAC-001(-01), respectively).
For your safety, discharge the battery below 25% before disassembling your Switch. This reduces the risk of a fire hazard if the battery is accidentally damaged during the repair. If your battery is swollen, take appropriate precautions.
crwdns2942213:0crwdne2942213:0
crwdns2942215:0crwdne2942215:0
crwdns2942339:0crwdne2942339:0


crwdns2943213:0crwdne2943213:0


crwdns2943215:0crwdne2943215:0


crwdns2944105:0crwdne2944105:0

crwdns2936621:0crwdne2936621:0
-
-
Press and hold down the small round button on the back of the Joy Con controller.
-
While you hold down the button, slide the controller upward.
-
-
-
Continue sliding the Joy Con upward until it's completely removed from the console.
-
-
crwdns2935267:0crwdne2935267:0Magnetic Project Mat$19.95
-
Use a Y00 screwdriver to remove the four 6.3 mm-long screws securing the rear panel.
-
-
-
Use a JIS 00 driver to remove the following screws securing the rear panel:
-
One 2.5 mm-long screw on the top edge of the device
-
Two 2.5 mm-long screws on the bottom edge of the device
-
-
-
Use a JIS 00 driver to remove the two 3.8 mm center screws on the sides of the device (one on each side).
-
-
-
Use your finger to flip up the kickstand on the back of the device.
-
-
-
Use a JIS 00 driver to remove the 1.6 mm screw in the kickstand well.
-
Close the kickstand.
-
-
-
Open the game card cartridge flap.
-
Lift the rear panel up from the bottom of the device and remove it.
-
-
-
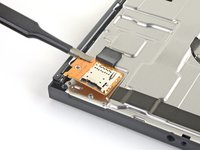
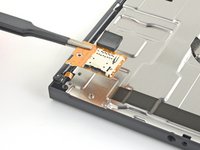
Use a JIS 00 driver to remove the 3.1 mm screw securing the microSD card reader to the device.
-
-
crwdns2935267:0crwdne2935267:0Tweezers$4.99
-
Use your fingers or a pair of tweezers to lift the microSD card reader straight up from the device to disconnect and remove it.
Yes. The reverse is not so simple- you can’t see what you’re doing when you attempt to reconnect and it only takes one small error to completely bend the contacts on the connector. Very delicate.
if you very gently remove the foam pad sticker, you can at least see better how it lines up and can feel your way to a degree… then you can stick the pad back in. The pad seems pretty critical in keeping things in place once reassembled.
Definitely agree about not sticking the foam pad back on until the new SD card slot is connected. Saved a lot of headache. Great walkthrough and easy repair!
Tried several times to replace this SD reader module. As mentioned above, the issue is aligning the connectors together. It appears the foam tape is being used to hold the connection in place. (assuming you can make a viable connection) I am rather surprised at this design. In my experience, mylar ribbon cables like this usually slide into a small PC mounted socket. It appears Nintendo went the cheap route here. This design is prone to failure since it does not enable a positive connection - at least from what I can see.
Alors je suis en détresse total . Jai cassé les bouches en or sur le connecteur qui est soudé sur la carte mère.. comment changer cette toute petite pièces, oû la trouver . Cela fais 1 mois que je cherche partout. Sans remplacer la carte mère. Merci pour vos réponses
I found it easier to connect it without the black foam pad so I could see and than add the foam pad over it. It was super easy and I an I 33 Mom doing this for my son. Was well worth the money for the kit saved us almost 100 bucks
Had my son follow this guide to fix his own switch where the ad card reader didn't work. And he did. Great instructions!!!! Thanks a million!
The only difficult part of following this guide is connecting the new sd card reader into the poorly designed motherboard connector. Its quite possible the sd card reader that came in the console wasnt broken at all.
The repair kit works just as advertised and even comes with stickers.
I’m still getting error 2002-2054 even after replacing memory card reader module. Thanks, Nintendo!
My switch won’t read my microSD card after I reassembled it (error 2016-0641) please help!
Tip: Keep the old SD reader piece loosely attached while you line up and gently press the new SD component into the connector on the motherboard. Once the new piece is snug, then carefully remove the old piece keeping the sticky foam in place.
I am a middle-aged mom with absolutely no special tech skills and I easily followed the directions and successfully fixed the broken SD drive. ifixit is the best!
Ah good! i have more confidence now in doing it once you said you're a middle age mom with no experience
I missed this bit about reconnecting the SD card reader under the foam pad and didn’t realise until my son pointed out a data storage problem?. All fixed in about 5 minutes taking advice from the replacing the SD card reader fix, especially removing the foam pad from the connector to better see and feel what you’re doing. All sorted!
Awesome guide! Very easy to do with the supplied kit
Tank you very much, and by tank I mean M1 Abrams, jokes apart easy and simple to follow
Thanks for the guide, I was struggling to find a solution, replaced more sd cards, before I stumbled upon this post. The Switch of my children works flawless again!
Doesn’t work! I have spent 4 hours and $26 on a tiny screwdriver and some stickers.. I just gave up and replaced the Switch instead.
I even contacted a local shop to have them fix it and they told me it really isn’t possible. Thanks for taking my money Ifixit!
This helped me to reseat my SD card reader ribbon cable. I was getting the 2016-0641 error and no card work. A drop had dislodged the cable partially. And yes remove the foam pad gently to properly connect the cable. You can reuse the foam pad.
For anyone who ends up bending the pins like I did while trying to reseat the microSD card reader…
I suggest gently placing very thin tweezers (like the curved ones in the Pro Tool Kit) in the gap and very, very gently pressing them back into alignment. Took a little effort but I was able to realign them enough to sit it in place and have it later working after reassembling the console.
Anyone have a suggestion where I can purchase replacement foam for this sticker?
When reassembling, note the alignment pins in the left and bottom notches before tightening the screw
Super gemakkelijk te installeren met behulp van deze zeer duidelijke handleiding (met dank aan de vertalers!)
Wel even goed opletten op de aansluiting op het moederbord is zeer fragiel.
It is key to remember most out of the box issues with the SD card reader, do not require a replacement part and can be solved with disconnecting then re-connecting the reader at the motherboard.
Only when a simple re-seating at the connector doesn't work should you buy the replacement part.
I bought the kit and followed the directions. I plucked the black rubber foam off with a pair of eyelash tweezers. Putting the tiny screws back in place also was made easier using the tweezers. As for placing the SD card in place I think I got a bit lucky. I lined it up and gently pressed until it simply went into place. I do believe being gentle is the key there. But it went in and I put it back together. The deconstructing and reconstructing is what took the longest for me at least. I turned it on to verify it worked and then unpowered the unit and inserted the card. The system recognized and update right away and did it and then recognized the card! Just what I need for 20 something dollars. Son is happy and back to gaming.
Thank you for postingthis fix. The original sd card reader had come unplugged from the motherboard, so replacement reader will be a spare.
Anybody found a way to ensure the sd reader stays in place?
It was my first time repairing a Switch and the fan replacement wasn't too hard, but unfortunately I think there should be a better warning about the SD card connector because I damaged it while trying to put it back in. I couldn't hear any click and it didn't seem to stay put and I think I ended up applying to much force and damaging the pins.
What are the foam black squares called and where can I get a replacement for one?
It’s called Foam tape
Alberto -
What is the error code 404 for
Managed to push the connector back in with foam on, used back of plastic tool to push secure and once completed was able to use the SD port again. Brilliant little guide.
so how would you theroedictly put the old slot back on.
and how does if even work
Horrible guide, incomplete. Needs to show how to reattach the new reader but doesn't show anything. This makes it incredibly easy to bend pins that become incredibly difficult to fix. Ended up bending pins on the connector beyond repair as I didn't know what to look for or how to reattach it. Wouldn't recommend
Tried to do this, everything went smoothly I thought, but when I turn on system w SD card in the new slot, immediately freezes up the system completely until I hard shut down. Did I do something wrong?
"Draw the rest of the !@#$ing owl"
I have an issue that when I insert the SD card with the case off (to test the connection is correct), the switch reads it no problem. When I put the case back on, it no longer reads it. Anyone else experienced this?
This bullshit replacement part broke after two weeks of use, and now the connector on the board is damaged. My Switch is probably &&^&@@.
Thanks, iFixit!It was easy to remove, but harder with the black sponge to install. I initially did not take it off (on Install) and just place it in the hole. Luckily I tried the micro sd card and the switch did not detect the card. I then removed the black sponge and was very easily able to connect it back in the correct location and then continue assembly after verifying it was working fine. Some of the folks on this thread seem to be treating it like it is not super delicate electronics.
The screw fell out. where can i find a new one?
Bonsoir a tous, question : tous les port micro sd sont compatibles ? Je l'ai installé et ca ne reconnaît pas ! Peut être il y a des références ? Merci
-
-
-
Use a JIS 00 driver to remove the six 3 mm screws securing the shield plate to the device.
-
-
crwdns2935267:0crwdne2935267:0Tweezers$4.99
-
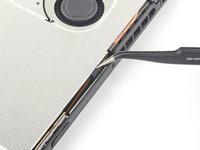
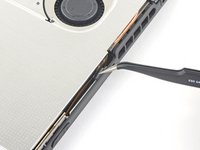
Use your fingers or a pair of tweezers to peel back the piece of foam on the top edge of the device near the fan exhaust port.
-
-
crwdns2935267:0crwdne2935267:0iFixit Thermal Putty$9.95
-
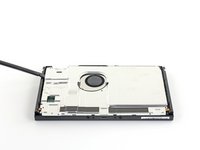
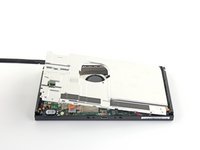
Insert a spudger underneath the shield plate along the edge of the device.
-
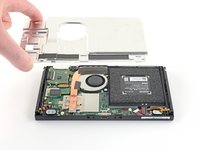
Pry up to lift the shield plate and remove it from the device.
-
You can reuse the pink thermal compound if you're careful. Keep the compound clean and make sure it makes solid contact between the heat sink and the shield during reassembly.
-
If you need to replace it, refer to our thermal paste guide to remove the old thermal compound and replace it with an appropriate compound, such as thermal putty or K5 Pro, during reassembly.
-
-
-
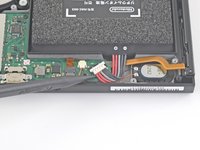
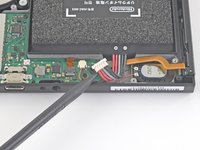
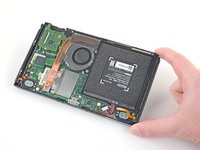
Use the point of a spudger to pry the battery connector straight up and out of its socket on the motherboard.
-
-
crwdns2935267:0crwdne2935267:0iFixit Adhesive Remover$19.99
-
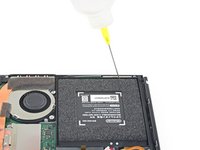
Apply a few drops of adhesive remover or high-concentration (90% or higher) isopropyl alcohol inside the battery well along the top edge to weaken the adhesive.
-
-
-
Tilt the top edge of the device upward to allow the isopropyl alcohol to work its way underneath the battery.
-
Hold for 1-2 minutes to allow time for the isopropyl alcohol to weaken the adhesive.
-
-
-
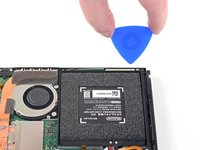
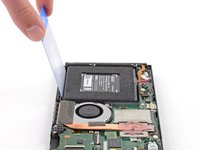
Insert an opening pick into the gap between the battery and the wall of the battery well.
-
Carefully dig the tip of the opening pick underneath the battery and slide it along the edge to begin slicing the adhesive.
-
-
-
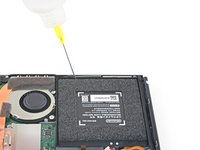
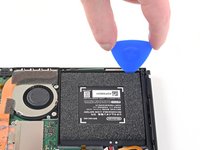
Leave the opening pick in place and apply a few more drops of adhesive remover or isopropyl alcohol inside the battery well.
-
Tilt the top edge of the device upward and wait 1-2 minutes for the isopropyl alcohol to weaken the adhesive.
-
-
-
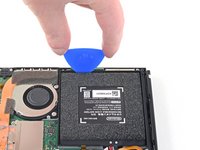
Continue sliding the opening pick deeper along the top edge of the battery, slicing more of the adhesive underneath.
-
-
crwdns2935267:0crwdne2935267:0Plastic Cards$2.99
-
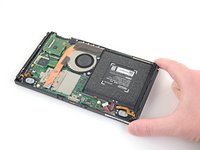
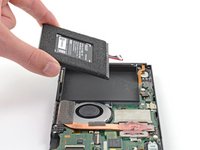
Once there's enough room, insert a plastic card underneath the battery and slowly pry the battery up.
-
Remove the battery.
-
-
crwdns2935267:0crwdne2935267:0Microfiber Cleaning Cloths$3.99
-
Use adhesive remover or isopropyl alcohol and a microfiber cloth to clean up any remaining adhesive left behind in the battery well before you install the new battery.
-


To reassemble your device, follow these instructions in reverse order.
For optimal performance, calibrate your newly installed battery after completing this guide.
Take your e-waste to an R2 or e-Stewards certified recycler.
Repair didn’t go as planned? Try some basic troubleshooting, or ask our Nintendo Switch Answers community for help.
crwdns2935221:0crwdne2935221:0
crwdns2935229:0226crwdne2935229:0
crwdns2947821:0crwdne2947821:0
crwdns2947823:0crwdne2947823:0


crwdns2947412:064crwdne2947412:0
Can anyone confirm that Switch will NOT work with the battery removed or dead (dead as in once it’s totally non-functional as all lithium batteries eventually are, not dead as in just discharged but the battery works).
PSP works with the battery dead or pulled, as far as I know DS, 3DS, Vita and Switch do NOT, which is a gigantic design flaw.
Yes. The battery of my Switch has been wearing down over some time, to the point where I had to charhe the device for some hours to even activate it - it isn't functional without a working battery.
I would highly recommend against keeping dead batteries in any system, as this can cause damage to the motherboard of the device. If you experience your Switch randomly turning off while its battery is dead, immediately seek to get the battery removed or replaced.
While it is considered rare, dead batteries can sometimes reverse in polarity when its voltage is too low. This can damage the motherboard or other components unexpectedly.
Reboot -
Why can't you reuse the switch's battery?, if I'm just replacing the shell of the switch and have to move the battery why can't I reuse the battery in the new shell?
Good question!
For safety reasons, we strongly discourage people from reusing a battery once it has been removed. Bending a lithium-ion battery even slightly can create uneven spots between the thin layers inside the battery. The battery may function fine for awhile, but over time and charge cycles, the uneven area can wear down faster, eventually resulting in an electrical short. The battery would fail, swell up, and possibly catch on fire.
I left my switch off for months, and now I cant charge it in anyway. It was a hacked switch, it doesnt turn on, doesnt indicate that's its charging or show anything on screen even after being plugged in for few days, does replacing the battery fix my issue?
Hi Matt. With a modded switch, once the battery loses power you will not see anything on the screen while it is charging. After plugging it in for a while just try booting it in the method you normally do. (I prefer using the RCM loader tool as it lets you bypass the annoying jig method.) If that doesn’t work for you, then yes, it’s most likely your battery. Hope that helps!
I am in exactly the same situation and have ordered this kit to see if it will resurect the hacked switch before I drop 499 on a new one. I'll report back in a few days once I get this done
SYSDmg -
I have a switch in the same state did replacing the battery fix it for you?
I would recommend plugging in your Switch to a computer (preferably with the libusbk driver installed). If your computer recognizes the Switch, and even better, if tegrarcmsmash gui shows that a Switch is detected in recovery mode, this means that your Switch is softbricked, and you'd need to figure out how to unbrick it. If nothing is detected at all, this means your Switch, the connected cable, or either of the USB sockets of your computer/Switch might be malfunctioning. Try different cables and ports, and if that doesn't help, you might need to troubleshoot further or send your Switch in for repair.
Reboot -
This helped me, my power button isn't responsive and had to turn it off and on. I skipped the battery and just pulled the chip with tweezers blow on it and put everything back together.
I had a problem taking off the plastic on the back near the earphone jack on step 6, you might want to give tips on how to remove it easier.
I’m a little new to this scene, but I am curious. Do you have to replace it with the same type of battery that comes with the switch or are you able to buy a different battery to possibly upgrade the switches battery life?
Do both switches run the same battery? and if not, are you able to install the Switch V2 battery into the V1 console?
Hopefully i’m making sense lol, thank you :D
The Switch v2 has the same battery as the launch-model Switch. The newer one gets better battery life through a more efficient CPU.
io mintz -
Once the battery has been replaced, should the console boot immediately?
I got an error 2101-0001 when booting my battery! TToTT this at least means the battery works but should I fix something else!
Great guide and thread! Thank you.
This was a very good video but a couple helpful comments. My switch had a stripped head on one joycon side that required me to drill out the screw a bit to make a new groove for the screwdriver bit. This was a brand new switch mind you. Anyway, the metal shield required the removal of 6 screws - not five as shown in the video. In the video, a screw hole is there with no screw, but I had the screw in the bottom right. The battery was a pain to remove with respect the adhesive that was used. It took more than a card to pull out and I crapped a little bit of the inside dividers. All said and done, the switch put back together just fine, no extra screws, and powered on and seems to work well.
Just did this to my sons switch and all works well…easy
I can’t seem to find the step where you use the thermal paste? Am I missing something?
The thermal paste/thermal pad is for the shield plate step found here.
I have a modded switch that will no longer charge and will not turn on. Should i replace the battery?
What type of mod did you do? a hardware mod or a software mod?
My switch battery is puffed up (i didnt poke at it or anything) and I'm getting a replacement soon, as soon as I opened it the battery puffed up more, I disattached it, im scared to remove it since it started fuming, what do I do???
Throw the battery that fumed away, and wait for the new one to come.
So i replaced the switch battery put it back together, and when i try to turn it on it shows the nintendo logo and then turns off, is that supposed to happen or did i do something wrong?
Did you calibrate your battery after replacement?
This is a great guide and I should have read it more thoroughly before I placed my order. The repair kit really should include a spot of thermal paste along with the precut adhesive. That’s my only complaint. I really had no difficulty removing the battery, I used a very flexible thin guitar pick to start the “glue-slicing’ step, then I used the metal spudger from another iFixit kit to help gently pry the battery out. Came out in one piece with all the adhesive stuck on the battery.
I had trouble reconnecting the battery. I feel like this tutorial would benefit from one extra step clarifying the proper way of reconnecting the new battery, as I almost broke something in the process. Or maybe I’m the only one lol. Either way, this was a great help! Thank you
I haven’t used my Switch in a while and since I started using it again, it’ll says my battery is 100%, but when I turn it on without it being plugged in it shuts off within 5 seconds. When I turn it on while it’s plugged in and then unplug after 10 seconds it keeps running fine until I go into sleep mode and this process starts over again. Does this sound like a problem a new battery would fix? I tried several of the reboot/reset steps on the internet without success
What is the usual method for booting a switch mine may have this fault dosnt indicate charge while trying to charge
Thank you for the step-by-step. Other than the magnetic work-mat, what would be some standard tools for someone to have for projects like this, or screen replacement on a phone, etc.?
Hi Jody, that's a great question!
I recently replaced the joysticks in both of my joy-cons and the battery in the Switch, itself. I used my ProTech Toolkit to do the bulk of the work. For the battery, I had to clean up the existing thermal paste and apply a new layer to the heat sink when I was done so I used Arctic Silver ArctiClean and Arctic Silver Thermal Paste (these are a personal preference in brand, you can use others.)
As far as screen replacements on phones, the Pro Tech Toolkit will get you pretty far. An extra thing I'd add for that would be an iOpener. In addition, and depending on the phone you're repairing, you may need replacement adhesives (here are examples for the Google Pixel 4 Rear Panel and the iPhone 12 Pro Max Rear Panel.) Luckily we have a ton of replacement guides which will let you know what extra part you'll need to complete the repairs!
Let me know if you have any more questions!
Can I use Ethyl Alcohol for the removing part?
Yes, this works. Alcohol-based solutions should help in removing the battery chamber adhesive effectively.
Reboot -
I left my switch off for about a month and a half and now it doesn't turn on. Is that a battery problem or what I've tried all booting methods and I need help with this one.
Habe you charged it since then? Batteries usually lose power over time when not used.
How do you dispose of the old battery?
Yano, read all about that here!
Hey guys, you have skipped the part where batterry is sticked by some glue in there (on the video, luckily its on the page here in written form so all good). Probably wasn't the first time you were doing it on this switch. :-)
Do you need to reapply thermal compound before putting the switch back together?
The battery I buy didn't come with foam ?
And I put everything back in without changing the thermal paste ?
Is the K5 thermal compound needed specifically or can a PC thermal paste such as Thermal Grizzly be used?
Any thermal putty would work in this scenario. Thermal paste is finer and can dry much more easily in a Nintendo Switch, simply because there is more space inbetween layers of the heat sinking components. (backplate, heatsink).
Theoretically you could apply regular thermal paste on the heatsink, then thermal putty or thermal pads on the backplate side, but I wouldn't recommend it personally for the sake of consistency.
Reboot -
I did a battery replacement on my Nintendo it was previously dead for a while how long until it powers back on it’s been on the charger since I entered the new battery
I bought a Switch battery set from you and installed it.
Unfortunately, the battery does not charge. Even after hours no sign that the Switch is charging.
So i just replaced the battery with the kit you recommended. Thanks by the way switch turned on fine but when i put the charger on it. It turns off the switch and goes blank. If the cord is on one side it makes no noise shows no sign of charging . But If i flip the other side of cord it makes a low pitch noise and its not the fan im sure of it but it doesn’t charge either. Thanks in advance
This guide was great! A few things to note:
The old battery was really stuck in there, and even with the alcohol soaking into the adhesive, I still had to grab a flat, metal tool to pry the battery out to counter the strength of the adhesive. The metal gave me more prying power to lift the battery out. I did this carefully so the battery wouldn't be punctured.
I reassembled everything, however, the Nintendo Switch was going to the boot screen and turning off. I took off the back cover again and found upon closer inspection that my battery connector wasn't securely plugged down. The new wires were too stiff and lifted it off the contacts. I used some leftover tape and a thermal pad on top of the battery connector to make it stay put. Before completely reassembling, I plugged the Nintendo Switch it and it showed the typical charging screen.
After that, I followed the calibration instructions for the battery. I can definitely notice my gaming sessions lasting much longer on a single charge.
Please don't do this. PLEASE. Metal is the stupidest idea ever with batteries. Use plastic. Also, just press the battery in firmly and you will not have to use any tape
Soul -
I've never done anything like this before, so I was very stressed out with the idea of opening my switch. But the guide was very well detailed, and my switch is now saved! I recommend reading the comments on the steps you are confused on because they might save you from ruining parts of your console. Also try to get at least 70% isopropyl alcohol and tweezers since they don't come with the kit (dental floss can also be really useful to remove the battery).
I’d recommend making sure to get 90% plus because I used 70% and I must have punctured the battery, but it started smoking and I think it was because it reacted with the water content. After I was convinced that it was OK I came back with 91% and was able to dissolve the adhesive and get it off.
On the battery clip, one of the side clips that I "think" helps keep the battery in place is missing or broken off! Would I need to replace it with a new one?
Thanks for any replies.
James.
Danke für die super Anleitung hat alles bestens geklappt 👍👍
I just replaced the battery (replaced the thermal paste as well) and the battery gets warm really fast. Is this a sign of incorrect installation?
I installed the new battery but my switch isn't working right. When I plug it in (switch AC adapter or generic usb-c charger) it does not show the battery charging icon on the screen. When I try to turn it on, the nintendo logo (not switch) logo flashes before returing to a black screen. I get no logo when the switch is unplugged. I tried charging the switch for a long time and leaving it unplugged for a long time. I also tried the different boot button combinations, no dice. What could be the problem and how could I fix it?
A few things that may help others:
- Where the guide suggests using a PH 000 screwdriver, I found more success in using a PH 00.
- Reconnecting the battery requires pushing the battery connector down quite hard. The white connector should sit almost flush with the black port; if the white connector is quite raised still then it won't be connected and your switch won't charge or turn on.
- If the switch shows a Nintendo logo before immediately turning off, and the switch fails to charge, you likely haven't pushed the battery connector down fully.
- You can test that the battery is properly connected immediately after connecting the battery connector by turning the switch on. You do not need to reassemble the switch or reconnect the SD card port first.
I have been doing repairs almost from dawn of IFIXIT time with IFIXIT Guides. This guide is one of the most complete easiest ones that I have ever used. The repair process was successful. The battery and repair kit that I purchased from IFIXIT was perfect. My son could not be more pleased.
Der Tausch von Akku und Lüfter (separate Anleitung) ging einfach vonstatten. Die Anleitung ist echt gut und leicht verständlich. Man sollte aber gewohnt sein, mit extrem kleinen Anschlüssen, Schrauben und Platinen zu arbeiten, da alles da drin recht klein ausgelegt ist und keine Toleranz für grobschlächtiges Arbeiten erlaubt! Meine Switch ist nun wieder wie neu :) - Danke iFixit!
The swapping of battery and fan (separate instruction) was fairly manageable. The instructions are easy to understand. One should be used to handle with extremely finnicky connectors, screws and circuits as the components are really small and do not allow any tolerance for rough handling at all! My Switch is good as new again :) - Thank you iFixit!
Nachtrag: Leider gibt es ein Problem. Obschon ich die Anleitung zur Kalibrierung der Austauschbatterie befolgt habe (100% Aufladen und mindestens 2h weiterladen lassen, dann kompletter Rundown, dann nochmal 100% Aufladen), meldet die Konsole trotz 91% Ladung bereits niedrigen Batteriestand. Beim Aufladen zieht die Konsole keinen Strom (0W). Harter Neustart ohne Erfolg. Austausch-Batterie defekt?
Addendum: Even though I followed the steps for calibration of the replacement battery (charge 100%, let charge for additional 2h, then rundown till turnoff and recharge to 100%) the console shuts down with 91% remaining battery. Hooking the console to charger shows no power drain (0W). Hard reboot without any success. Replacement battery defective?
95% of the time in this guide was spent dealing with the battery removal. Everything else was cake. Resurrected an otherwise dead switch. Didn't come with microfiber cloth or the padding on the original battery but oh well I guess. Also need compound and alcohol.
When replacing the battery, do I need to replace the pink stuff on the shield? Also, should I have invested in foam padding? I wasn’t aware of these when I purchased the kit and it’s not included, so… I hope it won’t ruin my Switch with me not doing it right away if it needed to be done.
If anyone is seeing messages from your switch that say battery console low and the console is about to go to sleep or anything like that and this is with your original battery then you should read articles on calibration and try and follow those directions before you decide you need a new battery. It could be that somehow your battery is fine and it got miscalibrated like it was dead for too long or something like that. I didn’t think about doing that and I got this battery replacement and got the battery replaced per the instructions and I still had to go through the calibration and it did work and those messages finally stopped appearing. So again, be sure to follow the calibration instructions either here on I fix it or finding where the link in these guidance pages sends you to on the web.
Just place IPA under the opening where the connector is and pry up. Best method, this Guide is dangerous
Should I ad a bit of thermal paste behind the battery?
Please don't. The thermal paste only goes on CPU or GPU.
Nash20b -