crwdns2915892:0crwdne2915892:0
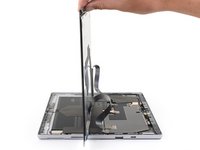
Follow this guide to replace the battery on your Microsoft Surface Pro 7.
If your battery is swollen, take appropriate precautions.
There is a significant chance that you may break the unreinforced and fragile display panel during this procedure. Be sure to apply adequate heat and be extremely careful while slicing through the adhesive. Wear safety glasses in case the glass shatters.
Optional motherboard removal: This battery guide shows how to remove the motherboard, which prevents it from being damaged as you pry out the battery. If you choose not to remove the motherboard, you can skip steps 30-48. If you leave the motherboard in:
- Be careful not to pry against the motherboard when
- Tilt the device when you apply adhesive remover so that it won’t pool under the motherboard
crwdns2942213:0crwdne2942213:0
-
-
If your display glass is cracked, keep further breakage contained and prevent bodily harm during your repair by taping the glass.
-
Lay overlapping strips of clear packing tape over the Surface’s display until the whole face is covered.
-
Do your best to follow the rest of the guide as described. However, once the glass is broken, it will likely continue to crack as you work, and you may need to use a metal prying tool to scoop the glass out.
-
-
-
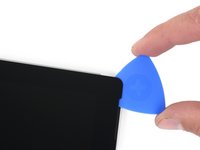
Heat an iOpener and apply it to the right edge of the Surface's screen for two minutes.
-
-
-
Take note of the screen adhesive layout before continuing:
-
These areas only contain adhesive and are safe to cut.
-
The display board and flex cables sit here close to the edge. Cut carefully and do not insert the pick more than 1/8 inch (3 mm).
-
Fragile antenna cables lie under this part of the screen. Carefully follow the procedure in step 13 to avoid damaging them. The adhesive is also the thickest here.
Be prepared; the bluetooth/wifi antennas are adhered to the glass with this very strong tape. You WILL 98% of the time damage them; have another module available that includes the antennas before you attempt this repair as you will damage them if you've never done this repair before. Ive done dozens of these and damage most of them.
For tablets without swollen batteries you can use one of these: https://www.amazon.com/gp/product/B019PX...
For tablets with swollen batteries, you can use one of these: https://www.amazon.com/220V-300W-Tool-Bl...
Just be careful that you don't damage the touchscreen by heating one spot too much. Also, the trick is to get the pick against the back of the display above the adhesive.
David S. -
I managed to remove the screen successfully without breaking the glass, but I found out I completely sliced through cables underneath the lower portion of the display as I used a razor blade, so be careful!
Muhammad, if you are still looking at this, what do the antennas connect to> I can't find the antennas on my glass, nor where they would connect to the frame?
-
-
-
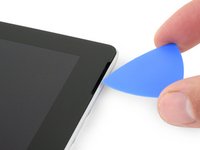
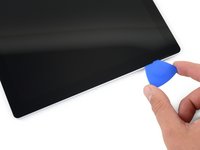
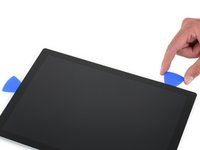
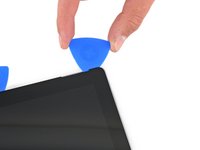
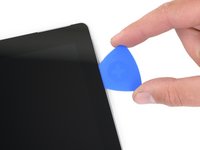
Insert an opening pick into the speaker opening on the screen and slide the pick between the glass and speaker grille.
Note carefully where they start. It is the only place with any sort of access. Razor blade is best. Use picks to hold the top open. Do NOT insert more than a quarter inch ever.
-
-
-
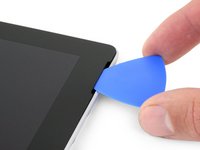
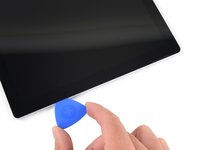
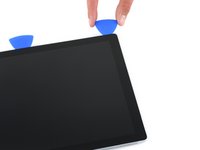
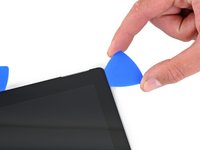
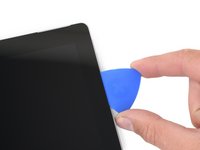
Rotate the pick toward the bottom of the Surface to slide it underneath the lower edge of the speaker cutout.
-
-
-
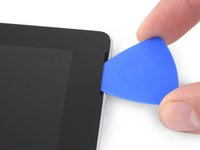
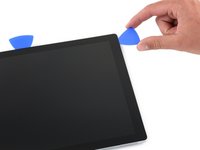
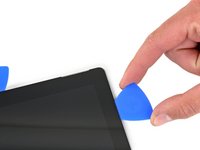
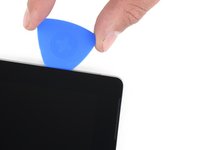
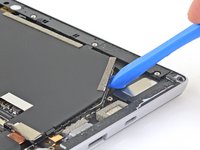
Slide the pick down the right edge of the Surface to slice through the adhesive under the screen.
-
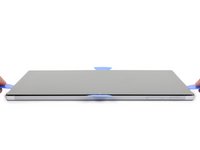
Leave this opening pick in the right edge to prevent the adhesive from resealing.
-
-
-
Reheat your iOpener and apply it to the bottom edge of the Surface's screen for two minutes.
-
-
-
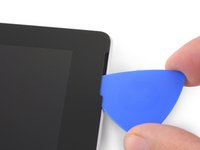
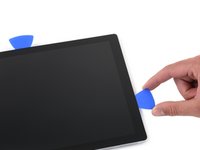
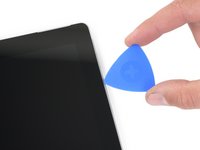
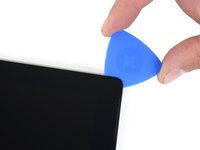
Insert a new opening pick into the bottom right corner and slide it around the corner toward the bottom edge.
-
Slide the pick along the bottom edge of the Surface to cut through the screen adhesive.
-
Leave this pick in the bottom edge to prevent the adhesive from resealing.
-
-
-
Reheat your iOpener and apply it to the left edge of the Surface's screen for two minutes.
-
-
-
Insert a new opening pick into the bottom left corner and slide it around the corner toward the left edge.
-
Slide the pick along the left edge of the Surface to cut through the screen adhesive.
-
Leave this pick in the left edge to prevent the adhesive from resealing.
-
-
-
Reheat your iOpener and apply it to the left edge of the Surface's screen for two minutes.
-
-
-
Round the left corner with the opening pick and slide it along the top edge of the Surface. Stop when the pick is 2.75 inches (70 mm) away from the left edge.
-
-
-
Insert the point of a pick under the display where you just stopped cutting. Do not insert the pick deeper than the edge of the bezel.
-
Carefully roll the pick to the right, pressing the long edge of the pick into the screen adhesive underneath the bezel, cutting the adhesive as you go. Do not slide the pick along the edge of the Surface.
-
Repeat this motion of inserting the point of the pick where you just cut, and rolling to the right all along the top edge of the Surface, until the pick is 2.5 inches (64 mm) from the right edge of the Surface.
Die WLAN-Antennen sind durch eine Plastikabdeckung geschützt und können nur durch wirklich rohe Gewalt beschädigt werden.
-
-
-
Once you cut the adhesive over the antennas (8.5 inches, or 22 cm, from the left edge), slide the pick the rest of the way along the top edge of the surface and round the top right corner to slice through any remaining adhesive.
-
-
-
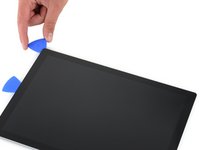
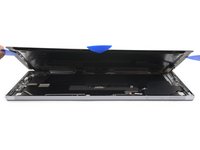
Very slowly lift the screen assembly away from the Surface case. If you encounter any resistance, stop and check that all the adhesive is separated.
-
Use an opening pick to cut through any remaining adhesive.
Be sure to lift the top first ( camera side) as the ribbon cable have more give that way. I tore one of the cables trying to open from the bottom
-
-
crwdns2935267:0crwdne2935267:0Tweezers$4.99
-
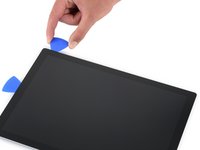
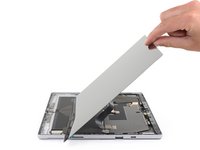
Lift the top of the screen assembly away from the case while sliding the bottom of the screen closer to the motherboard display connectors.
-
Use one hand to hold the screen still.
-
-
-
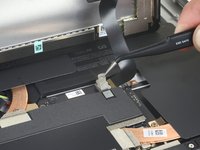
Use the pointed tip of a spudger to carefully push on each side of the battery connector.
-
Alternating from one side to the other, gently “walk” the connector out of its socket.
-
-
-
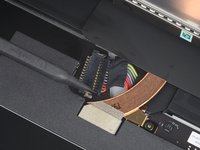
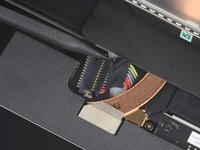
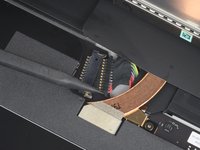
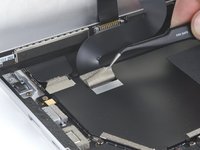
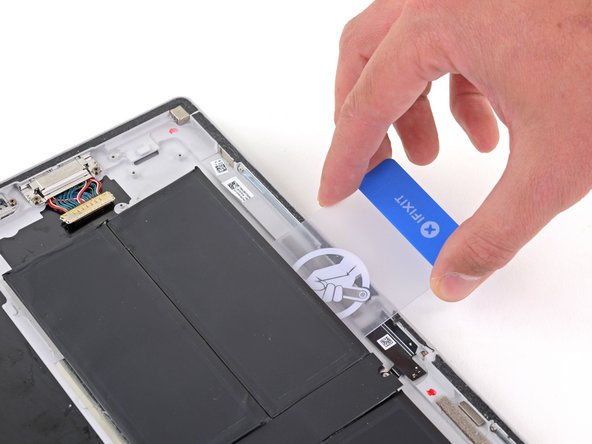
Use a pair of tweezers to peel back the silver tape covering the left display cable connector.
-
Insert the flat end of a spudger underneath the tape and pry up on the connector to disconnect it from the motherboard.
I found that the replacement screen cable does not run the same way as the previous screen and it actually doubles over. Is there a reason for this? Can I get a cable that matches the new screen anywhere?
-
-
-
-
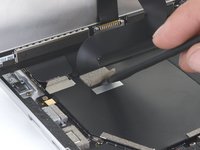
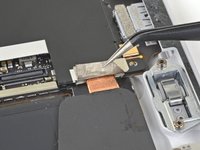
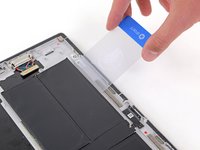
Use a pair of tweezers to peel back the silver tape securing the right display cable to the motherboard.
-
Use the flat end of a spudger to lift the right display cable straight up and disconnect it from the motherboard.
-
-
-
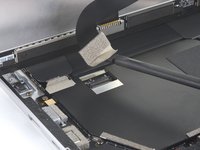
Use a T3 Torx screwdriver to remove the four 2.4 mm screws securing the EMI shield.
-
-
crwdns2935267:0crwdne2935267:0Tweezers$4.99
-
Use a pair of tweezers to carefully peel back the three pieces of silver tape adhering the motherboard EMI shield to the copper heatsink.
-
-
-
Notice the small arrows surrounding the perimeter of the motherboard EMI shield. These mark the locations of each clip securing the shield to the motherboard.
-
-
-
Starting with the clips adjacent to the battery, use an opening tool to carefully pry the motherboard EMI shield straight up from underneath each arrow to disconnect the clips.
-
-
-
Continue using your opening tool to disconnect the clips around the entire perimeter of the motherboard EMI shield.
-
-
-
Remove the motherboard EMI shield.
There is no step to remove the cover of the front cameras.
-
-
-
Gently peel the center thermal pad off of the copper heatsink.
You don't need to remove the thermal pads. If they are stuck to the battery, use a thin pick under the edges and wiggle it and it will release.
-
-
-
Peel the remaining two thermal pads off of the heatsink.
Die Pad´s reißen wirklich sehr sehr leicht… Gibt es eine Seite, wo man Ersatz kaufen kann?
Translated: The pads tear easily, is there a place to get replacements?
You don't need to remove the thermal pads. If they are stuck to the battery, use a thin pick under the edges and wiggle it and it will release.
-
-
-
Use a screwdriver to remove the following seven screws securing the heatsink:
-
Four 3.4 mm T5 Torx screws
-
Three 2.7 mm T3 Torx screws
-
-
-
Gently lift the heatsink straight up and off of the device.
-
Place the two small holes on each end of the heatsink pipes onto the corresponding pegs in the case to ensure proper alignment.
-
-
-
Use an opening tool to pry up on the edge of the EMI shield covering the microSD card reader connector and remove it from the motherboard.
-
-
-
Use the flat end of a spudger to lift up and disconnect the microSD card reader ribbon cable.
-
-
-
Use a T5 Torx screwdriver to remove the two 3.1 mm screws securing the microSD card reader.
You don't need to remove the microSD card reader; you can gently lift the cable and slightly bend it out of the way enough for the logic board to slide out from underneath it.
-
-
-
Remove the microSD card reader.
You don't need to remove the microSD card reader; you can gently lift the cable and slightly bend it out of the way enough for the logic board to slide out from underneath it.
-
-
-
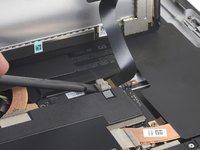
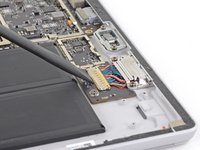
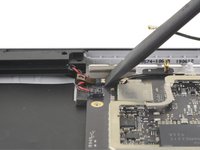
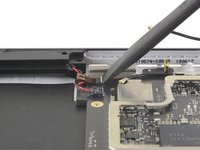
Use the flat end of a spudger to lift the flap that secures the Surface Connect port connector.
-
-
-
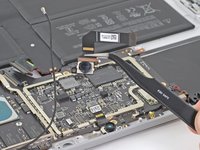
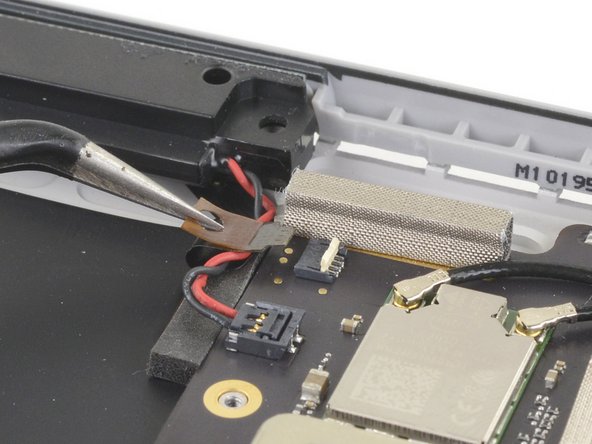
Use the pointed tip of a spudger to carefully push on each side of the battery connector.
-
Gently “walk” the connector out of its socket by alternating from one side to the other.
-
-
-
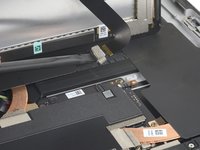
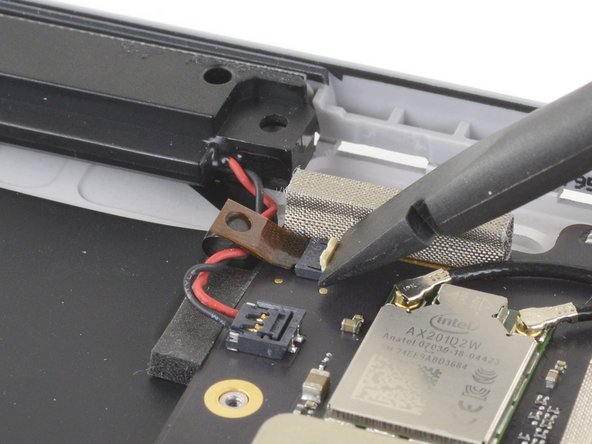
Use a T5 Torx screwdriver to remove the following two screws from the right speaker:
-
One 6.0 mm screw
-
One 3.8 mm screw
From step 26 and on, you will notice that the wifi/bluetooth board has already been removed; this needs to be removed before this step. There e are four P5 screws that need to be removed. Reference my earlier comment at beginning of section; you will MOST LIKELY RUIN THE BLUETOOTH/WIFI strips as they are adhered to the screen and are EXTREMELY difficult to remove without tearing them. Plan on purchasing another module and having it on hand. Ive done dozens of these and have had to replace most of them.
Correction; T4 screws not P5
I also noticed the missing step. This step is covered in another repair guide. See step 28: Microsoft Surface Pro 7 Windows Hello Face Camera Replacement
-
-
-
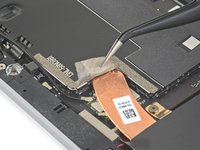
Use the pointed end of a spudger to gently lift the right speaker wire connector straight up and disconnect it from the motherboard.
-
-
-
Grab the right speaker by the end of the top edge and lift it slightly.
-
Pull the speaker out from the case horizontally and remove it.
-
-
-
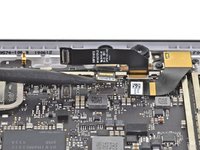
Use the flat end of a spudger to pry up and disconnect all three camera connectors from the motherboard.
-
-
-
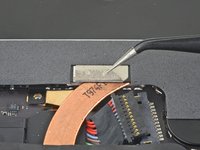
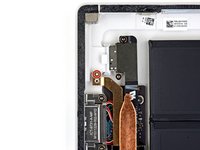
Use a T3 Torx screwdriver to remove the two 2.6 mm screws securing the rear-facing camera.
-
Remove the rear-facing camera.
-
-
crwdns2935267:0crwdne2935267:0Tweezers$4.99
-
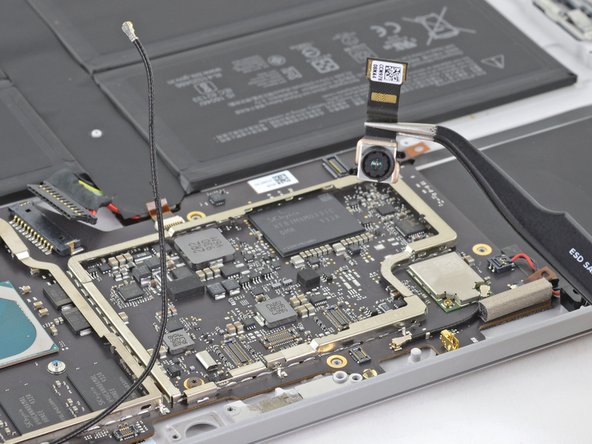
Use a pair of tweezers to disconnect the antenna cable covering the front-facing camera ribbon cables.
-
Move the antenna cable out of the way.
-
-
-
Remove the two front-facing cameras.
-
-
-
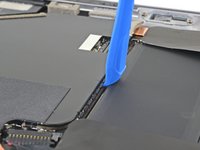
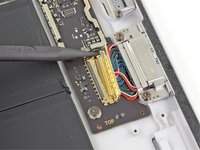
Use the flat end of a spudger to flip up the white plastic locking flap of the ZIF connector at the top-left corner of the motherboard.
-
Use your fingers or a pair of tweezers to pull the cable out.
-
-
-
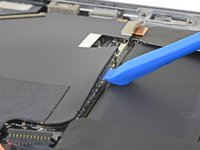
Gently slide the flat end of a spudger between the speaker wires and the motherboard until it is resting against the connector.
-
Carefully pry straight up on the connector to disconnect it from the motherboard.
-
-
-
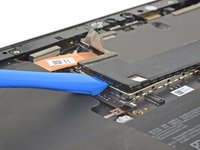
Use the flat end of a spudger to flip up the white plastic locking flap of the ZIF connector at the bottom-left corner of the motherboard.
-
Use your fingers or a pair of tweezers to pull the cable out.
-
-
-
Use the flat end of a spudger to flip up the black plastic locking flap of the ZIF connector at the bottom center of the motherboard.
-
Use your fingers or a pair of tweezers to pull the cable out.
Il manque l'étape de la déconnection de la nappe du port de la prise jack avant l'enlevement des vis de la carte mère
-
-
-
Use a T3 Torx screwdriver to remove the following three screws securing the motherboard:
-
Two 2.4 mm screws
-
One 2.3 mm flanged screw
-
-
-
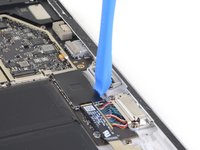
Grab the motherboard by the left edge and lift it up about two inches.
-
Gently pull the motherboard out from the right edge of the Surface.
-
Remove the motherboard.
-
-
-
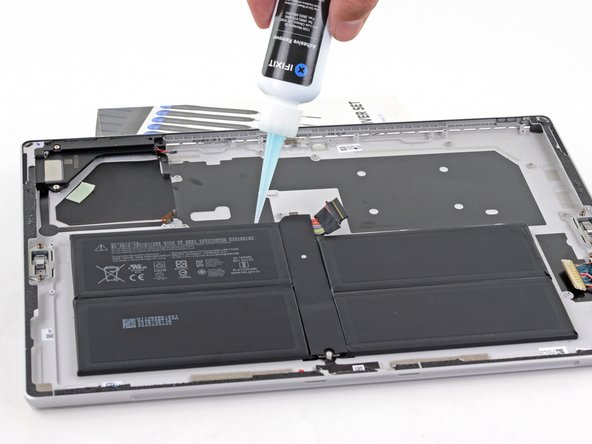
Prop the top edge of the Surface up a couple inches so the whole Surface slopes toward the bottom edge.
-
Apply adhesive remover or high-concentration (90% or higher) isopropyl alcohol underneath the the battery along the top edge.
-
Let the adhesive remover sit and soak into the adhesive for 2–3 minutes before continuing.
-
-
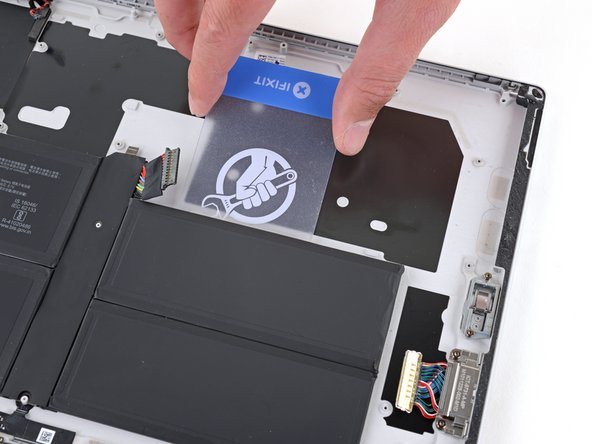
crwdns2935267:0crwdne2935267:0Plastic Cards$2.99
-
Slide a plastic card under the right side of the top edge of the battery.
-
Slide the card side to side under the upper right battery cell to slice through the adhesive underneath.
I put the isoproply alcohol in from the top and the bottom. I had to add more twice. These batteries are heavily glued!
-
-
-
Slide a plastic card under the right side of the bottom edge of the battery.
-
Slide the card side to side under the bottom right battery cell to slice through the adhesive underneath.
-
Repeat the previous two steps for the left side of the battery to release the two left cells from their adhesive.
-
-
-
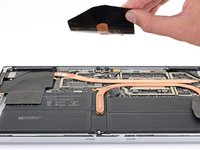
Lift each side of the battery with a plastic card and make sure all the adhesive is separated from the battery.
-
Gently lift the battery out of the case.
-


For optimal performance, calibrate your newly installed battery after completing this guide.
To reassemble your device, follow the above steps in reverse order.
Take your e-waste to an R2 or e-Stewards certified recycler.
Repair didn’t go as planned? Try some basic troubleshooting, or ask our Answers community for help.
crwdns2935221:0crwdne2935221:0
crwdns2935229:016crwdne2935229:0

crwdns2947412:02crwdne2947412:0
I have 17 surface pros that I need this done to. Can you recommend a repair facility?
I can't tell if it's an extremely bad design, anti consumer, or both. This might take an experienced repair shop two hours but to the average person this will take all day. Not to mention the dangers and significant risks involved. They want you to throw it away and buy a new one.