crwdns2915892:0crwdne2915892:0
Das Flowmeter misst, wieviel Frischwasser in den Kaffeeautomat gepumpt wird. Es können verschiedene Störungen auftreten, wenn der Sensor selbst defekt ist, muss das Teil getauscht werden. Oftmals ist es nur verstopft/verkalkt, insbesondere am Eingangsstutzen. Dann genügt eine gründliche Reinigung.
crwdns2942213:0crwdne2942213:0
-
-
Entferne alle Anbauteile wie Wassertank, Tresterschublade, Brühgruppe.
-
Drehe die Maschine mit der Rückseite zu dir.
-
Entferne fünf Torx T20 Security Schrauben.
-
-
-
Hebe die Rückseite heraus.
-
Folgende Bauteile sind gleich sichtbar:
-
Mahlwerk
-
Pumpe
-
Flowmeter
Sehr gute Anleitung. Die Security Schrauben der Rückwand können auch durch normale Kreuzschlitzschrauben ersetzt werden. Natürlich mit gleichen Abmessungen. Es erleichtert bei späteren Reparatur Arbeiten die Werkzeuge Auswahl , da überall Kreuzschlitzschrauben verbaut sind.
-
-
-
-
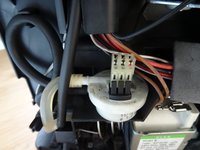
Das Flowmeter befindet sich auf der Rückseite der Maschine.
-
Löse zuerst den oberen Silikonschlauch ab.
-
Ziehe das Flowmeter gerade nach hinten heraus.
-
Wenn du es nicht austauschen willst, können die Kabel angesteckt bleiben.
-
-
-
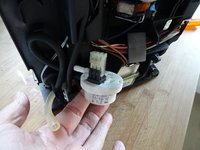
Drehe den Deckel des Flowmeters ein wenig gegen den Uhrzeigersinn.
-
Hebe den Deckel ab. Achte auf den Dichtring im Deckel. Das Turbinenrad wird sichtbar.
-
Ziehe auch den Schlauch an der Unterseite ab.
-
Blase in den Einlaufstutzen und prüfe, ob sich das Turbinenrad schnell dreht.
-
Wenn er verstopft ist, musst du den sehr dünnen Einlaufkanal mit einer Nadel frei machen.
-


Arbeite die Schritte in umgekehrter Reihenfolge ab, um dein Gerät wieder zusammenzubauen.
Arbeite die Schritte in umgekehrter Reihenfolge ab, um dein Gerät wieder zusammenzubauen.
crwdns2935221:0crwdne2935221:0
crwdns2935229:06crwdne2935229:0
crwdns2947412:029crwdne2947412:0
Herzlichen Dank für die übersichtliche Anleitung! Der Tipp mit dem verstopften Flowmeter aus einem Forum und dazu diese Anleitung haben mir heute sehr geholfen. Meine DeLonghi Dinamica läuft wieder. :D Selbst ist die Frau.
Beste Grüße
Christine
Fantastisch!!! Toller Job Christine! @VauWeh erstellt die besten Ratgeber für alles, was mit Kaffeemaschinen zu tun hat!
Fantastic!!! Great Job Christine! @VauWeh creates the best guides for anything Coffeemaker related!
Ich freue mich!
Hi,
kurz vor Weihnachten streikte unsere " PrimaDonna Class ". Ein Gau für jeden Kaffeetrinker. Schnell über Online - Shops zwei Ersatzteile besorgt. Doch sie streikte immer noch. Dann die Wasserzuleitungsschläuche gereinigt. Nein, es gab immer noch keinen frischen Morgenkaffee aus dem heimischen Automaten. Dann ging ich exakt nach Deiner Anleitung vor. Yes! Sie funktioniert wieder.
Vielen Dank für die hilfreichen Tipps und ein schönes Weihnachtsfest.
Jürgen aus Eching b. München
Sehr schön, hoch die Tassen!
VauWeh -
Hi,
Similar problem descale process fails to complete and also water tank when empty does not provide alarm message. I have checked the flow meter which was clean with no signs of blockage or calcification and spins freely. This leads me to think it may be the sensor beneath the water tank tray or perhaps the magnetic float inside the water tank. However not sure which one to tackle first, the sensor would be easy to change as I have traced the wires back to the PCB however not sure how to get access to the magnetic float as it is encapsulated in a plastic housing.
Please advise if you know the answer.
Regards
@gordonshirreffs I would first try the water tank. Does the magnet float freely? Do you know anyone with a similar machine who could swap the water tank on a trial basis? The sensor (Reed) inside can be cheated using a magnet. The watertank is not too expensive, If you want to replace it, including a new magnet. Here are both parts, be sure you have the right model number: watertank and sensor.
VauWeh -
Thanks VauWeh,
Will try the the magnet as a cheat to see what happens.
OK, dass Teil war es wohl nicht, was ich wohl schon dachte. Da bei mir das Problem ist, dass der Sensor nicht mehr richtig funktionierte. Dafür brauche ich wohl einen neuen Reed Sensor. Den ich dank deiner Anleitung aber jetzt auch gut finden konnte (bzw. wusste schon das der unter dem Wassertank ist, nur nicht wie man am besten da hinkommt).
Sauber gemacht habe ich es dennoch, den Schlauch. Meine Güte kam da Grütze mit raus... Geschadet hat es nicht. Bei mir hat da gut der Trinkschlauchreiniger geholfen, dieser Schrubber passt auch gut in die Schläuche. 👌
Thanks everyone, got myself a new reed switch and successfully completed 1) detecting empty water tank and 2) completed the descale process and checked that it recorded a completed descale cycle.
Much appreciated regards Gordon
I'm always pleased when a repair is successful. Congratulations!
Since successfully replacing the "read switch" another issue may become a problem, I have set up the machine to dispense a mug of coffee (half pint approx.) using the My Coffee programme however after getting the settings correct I now find that I am getting less and less quantity and have to top up with the hot water spout.
The machine has been descaled on a regular basis as per instruction for a hard water area and the water tank is always filled with filtered water.
I think that it might be the flow meter however when I replaced the "read switch" the flow meter was working and the wheel spins freely.
Have you any other suggestions as to the cause?
Thanks Gordon
@gordonshirreffs Another issue may be a clogged upper piston.
VauWeh -
Hi Gordon, if the machine gives too little water/coffee it could be that the pump is no longer working properly. But there could be several causes, it could also be the boiler for example (limescale). You can start by checking the strainers of the brewing unit to see if they are open properly.
Martin
Hi Martin, "strainers" are these the 2 multi holed discs either end of the brewing unit?
regards G
That is correct there is 1 in the brewing unit and there is 1 in the upper brewing unit
Hi Martin, both upper & lower parts of the brewing unit have had all the o-rings replaced and when dispensing less water in the grout box, however another issue has emerged. Lack of water from the independent water spout. Functions from the coffee spouts work ok, delivers coffee, rinsing on starting and shut down ok. When I select hot water the pump is working but the water ends up in the grout box.
When I dismantled the upper brewing unit and reassembled all correct connections were made.
I cannot see any other loose wires or disconnected/leaking water tubes, so at a loss to identify the fault.
Regards G
Hello Gordon,
You might want to check if the solenoid valve is working properly.
Have a look at this manual.
Hi Martin,
Thanks is the solenoid valve the one pictured in the guide, bottom left of the machine step 5 picture ,
Regards G
Hallo Gordon, yes that is the right valve.
Hi Martin, just checked the lower solenoid which feeds the upper steam generator; took it apart and it is completely clean with no scaling or blockages, moves freely and it appears to work as I verified that by utilising the cappuccino function and that worked, what did not, was the final part of that process where the system flushes the frother mechanism to clean it; instead hot water was pumped into the grout box.
I suspect that the next item to check is the upper solenoid which sits at the top of the machine just above the steam generator/boiler to check if it has become calcified, other than that I am at a loss.
Regards G
@gordonshirreffs Think of using the testmode.
VauWeh -
Hi VauWeh, is there a test mode for ECAM Cappuccino 44.660.B
Oh oh, this is top secret...
This is from a 45.366, perhaps it works: Switch off the machine at the front, pull out the drawer, press and hold B15(coffee quantity) + B11(single cup) + B6(Milk Menu) simultaneously until Select Test appears. Then insert the drawer and press Cappuccino. The test mode is now active.
VauWeh -
that configuration did not work
Well without the fault codes I have managed to get the supply to the hot water spout working again. It would appear that when I dismantled the upper brewing unit to replace all the o-rings and then reassemble I fitted a small component in reverse, this component is the small dark grey/ black in colour which slides in its housing in the external section of the brewing unit, oblong with rounded ends in shape with 3 holes the centre one holds a screw that attaches through to the orange colour housing of the brew unit and allows it to move when a drink is being processed. Its a pity the Delonghi schematic does not show this small plastic component, but I hope I have described it reasonably accurately.
Good to hear! I mentioned it in the guide for the upper piston: Note the valve: the plunger points upwards.
VauWeh -
Tipp mit dem Flowmeter und der Anleitung haben mir echt geholfen! Vielen Dank.
Screwdriver must have a hole? What does that mean? Is it a standard Tx20 bit?
Kevin - crwdns2934203:0crwdne2934203:0
No, it is a TR20 Security Bit, which really has a hole (if you look to the star shape) . See TR10 Torx Security Screwdriver
VauWeh -
Bits from iFixit are equipped with it.
VauWeh -