crwdns2915892:0crwdne2915892:0
Vorwerk served up its pioneer and flagship multifunctional kitchen machine with 2014's Thermomix TM5. The purchase price of over $1,100 isn’t too digestible for everyone's wallet; however, the device is supposed to conjure up some delicious dishes. Loved by some, despised by others, the Thermomix should not be left out when discussing cooking gadgets.
We wondered what the machine's ingredients were—so we competently dismantled and deboned it in order to find out.
To make sure that you always get the freshest teardowns served hot, you can drop by our Facebook page, have a look at our Instagram account and follow us on Twitter.
crwdns2942213:0crwdne2942213:0
-
-
This machine is capable of stirring, mixing, kneading, crushing, weighing, heating, cooking, and steaming.
-
However, what we're interested in is its inner life, which is why we make our own soup:
-
As a basis for our teardown we take...
-
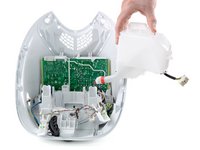
... a Thermomix TM5 and separate the mixing bowl (including the cover) from the device.
-
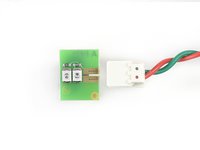
Then we detach the recipe chip from the base unit.
-
-
crwdns2935267:0crwdne2935267:0Jimmy$7.16
-
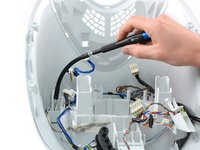
Next we peel off the cover on the back with our Jimmy.
-
Then we remove the two screws and pull the handle out upwards.
-
-
crwdns2935267:0crwdne2935267:0iFixit Opening Tool$1.99
-
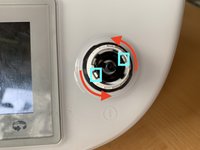
Now we remove the program selector and motor shaft ring using the opening tool.
-
Once the program selector is removed, we remove the white holder so that the selector slides towards inside. In order to do that we turn it as indicated while we push backwards the clips highlighted in blue.
-
-
-
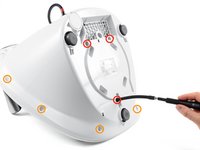
Now we first remove the three screws on the bottom side.
-
Then the six housing screws.
-
At last we remove the screw on the back side and then we can carefully open the housing with the opening tool.
-
-
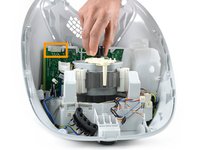
-
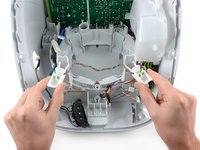
Disconnecting the display cable is straightforward. It does not have a latch.
-
Contrarily, on the main plate, a small clip must be pushed backwards while the connector is removed.
-
-
-
-
The motor locks the handles on the front via a hinge assembly.
-
Several sensors register whether the cover is on the mixing bowl and whether the arms are completely closed.
-
-
-
Each time the mixing bowl cover is locked, the following sequence is run:
-
The first sensor (component of the 5-pin plug near the crankshaft) determines whether the mixing bowl is inserted at all.
-
Then the motor mechanically turns both arms and locks the mixing bowl cover.
-
Three more sensors check whether the cover is fixed and the handles are completely closed.
-
-
-
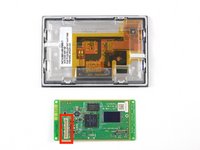
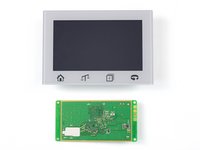
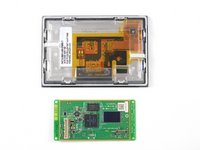
The next item is the control panel, which is used for most inputs.
-
The 4.3" (640×480 pixel) LCD TFT touch panel is fastened with simple plastic clips that can easily be detached by hand.
-
The board is retained by two Torx screws on a ribbon cable connector. Here's what we find on it:
-
-
-
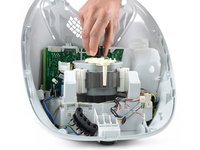
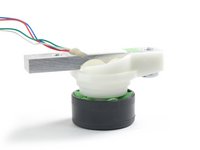
Next we remove the selector knob encoder, the motor cover, and the 5-pin connector.
-
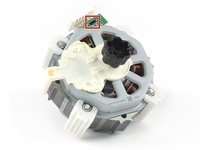
And out comes the 500 watt reluctance motor. It stirs at 40-500 rpm and mixes at up to 10,700 rpm in turbo mode.
-
The adjacent board features an NXP HEF4093B quad NAND gate with two inputs as Schmitt trigger for motor control.
-
-
-
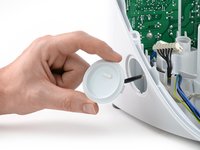
The Thermomix is fed with knowledge via the side-mounted interface with so-called recipe chips.
-
The interface with 4 pins suggests a standard USB connection. This connection is also used to add Wi-Fi support via Cook-Key®.
-
Four LEDs take over the lighting at the front. They sit in pairs on an exchangeable mini circuit board.
-
-
-
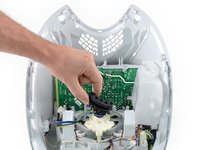
On the way to the core of the Thermomix, we pass a suspicious, almost empty cable box. That surely has something to do with some kind of DIN standard.
-
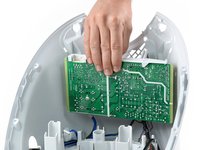
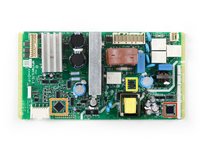
But we won’t let ourselves get distracted by such garnishes. We take out the brain, which seems to only be of interest on one side containing:
-
-
crwdns2935267:0crwdne2935267:0iFixit Precision Bit Driver, Aluminum$9.99
-
To extract the remaining parts, we once again take advantage of the flexible shaft extension for our precision bit holder.
-
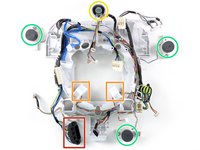
We bravely grip everything and remove in one piece:
-
5-pin connector for the mixing bowl
-
LED light elements
-
5W speaker
-
3 rubber feet with load cells for the balance function
-
-
-
The Thermomix is dismantled into its components. Here's our conclusion:
-
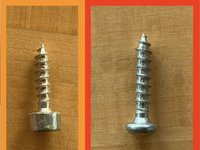
We found no proprietary screws; only Torx screws were used.
-
The components are all individually exchangeable, even up to the LED boards.
-
Housing, display, motherboard, and a few smaller parts are mostly attached via easily accessible clip connections.
-
Some of the cable connections are somewhat tight and therefore difficult to access. This increases the risk of damage to the cables and connectors.
-


crwdns2934873:0crwdne2934873:0
100%


crwdns2934885:0crwdne2934885:0 crwdns2934875:0crwdne2934875:0
crwdns2934877:0crwdne2934877:0 ›

crwdns2935287:0crwdne2935287:0

Tobias Isakeit - Repairability Engineer crwdns2935289:0Tobias Isakeit - Repairability Engineercrwdne2935289:0
Business
crwdns2934841:01crwdne2934841:0
crwdns2935297:01,145crwdne2935297:0
crwdns2947412:060crwdne2947412:0
Ou pouvons acheter les pièces défectueuses ?
Malheureusement je ne connais pas la réponse, mais si vous postez la question dans notre Forum de réponses la chance d’obtenir une réponse de la part d’un autre membre de la communauté est beaucoup plus grande ;-)
Dommage que les pièces détachées ne soit pas disponible en tout cas pas à ma connaissance.
Les pièces ne sont pas disponibles dans notre boutique, mais vous êtes le bienvenu de poster cette question dans le Forum de réponses, peut-être que quelqu’un peut vous indiquer une bonne source.
Wie beurteilt ihr die Qualität der Bauteile? Ist der Thermomix sein Geld wert?