crwdns2915892:0crwdne2915892:0
The cream of the season's Android crop is here—it's Google's own showstopping phablet, the Nexus 6P. In an historical first, this device comes to us via Chinese manufacturer Huawei—and since we've never had a Huawei offering on the teardown table, we're excited to get cracking! Will the cream rise to the top of the repairability bottle—or will the Nexus 6P give us sour milk face? Let's find out.
There's more teardown on tap—follow along on Facebook, Instagram, and Twitter for all the disassembly shenanigans!
crwdns2942213:0crwdne2942213:0
crwdns2936621:0crwdne2936621:0
-
-
Now that we've (un)wrapped up the opening act, it's time for the main event! Here's what Google has to say about its latest Android flagship:
-
Qualcomm Snapdragon 810 v2.1, 2.0 GHz octa-core 64-bit processor with Adreno 430 GPU
-
12.3 MP/4K rear-facing camera with laser-assisted autofocus and electronic image stabilization, 8 MP front-facing camera
-
5.7” WQHD 2560 × 1440 (518 ppi) AMOLED display
-
3 GB LPDDR4 RAM with 32 GB, 64 GB, or 128 GB of internal storage
-
USB Type-C Port
-
Nexus Imprint fingerprint reader and Android Sensor Hub
-
Android 6.0 Marshmallow
-
-
-
The all-metal, aeronautical-grade anodized aluminum chassis is another first for a Nexus device.
-
We're fairly certain that the 6P isn't designed to function as a ramp for your Tech Deck.
-
The raised camera mesa is apparently Huawei's strategy for squeezing a 4K camera into the new phone. Or, like us, they could just be obsessed with mesas.
-
Coming in for a closer look, we see that the glass lens cover slopes to a smooth curve at either end. Fancy!
-
-
-
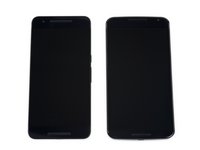
Compared with its fraternal twin, the Nexus 5X (top), the 6P shines through with its Wide Quad HD AMOLED display.
-
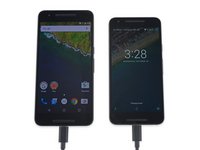
Just for fun, we also line up the 6P next to ye olde Nexus 6. With its nearly identical footprint, you get triple bonus points if you can tell which is which!
-
No word yet on what happens if you umbilical two 6Ps that are both at 50% power. We assume they'll both charge to 100%. Perpetual power, solved.
Why stop there? Come up with a USB-C splitter cable, connect the two 6Ps, and then you have perpetual power that's actually useful!
if only it were that simple. When I was a kid I had this idea that you could run a generator that's solar powered, have a lightbulb that puts out enough power to run the solar panel AND the generator... and run other items of said generator.
this was of course before I understood the nature of electricity and effectiveness and lost power etc etc.
Can someone identify the chips belonging to the Android Sensor Hub? On the 5X ist was a pressure sensor, geomagnetic sensor, a combined gyro/accelerometer and an STM32.
I have no idea why they label the chips the way they do. If a sensor is called 'BMP280', why not label it with that? Why do they use some random other letters and numbers?
Anyway, would be cool if someone could help! Thanks!
/edit: found the same STM32F411CE as on the 5X. Top right from the processor.
Pressure sensor is on the top right of the PCB, but no idea which model. Has a different number on it that the one on the 5X.
Did you figure out what specs the acceleramotor/gyroscope have in the Nexus 6p?
Why is the touch screen controller not covered, can someone udpate?
Shouldn't the Avago 77814-1 in step 15 be listed as a Skyworks SKY77814-11? The Skyworks logo is clearly visible on the chip.
Yes. Thanks for the correction! It reads correctly now.
The metal part on the mainboard beside the CPU and Flash chip seems to be the SIM card bay. Looks like it can hold 2 SIM cards!?
There was another [leaked?] video of an earlier prototype advertising this capability. Please try this iFixit?
That definitely is the SIM reader on the motherboard, and it does look wide enough for two SIMS! However, the SIM tray in our device only has a single slot. Perhaps different carriers or markets will see the 6P able to support multiple SIMs, but not ours.
No QFE1100 envelope tracker? Surprising as most highend phones have included it for the last ~2 years
It's there! Marked "E1100", step 14, bottom left.
-
-
crwdns2935267:0crwdne2935267:0iOpener$19.99
-
Like the Nexus 6, there are no visible screws on the rear cover. Unlike the Nexus 6, this is a unibody device, so there won't be any handy peel-off rear cover.
-
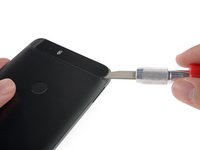
The 6P's smooth enclosure is broken only by this small, suspicious plastic panel at the bottom. Let's pile a hot iOpener on it and see what's inside.
-
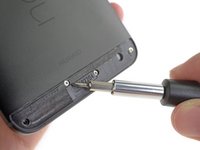
With enough heat, the panel is easily pried and peeled off, exposing four screws.
Don't forget to remove the SIM card tray, like I did!
Almost broke my screen trying to pull it apart with the tray in.
-
-
crwdns2935267:0crwdne2935267:0iSclack$24.99
-
Getting to the screws under the plastic cover wasn't too hard, but signs now point to screws under the camera mesa cover too...
-
The panel in question is made of tight-fitting, easily shattered, glass. Removing this won't be any fun at all.
-
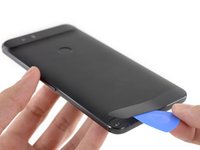
Several frustrating minutes later, we are able to deploy the iSclack, and pop the phone out of its rear enclosure.
One supposes that if it's that easy to break the glass camera cover, replacement camera covers will become available.
My camera glass cover cracked after a literal 6" drop. Yikes. I hope replacements are available.
Are those additional sensors to the right of the lazer auto focus? If so, what happens when these are covered by a case?
Don't forget to seal properly the camera glass, because mine got dust in about 2 month. Now I need to clean the camera sensor from dust. Seems like doable, but I need to open this %#*@ thing again and crack the metalic camera case open, don't loose camera balls that should be inside, don't scratch the sensor while cleaning it and assemble it all in revese again.
Missing a step on the bottom of the phone there another flip, under there are 2 more screw
I was using a heat gun on the glass, it did not take much heat to warm it up. Don't put too much heat or you will start to melt the plastic LED cover for flash. I recommend using a sharp hobby knife (i.e. The X-Acto) to fit into the same side in the picture here. Hope this helps anyone.
-
-
-
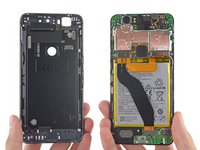
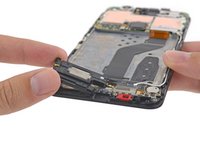
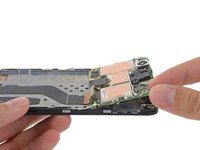
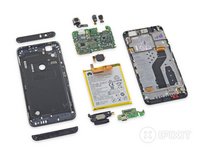
With the initial adhesive adventures behind us, the 6P has finally come out of its shell.
-
Unlike other phones we've seen lately, there's no discrete display assembly or easily removed rear cover here. Instead, the 6P's internals come out of the rear case in one mega-sized component assembly, leaving only the NFC antenna behind.
-
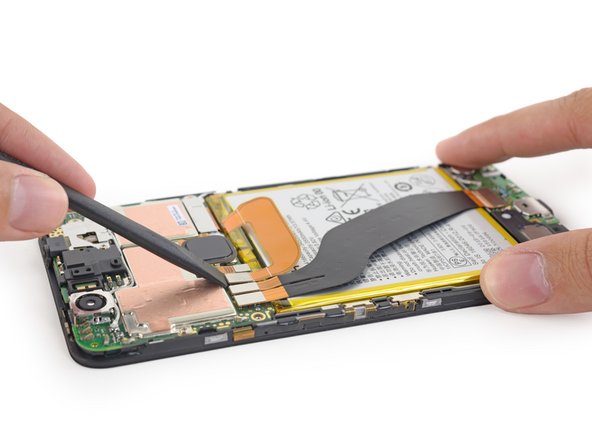
On the bright side, it looks like a daughterboard interconnect cable is all that stands between us and the battery!
Can you please let me know how long this battery can last if I use Nexus stock charger?
Huawei support team said they don't have any service to replace battery after warranty? :(
-
-
-
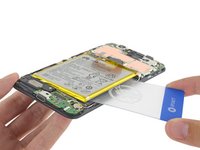
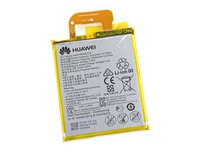
The battery is a monster—and, it's fiercely glued in. But at least we didn't have to dig too far to get here.
-
This super-sized, 3.82 V, 13.18 Wh lithium-poly cell weighs in at a rated capacity of 3450 mAh.
Careful! There is a ribbon cable right under the battery (it the screen cable), don't pry on the cable or get under it.
I second Ian’s caution. I barely nicked the little rounded tab near the bottom of the cable and it rendered the touchscreen worthless. Had to buy a new (used) one.
I accidentally bended the battery just a tiny bit and it broke one of the cells, the battery exploded. BE CAREFUL
I accidentally bended the battery just a tiny bit and it short circuited and exploded, BE CAREFUL NOT TO BEND THE BATTERY
Class listen to Ian. I shredded the ribbon cable under the battery while prying out the battery. Yuck.
Same as Mike, just tore mine in half using a credit card behind the battery. Why the !&&* do they use such large amounts of tape!!! now i have to buy a new phone, as the ribbon is attached to the screen perminently! Not bothering with this phone anymore. 16 months of great, the 1 month of crap battery life. Not worth the shoddy assembly to be honest.
Why isn’t the ribbon cable mentioned in this step in the removal? Tearing it is (obviously) easy trying to fight adhesive and it results in your repair jumping up 160$ in price. Next thing you know you’re 200 bucks into a phone that isn’t known for its longevity to begin with…
I tore the ribbon with an iFixIt plastic card after failing to see the mentions in the comments (which aren’t visible by default). Rest in peace Nexus 6p
-
-
-
-
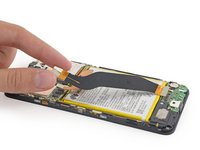
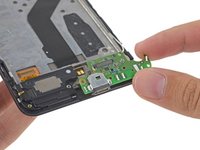
Next up, we pull out one of the smallest daughterboards we've ever seen. It's only a little more than a simple USB-C board.
-
The front side of the daughterboard features some control hardware and spring contacts for the LTE antenna...
-
Texas Instruments TUSB320 USB type-C port controller
-
AKM Semiconductor AK8789 hall sensor
-
Skyworks SKYxxxx antenna tuner (likely)
-
...And on the back we spy one of the 6P's three noise canceling microphones and a couple more contacts, for the vibrating motor and speaker.
Where is the main microphone? Can it be the white circle feature on the speakerbox?
Or is the noice cancelling microphone at the back of the daughterboard also the main microphone?
Does anyone know which part contains a noise cancelling microphone? My 6p is out of warranty and has the muffled microphone issue. Wondering if replacing the daughterboard / speakerbox would make any difference, or if the culprit microphone is located on the motherboard itself.
Did you ever replace the Daughterboard in order to fix that microphone issue?
-
-
-
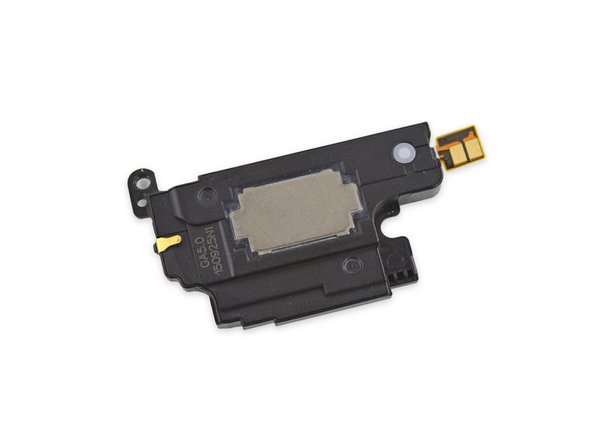
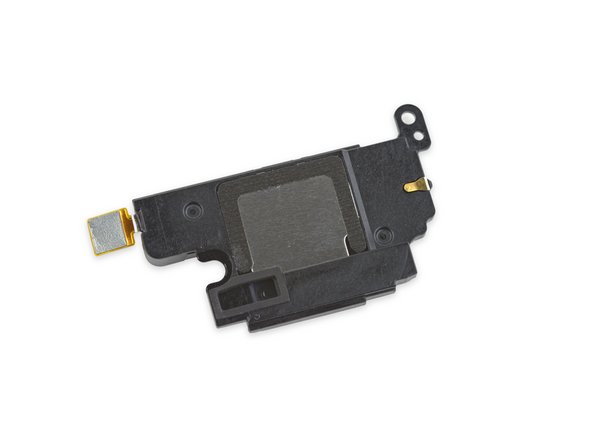
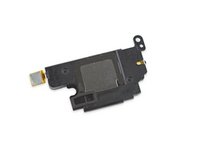
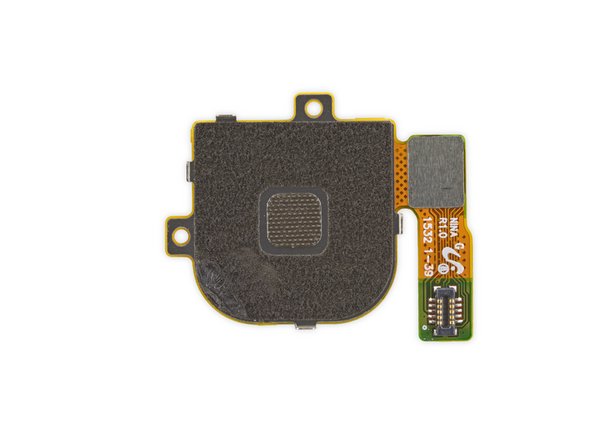
We continue our sleuthing along the bottom of the phone and come across what appears to be a speaker box.
-
We suspect Google's motive for including these front-facing speakers is simple enough: people prefer speakers that face them.
-
Of course that says nothing about how it actually sounds. We'll have to wait until we put our 6P back together to give it a listen.
-
-
-
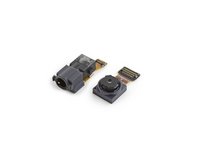
Next to fly free is the headphone jack, which we find encased in a little rubber sleeve. Hmmm.
-
While we've been watching carefully for signs of
lifewaterproofing, this small sleeve alone doesn't indicate whether Google might be preparing for rising tides. -
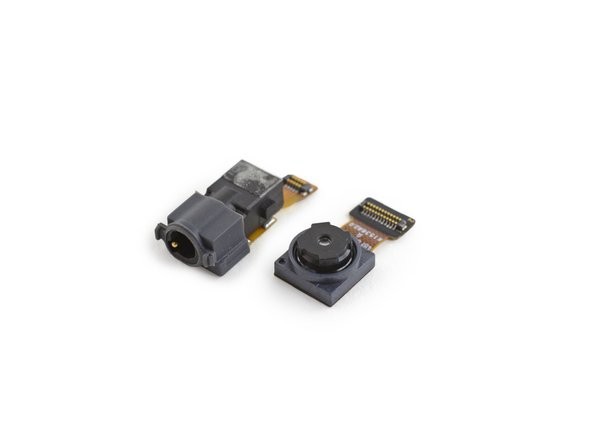
Moving along, we pull out the front-facing (i.e. selfie) camera. This 8 MP, ƒ/2.4 camera is up 3 MP from its counterpart on the 5X, but still maintains the same 1.4 micron pixel size.
-
We snap a few photos of our new-found peripheral friends and head for the core.
Is the connector capable of using a TRRS cable? For say, a lapel mic?
-
-
-
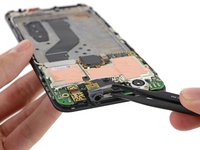
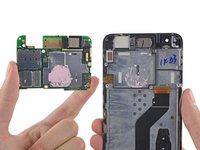
Most of the peripherals are out of the way, allowing us to focus on the motherboard—glue-free and topped off with a glob of
bubblegumthermal paste, just the way we like it. -
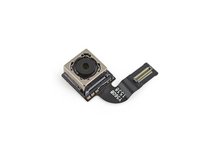
Well, this is awkward. Although the front-facing camera didn't put up much of a fight, it appears the main camera is soldered in place.
-
-
-
. . . Or not!
-
While you do have to remove the motherboard to access the main camera, it turns out that only the camera bracket is soldered to the board. The camera itself is easily disconnected and removed.
-
-
-
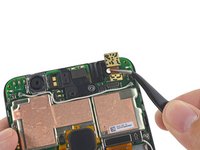
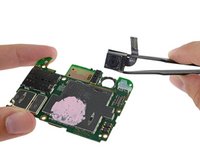
Spudger ready, we turn our attention to the square Nexus Imprint sensor.
-
It turns out this version of the Imprint sensor is quite different from the one we found in the 5X. The circular profile of this fingerprint reader is solely due to the round hole in the 6P's rear case.
-
Fingerprints FPC1020 fingerprint sensor
-
Fingerprints FPC2050 fingerprint controller (likely)
who manufactures the Nexus Imprint sensor? I have read that Fingerprint Card does, as well as one of the new nexus sensors (5x/6p) is the same as the OnePlus Two sensor. Any info on this would be appreciated. Thank you.
Hey, I was wondering about the fingerprint reader, is it possible to switch it (get a new one with a different color), or is it like iPhones where it will stop working if you replace it?
-
-
-
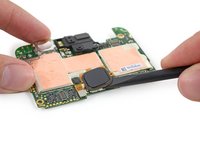
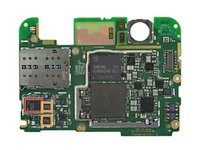
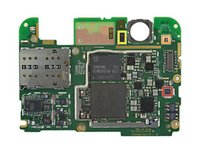
We smell chips! With the motherboard free and the EMI shielding pulled away, it's time for a look at the silicon:
-
Micron MT53B384M64D4NK-062 3 GB LPDDR4 RAM, layered over Qualcomm Snapdragon 810 v2.1, 2.0 GHz octa-core 64-bit CPU
-
Samsung KLMBG4GEND-B031 32 GB eMMC 5.0 NAND flash
-
Qualcomm PMI8994 power management IC (found in many 2015 Android smartphones including the Nexus 5X)
-
Qualcomm SMB1351 Quick Charge IC (Likely an iteration of SMB1358 found in the Nexus 5X)
-
Qualcomm QFE1100 envelope tracking IC
-
ST Microelectronics STM32F411CE 32-bit 100 MHz ARM Cortex-M4 RISC microcontroller
-
Maxim Integrated MAX98925 audio amplifier
Funny, the "Avago ACPM-7251" has a Skyworks logo!
Same thing happened in Step 15 with the amplifier, but they corrected it. I verified that the Skyworks logo is on the ACPM-7251 as well. Hopefully, this will get fixed soon, just as the other one was.
It's been removed altogether. I guess that's one way to fix it. lol
jon -
2x maxim chips are max98925 boosted class dg speaker amplifiers, not max989
Seems like the NXP TFA chips aren't being used now that Maxim has comparable smart speaker amplifiers
djlobb01 -
On this step, on the left upper corner, it's like there are 2 SIMs slots, or a SIM slot + SD card slot. Are both connected ? If so, why the SIM tray is only for 1 SIM card ?
-
-
-
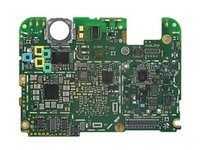
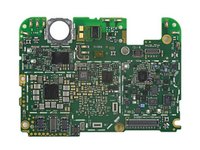
The back of the motherboard is brimming with even more control hardware:
-
Broadcom BCM4358 5G WiFi 802.11ac client
-
Qualcomm PM8994 power management IC (as seen in the Nexus 5X and HTC One M9)
-
NXP PN548 NFC controller
-
Qualcomm WCD9330 audio codec
-
Qualcomm WTR3925 RF transceiver
-
RF Microdevices RF1891 antenna switch module
-
Skyworks SKY77814-11 power amplifier module for LTE
Can you shed any light on the several small chips labeled "SKY1"?
Anyone notice those bypass capacitors with two extra connections on the sides? I ogle electronics regularly and it's the first time I've seen them. There are unpopulated pads for them too. A little Googling suggests they're Murata EMIFIL devices or equivalent. Nifty!
No NXP TFA9890A Audio Amplifier this time? So Nexus 6P uses what chip to boost the speaker so loud? The speaker module is by which company?
I have noticed on this teardown as well as your LG 4 you do not identify the IMU. It would be great in the future you start doing this since it will be important to those who are looking for the best mobile VR smartphone.
Thanks
-
-
-
IC Identifications, pt. 2:
-
ON Semiconductor FAN53526UC89X 3.0 A step-down switching regulator
-
Texas Instruments display power supply (likely)
-
Texas Instruments TLV62084 step-down converter
-
Texas Instruments TPS61256A boost converter
-
Texas Instruments INA231 output current/voltage/power monitor
-
ON Semiconductor NLAS2750 dual SPDT analog switch and NCN1154 DP3T analog switch
-
Texas Instruments LMV7275 comparator
-
-
-
IC Identification, pt. 3:
-
Qorvo (formerly TriQuint) RF8117V RF power amplifier
-
Qorvo (formerly RF Micro Devices) RF7302 and RF7305 power amplifier module
-
Skyworks SKY15203 antenna switch
-
Skyworks SKY85608-11 5-Ghz, 802.11ac switch and low noise amplifier (likely)
-
NXP Semiconductor BGU80x9 GPS/GLONASS/Galileo/COMPASS LNA
-
-
-
-
Nexus 6P Repairability Score: 2 out of 10 (10 is easiest to repair)
-
Solid external construction improves durability.
-
Once the arduous opening procedure is complete, the battery is immediately accessible.
-
It's very difficult—although not impossible—to open the device without damaging the glass camera cover. Because of the unibody design, this makes every component extremely difficult to replace.
-
The display assembly cannot be replaced without tunneling through the entire phone. This makes one of the most common repairs, a damaged screen, difficult to accomplish.
-
Tough adhesive holds the rear cover panels and battery in place.
-


crwdns2947412:048crwdne2947412:0
For step 7, don't know if anyone has noticed the typo... You say the nexus 6p has 700mAh more battery than the iphone 6s... 6s has ~1750mAh and the 6p has 3450 mAh... That's almost double the battery size (1700 mAh difference). Just a stickler for an order of magnitude :D Thanks for the great teardown, sad to see the 6p isn't easily repaired...
We're actually comparing the battery in the Nexus 6P to the battery in the 6s Plus, not the 6s. The 6s Plus has a 2750 mAh battery :)
At least the battery is not "smaller than promised" like iPhone
The battery is Li-Po and not Li-ion tech which is more safer and lasts longer. I'd rather have the iPhone battery still. Lasts just as long in my experience.
Jake -
Li-Po means Li-polymer.Li-Po is included in Li-ion, which means lithium batteries.iPhone's batteries are the same Li-Po batteries,they're just written Li-ion.
Nah, lithium ion is a different ype from lithium ion; even bother googling that?
Just being a stickler but an order of magnitude is a factor of 10
Is there any information regarding the headphone jack audio amplifier chip?
I actually came over to see if I could replace the screen if it broke (My Note 2 needed a repair in just five days of purchasing it). Apparently Google sucks at inheritance of qualities in its nexus devices
Andrew, thanks for setting me straight! I wish I had reread and seen that it was for the 6s plus. I appreciate you taking the time to respond though :)
Slime, you're right, and order of magnitude is 10 times larger... I was at a loss for what to call a difference from 3 digits to 4. Any ideas? I guess I could have said more than double instead...
On removing the camera glass, I found the best place to get a purchase with a razor blade was on the curved portion. And I had to get it HOT. I was using a heat gun (didn't think a table would work with the curved glass) and it didn't come off for me until I had heated several times and got the temperature to the point of being hot enough that you could only touch the glass very quickly (< 1 second). How you could possibly remove that without scuffing the frame at all though is beyond me. The metal frame is incredible sensitive to showing wear from a metal tool.
Also, the bottom plastic one starts bending pretty quickly from the heat. I'd use a slight about of heat but mostly rely on an opening tool to tear the adhesive.
Definitely agree, had to use more heat than I thought I should have used, crank that heat gun up people. I ended up cracking the glass on the back, but of course I started on the opposite side of the camera. Luckily all the cracks are covered by my case.
Tips learned:
Use lots and lots of heat
Work on the camera glass from the side opposite the lenses
You WILL scuff metal opening this thing
What are the sensors that we can see inside the camera hump once that glass came off as some cases actually cover most of this area?
Actually scratch that - now that I look closer at the close up photo I see they are just a couple of holes, one with some foam under it and one looking down on the back of the headphone jack component.
Monty M -
What would it take to put the back and camera glass back on? I dropped mine 12 hrs after getting it and now my volume key is bent so I can only lower the volume.
Anyone knows the logo on the orange part of the fingerprint sensor?
Does anyone know where to find a original nexus 6p back housing, or how mutch does it cost?
Where is the laser autofocus assembly on the last picture? It is not shown
Hi every one my name is shabeer i have a issue in my nexus 6p and it has network ic problem can any one let me know the network ic model in nexus 6p it will be a great help thank you.
Can you please confirm , if FM chip is inside the Nexus 6p. If FM chip and receiver is enabled then we all can hear the FM Radio for free and save a lot on the data usage . Thanks
no there is no fm chip in the nexus 6p
Question: so ive apparently suffered from the "jeans too tight bent my volume rocker" problem, and i am in the early learning stages of the repair ability preparation process. I dont mind having to tackle this repair myself (as opposed to RMA'ing the device, as many have done) since I have planned on swapping out the gold housing with a different color since i first purchased the device. Its not because the gold is my LEAST favorite color of the 4-- in fact, its actually the ONLY color option that i don't like. I purchased the gold one because i was able to get a 32 gb version for just over $300 brand new at a crazy random sale/opportunity, and so I knew iFixit wouldn't let me down when it came to showing me how to get that desired colorway while still saving one or two benjamins in the process.
Then, sadly, I hopped on here and learned the bitter truth about the 6p's teardown: it frickin sucks.
so now that story time is over, back to my question: I've decided that since im tearing down anyways, i might as well frankenstein some parts, and so I'm going to either do a White body with black sim card tray, black finger print sensor, power button, volume rocker, etc. I'll probaboly even do the little back bottom battery cover piece in black as well. Theres also a slightly low to to medium chance that I may opt out of the white body and go with the same design, but with a silver housing instead. My question is: ive found every part that i need seperately, but the volume rocker and power button piece seems to only be the ribbon. Does anyone know if the oems selling the housing are including the actual buttons with the main housing, and selling the ribbon seperately? Or do I need to find the black ones to ensure my little colorway variant comes together as i want it to?
Anyone with any advice would be greatly appreciated. p.s. iFixit-- rock on! thank you once again for going where no man has gone (generally, at the time of the original video) and delivering unto us the gift of disassembly.
What is the part number of the Bluetooth Chip here?Manufacturer?
The Broadcom BCM4358 used for Wi-Fi is also capable of Bluetooth, according to the device specs. Click on the link above in the article.
I am trying to find the internal hard drive and attempt to pull my pictures off it. My phone went through the treadmill and wont turn on. Any advice?
You could unsolder the eMMC chips and use a socket reader to pull the data off of them. However, itsecuritything.com stated that google forced full disk encryption out of the box on Nexus 6P. So I'm not sure you can read the data anyway.
Ryan -
Any thoughts where I could find help identifying some of the small electronics on the main board? I lost two small components when swapping out the screen. Now the screen works, but it does not recognize the sim. The two components are circled in red in the lower right corner of this picture.
https://postimg.org/image/b4wqltgox/
It's a long shot, but if I could get replacements maybe I could manage to solder them back on.
Burton, the SMDs you have circled are capacitors. By the size of them they are bypass caps for a DC line. I would try a 1uF cap or 10uF cap and see if that fixes your issue. It's hard to tell from the picture but the size looks like a 0201. You'll have to measure the pad spacing to be sure.
Hope that helps,
Daniel
Thanks for the tutorial, it's very helpful. Can you please tell me how may I change the sim card holder?
Do i have to remove all the electronic stuff off the back including the battery and speaker? why can't i just remove the glass once i remove it all from the frame???
Where is the Bosch BMM150 geomagnetic sensor?
Hi. what about reassembly? Do we need to re-glue the glue we cut?
The glue still sticks fairly well when you just press it together,
What about re-assembly? Do we need to re-glue the fierce glue we cut? Do you have that glue?
Did you ever find an answer to you adhesive question? I too am about to replaces the battery in my 6p, and all the tear-downs I seen just stick the battery, glass lens cover, and plastic bottom piece right back on. Is the adhesive strong enough to reuse?
You don’t need glue - you can just press it back together and it sticks.
I don’t get an LTE or 3G antenna bars any longer after taking it and getting my battery replaced. What part would I need to get replaced and can I order that?
I need to have the part replaced that handles comm. My phone doesn’t have the LTE or 3G cell antenna bars. Bluetooth & WiFi still work though. No cell service at all. New SIM too, just doesn’t work any longer.
There doesn’t seem to be a text guide on here on how to change the battery in the Nexus 6P, so I made a video. It’s at https://www.youtube.com/watch?v=C9K0A79s... - hope it’s useful to somebody! :)
Just a warning about removing the battery. Angle the card toward the battery and away from the body/screen. I didn’t and tore the LCD flexible flat cable that is underneath. Even more unfortunately, it seems to be attached to the LCD and not separately replaceable.
What is the flex connector that's on the display frame? Pictured on Step 16 to the far right. Wide, black with two 45 degree bends?
Hi Javier,
the flex cable you’re talking about is the display flex cable, which runs through a gap in the mid frame right above where the daughter board is placed.
Where is the Android Sensor Hub mentioned in the beginning. I have problems with all the sensors in my 6p and would like to replace this sensor hub if possible.
Does anyone know the chip part number or pinout of the two 4-pin chips on the bottom right of the motherboard as seen in the Step 14 picture? My deduction is that these chips control the power on / off and volume. My issue is that I am repairing the screen and ordered a replacement that includes screen+frame. In that assembly, the orange ribbon cable as seen on the left side of the bottom case view in the Step 16 is not included. So when the phone is all put together, it will not power one as there is nothing to make contact with these chips. The replacement screens do not seem to have this needed piece. I am thinking I can solder some wires to those pins an short them as needed to make the power / volume functions. My goal is to just get the phone powered with the new screen enough to get the data off the phone, so rigging the wires this way may work. I just need to know the pinout on those chips.
Hello geniuses, I will be very grateful if anyone could help me out on this, I have a nexus 6p I am having a unique issue, in which when I am connecting my charger it's showing a charging sign but the charging percentage isn't increasing a bit, I have changed chargers, batteries and even the charging port, but the issue is still there and when I am going on the battery section through settings it's showing "charger connected, can't charge right now".
Please help me out.
Wow man, thank you for the teardown! Appreciate the detailed step by step….keep up the great work.